
Others
Studio Pro activities > Email > Others. Includes "For each email", "Read emails", "Send email" and "Email trigger".
Activities
| For each email | Read emails |
|---|---|
| Work with one email at a time | Read emails from a specified date |
| Send email | Email trigger |
| Sends a message via an email | Trigger other activities when an email appears |
For each email
NoteTo help keep users' accounts secure, since May 30, 2022, Google no longer supports the use of third-party apps or devices which ask you to sign in to your Google Account using only your username and password. Since this is how Studio Pro connects to Gmail, you will need to use an App Password to maintain access to the email service.
Description
The main difference between "For Each Email" and "Read emails" is that "Read emails" stores all emails in one variable, for example email_messages. However, "For Each Email" does not store all emails and works with one email at a time. In the case of the "For Each Email" activity, the bot also reads all e-mails according to the filters at once.
This activity allows you to apply a set of actions to each email for the selected account. Unlike other activities, it has a specific structure, when you add this activity to a workflow, a gray area appears. The area contains the body of the loop — the set of actions you would like to apply to each email in your email box. Firstly, you need to drag and drop desired activities here, link them to the "For Each Email" block, and then to the "Loop end" block. The activity looks like as shown below.
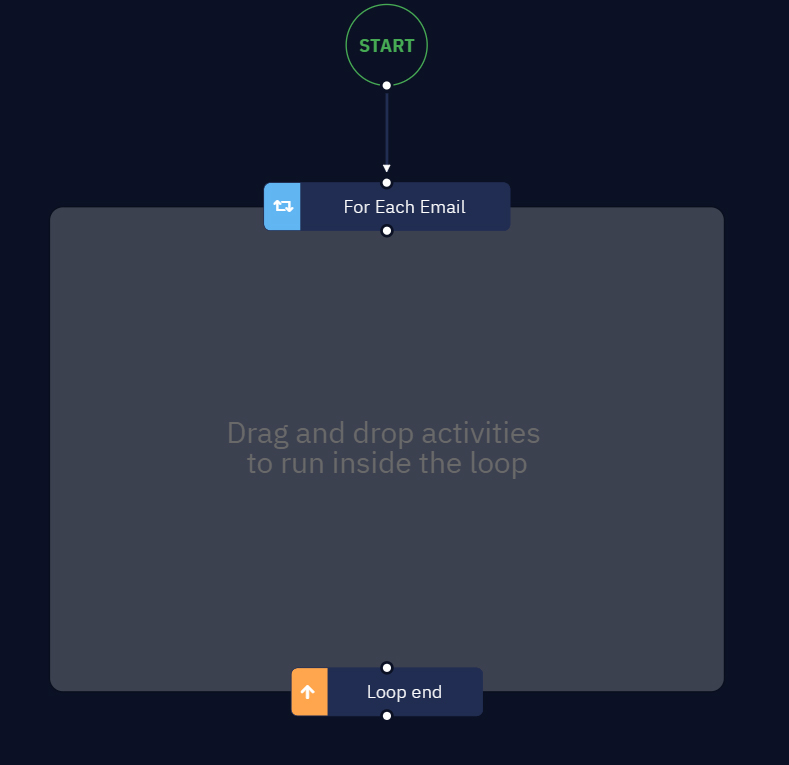
A template of the "For Each Email" activity.
How to work with credentials
To start using this activity, you first need to enter the credentials for your email box.

The button to add new credentials.
Parameters
Host and email
Click on the drop-down list to select the required host/login pair. Then start typing your host or login name so that this pair (email address) appears at the top of the list.
Server settings
This option allows you to specify the settings of the server used for e-mail messages.
- Custom: allows you to manually select the protocol "IMAP" or "POP3", enter the server address in the "Server address" field and select a secure connection.
- Secure connection - if this checkbox is checked, then the connection will be performed using TLS.
- Yandex: the default settings for Yandex are applied.
- Google: the default settings for Google are applied.
- Yahoo: the default settings for Yahoo are applied.
- Mail.ru: the default settings for Mail.ru are applied.
- iCloud: the default settings for iCloud are applied.
Date from
If there is no value for the “Date from” parameter, emails from the last 24 hours will be read.
- Set a value: allows you to explicitly specify the date from which the mail messages are to be read. If you click in the corresponding field, the calendar will pop up, in which you can manually select the desired date.
- Calculate a value: allows you to use a special formula or a special method to specify the date from which the messages are to be read.
- Save the previous step result: takes the result of the function from the previous workflow action as the date.
Filter by status
- Unread only: Read the emails with the "Unread" status only.
- Starred only: Read the emails marked as "Important" only.
- From a specific category (Gmail): Read the emails from the category you specified.
Filter by content
Subject contains
Retrieve emails with a specific subject.
- Set a value: allows you to manually write a keyword for the subject of an email.
- Calculate a value: allows you to use a special formula or a special method to specify a keyword.
- Save the previous step result: takes the result of the action from the previous workflow step as the keyword.
Body contains
Retrieve emails that contain a certain value in the body (text) of the email.
- Set a value: allows you to manually set a keyword for the body of the letter.
- Save the previous step result: takes the result of the action from the previous workflow step as the keyword.
- Calculate a value: allows you to use a special formula or a special method to specify a keyword.
Sender
Retrieve emails that came from a specific sender.
- Set a value: allows you to manually specify the sender of an email.
- Calculate a value: allows you to use a special formula or a special method to specify the sender.
- Save result of previous step: takes the name of the sender from the result of the previous step in the workflow.
Attachments
Download attachments
Allows you to download the attachments from all read emails for a specified period.
Directory path template
The option is available only if the Download attachments option is selected. It requires you to specify the folder where the files will be uploaded. It is also possible to specify {{keyword}} in the path to save the attachments, where keyword is one of the parameters listed below:
- from - sender;
- to - the recipient;
- cc - those specified in the copy;
- date - date the message was sent;
- messageId - unique identifier of the message;
- dateTime - date time in the ISO format;
- dateTimeMs - date and time in the Unix time format;
- receivedDateTime - date and time of receiving the message in the ISO format;
- receivedDateTimeMs - date and time of sending in the Unix time format.
When keywords are added, the bot will automatically create sub-folders with the date or subject of the corresponding message. You can specify several keywords.
- Set a value: allows you to explicitly specify the path to the folder, for example:
C:\ElectroNeek\ or C:\ElectroNeek\{{date}}\{{subject}}- Calculate a value: allows you to use a special formula or a special method to form a folder.
- Save the previous step result: takes the result of the function from the previous workflow action as a folder.
Mail folder name
If you want to read mails from a subfolder, the path must be specified with |. For example, there is an "Inbox" folder with a subfolder called "Work". The path to the "Work" folder should be set in the following way: Inbox|Work.
- Set a value: allows you to specify explicitly the path to the folder from which you want to read the mail messages.
- Calculate a value: allows you to use a special formula or a special method for specifying a folder name.
- Save the previous step result: takes the folder name from the result of the previous step in the workflow.
Emails limit
This parameter allows you to set the number of emails to be read.
Load one by one
This new parameter allows you to create bots that can interact with emails one by one and get partial results while handling many emails at a time. If you enable this checkbox, the bot can:
- Read the first email;
- Process it;
- Read the second email;
- Process it; and so on.
For example, if you have a bot that reads several emails and downloads files per each email, with this parameter the bot will download each file while running, so you will have them available before the workflow finishes.
NoteYou can interrupt the whole process before it finishes and be able to get partial results from the read emails. This means that if a workflow is suddenly interrupted, you will not lose data.
Comment
This parameter allows you to create an annotation for the activity. The input text will be displayed above the activity name.
How to use it?
"For Each Email" is a better option for dealing with a high volume of emails than "Read emails". As "For Each Email" does not store all emails in your memory and only works with one email at a time.
Since there are many ways to use this activity, let us look at the following example to understand a simple workflow.
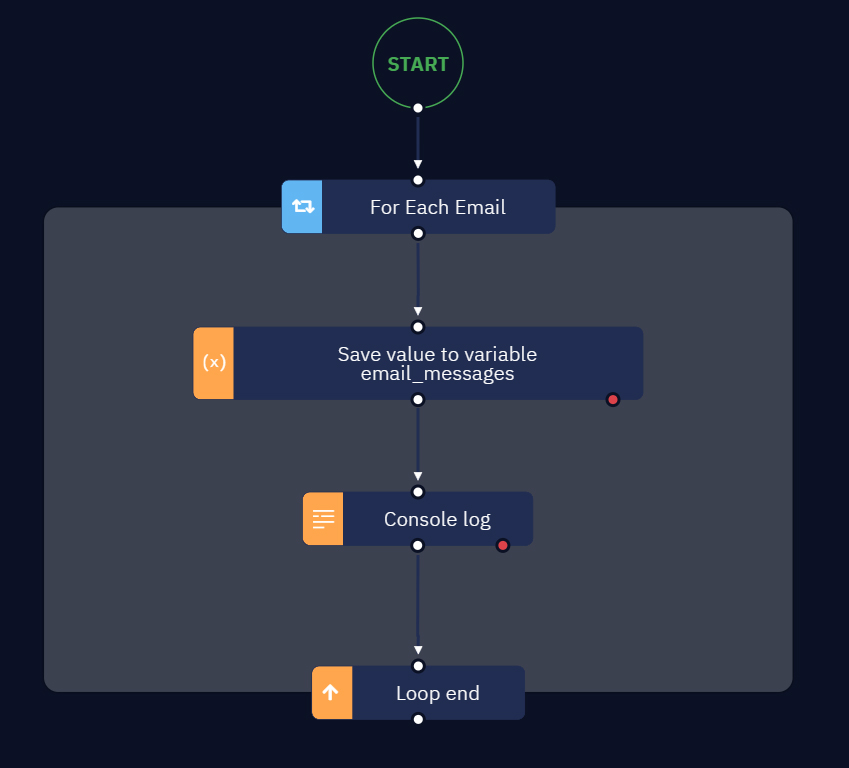
An example of a workflow.
In this test case, we would like to display the text of each email from our email box in the console log using "Console log". Therefore, we need to use the correct key, in this case "text" as follows:
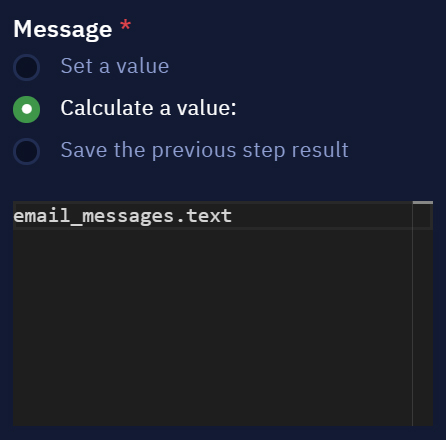
The result of this workflow should look like below.

Read emails
NoteTo help keep users' accounts secure, since May 30, 2022, Google no longer supports the use of third-party apps or devices which ask you to sign in to your Google Account using only your username and password. Since this is how Studio Pro connects to Gmail, you will need to use an App Password to maintain access to the email service.
Description
This activity allows you to read emails from a specified date. When you add this activity to the canvas, the "Save value to variable" activity is automatically added. This activity is optional and can be removed.
Third-party application access
For Studio Pro and your email client to work correctly, the option to allow third-party applications must be enabled in your email settings.
Read emails from folders and subfolders
With this activity, you can read emails from any folders and subfolders in your mail client. Typically, a mail client has a hierarchy of several folders, e.g:
- Inbox
- Inbox subfolder
- Sent
- Important
- Important subfolder
- Drafts
If you want to read mails from a certain folder, you have to specify its full name with a / character, for example: Inbox/{{Subfolder name}}
Please note that in this case you must specify the original name of the folder. If in your mail client the inbox is called "Inbox", you must write that name of the parent folder. For example, if the "Inbox" folder contains the "Work" folder, you must write the path to the folder in the "Mail folder name" parameter like this: Inbox/Work.
NoteSome mail services may use a different syntax for specifying folders.Gmail requires the following syntax for specifying the folder with sent emails:
[Gmail]/SentMail. Note that you can also specify other folders with that syntax:[Gmail]/Folder name. In case of other services, if a folder is not recognized when the parameter is filled like this:Inbox/Work, try specifying the subfolder name only (Work), or change the/symbol to|.
How to work with credentials
To start using this activity, you first need to enter your credentials.

The button to add new credentials.
Parameters
Host and email
Click on the drop-down list to select the required host/login pair. Then start typing your host or login name so that this pair (email address) appears at the top of the list.
Server settings
This option allows you to specify the settings of the server used for e-mail messages.
- Custom: allows you to manually select the protocol "IMAP" or "POP3", enter the server address in the "Server host" field and select a secure connection.
- Secure connection - if this checkbox is checked, then the connection will be performed using TLS.
- Yandex: the default settings for Yandex are applied.
- Google: the default settings for Google are applied.
- Yahoo: the default settings for Yahoo are applied.
- Mail.ru: the default settings for Mail.ru are applied.
- iCloud: the default settings for iCloud are applied.
Date from
If there is no value for the “Date from” parameter, emails from the last 24 hours will be read.
- Set a value: allows you to explicitly specify the date from which the mail messages are to be read. If you click in the corresponding field, the calendar will pop up, in which you can manually select the desired date.
- Calculate a value: allows you to use a special formula or a special method to specify the date from which the messages are to be read.
- Save the previous step result: takes the result of the function from the previous workflow action as the date.
Filter by status
Unread only
Read the emails with the "Unread" status only.
Starred only
Read the emails marked as "Important" only.
From a specific category (Google only)
Read the emails from the category you specified. This option only appears if the server is set to Google.
Filter by content
Subject contains
Retrieve emails with a specific subject.
- Set a value: allows you to manually write a keyword for the subject of an email.
- Calculate a value: allows you to use a special formula or a special method to specify a keyword.
- Save the previous step result: takes the result of the action from the previous workflow step as the keyword.
Body contains
Retrieve emails that contain a certain value in the body (text) of the email.
- Set a value: allows you to manually set a keyword for the body of the letter.
- Save the previous step result: takes the result of the action from the previous workflow step as the keyword.
- Calculate a value: allows you to use a special formula or a special method to specify a keyword.
Sender
Retrieve emails that came from a specific sender.
- Set a value: allows you to manually specify the sender of an email.
- Calculate a value: allows you to use a special formula or a special method to specify the sender.
- Save result of previous step: takes the name of the sender from the result of the previous step in the workflow.
Reading groups of emails
In some cases, certain email services (for example, Gmail) would group several emails. They will be displayed in a single line. Gmail would also show the number of emails by the name of the sender.

Pay attention to the fact that the bot will read all the emails following the specified filters, including all the emails from the group. Thus, if the bot would read the emails shown in the screenshot, the total number of emails would be six.
Attachments
NoteAttached folder names should not include the following characters:
Reserved characters (
/,?,<,>,\,:,*,|,",.and..).
In the case they are used, Studio Pro will automatically remove them.
Download attachments
Allows you to download the attachments from all read emails for a specified period.
Save duplicate with new name
With this option it is possible to save several files with the same name in the same folder. Thus, the second and subsequent files will not overwrite the first one, but will be saved under a new name - the date in unix format will be added before the name of the file itself.
Directory path template
The option is available only if the Download attachments option is selected. It requires you to specify the folder where the files will be uploaded. It is also possible to specify{{keyword}}in the path to save the attachments, where keyword is one of the parameters listed below:
- from - sender;
- to - the recipient;
- cc - those specified in the copy;
- date - date the message was sent;
- messageId - unique identifier of the message;
- dateTime - date time in ISO format;
- dateTimeMs - date and time in unixTime format;
- receivedDateTime - date and time of receiving the message in ISO format;
- receivedDateTimeMs - date and time of sending in unixTime format.
When keywords are added, the bot will automatically create sub-folders with the date or subject of the corresponding message. You can specify several keywords.
- Set a value: allows you to explicitly specify the path to the folder, for example,
C:\\ElectroNeek\\ or C:\\ElectroNeek\{{date}}\{{subject}}. - Calculate a value: allows you to use a special formula or a special method to form a folder.
- Save the previous step result: takes the result of the function from the previous workflow action as a folder.
Mail folder name
If you want to read mails from a subfolder, the path must be specified with |. For example, there is an "Inbox" folder with a subfolder called "Work". The path to the "Work" folder should be set in the following way: Inbox|Work.
- Set a value: allows you to specify explicitly the path to the folder from which you want to read the mail messages.
- Calculate a value: allows you to use a special formula or a special method for specifying a folder name.
- Save the previous step result: takes the folder name from the result of the previous step in the workflow.
Notice that some Email Servers adopt "|" and some others use "/" as a separator. Hence, in case you have issues using "|", try "/". For example, it might be
Folder|SubfolderorFolder/Subfolder.
Emails Limit
This parameter only takes non-negative integers and allows you to limit the number of emails your bot should process. For example, if the “Emails Limit” is equal to five, then your bot will read only the first five emails.
- Set a value: allows you to manually set the number of emails your bot should process.
- Calculate a value: allows you to use a special formula or a special method to specify the number of emails your bot should process.
- Save the previous step result: takes the result of the action from the previous workflow step as the number of emails your bot should process.
Download original
If you select this checkbox, all downloaded messages will have the new {{keyword}} parameter — original. The original parameter contains a raw email body in the HTML format.
Mark as read
This field checkbox you to mark emails processed by your bot as read.
Move to folder
This option allows you to move the read emails to a certain folder in the mailbox.
- Set a value: allows you to manually set the name of the folder, where the emails will be moved.
- Calculate a value: allows you to use a special formula or a special method to specify the folder.
- Save the previous step result: takes the result of the action from the previous workflow step as the name of the folder.
Comment
This parameter allows you to create an annotation to the activity. The input text will be displayed above the activity name.
Result
By default, the read emails are stored in the variable email_messages. This variable is an array of objects, where each object corresponds to one email. The object contains the following keys and values:
It is important to note that some mail services do not return the bcc value. Therefore, in those cases, the bcc cannot be retrieved.
[
  {
    "from": [
      {
        "name": "sender's name",
        "address": "sender's email address"
      }
    ],
    "date": "time when this email has been sent",
    "receivedDate": "time when this email has been received",
    "replyTo": [
      {
        "name": "name from the 'reply-to' section of this email",
        "address": "email address from the 'reply-to' section of this email"
      }
    ],
    "to": [
   {
    "name": "receiver's name",
    "address": "receiver's email address"
   }
   ],
    "subject": "this particular email's subject",
    "text": "this email's text processed with an html-parser",
    "textPlain": "this email's text returned by the server",
    "hasAttachment": "Whether the email has an attachment or not",
    "original": {
    "body": "A raw email body, if you have selected the Download original checkbox"
    }
    "cc": [
      {
        "address": "email addresses of secondary recipients",
        "name": "names of secondary recipients"
      }
    ],
    "bcc": [
      {
        "address": "email addresses of tertiary recipients",
        "name": "names of tertiary recipients"
      }
    ],
    "attachments": [
   {
    "path": "path to the first attachment"
   },
   {
    "path": "path to the second attachment"
   }
],
  }
]
How to use it?
Use the "Read emails" activity when the bot needs to read emails. You can configure the bot so that an incoming email becomes a trigger for a workflow.
Send email
NoteTo help keep users' accounts secure, since May 30, 2022, Google no longer supports the use of third-party apps or devices which ask you to sign in to your Google Account using only your username and password. Since this is how Studio Pro connects to Gmail, you will need to use an App Password to maintain access to the email service.
Description
Sends a message via an email.
How to work with credentials
To start using this activity, you first need to enter your credentials.

The button to add new credentials.
This article describes in detail the process of adding credentials.
The Yahoo mail services requires using an application password. You can learn how to do it in this instruction. Make sure to set up the credentials using the application password.
Parameters
Host and login
Click the drop-down list and select the host/login pair. Or start typing the hostname or login for fast search.
Server settings
Enables you to specify the server settings that are used for email exchange.
- Custom: allows you to manually enter the server address in the 'Server host' field.
- No authorization - if this checkbox is checked, it is not necessary to specify the Host and login parameter, so the email will be sent without specifying a personalized sender. If the checkbox is not checked, you must specify the Host and login of the service used to send emails.
- Secure connection - if this checkbox is checked, then the connection will be performed using TLS.
- Yandex: the default settings for Yandex are applied.
- Google: the default settings for Google are applied.
- Yahoo: the default settings for Yahoo are applied.
- Mail.ru: the default settings for Mail.ru are applied.
- iCloud: the default settings for iCloud are applied.
If you use the Custom option in the Send email activity while the "No authorization" box is unchecked, you must include the domain in the Login field of the Host and login parameter.For example, you must enter "[email protected]" instead of just "username". If you don't include the domain, the recipient will not see the name of the sender.
Mail to
- Set a value: enables you to directly write the email to receive a message.
- Save the previous step result: chooses the previous activity result as an email.
- Calculate a value: enables you to use available properties and methods to form an email.
If the 'Send copy to sender' option is selected, then the sender of the email message will be added to the blind copy.
Mail CC
- Set a value: enables you to directly write the email which will be added as a copy email address to the message.
- Save the previous step result: chooses the previous activity result as an email.
- Calculate a value: enables you to use available properties and methods to form an email.
Mail BCC
- Set a value: enables you to type the email to be added as a Blind Carbon Copy to the message.
- Save the previous step result: chooses the previous activity result as an email.
- Calculate a value: enables you to use available properties and methods to form an email.
NoteStarting with 8.7, you can add multiple recipients to the Mail CC and Mail BCC parameters using the
;character.
Subject
- Set a value: enables you to directly provide an email subject text.
- Save the previous step result: chooses the previous activity result as a subject.
- Calculate a value: enables you to use available properties and methods to form a subject.
Mail body
- Set a value: enables you to write an email message text directly.
- Save the previous step result: chooses the previous activity result as a text to write.
- Calculate a value: enables you to use available properties and methods to form an email message text.
Attachment
- Set a value: enables you to directly write a path to the file that is to be attached. Clicking the 'Pick' button allows you to manually choose the path.
- Save the previous step result: chooses the previous activity result as a path.
- Calculate a value: enables you to use available properties and methods to form a path.
If the "Add directory" checkbox is selected, all files from the specified directory will be sent as attachments. All the options above are applied to a folder path, not to a file path.
To specify several files to be attached, use the following format of the path (in the “Calculate a value” option):
["C:\\Users\\ElectroNeek\\Desktop\\attachment\\request.neek","C:\\Users\\ElectroNeek\\Desktop\\attachment\\main.neek"]Emails Limit
This parameter allows you to set the number of emails to be sent.
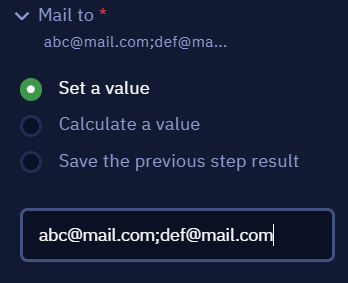
Sending emails to multiple recipients
This activity allows you to send emails to several recipients at a time. To specify two or more email addresses as recipients, use “;” or “,” as a separator. For example:
Comment
Contains an annotation of the activity. The input text will be displayed above the activity name.
Usage Examples
This activity can be used every time when you need to send an email. For example, you can configure your workflow the way that it will send an email message with the process results to responsible people before finishing.
Email trigger
NoteTo help keep users' accounts secure, since May 30, 2022, Google no longer supports the use of third-party apps or devices which ask you to sign in to your Google Account using only your username and password. Since this is how Studio Pro connects to Gmail, you will need to use an App Password to maintain access to the email service.
Description
This activity is used to trigger other activities when an email appears in any of the folders in the account. Currently Google, Yandex, Yahoo, Mail.ru and iCloud mail services are supported. It is also possible to set a custom server.
It can be used for automatic email processing or other email-related activities. Note, however, that this activity is initially triggered only once. If you want to set up a cyclic operation of "Email trigger", you must manually create a loop.
An example of using the activity is saving the contents of a message to a text file. Here is what such a bot might look like:
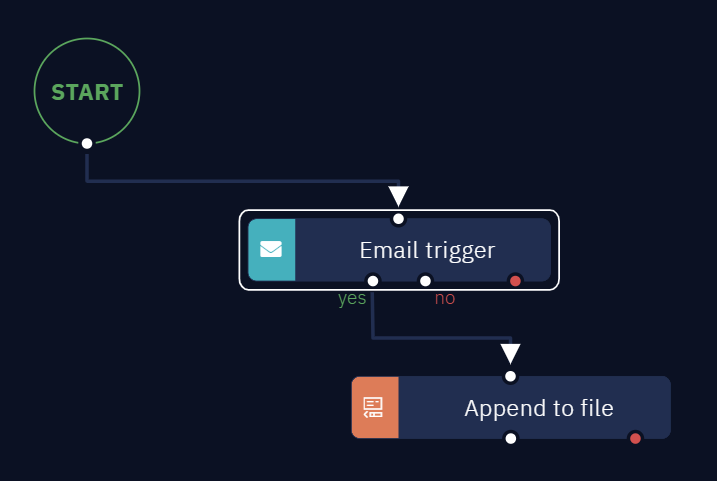
This simple workflow saves the text from the email to a file
Also note that this activity returns an object which represents a set of the email data. The returned output can be saved by adding a 'Assign value to variable' block after this action and selecting the Save the previous step result option. This is how it looks like.
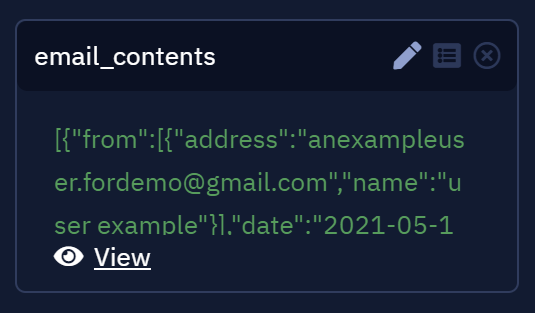
This variable stores the contents and other data of the email. Click the View button to see more
How to work with credentials
To start using this activity, you first need to enter your credentials.

The button to add new credentials.
This article describes in detail the process of adding credentials.
Parameters
This activity requires credentials data of the email account you are going to use for it. It is set in first parameter called Host and login. It is required. This can be done in the Settings - Credentials management menu.
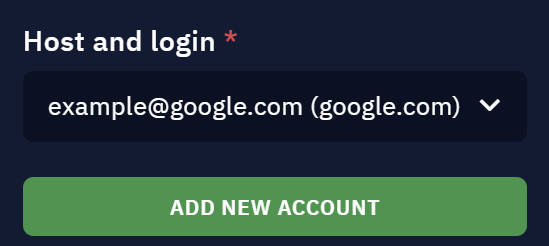
Host and login parameter
Then there is Server settings parameter. It defines what email service will be used.
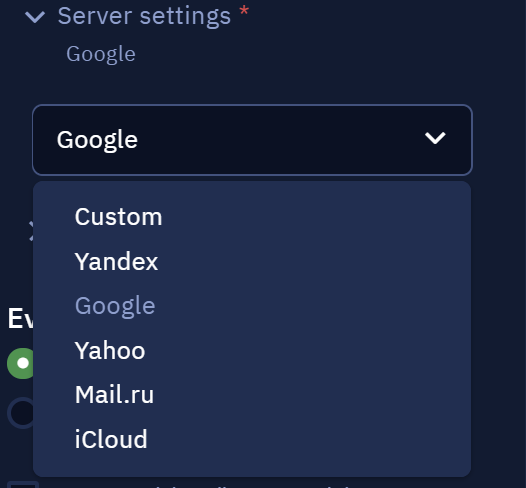
Server settings parameter and the supported services
This is what you will see when selecting the Custom option. Here you can set the protocol, server host and toggle the secure connection.
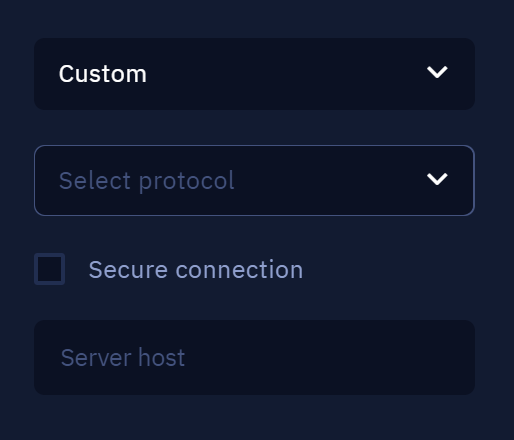
Custom server settings
- Secure connection - if this checkbox is checked, then the connection will be performed using TLS.
Next, there are the event settings. They define what kind of email should appear to trigger other actions. If you choose to enable the Wait for a specific email to appear option, you will be able to set a specific email subject, body (i.e. its contents) or sender. It is also possible to only check for the emails that contain attachments.
Here you can choose as many options as needed for your task.
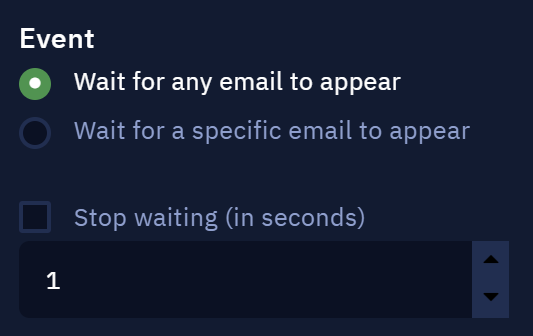
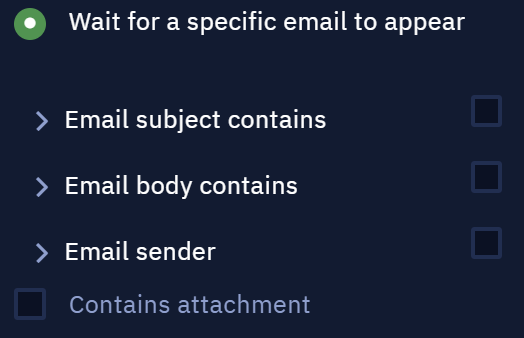
Event settings
Finally, the Stop waiting (in seconds) option defines the awaiting time for the email to appear. After this time No branch will be executed.
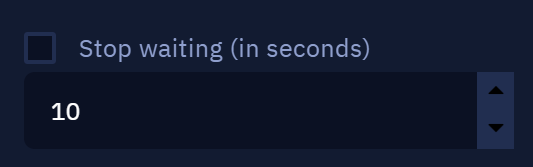
Setting the awaiting time
Updated about 1 year ago