
Logic
Studio Pro Activities > General > Logic. Includes "Assign value to variable", "If... then", "Do-while loop", "Subprogram" and more.
Activities
| Assign value to variable | If... then | Do-while loop |
|---|---|---|
| Create and modify variables | Apply business logic and define conditions to perform actions | Build repetitive operations using the while loop programming concept |
| Subprogram | Delay | Log |
| Trigger another workflow from the current one | Define a timeout to execute the next step of the workflow | Save written data from the workflow in a text file |
| Console log | Open Application | TODO |
| Print a message to the Studio Pro console | Select a desktop application to be opened by the workflow | Add an informative text block to your workflow |
Assign value to variable
Description
This activity lets you create and modify variables. They store the set value and can be used in other activities.
General usage of this activity:
- Set the name and value. For example, we have a variable named login_message and its value is some text like You have successfully logged in.
- Use this variable in other activities. For example, use it with ‘Save the previous step result’ in different activities.
Parameters
Let us review its parameters.
Variable name and value
Variable name is pretty self-explanatory. You can name variables as you see fit, but there are some restrictions and things to remember:
- The first symbol in the name must be a Latin character or underscore (_).
- The rest of the name can include any Latin letter, digit, or underscore.
- It is not possible to use JavaScript reserved words.
- Avoid using the $ symbol at the beginning and at the end of the name. Such names are reserved for ElectroNeek platform internal variables.
- Variable names are case-sensitive.
- All the variables declared in this block are global. This means that a variable can be used in any other .neek files.
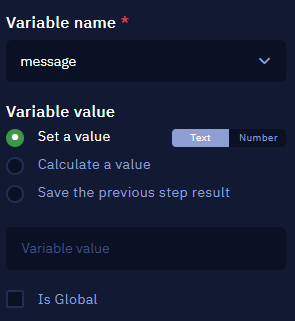
In this example message is the name of the variable.
There is also a dropdown list that lets you choose the variable that is handled by the selected block.

Dropdown list containing other created variables
For example, we have these two variables: message and message2.
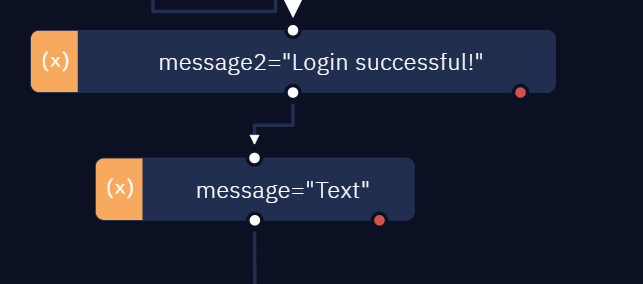
Two variables containing some text in the workflow
Currently, the lower block (containing message) is selected, and this is what we see. These parameters are set for the message variable.
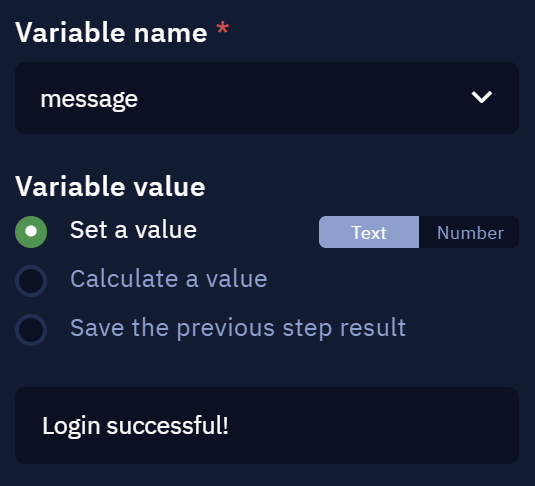
Parameters of the message variable
What if we change the Variable name from message to message2 in this list? This is what will happen.
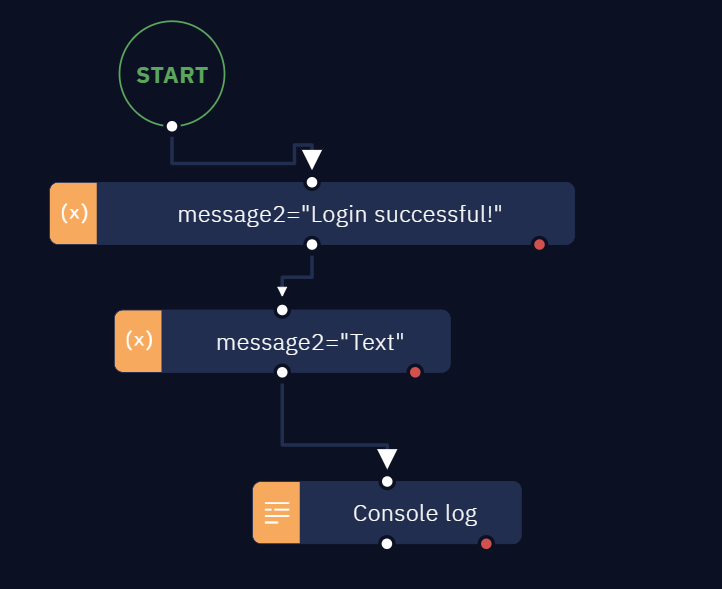
Redefinition of variable value

This output message shows that the new value was used
Basically, we have redefined the message2 variable. It can be seen in the output if we try to display the result in the console using the ‘Console log’ activity. This could come in handy in some situations.
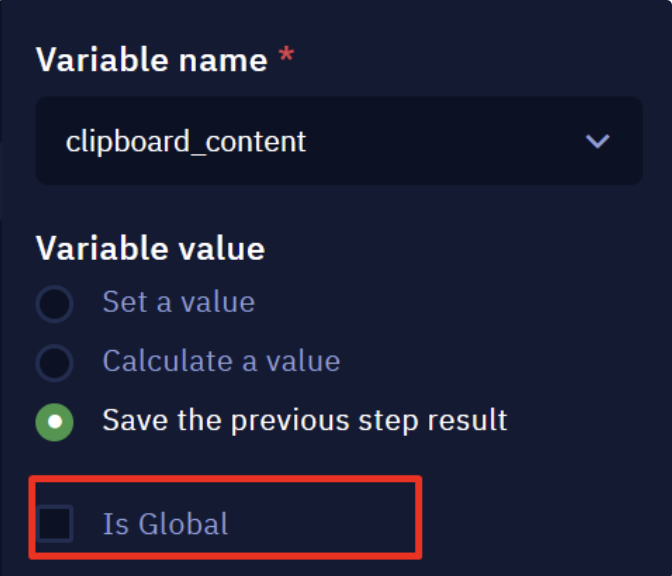
Now let us move to the Variable value parameter. Similar to many other activities, it offers a few options:
- Set a value lets you input the value manually. In this case, the type is automatically switched between Text and Number based on the input. Examples: Some text, 122.
- Calculate a value lets you use JS to define a specific value. Example: some_variable 2, someArray.length*.
- Save the previous step result lets you set the variable value using the result or output of the previous activity block.
If you check the Is Global box, the variable created in this .neek file can be accessed from other files in the same project. In other words, the scope of the variable is global. Otherwise — if the checkbox is not selected —, the assigned variable is only available for the current .neek file, which means the scope of the variable is local.
NoteWhen you click on "Is Global", the "Output Data" option appears. Activate this parameter if you want to include the value of this variable in the output data of this workflow, so you can send it to Orchestrator and use it in another applications.
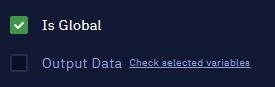
Click "Check selected variables" to see the Output tab. Learn more about this process in this article.
If... then
Description
This activity allows you to apply various business logic to algorithms and perform certain actions depending on the conditions you set.
The conditions can be set either using JavaScript syntax or using a visual editor. We will describe it in more detail in the following section of this article.
Parameters
There are two modes of working with the "Condition" parameter in the "If...then" activity:
- Basic
- Advanced
Basic
This mode involves using the visual editor to set simple conditions.
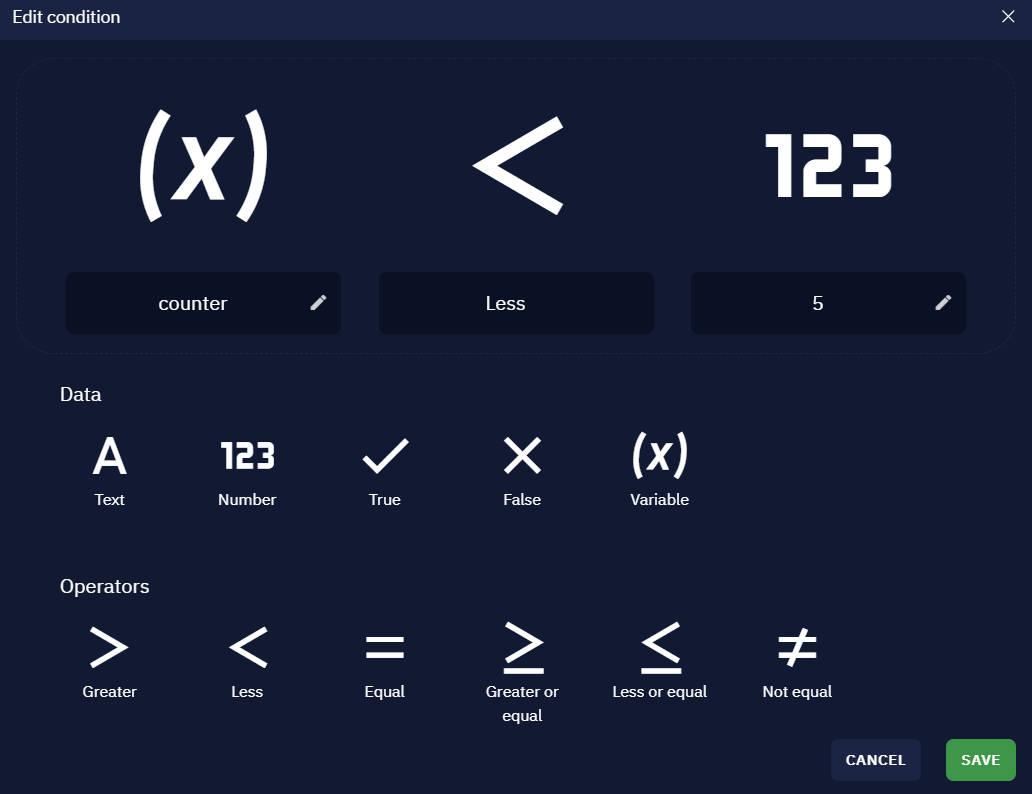
When you click on the "Edit condition" button you will see such a window:
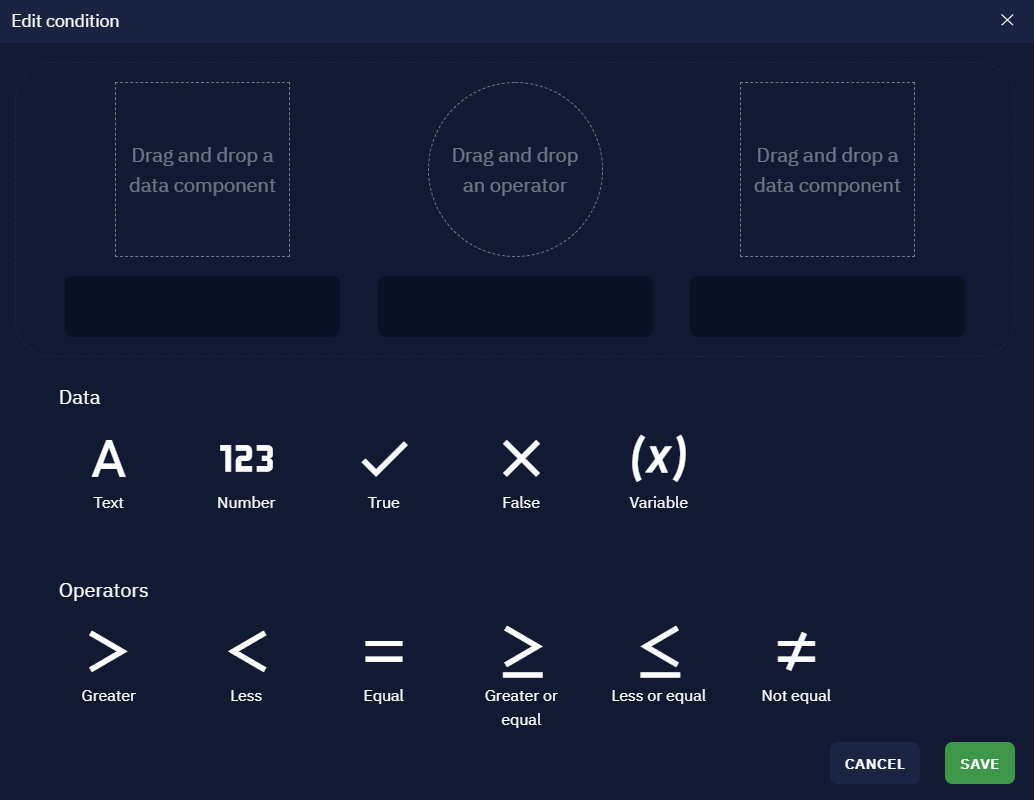
At the top of the window there is a working area consisting of three parts: data component - operator - data component.
At the bottom of the window are available elements - data and operators.
Data can be a Boolean type - true or false, explicit data - text or number, and a variable. Operators define a condition for comparing components.
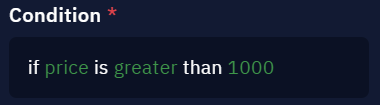
Suppose that the condition should be: "If the variable price is greater than 1000, then". Let's set this condition using the visual constructor. To do this:
- Drag and drop the "Variable" block into the left-hand data component. After dragging it, you will be able to set the name of the variable. In our case it will be
price. If you want to change the variable name, click on the pencil icon. - Next, drag and drop the "Number" block into the right-hand data component. You can set or change the value of the component similar to the first action. Set the number to
1000.
Now drag the "Greater" block to complete the condition. - This way, the condition will look like this:
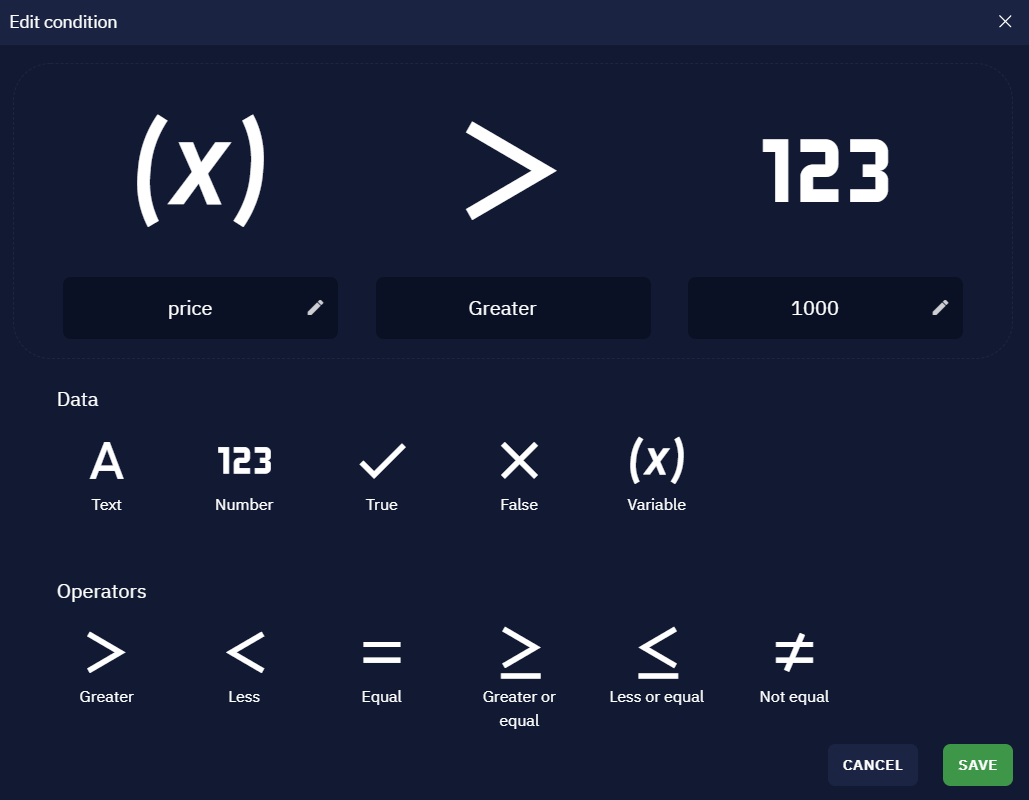
Click Save. The "If...then" block will appear ready to work on the canvas.

In the toolbar on the right you will also see the specified condition.
Advanced
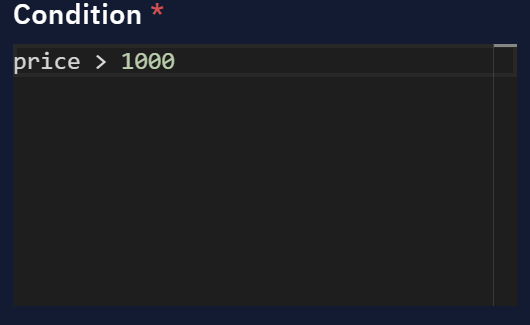
It allows you to manually write code in JavaScript syntax to create a condition within the "If...then" activity.
Similar to the example above, we set the same condition - whether the value of the price variable is greater than 1000 using JavaScript code.
JavaScript input field
This is what a complete algorithm with a condition might look like. Here we have some variable with a value assigned to it. We apply the "If...then" check to it (if the price is greater than 1000) and output the result to the console.
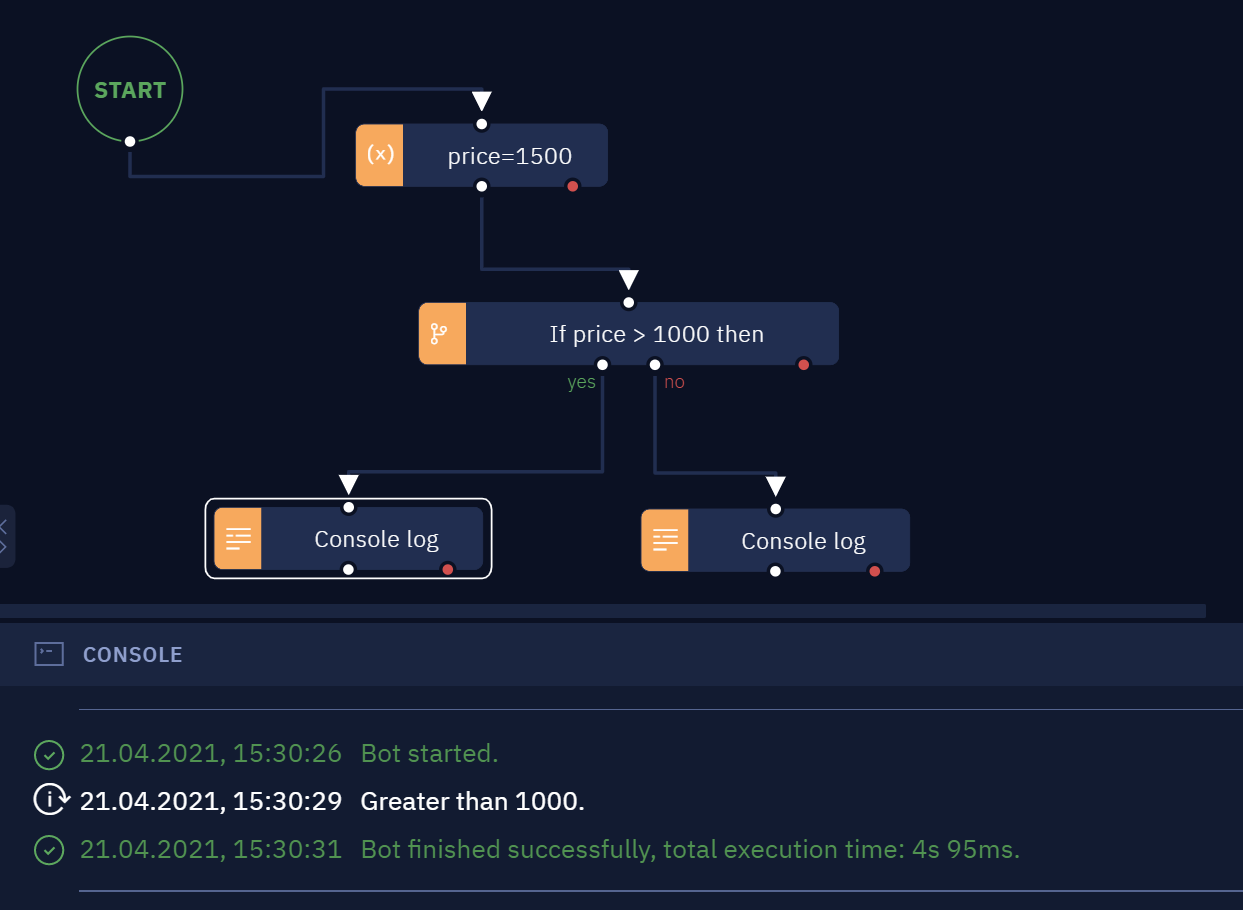
The algorithm from the example above and the result - the checked condition
Here are more examples of setting conditions using JavaScript:
price > 10 //checks if a number is greater than 10

(milk_price \< 10) && (bread_price > 15) //checks if both conditions are met

ocr_data.includes('Total') // checks if data returned by an ocr engine has the word "Total"

number_in_system === user_input // checks if some number in system is of the same data type as the user input and if they are equal in values

number_in_system == user_input // checks if the values are the same if one of the variable is automatically converted to the type of the other variableDo-while loop
Description
This activity is used for repetitive operations and follows the structure of the while loop in programming.
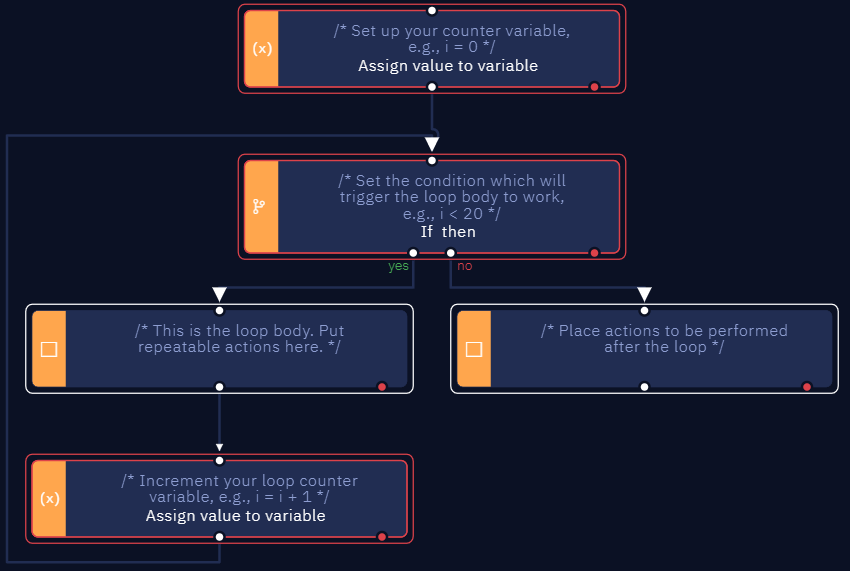
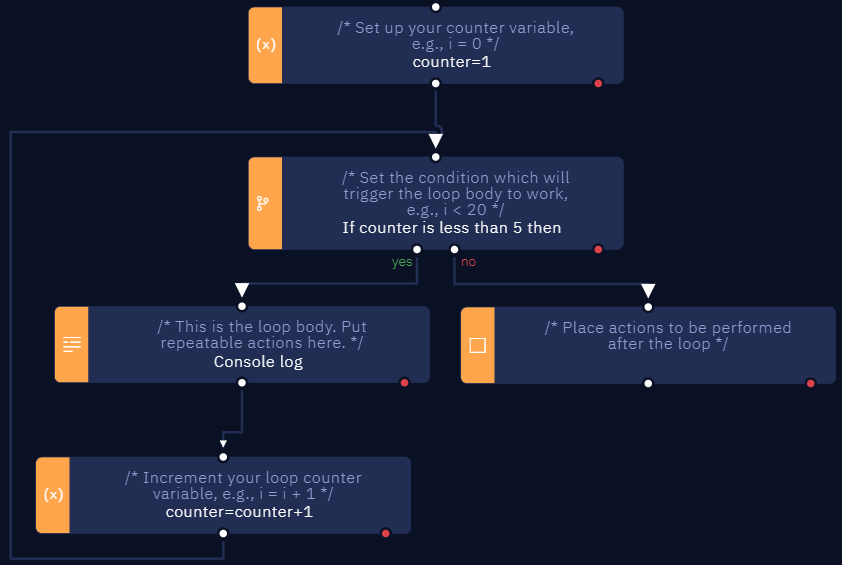
It differs in structure from the other activities. The "Do-while loop" activity itself is not a standard single activity block. By default, the "Do-while loop" consists of five connected blocks: "Assign value to variable", "If...then", two "TODO" blocks, and another "Assign value to variable" block.
The arrangement of the blocks reproduces the structure of the cycle. The first "Assign value to variable" block allows you to set a variable-counter, which allows you to keep track of loop iterations. The next block - "If...then" - allows you to set the condition of the loop.
The "TODO" blocks indicate the body of the loop (after the "Yes" branch) and the exit from the loop (after the "No" branch) and do nothing on their own. They are placed to show that you can specify a sequence of actions instead.
This is what the default action looks like:
Example
To make the activity ready to work, a little adjustment is needed. Let's see how this can be done, using a simple example — we'll output the iteration numbers to the console (let's say we want to iterate the loop 4 times).
Let's start with the variable-counter. Loops are integrally connected to iterations, which need to be counted somehow. In standard while loops, this is done with a variable-counter. In general, the counter and loop condition can be set in different ways.
Among them, we can find situations where the counter initially takes a large value and then decreases. In our case, we'll set the counter to one because we just want to iterate through 4 loop actions and display the iteration number. Therefore, let's set up the first block "Set Variable Value" as follows (shown in the image below):

This is the variable-counter. It will be incremented with each iteration.
Next, set the loop condition. Since we want to iterate four times, the condition can look like counter <= 4 or counter < 5 (the counter variable is integer).
The condition to check. As soon as counter reaches 5, the loop will stop.
Now let's set how the counter will change. Since we make four consecutive iterations, the counter will increase by one. In other cases the counter change may be different.
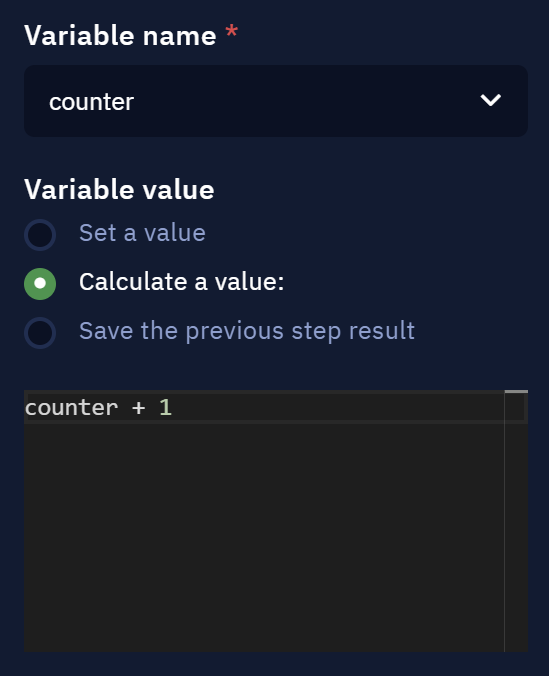
In the last block, the counter variable is incremented with each iteration.
At this point, we already have an actually ready-to-go workflow. It only remains to replace the "TODO" blocks with activity blocks. Let's take the "Console log" activity and fill in the parameters as shown in the images below:

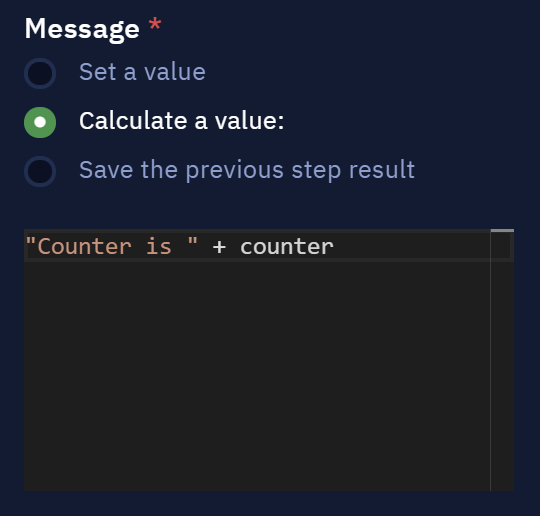
The message in the "Console log" parameter. In the beginning - the line with the message, then - the current counter value.
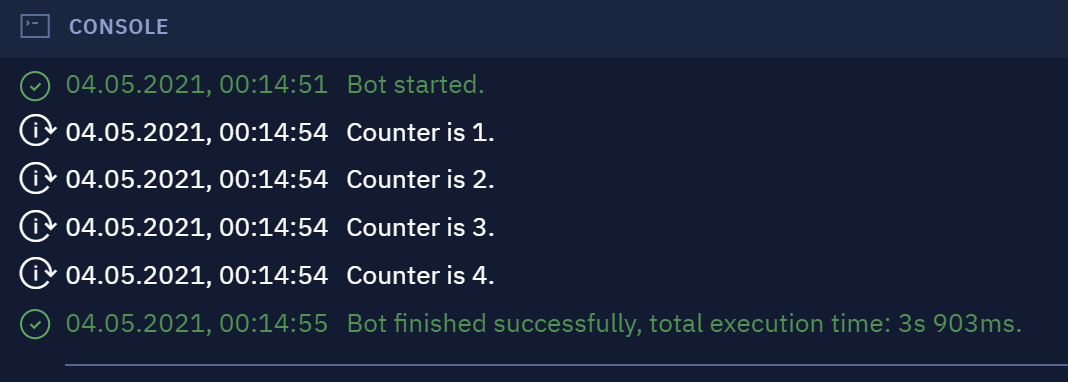
An example of the message output to the console - the result of the work. The loop ended as soon as the condition was no longer satisfied.
Workflow with a "Do-while loop".
Subprogram
Description
This activity makes it possible to run another workflow file (.neek format) from the current workflow.
This activity is convenient for reusing the existing workflows. This eliminates the necessity to recreate them manually. It also lets you achieve modularity while developing bots: every single subprogram can be edited separately as well as added or removed from the workflow at any time.
This is how a complete example would look like. There are some actions at the beginning of the workflow. As soon as they are complete, a subprogram is launched. Based on the result of its work, the workflow execution will continue according to the set scenario: it can either have one branch or an additional branch that is chosen in case the subprogram was not executed properly.
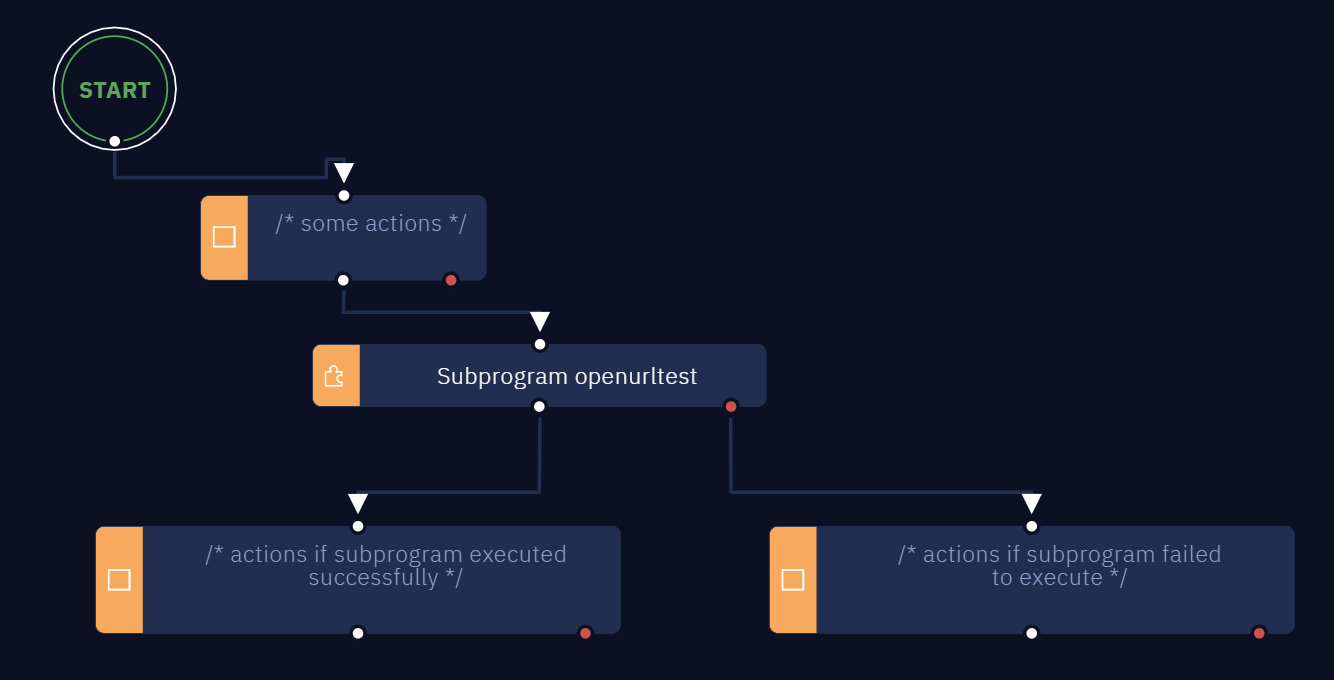
In this example, a subprogram is run when the preceding actions are complete. Then the algorithm continues executing other actions in this workflow
Parameters
The only parameter here is Path to file. It lets you specify the path to the workflow file that needs to be executed. It is required.
There are two kinds of paths:
- Absolute path. It is used when the required workflow file is placed in the home directory or in any other place different from the directory that contains the current workflow (higher in the hierarchy).
- Relative path. It is used when the required file is in the same directory as the workflow file (or in a child directory).
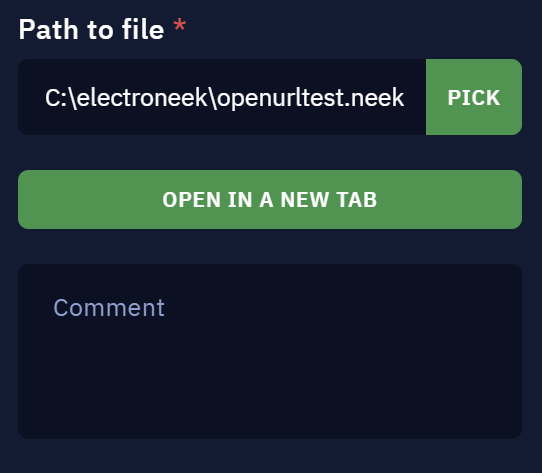
Path to file parameter
The Open in a view tab button lets you view the workflow file you are going to set as a subprogram in a separate Studio Pro tab.
Interaction between subprograms and variables
All variables in ElectroNeek are global. This means that the scope of such variables is the entire program (including different workflows opened in different tabs). Thus, if you set 5 as a value of the variable x in one bot, you can set the variable y=x in the second bot, and get 5 as the value of y.
The use of global variables allows you not to pass or return values explicitly. Nevertheless, this possibility exists. You can use the arrows connecting the blocks in the canvas to pass variables into and out of a subprogram.
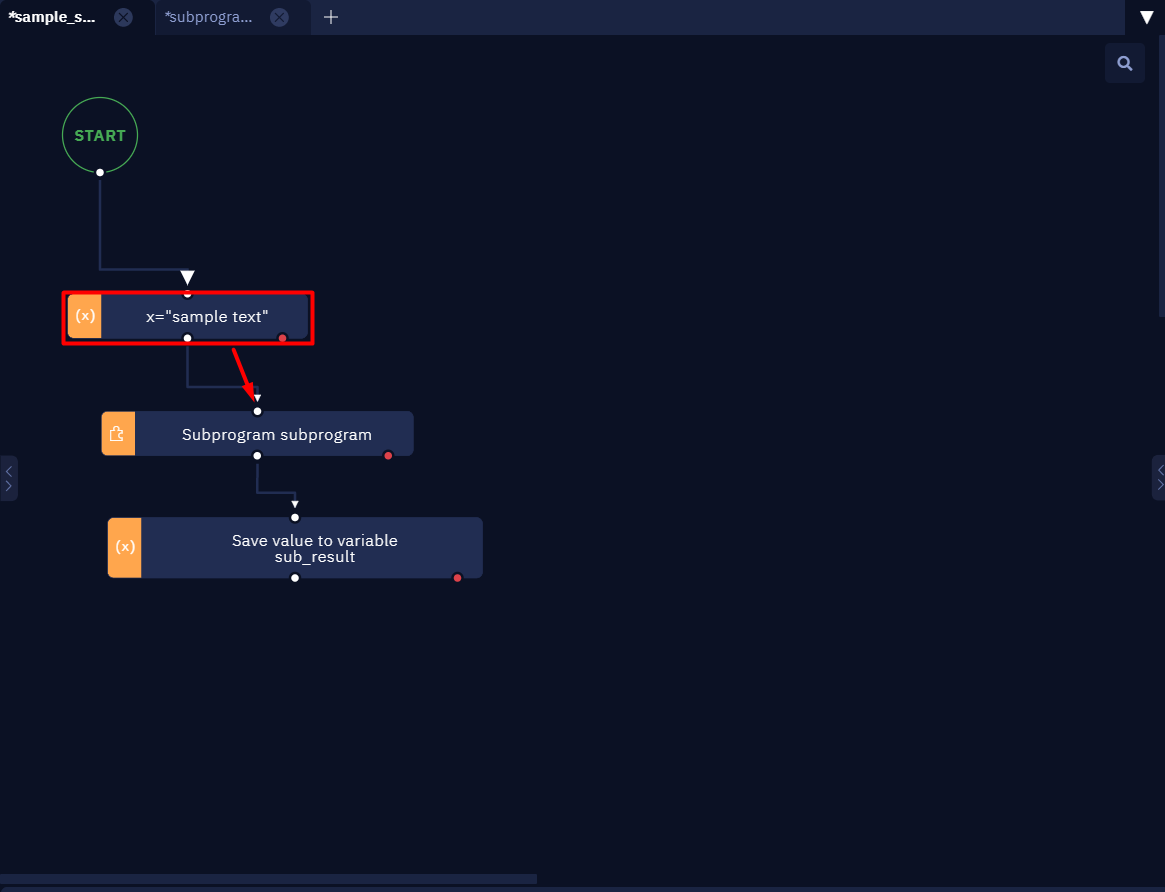
Main program. Passing the value “sample text” of the variable “x” to the subprogram.
In order for an activity within a subprogram to use a variable value, you need to set the "Save the previous step result" parameter for that activity.
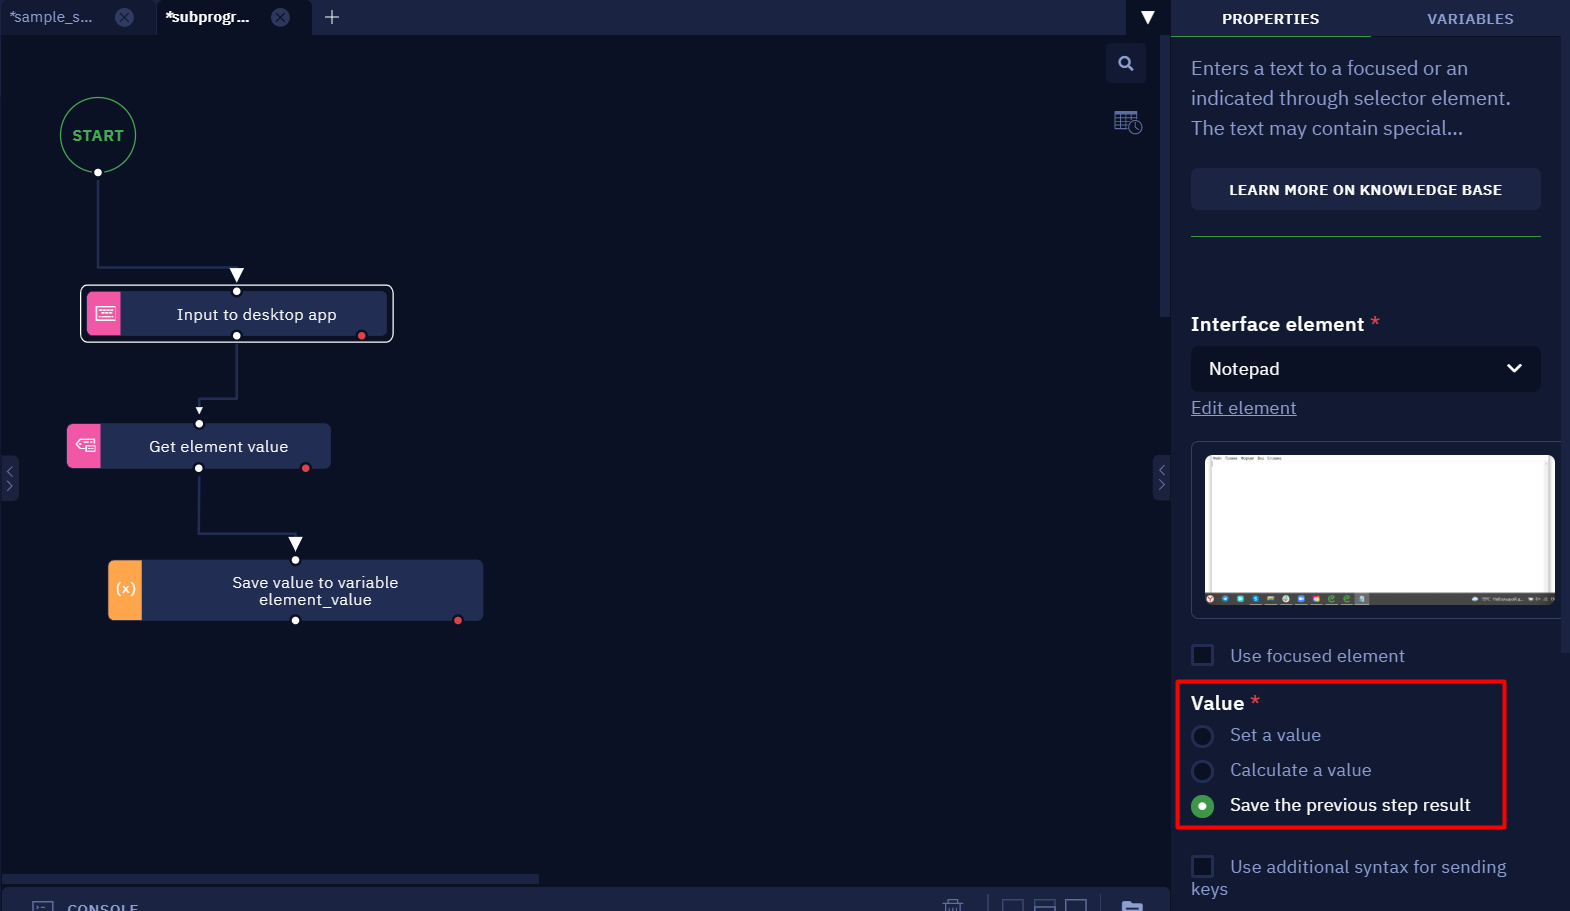
Subprogram. Thus, the string "sample text" will be entered in Notepad.
To return the value of a variable from a subprogram is also quite simple. To do this, make sure that the last action in the subprogram returns a value and create a "Save value to variable" block with the "Save the previous step result" parameter in the main program.
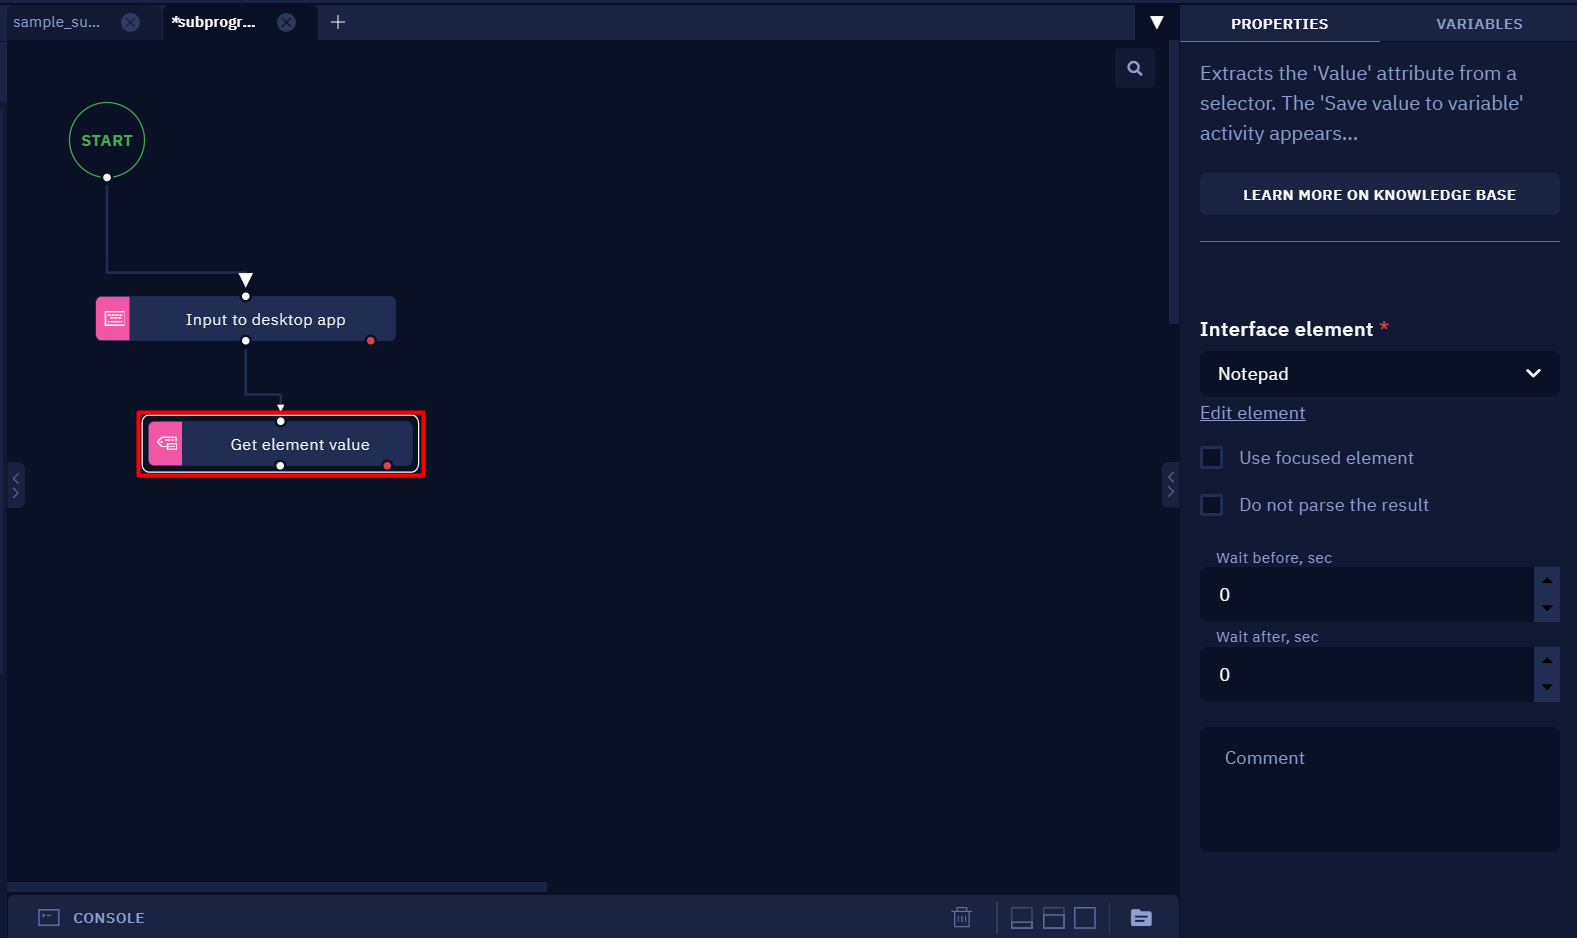
Subprogram. This activity returns the read text to the variable.
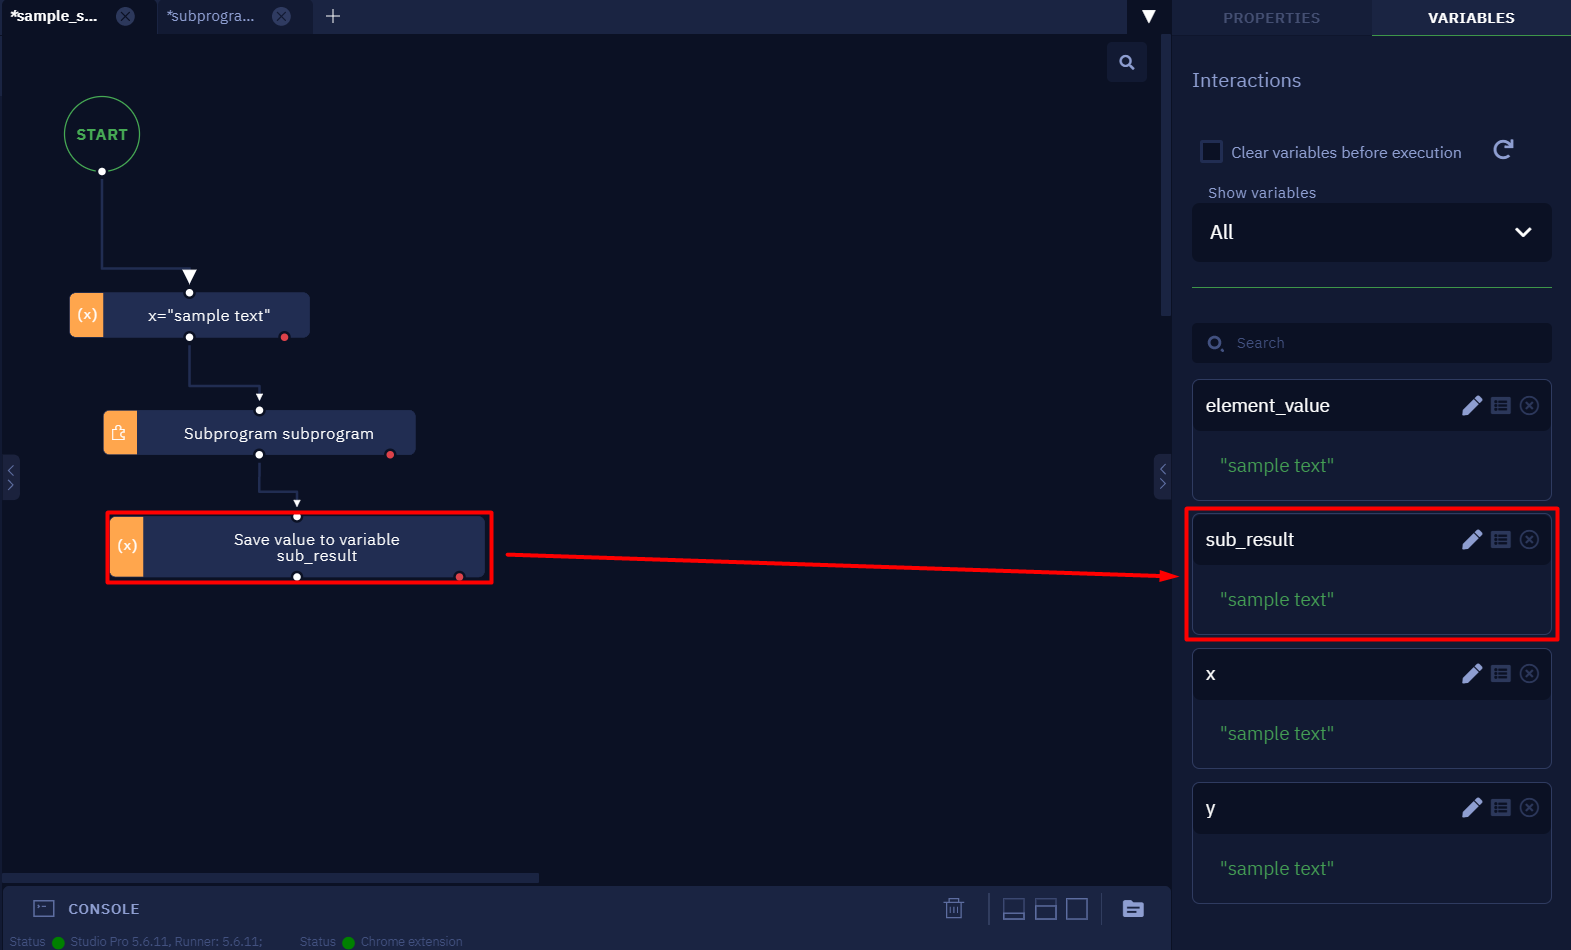
Main program. This activity saves the result from the subprogram to a new variable.
Delay
Description
Waits a specified amount of time before executing the next step.
Parameters
Delay, sec
Amount of time in seconds. In case the number is not an integer, the comma must be used as a separator, for example, 0,25.
Comment
Contains an annotation to the activity.
Usage Examples
This activity is used in projects where there is a clear time separation between actions. For instance, you might want to use the 'Delay' activity for checking email messages, say, every three minutes.
This activity also can be used as a fail-safe option when automating interaction with the interface. However, it is not recommended to overuse the activity since usually it is difficult to predict how much time a certain interface element takes to load. Wait for element will be better solution.
Log
Description
Writes the information to a text file.
Parameters
Path
- Set a value: enables you to directly pick the desired path.
- Save the previous step result: takes the previous activity result as a path.
- Calculate a value: enables you to use available variables and methods to form a path.
Text
- Set a value: enables you to directly provide a text to be written.
- Save the previous step result: chooses the previous activity result as a text to write.
- Calculate a value: enables you to use available variables and methods to form an output string. For example,
new Date().toString("HH_mm_ss")+" Testing function \n"
Comment
Contains an annotation to the activity.
Usage Examples
The activity is suitable when you need to monitor robot execution by writing the corresponding results to a text file. This file may be used to analyze the execution flow after the program has stopped.
Console log
Description
Prints a text to the Studio Pro console.
Below is an example of using a variable and outputting a dynamic value to the console.
NoteYou can register the logs from this activity in Orchestrator if you activate the "Collect execution logs automatically" parameter. For more information, check this article.
Parameters
Message
- Set a value: enables you to specify the text to be printed.
- Save the previous step result: chooses the previous activity result as the text.
- Calculate a value: enables you to use available variables and methods to form the text.
Details
- Set a value: enables you to specify the text which will be displayed after clicking the "Details" button in the console.
- Save the previous step result: chooses the previous activity result as the text.
- Calculate a value: enables you to use available variables and methods to form the text.
Type
Enables you to specify the message type. The color indication of the text changes according to its type.
| Type | Color |
|---|---|
| Info | Light-blue |
| Success | Green |
| Warning | Orange |
| Error | Red |
Comment
Contains an annotation to the activity.
Usage Example
Console Log activity is useful for debugging your workflow. It’s very convenient to use it at the ‘Error’ branch of activities to see where the actual error occurs.
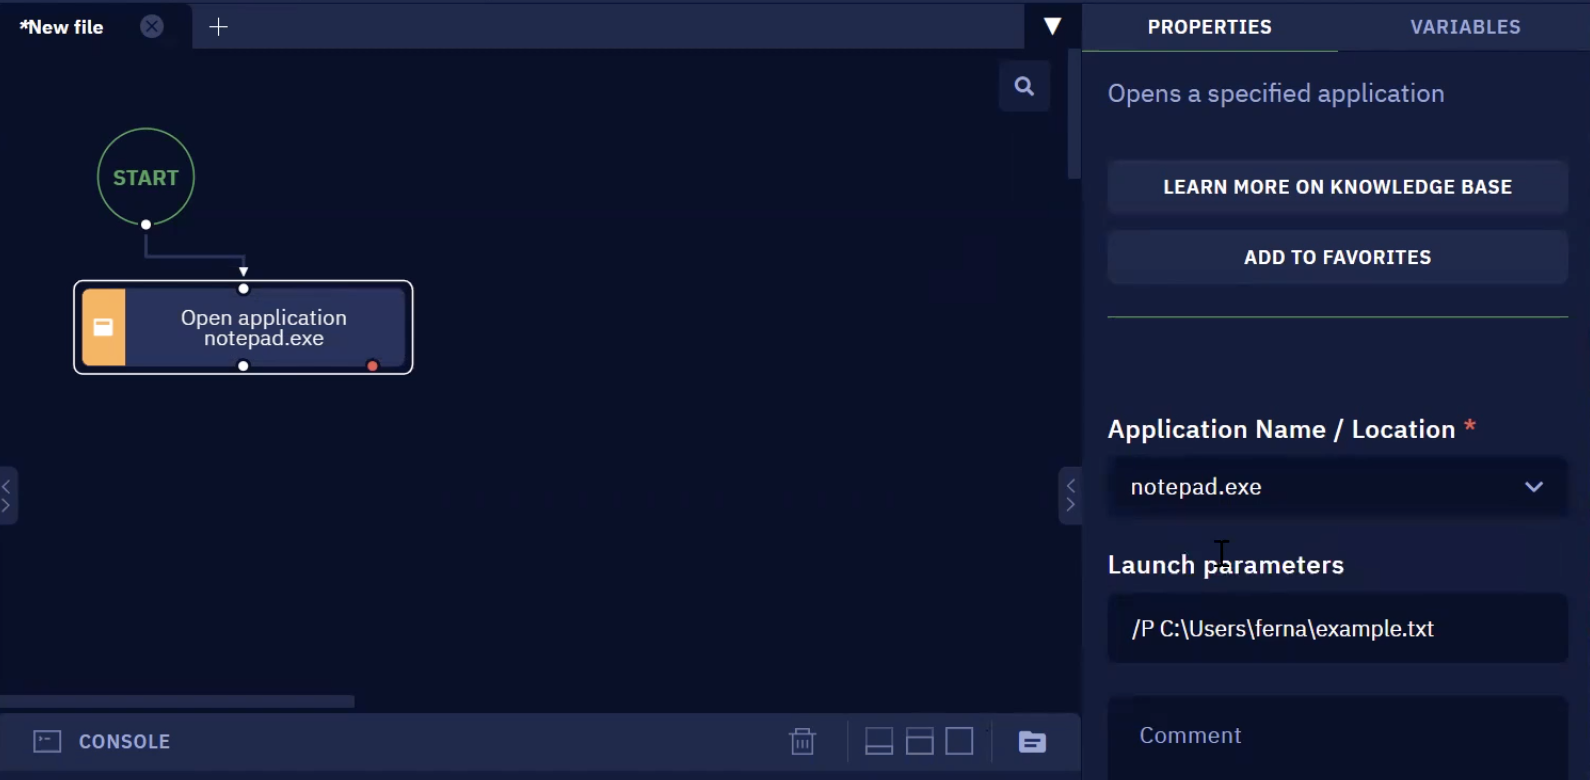
Open application
Description
This activity is used to open desktop applications.
Parameters
Application Name / Location
In this parameter, click on the dropdown menu to select the app you would like to open with this workflow. You can start typing for the list of available software to appear and choose one. Otherwise, you can use the "Pick up from filesystem" button and click on the application you want to open.
Launch parameters
It is used to pass additional command line arguments when launching a program. Command line arguments are extra commands that can be used to modify how the program executes or to enable specific functions. Keep in mind that each program has its own list of possible parameters. Make sure you know what parameter should be used for the specific application you have selected. The screenshot below, it is displayed an example of notepad.exe.
Comment
Enter any description or remark on the activity.
TODO
Description
A block with a text for descriptive purposes only. It does not influence execution in any way.
Parameters
Comment
Text that will be displayed on the block.
Usage Examples
The function serves as a comment block.
You can use it as a dummy for the activities or subprograms that will be added later.