
MS Excel
Studio Pro Activities > MS Office > MS Excel. Includes "Read Excel File", "Write Excel File", "Append row to Excel file" and more.
Activities
| Read Excel File | Write Excel File | Append row to Excel file | Insert/Delete Rows |
|---|---|---|---|
| Read the contents of an Excel table | Write specified values to a specified range in an Excel file | Add a row to the end of an Excel sheet | Insert or delete a row in an existing Excel document |
| Read Excel Range | Write Excel Range | Read Excel Row | Update Excel Row |
| Get the value of the range from the Excel file | Write specified values to a specified range in an Excel file | Get a particular row value from the Excel file | Updates particular row values in the Excel file |
| Read Excel Cell | Update Excel Cell | Execute Macro | Insert/Delete Columns |
| Reads the value of a specified cell in an Excel document | Updates the content of specified cells in an Excel document | Execute a .vbs-macro in the selected Excel file | Insert or delete a column in an existing Excel document |
| Read Column | Append Column | Update Column | Sort Range |
| Read data from a selected column in an Excel document and save it to a variable | Insert a column at the end of the selected Excel document | Overwrite data in a certain column of an Excel document | Sort the range of data in the Excel file by column |
| Duplicate Sheet | Remove Sheet | Clear Range | Rename Sheet |
| Create an exact copy of a worksheet in Excel. | Delete a worksheet from the Excel workbook. | Remove the contents from a specified range of cells. | Change the name of a worksheet in Excel. |
| Copy/Paste Range | Format Cells | Get Cell Formula | Locate Cell |
| Duplicate and transfer data between ranges in Excel. | Adjust the appearance and formatting of selected cells. | Retrieve the formula used in a specific cell. | Find the position of a particular cell within a worksheet. |
| Remove Duplicate Rows | Autofill Formula | Format Data Type Cells | |
| Delete duplicate rows from a dataset in Excel. | Automatically extend a formula across a range of cells. | Set the data format for selected cells in Excel. |
Read Excel File
Description
This activity is used to read the contents of an Excel table. When adding this activity to a workflow, an 'Assign value to variable' action block connected to this block also appears. The result of the reading operation is saved to this variable.
However, using the 'Assign value to variable' activity is not strictly necessary in this case. It is safe to delete this block and handle the result any other way. For example, it could be possible to save the table 'as is' by connecting the 'Read Excel file' to 'Save table' activity and selecting the Save the previous step result in the 'Save table' block parameters.
One more important thing to remember: do not forget to close the Excel application if the table you are going to read using this activity is currently open in the application. Otherwise, Studio will not be able to get access to the file and execute the activity.
Studio Pro supports Microsoft Excel .xls and .xlsx file formats.
Microsoft Native and Generic
As of the 8.3 update, there are two ways of interacting with MS Excel - Microsoft Native and Generic. Navigate to the menu "Settings" → "Microsoft activities" to choose a method.
- Microsoft Native uses standard Microsoft methods to interact with the Excel application. It requires Excel to be installed on your computer and extends the capabilities of interacting with all Excel functionalities.
- Generic does not require Excel to be installed and may have some Excel functionalities limitations.
Parameters
Path is the main parameter here. It defines the path to the Excel file that needs to be read. It is a required parameter.

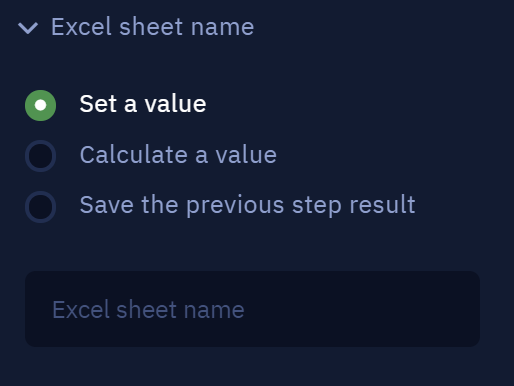
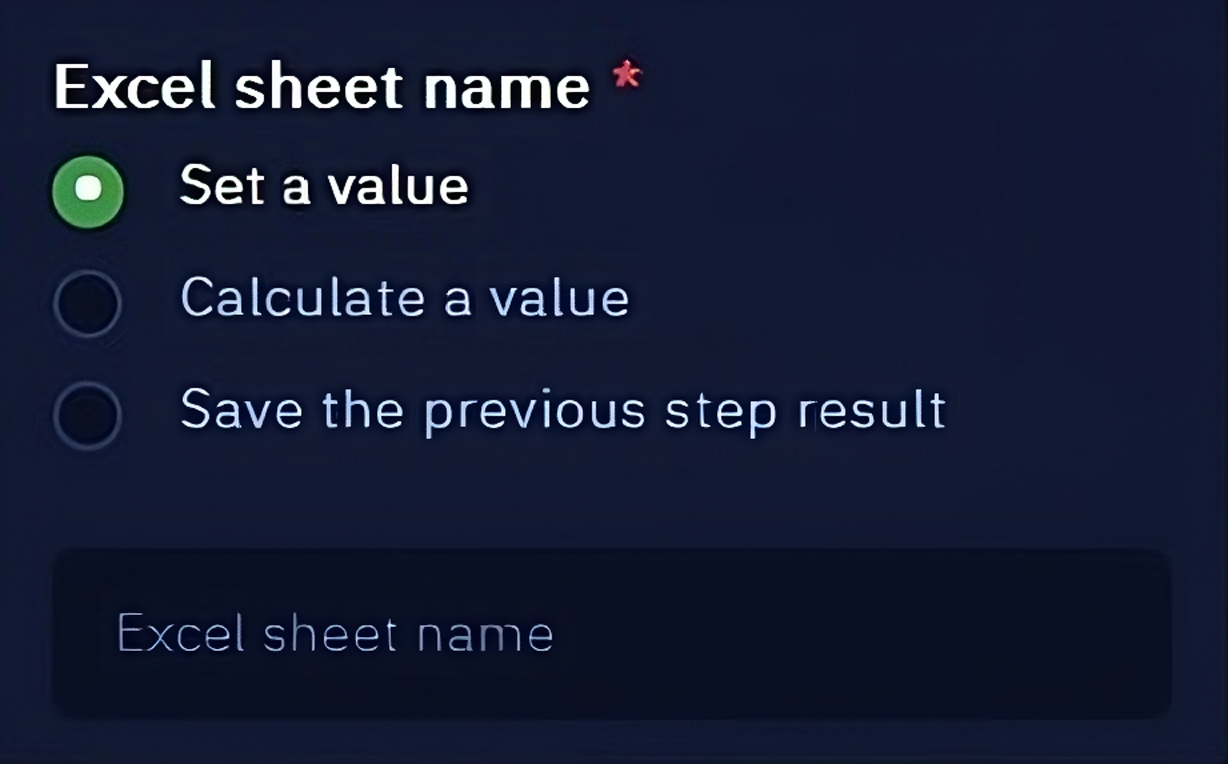
The next parameter is Excel sheet name. It lets you read the value from a specific sheet within the Excel file. Leave it blank if you would like to read the whole file.
And the last parameter is Get dictionary key. It defines how the table headers will be represented.
With Use table headers option the first row of the table is taken as a header.
With Use column letters option standard Excel headers will be used (for example, A, B, C, etc.).
We will show examples of differences between these options in the next article section.

Results
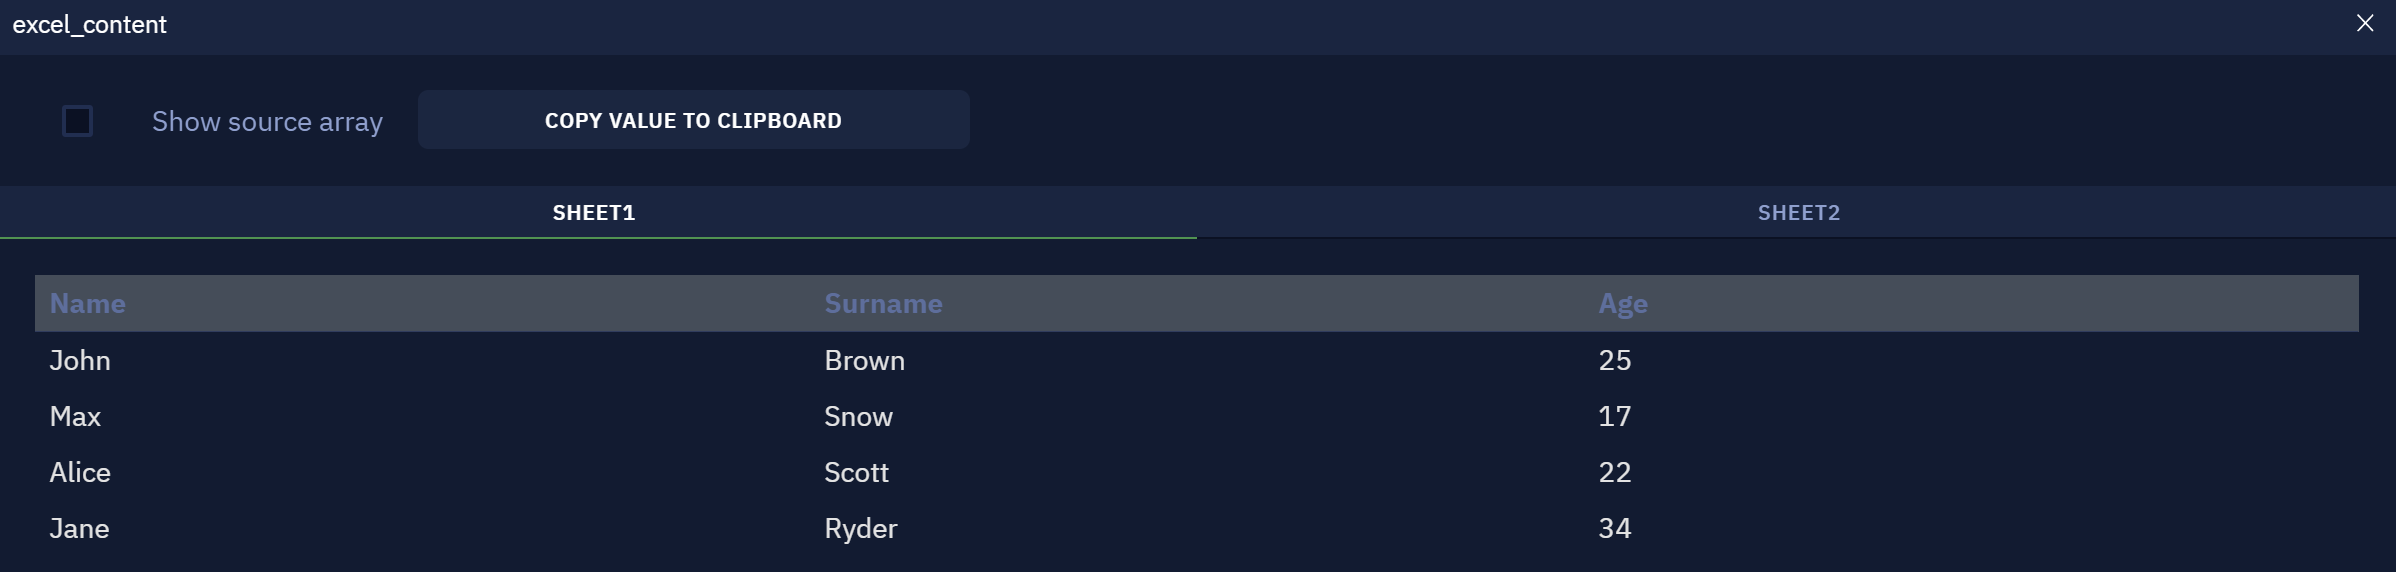
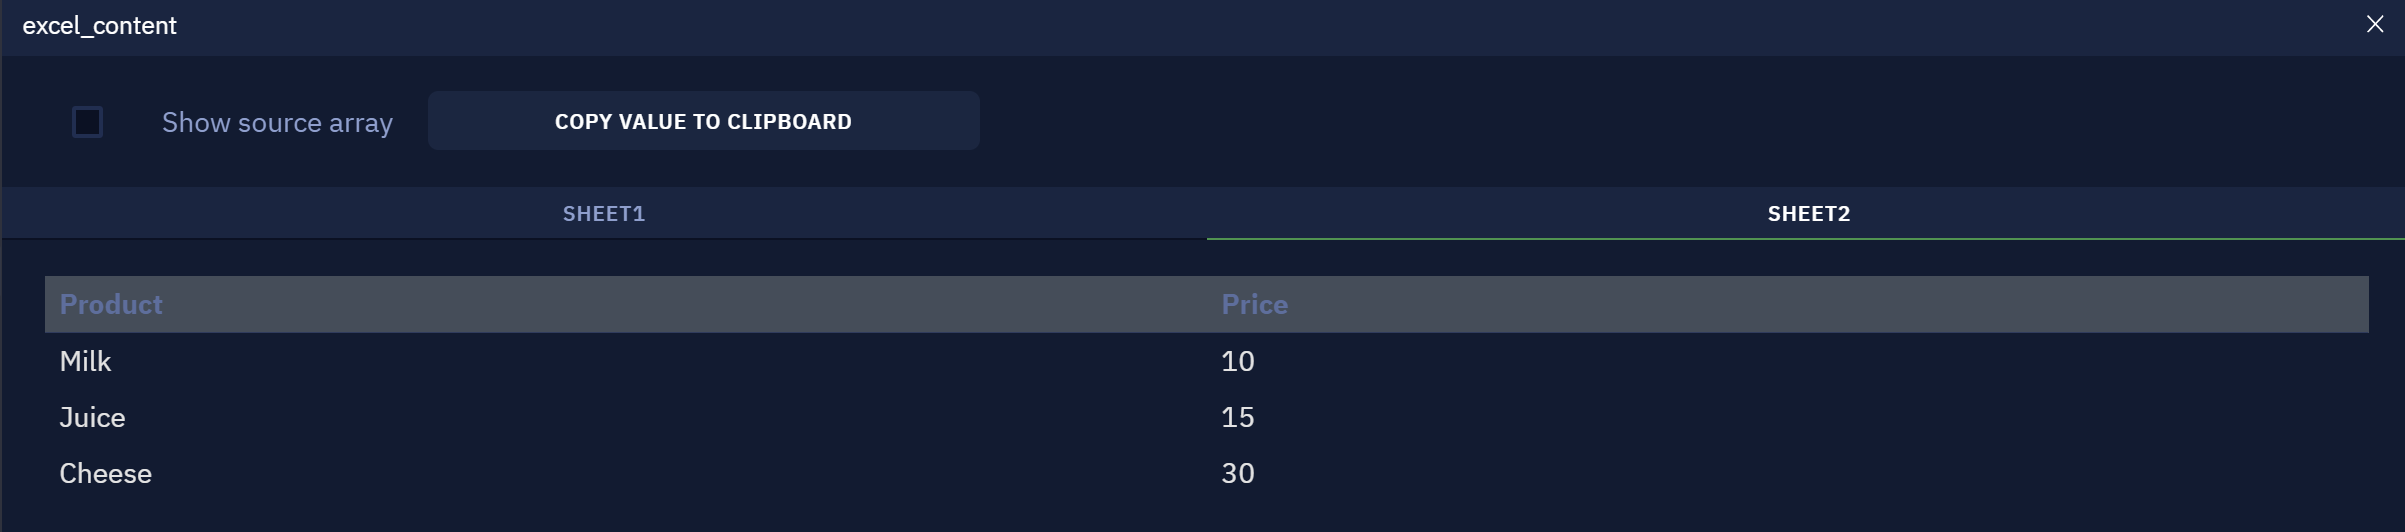
Now let us take a look at how the results of this activity are represented.
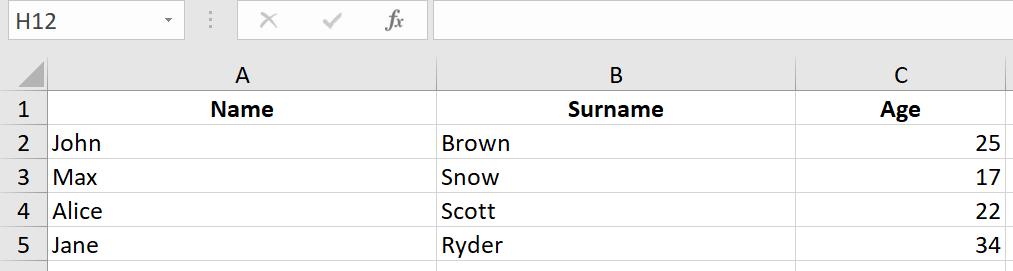
We will use this table with two sheets as an example.
And here are the results. In this example, we saved the results using the 'Assign value to variable' activity.
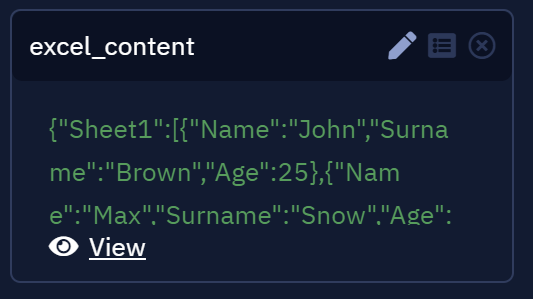
Click the 'View' button to see more detail. Here we can see the data from the read table and two tabs for the corresponding sheets within it. In this case, we used the Use table headers option. The headers were copied from the table as we wrote them.
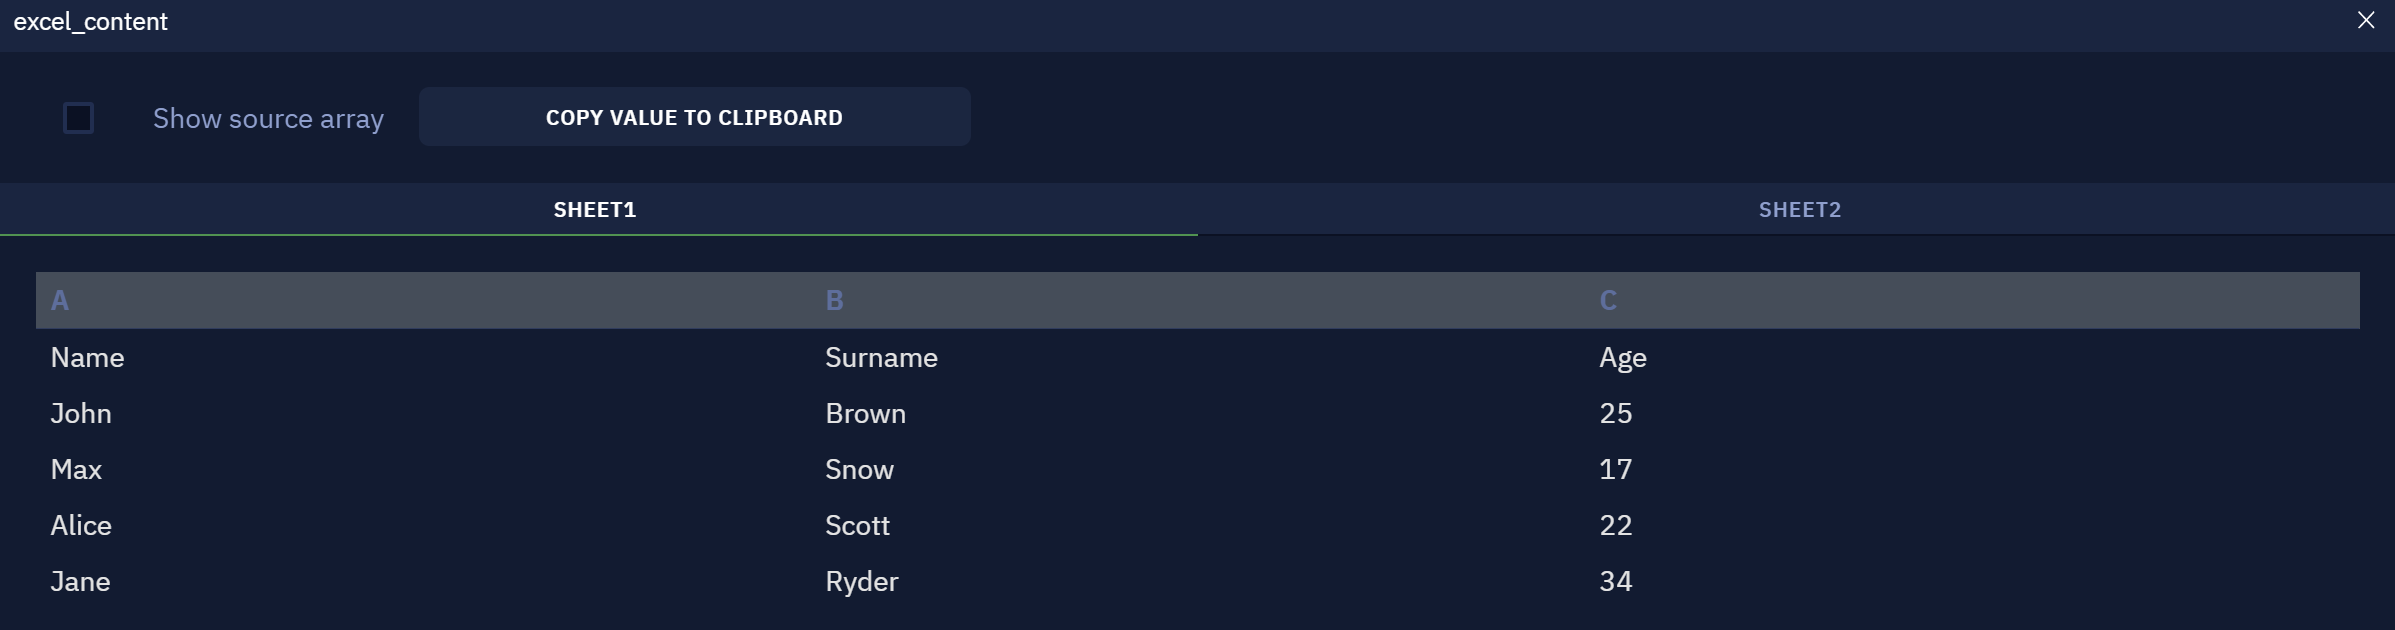
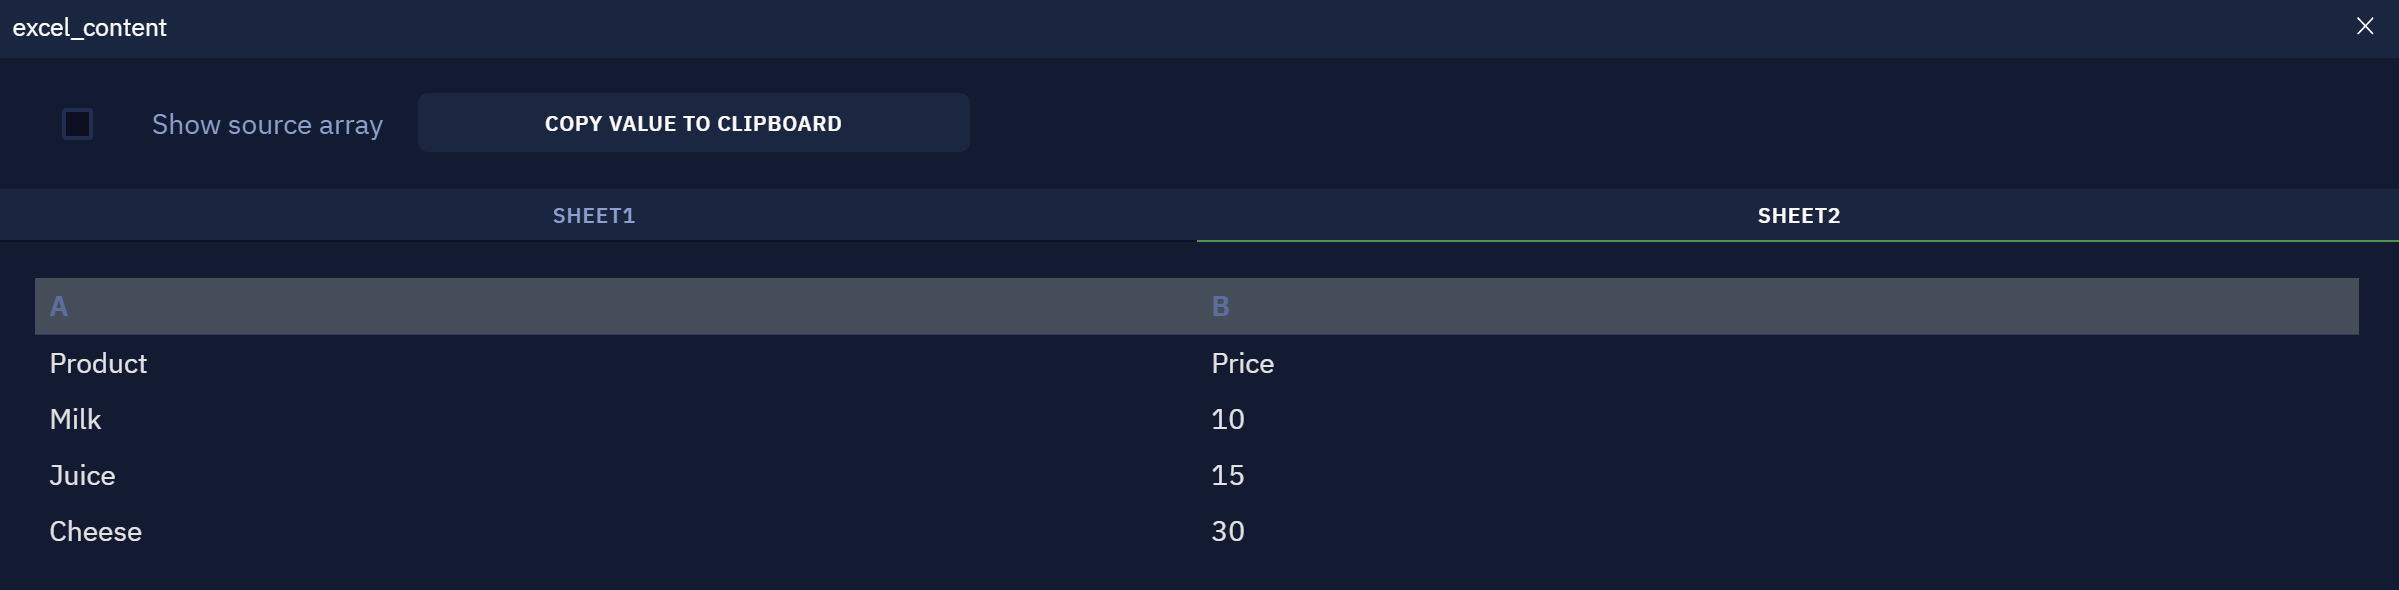
And now let us have a look at another representation where Use column letters option is used. Here the headers we made in the tables are not taken into consideration and replaced by the letters.
Write Excel File
Description
This activity is used to write some data into an Excel file. It can be used for a wide variety of tasks when it is needed to save some structured data to a table, for example, when processing some business data.
Studio Pro supports Microsoft Excel .xls and .xlsx file formats.
As of the 8.3 update, there are two ways of interacting with MS Excel - Microsoft Native and Generic. Navigate to the menu "Settings" → "Microsoft activities" to choose a method.
- Microsoft Native uses standard Microsoft methods to interact with the Excel application. It requires Excel to be installed on your computer and extends the capabilities of interacting with all Excel functionalities.
- Generic does not require Excel to be installed and may have some Excel functionalities limitations.
Parameters
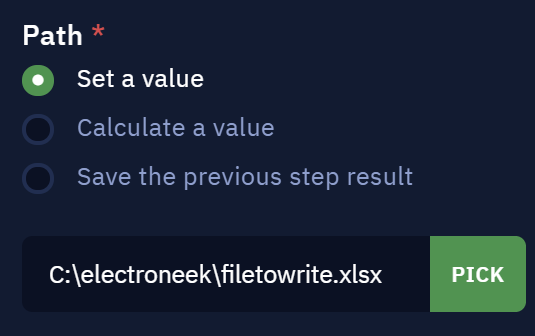
The first parameter here is Path which defines the Excel file you are going to modify. It is required.
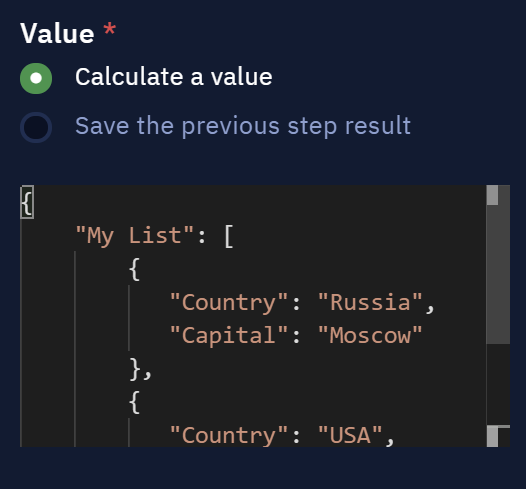
The next one is Value. It defines what will be written to the Excel file. It is also required.
The Calculate a value option lets you form the value dynamically. Here is a usage example:
{
"My List": [
{
"Country": "Russia",
"Capital": "Moscow"
},
{
"Country": "USA",
"Capital": "Washington DC"
}
]
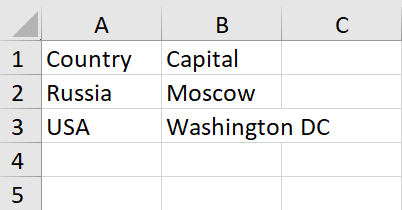
}"My List" is the table sheet name, "Country" and "Capital" are columns, "Russia", "USA", "Moscow" and "Washington DC" are the respective values that will be written to the columns.
This is how the result would look like.
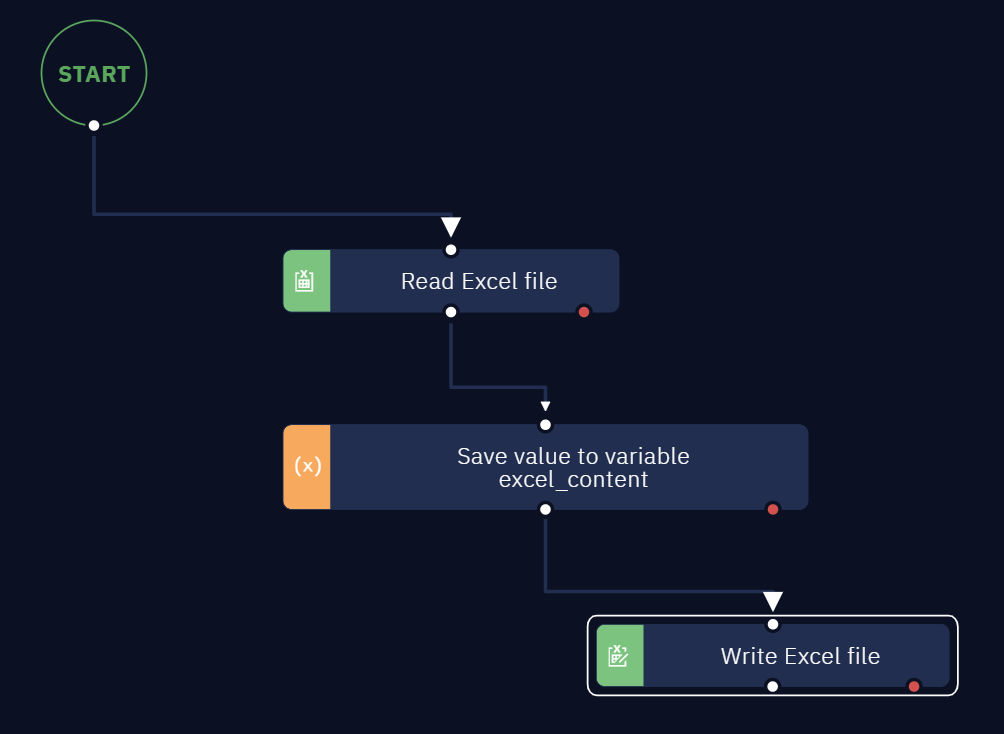
The Save the previous step result can be used with the activities that return the contents of a table. For example, here we read a table and write its contents to the Excel file as shown in the example above.
Excel Formulas
You can use this action to enter not only numeric or alphabetic data but also formulas for mathematical operations into Excel rows.
The Order in Formulas
The formulas you enter must be written on the same line as the data you want to enter in Excel. For example
[“10”, “20”, “30”, “=SUM(A1:C1)”]In this case, the values 10, 20, and 30 will be entered in cells A1, B1, and C1, respectively. Cell D1 will show the result of the formula, that is, the sum of these numbers.
Important: The formulas that you enter in Excel through ElectroNeek must be written in English only. Thus, you should use the formula =SUM(A1:C1) instead of =СУММ(А1:С1). Find the complete list of Excel formulas here.
NoteThis activity adds information to Excel without formatting.
Append row to Excel file
Description
Adds a row to the end of an Excel sheet.
Studio Pro supports Microsoft Excel .xls and .xlsx file formats.
As of the 8.3 update, there are two ways of interacting with MS Excel - Microsoft Native and Generic. Navigate to the menu "Settings" → "Microsoft Activities" to choose a method.
- Microsoft Native uses standard Microsoft methods to interact with the Excel application. It requires Excel to be installed on your computer and extends the capabilities of interacting with all Excel functionalities.
- Generic does not require Excel to be installed and may have some Excel functionalities limitations.
Parameters
Path
- Set a value: enables you to directly write the desired path. Clicking the 'Pick' button allows you to manually choose the path.
- Save the previous step result: chooses the previous activity result as a path.
- Calculate a value: enables you to use available properties and methods to form a path.
Row to append
- Save the previous step result: chooses the previous function result as the row.
- Calculate a value: enables you to use available properties and methods to form the row. The format must be one of the following:
-
{"Column 1": "Value 1", "Column 2": "Value 2", "Column 3": "Value 3"}. For example,{"Name": "Michael", "Last Name": "Smith", "Age": 30} -
["Value 1", "Value 2", "Value 3"]. For example,["Michael", "Smith", 30]
Excel sheet name
By default, the first sheet in an Excel file is used.
- Set a value: enables you to directly specify the sheet name, for example, Employees.
- Save the previous step result: chooses the previous activity result as the sheet name.
- Calculate a value: enables you to use available properties and methods to form the sheet name.
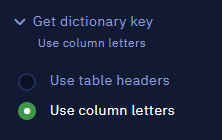
Get dictionary key
The default method is "Auto".
- Use table headers: select this option if the header contains words specified by the user (see the example above).
- Use column letters: select this option if the header contains the standard 'Excel' column names: 'A', 'B', 'C', and so on.
- Auto: select this option to define a header by the input data automatically
Comment
Contains an annotation of the activity. The input text will be displayed above the activity name.
NoteThis activity adds information to Excel without formatting.
Insert/Delete Rows
Description
This activity allows you to insert or delete a row in an existing Excel document.
Studio Pro supports Microsoft Excel .xls and .xlsx file formats.
As of the 8.3 update, there are two ways of interacting with MS Excel - Microsoft Native and Generic. Navigate to the menu "Settings" → "Microsoft activities" to choose a method.
- Microsoft Native uses standard Microsoft methods to interact with the Excel application. It requires Excel to be installed on your computer and extends the capabilities of interacting with all Excel functionalities.
- Generic does not require Excel to be installed and may have some Excel functionalities limitations.
Parameters
Path
- Set a value option allows you to manually specify the path to the target excel document. Click the "PICK" button to open the file explorer and select the path.
- Calculate a value option allows you to use a special formula or a special method to determine the path.
- Save the previous step result option takes the result of the previous workflow action as the path.
- Insert - if this option is selected, an empty row will be inserted into the table.
- Delete - if this option is selected, a row will be deleted from the table.
Row
- Set a value option allows you to manually specify the number of the row to be inserted or deleted. For example, specify the number 2 to move the data from row 2 to row 3, and leave row 2 empty (with the "Insert" option picked).
- Calculate a value option allows you to use a special formula or a special method to determine the row number.
- Save the previous step result option takes the result of the previous workflow action as the row number.
Row count
- Set a value option allows you to manually specify the number of rows to be inserted or deleted.
- Calculate a value option allows you to use a special formula or a special method to determine the number of rows.
- Save the previous step result option takes the result of the previous workflow action as the number of rows.
Excel sheet name
- Set a value option allows you to manually specify the name of the sheet in which you want to perform actions.
- Calculate a value option allows you to use a special formula or a special method to determine the name of the Excel sheet.
- Save the previous step result option takes the result of the previous workflow activity as the sheet name.
Comment
Allows you to add explanatory text to the block. The text will be displayed inside the block on top of the activity name.
NoteThis activity adds information to Excel without formatting.
Read Excel Range
Description
Gets the value of the range from the Excel file. The 'Save value to variable' activity appears automatically when choosing the 'Read Excel Range' activity. It automatically saves the value to a variable. However, the activity is not mandatory to use and can be removed from the workflow.
Studio Pro supports Microsoft Excel .xls and .xlsx file formats.
As of the 8.3 update, there are two ways of interacting with MS Excel - Microsoft Native and Generic. Navigate to the menu "Settings" → "Microsoft activities" to choose a method.
- Microsoft Native uses standard Microsoft methods to interact with the Excel application. It requires Excel to be installed on your computer and extends the capabilities of interacting with all Excel functionalities.
- Generic does not require Excel to be installed and may have some Excel functionalities limitations.
Parameters
Path
- Set a value: enables you to directly write the desired path. Clicking the 'Pick' button allows you to manually choose the path.
- Save the previous step result: chooses the previous activity result as a path.
- Calculate a value: enables you to use available properties and methods to form a path.
From Row
Allows you to specify a start row for reading.
- Set a value: enables you to directly write the desired number of the start row.
- Save the previous step result: chooses the previous activity result as a number of the start row.
- Calculate a value: enables you to use available properties and methods to form a number of the start row.
To Row
Allows you to specify an end row for reading.
- Set a value: enables you to directly write the desired number of the end row.
- Save the previous step result: chooses the previous activity result as a number of the end row.
- Calculate a value: enables you to use available properties and methods to form a number of the end row.
From Column
Allows you to specify a start column for reading.
- Set a value: enables you to directly write the desired Excel column index of the start column.
- Save the previous step result: chooses the previous activity result as Excel column index of the start column.
- Calculate a value: enables you to use available properties and methods to form Excel column index of the start column.
To Column
Allows you to specify an end column for reading.
- Set a value: enables you to directly write the desired Excel column index of the end column.
- Save the previous step result: chooses the previous activity result as Excel column index of the end column.
- Calculate a value: enables you to use available properties and methods to form Excel column index of the end column.
Excel sheet name
By default, the first sheet in an Excel file is used.
- Set a value: enables you to directly specify the sheet name, for example, Employees.
- Save the previous step result: chooses the previous activity result as the sheet name.
- Calculate a value: enables you to use available properties and methods to form the sheet name.
Get dictionary key
The default method is "Use table headers".
- Use table headers: select this option if the header contains of words specified by the user.
- Use column letters: select this option if the header contains of the standard 'Excel' column names: 'A', 'B', 'C' and so on.
Comment
Contains an annotation to the activity. The input text will be displayed above the activity name.
Result
The excel data is stored in the excel_range_content variable by default. This variable is an array of "key-value" objects. Each object of the array represents one row of the table.
For example, if we read the range between the first three rows (1-3) and columns (A-C) we can get such a record:
Format of the variable with excel data ('use table headers' option enabled):
[

 {

 "Column 1": "Value (1,1)",

 "Column 2": "Value (1,2)",

 "Column 3": "Value (1,3)"

 },

 {

 "Column 1": "Value (2,1)",

 "Column 2": "Value (2,2)",

 "Column 3": "Value (2,3)"

 }

]
This record present the following table:
| Column 1 | Column 2 | Column 3 |
|---|---|---|
| Value (1,1) | Value (1,1) | Value (1,3) |
| Value (2,1) | Value (2,2) | Value (2,3) |
Write Excel Range
Description
Writes specified values to a specified range in an Excel file.
Studio Pro supports Microsoft Excel .xls and .xlsx file formats.
As of the 8.3 update, there are two ways of interacting with MS Excel - Microsoft Native and Generic. Navigate to the menu "Settings" → "Microsoft activities" to choose a method.
- Microsoft Native uses standard Microsoft methods to interact with the Excel application. It requires Excel to be installed on the machine and provides higher efficiency and stability with different types of files.
- Generic does not require Excel to be installed, but it may be less efficient and stable.
Parameters
Path
- Set a value: enables you to directly write the desired path. Clicking the 'Pick' button allows you to manually choose the path.
- Save the previous step result: chooses the previous activity result as a path.
- Calculate a value: enables you to use available properties and methods to form a path.
Value
- Save the previous step result: chooses the previous activity result as the data.
- Calculate a value: enables you to use available properties and methods to form a table. For example:
[{Country: "Russia", Capital: "Moscow"}, {Country: "USA", Capital: "Washington DC"}]
From Row
Allows you to specify a start row for writing.
- Set a value: enables you to directly write the desired number of the start row.
- Save the previous step result: chooses the previous activity result as a number of the start row.
- Calculate a value: enables you to use available properties and methods to form a number of the start row.
From Column
Allows you to specify a start column for writing.
- Set a value: enables you to directly write the desired Excel column index of the start column.
- Save the previous step result: chooses the previous activity result as Excel column index of the start column.
- Calculate a value: enables you to use available properties and methods to form Excel column index of the start column.
Excel sheet name
By default, the first sheet in an Excel file is used.
- Set a value: enables you to directly specify the sheet name, for example,
Employees. - Save the previous step result: chooses the previous activity result as the sheet name.
- Calculate a value: enables you to use available properties and methods to form the sheet name.
Get dictionary key
The default method is "Auto".
- Use table headers: select this option if the header contains words specified by the user (see the example above).
- Use column letters: select this option if the header contains of the standard 'Excel' column names: 'A', 'B', 'C' and so on.
- Auto: select this option to define a header by the input data automatically.
Comment
Contains an annotation of the activity. The input text will be displayed above the activity name.
NoteThis activity doesn't change the formatting of Excel-table.
Read Excel Row
Description
Gets a particular row value from the Excel file. The 'Save value to a variable' activity appears automatically when choosing the 'Read Excel Row' activity. It automatically saves the value to a variable. However, the activity is not mandatory and can be removed from the workflow.
Studio Pro supports Microsoft Excel .xls and .xlsx file formats.
As of the 8.3 update, there are two ways of interacting with MS Excel - Microsoft Native and Generic. Navigate to the menu "Settings" → "Microsoft activities" to choose a method.
- Microsoft Native uses standard Microsoft methods to interact with the Excel application. It requires Excel to be installed on your computer and extends the capabilities of interacting with all Excel functionalities.
- Generic does not require Excel to be installed and may have some Excel functionalities limitations.
Parameters
Path
- Set a value: enables you to write the desired path directly. Clicking the 'Pick' button allows you to manually choose the path.
- Save the previous step result: chooses the last result activity as a path.
- Calculate a value: enables you to use available properties and methods to form a path.
Row number
Allows you to specify a row for reading.
- Set a value: enables you to directly write the desired number of the row.
- Save the previous step result: chooses the last result activity as a number of the row.
- Calculate a value: enables you to use available properties and methods to form a number of the row.
Excel sheet name
By default, the first sheet in an Excel file is used.
- Set a value: enables you to directly specify the sheet name, for example,
Employees. - Save the previous step result: chooses the previous activity result as the sheet name.
- Calculate a value: enables you to use available properties and methods to form the sheet name.
Get dictionary key
- Use table headers: select this option if the header contains words specified by the user.
- Use column letters: select this option if the header contains the standard 'Excel' column names: 'A', 'B', 'C', and so on.
Comment
Contains an annotation of the activity. The input text will be displayed above the activity name.
Result
The excel data is stored in the excel_row_content variable by default. This variable is an array of objects. Each object of the array represents one cell of the table.
For example, if we read the first row (1) we can get such a record:
{

 "Column 1": "Value (1,1)",

 "Column 2": "Value (1,2)",

 "Column 3": "Value (1,3)"

}Update Excel Row
Description
Updates particular row values in the Excel file.
Studio Pro supports Microsoft Excel .xls and .xlsx file formats.
As of the 8.3 update, there are two ways of interacting with MS Excel - Microsoft Native and Generic. Navigate to the menu "Settings" → "Microsoft activities" to choose a method.
- Microsoft Native uses standard Microsoft methods to interact with the Excel application. It requires Excel to be installed on the machine and provides higher efficiency and stability with different types of files.
- Generic does not require Excel to be installed, but it may be less efficient and stable.
Parameters
Path
- Set a value: enables you to directly write the desired path. Clicking the 'Pick' button allows you to manually choose the path.
- Save the previous step result: chooses the previous activity result as a path.
- Calculate a value: enables you to use available properties and methods to form a path.
Value
- Save the previous step result: chooses the last result activity as the data.
- Calculate a value: enables you to use available properties and methods to form a data for the row. For example,
{{Col1: "1", Col2: "2"}, {Col1: "3", Col2: "4"}}or[1, 2, 3], [4, 5, 6].
Row number
Allows you to specify a row for updating.
- Set a value: enables you to directly write the desired number of the row.
- Save the previous step result: chooses the previous activity result as a number of the row.
- Calculate a value: enables you to use available properties and methods to form a number of the row.
Excel sheet name
By default, the first sheet in an Excel file is used.
- Set a value: enables you to directly specify the sheet name, for example,
Employees. - Save the previous step result: chooses the previous activity result as the sheet name.
- Calculate a value: enables you to use available properties and methods to form the sheet name.
Get dictionary key
The default method is "Auto".
- Use table headers: select this option if the header contains of words specified by the user (see the example above).
- Use column letters: select this option if the header contains of the standard 'Excel' column names: 'A', 'B', 'C' and so on.
- Auto: select this option to define a header by the input data automatically
Comment
Contains an annotation of the activity. The input text will be displayed above the activity name.
NoteThis activity does not change the formatting of the Excel table.
Read Excel Cell
Description
Reads the value of a specified cell in an Excel document. The 'Save value to variable' activity appears automatically when choosing the 'Read Excel Cell' activity. It automatically saves the value to a variable. However, the activity is not mandatory to use and can be removed from the workflow.
Studio Pro supports Microsoft Excel .xls and .xlsx file formats.
As of the 8.3 update, there are two ways of interacting with MS Excel - Microsoft Native and Generic. Navigate to the menu "Settings" → "Microsoft activities" to choose a method.
- Microsoft Native uses standard Microsoft methods to interact with the Excel application. It requires Excel to be installed on your computer and extends the capabilities of interacting with all Excel functionalities.
- Generic does not require Excel to be installed and may have some Excel functionalities limitations.
Parameters
Path
- Set a value: enables you to directly write the desired path. Clicking the 'Pick' button allows you to manually choose the path.
- Save the previous step result: chooses the last result activity as a path.
- Calculate a value: enables you to use available properties and methods to form a path.
Row number
Allows you to specify a row for the cell to read.
- Set a value: enables you to directly write the desired number of the row.
- Save the previous step result: chooses the last result activity as a number of the row.
- Calculate a value: enables you to use available properties and methods to form a number of the row.
Column number
Allows you to specify a column for the cell to read.
- Set a value: enables you to directly write the desired Excel column index of the column.
- Save the previous step result: chooses the previous activity result as Excel column index of the start column.
- Calculate a value: enables you to use available properties and methods to form Excel column index of the column.
Excel sheet name
By default, the first sheet in an Excel file is used.
- Set a value: enables you to directly specify the sheet name, for example,
Employees. - Save the previous step result: chooses the previous activity result as the sheet name.
- Calculate a value: enables you to use available properties and methods to form the sheet name.
Comment
Contains an annotation to the activity. The input text will be displayed above the activity name.
Result
The excel data is stored in the excel_cell_content variable by default. This variable represents one cell of the table.
For example, if we read the first row (1) and third column (C) we can get such a record: "Value (1,3)".
Update Excel Cell
Description
Updates the content of specified cells in an Excel document.
Studio Pro supports Microsoft Excel .xls and .xlsx file formats.
As of the 8.3 update, there are two ways of interacting with MS Excel - Microsoft Native and Generic. Navigate to the menu "Settings" → "Microsoft activities" to choose a method.
- Microsoft Native uses standard Microsoft methods to interact with the Excel application. It requires Excel to be installed on your computer and extends the capabilities of interacting with all Excel functionalities.
- Generic does not require Excel to be installed and may have some Excel functionalities limitations.
Parameters
Path
- Set a value: enables you to directly write the desired path. Clicking the 'Pick' button allows you to manually choose the path.
- Save the previous step result: chooses the last result activity as a path.
- Calculate a value: enables you to use available properties and methods to form a path.
Value
- Save the previous step result: chooses the last result activity as the data.
- Calculate a value: enables you to use available properties and methods to form data for the cell. You can use strings or numbers.
Row number
Allows you to specify a row for the cell to update.
- Set a value: enables you to directly write the desired number of the row.
- Save the previous step result: chooses the last result activity as a number of the row.
- Calculate a value: enables you to use available properties and methods to form a number of the row.
Column number
Allows you to specify a column for the cell to update.
- Set a value: enables you to directly write the desired Excel column index of the column.
- Save the previous step result: chooses the previous activity result as Excel column index of the start column.
- Calculate a value: enables you to use available properties and methods to form Excel column index of the column.
Excel sheet name
By default, the first sheet in an Excel file is used.
- Set a value: enables you to directly specify the sheet name, for example,
Employees. - Save the previous step result: chooses the previous activity result as the sheet name.
- Calculate a value: enables you to use available properties and methods to form the sheet name.
Comment
Contains an annotation of the activity. The input text will be displayed above the activity name.
NoteThis activity doesn't change the formatting of Excel table.
Execute Macro
Description
This activity requires having Microsoft Excel installed on the computer.
This activity allows you to execute a .vbs-macro in the selected Excel file. Studio Pro supports Microsoft Excel .xls and .xlsx file formats.
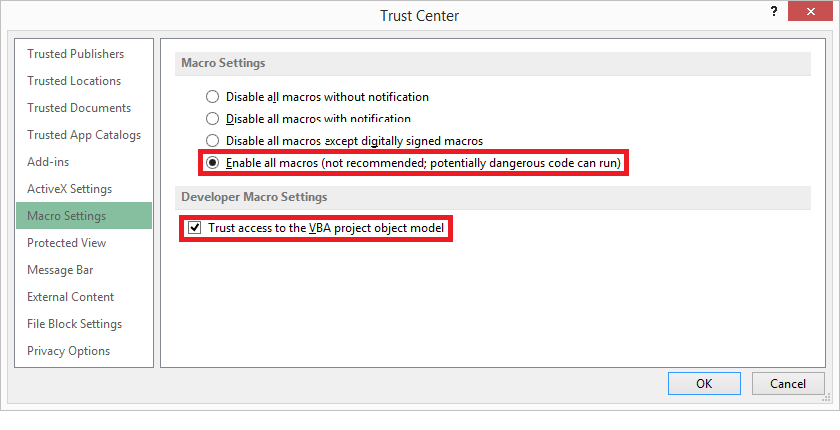
Ensure that the “Enable all macros” and “Trust access to the VBA project object model” options are enabled in the Trust Center of Microsoft Excel before executing the macro.
As of the 8.3 update, there are two ways of interacting with MS Excel - Microsoft Native and Generic. Navigate to the menu "Settings" → "Microsoft activities" to choose a method.
- Microsoft Native uses standard Microsoft methods to interact with the Excel application. It requires Excel to be installed on the machine and provides higher efficiency and stability with different types of files.
- Generic does not require Excel to be installed, but it may be less efficient and stable.
Parameters
Path
- Set a value option allows you to set a path to the Excel file where the macro is to be executed. By clicking PICK you can find the desired file using file explorer.
- Calculate a value option lets you use a special formula or method to set a path to the required file.
- Save the previous step result option takes the path to the required file from the result of the previous step in the workflow.
Please note that if the file name contains spaces, then the whole path to the file should be marked with quotes. For example:
"
C:\Users\John\Documents\ElectroNeek\Macros\Macrofor invoices"Another option is to replace all the spaces with the _ symbol. In such a case, you will not need to mark the path with quotes.
Macro file path
- Set a value option allows you to set a path to the .vbs file (macro) manually. By clicking PICK you can find the desired file using file explorer.
- Calculate a value option lets you use a special formula or method to set a path to the .vbs file.
- Save the previous step result option takes the path to the .vbs file from the result of the previous step in the workflow.
Please note that if the file name contains spaces, then the whole path to the file should be marked with quotes. For example:
"
C:\Users\John\\Documents\ElectroNeek\Macros\Macrofor invoices"Another option is to replace all the spaces with the _ symbol. In such a case, you will not need to mark the path with quotes.
Sub or Function name
- Set a value option allows you to manually set the name of the procedure or function to be launched.
- Calculate a value option lets you use a special formula or method to set the name of the procedure or function.
- Save the previous step result option takes the name of the procedure or function from the result of the previous step in the workflow.
Input arguments
This parameter allows you to pass certain arguments to the macro, to the Sub or Function defined above. The arguments should be listed as an array of strings or numbers. For example, if a macro function or procedure takes four input arguments, you need to pass the value in this parameter through an array of numbers (or strings) in the same order - [2,3,4,5] (here, number 2 will be passed to the first argument of the procedure or function, number 3 to the second, and so on; numbers are given for example).
- Calculate a value option lets you set the array of strings or numbers to state the input arguments.
- Save the previous step result option takes the input arguments from the result of the previous step in the workflow.
Comment
This parameter allows you to create an annotation for the activity. The input text will be displayed above the activity name.
How to use it?
The "Execute macro" activity can be useful for users with experience in working with macros: it allows you to quickly solve non-trivial problems by reusing the existing code.
When working with macros in MS Excel, there are several approaches, for example, the built-in Excel functionality involves creating macros, in which case they will be saved in .xlsm format. On the other hand, you can create macros separately from Excel using VBScript. Such files will have the format .vbs. Studio Pro supports the latte approach.
In order for the activity to work correctly, you must first open Excel with a command in the .vbs file. For example, you can use this method:
Dim xlApp, Book
Set xlApp = CreateObject("Excel.Application")
Set Book = xlApp.Workbooks.Open(WScript.Arguments(0))
You can then specify other instructions to open the file.
After executing the macro, you must save the page and close Excel. Here is an example of such a command:
Book.Save
Book.Close True
xlApp.Quit
Here is an example of a VBS file. This script will change the size of the range A18:A (to the end of the page). The height will be 65 and the width will be 14.
Private Sub RowSize_Click()
      Dim xlApp, Book, Sheet
      Set xlApp = CreateObject("Excel.Application")
      Set Book = xlApp.Workbooks.Open(WScript.Arguments(0))
      Set Sheet = Book.Sheets("Sheet1")
      Sheet.Range("A18:A" & Sheet.Rows.Count).RowHeight = 65
      Sheet.Columns("A:Z").ColumnWidth = 14
      Book.Save
      Book.Close True
      xlApp.Quit
End Sub
Here are two simple examples of how ElectroNeek interacts with macros. At the end of this article, you will find two zip archives for downloading. These archives contain the .neek file to run in Studio Pro, the .vbs macro file linked inside the .neek file, and the .xlsx file, the table in which changes occur as a result of the bot's actions.
The sample_macro.zip archive demonstrates ElectroNeek's interaction with a single procedure (Sub) macro. The macro changes the color of cells B2:B5 to blue in sample_file.xlsx (initially the cells have no background color).
The second example, sample_macro_function.zip, does the same thing as the first one, but with the following differences:
- First, the macro itself uses a Function, not a procedure.
- Second, the Function returns a result, the string "DONE". This result is stored in the variable x in the .neek file. So after running the .neek file, you have to make sure that the color of the cells B2:B5 is changed to blue and the string "DONE" is displayed in the variable x.
Thus, these examples demonstrate how parameters are passed to a macro and how the result can be returned from the macro and saved in a .neek file.
Insert/Delete Columns
Description
This activity allows you to insert or delete a column in an existing Excel document.
Studio Pro supports Microsoft Excel .xls and .xlsx file formats.
As of the 8.3 update, there are two ways of interacting with MS Excel - Microsoft Native and Generic. Navigate to the menu "Settings" → "Microsoft activities" to choose a method.
- Microsoft Native uses standard Microsoft methods to interact with the Excel application. It requires Excel to be installed on your computer and extends the capabilities of interacting with all Excel functionalities.
- Generic does not require Excel to be installed and may have some Excel functionalities limitations.
Parameters
Path
- Set a value: allows you to manually specify the path to the target excel document. Click the "Select" button to open the file explorer and select the path.
- Calculate a value: allows you to use a special formula or a special method to determine the path.
- Save the previous step result: takes the result of the previous workflow action as the path.
Action
- Insert
- Delete
Here you can select the necessary action.
Column
- Set a value: allows you to manually specify the index of the column whose data you want to read. The index is indicated by the letter of the corresponding column, for example, A.
- Calculate a value: allows you to use a special formula or a special method to determine the column index.
- Save the previous step result: takes the result of the previous workflow activity as the column index.
Column count
- Set a value option allows you to manually specify how many columns to insert or remove.
- Calculate a value option allows you to use a special formula or a special method to determine the number of columns.
- Save the previous step result option takes the result of the previous workflow activity as the number of columns.
Excel sheet name
- Set a value: allows you to manually specify the name of the sheet in which you want to perform actions.
- Calculate a value: allows you to use a special formula or a special method to determine the name of the Excel sheet.
- Save the previous step result: Excel takes the result of the previous workflow activity as the sheet name.
Comment
Allows you to add explanatory text to the block. The text will be displayed inside the block on top of the activity name.
NoteThis activity adds information to Excel without formatting.
Read Column
Description
This activity allows you to read data from a selected column in an Excel document and save it to a variable.
Studio Pro supports Microsoft Excel .xls and .xlsx file formats.
As of the 8.3 update, there are two ways of interacting with MS Excel - Microsoft Native and Generic. Navigate to the menu "Settings" → "Microsoft Activities" to choose a method.
- Microsoft Native uses standard Microsoft methods to interact with the Excel application. It requires Excel to be installed on your computer and extends the capabilities of interacting with all Excel functionalities.
- Generic does not require Excel to be installed and may have some Excel functionalities limitations.
Parameters
Path
- Set a value option allows you to manually specify the path to the target excel document. Click the "PICK" button to open the file explorer and select the path.
- Calculate a value option allows you to use a special formula or a special method to determine the path.
- Save the previous step result option takes the result of the previous workflow action as the path.
Column
- Set a value option allows you to manually specify the index of the column to read the data. The index is indicated by the letter of the corresponding column, for example, A.
- Calculate a value option allows you to use a special formula or a special method to determine the column index.
- Save the previous step result option takes the result of the previous workflow activity as the column index.
Excel sheet name
- Set a value option allows you to manually specify the name of the sheet in which you want to perform actions.
- Calculate a value option allows you to use a special formula or a special method to determine the name of the Excel sheet.
- Save the previous step result option takes the result of the previous workflow activity as the sheet name.
Comment
Allows you to add explanatory text to the block. The text will be displayed inside the block on top of the activity name.
Append Column
Description
This activity allows you to insert a column at the end of the selected Excel document.
Studio Pro supports Microsoft Excel .xls and .xlsx file formats.
As of the 8.3 update, there are two ways of interacting with MS Excel - Microsoft Native and Generic. Navigate to the menu "Settings" → "Microsoft activities" to choose a method.
- Microsoft Native uses standard Microsoft methods to interact with the Excel application. It requires Excel to be installed on your computer and extends the capabilities of interacting with all Excel functionalities.
- Generic does not require Excel to be installed and may have some Excel functionalities limitations.
Parameters
Path
- Set a value: allows you to manually specify the path to the target excel document. Click the "Select" button to open the file explorer and select the path.
- Calculate a value: allows you to use a special formula or a special method to determine the path.
- Save the previous step result: takes the result of the previous workflow action as the path.
Value
- Calculate a value: allows you to specify the data that will be contained in the new column. The data must be an array in JavaScript syntax. For example, if the new column will contain a list of cities Moscow, New York, Istanbul, the data in the form of an array should look like this:
["Moscow","New York","Istanbul"] - Save the previous step result: takes the result of the previous workflow activity as data. Note that in this case the result of the previous action must also be an array.
Excel sheet name
- Set a value: allows you to manually specify the name of the sheet in which you want to perform actions.
- Calculate a value: allows you to use a special formula or a special method to determine the name of the Excel sheet.
- Save the previous step result: Excel takes the result of the previous workflow activity as the sheet name.
Comment
Allows you to add explanatory text to the block. The text will be displayed inside the block on top of the activity name.
NoteThis activity adds information to Excel without formatting.
Update Column
Description
This action allows you to overwrite data in a certain column of an Excel document.
Studio Pro supports Microsoft Excel .xls and .xlsx file formats.
As of the 8.3 update, there are two ways of interacting with MS Excel - Microsoft Native and Generic. Navigate to the menu "Settings" → "Microsoft Activities" to choose a method.
- Microsoft Native uses standard Microsoft methods to interact with the Excel application. It requires Excel to be installed on your computer and extends the capabilities of interacting with all Excel functionalities.
- Generic does not require Excel to be installed and may have some Excel functionalities limitations.
Parameters
Path
- Set a value: allows you to manually specify the path to the target excel document. Click the "Select" button to open the file explorer and select the path.
- Calculate a value: allows you to use a special formula or a special method to determine the path.
- Save the previous step result: takes the result of the previous workflow activity as the path.
Value
- Calculate a value: allows you to specify the new data to be contained in the overwritten column. The data must be an array in JavaScript syntax. For example, if the data will be a list of cities Moscow, New York, Istanbul, the data in the form of an array should look like this:
["Moscow","New York","Istanbul"] - Save the previous step result: takes the result of the previous workflow activity as data. Note that in this case, the result of the previous activity must also be an array.
Column
- Set a value: allows you to manually specify the index of the column where to overwrite the data. The index is indicated by the letter of the corresponding column, for example, A.
- Calculate a value: allows you to use a special formula or a special method to determine the column index.
- Save the previous step result: takes the result of the previous workflow activity as the column index.
Excel sheet name
- Set a value: allows you to manually specify the name of the sheet in which you want to perform actions.
- Calculate a value: allows you to use a special formula or a special method to determine the name of the Excel sheet.
- Save the previous step result: Excel takes the result of the previous workflow activity as the sheet name.
Comment
Allows you to add explanatory text to the block. The text will be displayed inside the block on top of the activity name.
NoteThis activity does not change the formatting of the Excel table.
Sort Range
Description
This action allows you to sort the range of data in the Excel file by column. Note that the data is sorted as strings.
Studio Pro supports Microsoft Excel .xls and .xlsx file formats.
As of the 8.3 update, there are two ways of interacting with MS Excel - Microsoft Native and Generic. Navigate to the menu "Settings" → "Microsoft activities" to choose a method.
- Microsoft Native uses standard Microsoft methods to interact with the Excel application. It requires Excel to be installed on your computer and extends the capabilities of interacting with all Excel functionalities.
- Generic does not require Excel to be installed and may have some Excel functionalities limitations.
Parameters
Path
- Set a value: allows you to set a path to the target Excel file. By clicking PICK you can find the desired file using file explorer.
- Calculate a value: lets you use a special formula or method to set a path to the target file.
- Save the previous step result: takes the path to the target file from the result of the previous step in the workflow.
Range
- Set a value: here you can manually specify the range to be sorted by column. Note that you must use the A:B format for these coordinates, where A represents the left-top value and B represents the right-bottom value.
- Calculate a value: lets you use a special formula or method to set a range.
- Save the previous step result: takes the range from the result of the previous step in the workflow.
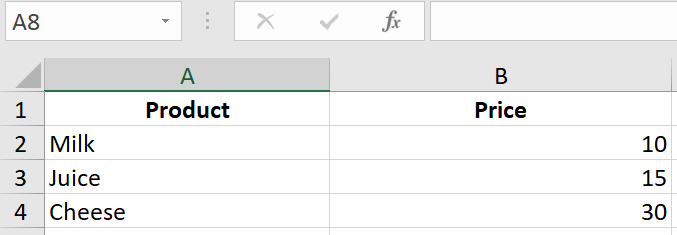
For an example of how to fill "Set a value", look at this table:
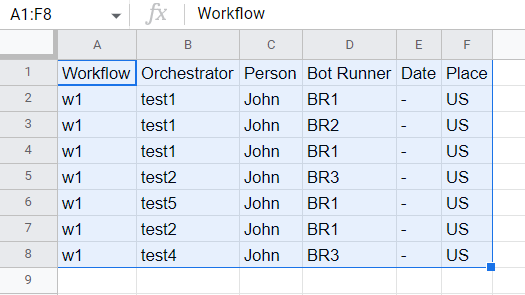
To cover this area, you must use A1:F8.
Sort by columns
- Set a value: allows you to manually specify the column indices by which you want to sort the range. For example, D,E.
- Calculate a value: lets you use a special formula or method to set the column indices.
- Save the previous step result: takes the column indices from the result of the previous step in the workflow.
Order by
Here you can choose the required option:
- Ascending
- Descending
Excel sheet name
- Set a value: allows you to manually specify the name of the sheet in which you want to perform actions.
- Calculate a value: allows you to use a special formula or a special method to determine the name of the Excel sheet.
- Save the previous step result: takes the Excel sheet name from the result of the previous step in the workflow.
Comment
Allows you to add explanatory text to the block. The text will be displayed inside the block on top of the activity name.
Duplicate Sheet
Description
This activity is used to create an exact copy of a worksheet in Excel. It allows you to duplicate an existing sheet within the same Excel file. This can be useful when you need to maintain a copy of a worksheet for backup, create templates, or make multiple versions of a sheet with similar data.
Parameters
Path
- Set a value: Enables you to directly specify the path to the Excel file containing the sheet you want to duplicate. Clicking the 'Pick' button allows you to manually choose the path.
- Calculate a value: Enables you to use available properties and methods to dynamically form the path.
- Save the previous step result: Chooses the result of the previous workflow action as the path.
Excel Sheet Name
- Set a value: Specify the name of the Excel sheet you want to duplicate. This is the sheet you want to create an exact copy of.
- Calculate a value: Enables you to use available properties and methods to dynamically form the sheet name.
- Save the previous step result: Chooses the result of the previous workflow action as the sheet name.

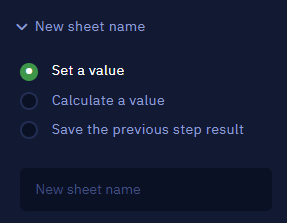
New Sheet Name
- Set a value: Enter the name for the new duplicated sheet. This will be the name of the copied sheet in the Excel file.
- Calculate a value: Enables you to use available properties and methods to dynamically form the new sheet name.
- Save the previous step result: Chooses the result of the previous workflow action as the new sheet name.
Comment
Contains an annotation of the activity: The input text will be displayed above the activity name.
NoteThe new sheet name should be unique within the Excel file to avoid conflicts with existing sheets.
Remove Sheet
Description
This activity is used to delete a worksheet from the Excel workbook. It allows you to remove a specific sheet from an Excel file when it is no longer needed. This can help you clean up your workbook and manage your worksheets more efficiently.
Parameters
Path
- Set a value: Enables you to directly specify the path to the Excel file from which you want to remove a sheet. Clicking the 'Pick' button allows you to manually choose the path.
- Calculate a value: Enables you to use available properties and methods to dynamically form the path.
- Save the previous step result: Chooses the result of the previous workflow action as the path.

Excel Sheet Name
- Set a value: Specify the name of the Excel sheet you want to remove. This is the sheet you intend to delete from the workbook.
- Calculate a value: Enables you to use available properties and methods to dynamically form the sheet name.
- Save the previous step result: Chooses the result of the previous workflow action as the sheet name.

Comment
Contains an annotation of the activity: The input text will be displayed above the activity name.
NotesBe cautious when using this activity, as the deleted sheet cannot be recovered.
Clear Range
Description
This activity is used to remove the contents from a specified range of cells within an Excel worksheet. It allows you to clear the data, including values, formulas, and formatting, from a specific range, leaving the cells empty.
Parameters
Path
- Set a value: Enables you to directly specify the path to the Excel file containing the worksheet from which you want to clear a range of cells. Clicking the 'Pick' button allows you to manually choose the path.
- Calculate a value: Enables you to use available properties and methods to dynamically form the path.
- Save the previous step result: Chooses the result of the previous workflow action as the path.

Range
- Set a value: Specify the range of cells you want to clear. You can define the range using Excel notation (e.g., "A1:B5").
- Calculate a value: Enables you to use available properties and methods to dynamically form the range.
- Save the previous step result: Chooses the result of the previous workflow action as the range.

Excel Sheet Name
- Set a value: Specify the name of the Excel sheet from which you want to clear the range of cells.
- Calculate a value: Enables you to use available properties and methods to dynamically form the sheet name.
- Save the previous step result: Chooses the result of the previous workflow action as the sheet name.

Comment
Contains an annotation of the activity: The input text will be displayed above the activity name.
Rename Sheet
Description
This activity is used to change the name of a worksheet within an Excel workbook. It allows you to rename an existing sheet to a new name of your choice, helping you organize and manage your Excel workbook effectively.
Parameters
Path
- Set a value: Enables you to directly specify the path to the Excel file containing the sheet you want to rename. Clicking the 'Pick' button allows you to manually choose the path.
- Calculate a value: Enables you to use available properties and methods to dynamically form the path.
- Save the previous step result: Chooses the result of the previous workflow action as the path.

Excel Sheet Name
- Set a value: Specify the current name of the Excel sheet that you want to rename.
- Calculate a value: Enables you to use available properties and methods to dynamically form the current sheet name.
- Save the previous step result: Chooses the result of the previous workflow action as the current sheet name.

New Name
- Set a value: Enter the new name you want to assign to the sheet. This will be the updated name of the sheet in the Excel workbook.
- Calculate a value: Enables you to use available properties and methods to dynamically form the new sheet name.
- Save the previous step result: Chooses the result of the previous workflow action as the new sheet name.
Comment
Contains an annotation of the activity: The input text will be displayed above the activity name.
NoteThe new name should be unique within the workbook to avoid conflicts with other sheet names.
Copy/Paste Range
Description
This activity is used to duplicate and transfer data between specified ranges in an Excel workbook. It allows you to copy data from one range and paste it into another, providing flexibility in managing and organizing data within Excel worksheets.
Parameters
Path
- Set a value: Enables you to directly specify the path to the Excel file containing the data you want to copy and paste. Clicking the 'Pick' button allows you to manually choose the path.
- Calculate a value: Enables you to use available properties and methods to dynamically form the path.
- Save the previous step result: Chooses the result of the previous workflow action as the path.

Range
- Set a value: Specify the source range from which you want to copy data. Define the range using Excel notation (e.g., "A1:B5").
- Calculate a value: Enables you to use available properties and methods to dynamically form the source range.
- Save the previous step result: Chooses the result of the previous workflow action as the source range.

Destination Range
- Set a value: Specify the target range where you want to paste the copied data.
- Calculate a value: Enables you to use available properties and methods to dynamically form the destination range.
- Save the previous step result: Chooses the result of the previous workflow action as the destination range.
- Set to new sheet: Create a new sheet in the same Excel file and paste the copied data into it.
- Save to another Excel file: Specify a different Excel file path where you want to save and paste the copied data.
Excel Sheet Name
- Set a value: Specify the name of the Excel sheet containing the source and destination ranges.
- Calculate a value: Enables you to use available properties and methods to dynamically form the sheet name.
- Save the previous step result: Chooses the result of the previous workflow action as the sheet name.
Get Dictionary Key
- Use Column Letters: Select this option if you want to use standard Excel column letters (e.g., "A," "B") to represent the columns in the data.
- Use Table Headers: Choose this option if your data contains custom headers that you want to use as column names.

Comment
Contains an annotation of the activity: The input text will be displayed above the activity name.
Format Cells
Description
This activity enables you to adjust the appearance and formatting of selected cells in an Excel worksheet, allowing you to customize various attributes such as font, fill color, row height, and column width.
Parameters
Path
- Set a value: Directly specify the path to the Excel file where you want to format cells. Clicking the 'Pick' button allows you to manually choose the path.
- Calculate a value: Utilize available properties and methods to dynamically form the path.
- Save the previous step result: Choose the result of the previous workflow action as the path.

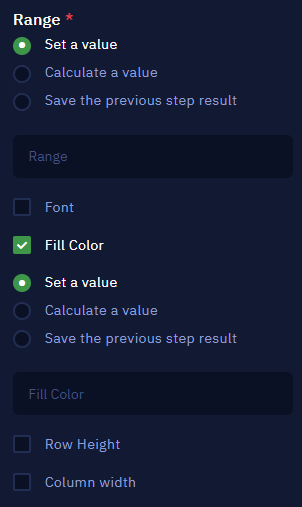
Range
- Set a value: Define the target cell range within the Excel sheet where you want to apply formatting. Use Excel notation to specify the range (e.g., "A1:B5").
- Calculate a value: Use available properties and methods to dynamically form the range.
- Save the previous step result: Select the result of the previous workflow action as the range.
Formatting Options
Font:
- Set a value: Customize the font attributes (e.g., font style) for the selected cells.
- Calculate a value: Dynamically generate font attributes based on your requirements.
- Save the previous step result: Use the result of a previous action to define font attributes.
Fill Color:
- Set a value: Choose a specific fill color to apply to the selected cells. The format of the entered value must be hexadecimal, e.g. #ff8080.
- Calculate a value: Calculate the fill color dynamically based on your needs.
- Save the previous step result: Utilize the result from a previous workflow action as the fill color.
Row Height:
- Set a value: Define the desired row height for the selected cells.
- Calculate a value: Calculate the row height dynamically using properties and methods.
- Save the previous step result: Choose the result of a previous action as the row height.
The value must be an integer for any of the 3 options
Column Width:
- Set a value: Specify the desired column width for the selected cells.
- Calculate a value: Calculate the column width dynamically using properties and methods.
- Save the previous step result: Select the result of a previous action as the column width.
The value must be an integer for any of the 3 options
Excel Sheet Name
- Set a value: Specify the name of the Excel sheet where you want to apply cell formatting.
- Calculate a value: Use available properties and methods to dynamically form the sheet name.
- Save the previous step result: Choose the result of the previous workflow action as the sheet name.

Get Dictionary Key
- Use Table Headers: Select this option if the Excel sheet's headers contain user-specified words to represent columns.
- Use Column Letters: Choose this option if you prefer to use standard Excel column letters (e.g., "A," "B") as column references.

Comment
Contains an annotation of the activity: The input text will be displayed above the activity name.
Get Cell Formula
Description
The "Get Cell Formula" activity allows you to retrieve the formula used in a specific cell within an Excel worksheet. This is particularly useful for extracting and analyzing the mathematical or logical formulas applied to your Excel data.
Parameters
Path
- Set a value: Directly specify the path to the Excel file containing the target cell with the formula. Clicking the 'Pick' button allows you to manually choose the path.
- Calculate a value: Utilize available properties and methods to dynamically form the path.
- Save the previous step result: Choose the result of the previous workflow action as the path.

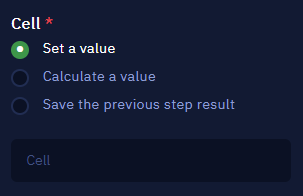
Cell
- Set a value: Specify the cell reference (e.g., "A1," "B2") from which you want to retrieve the formula.
- Calculate a value: Dynamically calculate the cell reference based on your requirements.
- Save the previous step result: Select the result of the previous workflow action as the cell reference.
Excel Sheet Name
- Set a value: Provide the name of the Excel sheet where the target cell with the formula is located.
- Calculate a value: Use available properties and methods to dynamically form the sheet name.
- Save the previous step result: Choose the result of the previous workflow action as the sheet name.
Get Dictionary Key
- Use Table Headers: Select this option if the Excel sheet's headers contain user-specified words to represent columns.
- Use Column Letters: Choose this option if you prefer to use standard Excel column letters (e.g., "A," "B") as column references.

Comment
Contains an annotation of the activity: The input text will be displayed above the activity name.
Locate Cell
Description
The "Locate Cell" activity is used to find the position of a particular cell containing a specific value within an Excel worksheet. This can be extremely helpful for locating and referencing specific data points in your Excel documents.
Parameters
Path
- Set a value: Directly specify the path to the Excel file where you want to locate the cell with the given value. Clicking the 'Pick' button allows you to manually choose the path.
- Calculate a value: Utilize available properties and methods to dynamically form the path.
- Save the previous step result: Choose the result of the previous workflow action as the path.

Value
- Set a value: Enter the specific value you want to locate within the Excel worksheet.
- Calculate a value: Dynamically calculate the value based on your requirements.
- Save the previous step result: Select the result of the previous workflow action as the value to locate.
Excel Sheet Name
- Set a value: Provide the name of the Excel sheet where you want to search for the specified value.
- Calculate a value: Use available properties and methods to dynamically form the sheet name.
- Save the previous step result: Choose the result of the previous workflow action as the sheet name.

Get Dictionary Key
- Use Table Headers: Select this option if the Excel sheet's headers contain user-specified words to represent columns.
- Use Column Letters: Choose this option if you prefer to use standard Excel column letters (e.g., "A," "B") as column references.
Comment
Contains an annotation of the activity: The input text will be displayed above the activity name.
Remove Duplicate Rows
Description
The "Remove Duplicate Rows" activity is used to efficiently eliminate duplicate rows from a dataset within an Excel workbook. This can help maintain data integrity and streamline data analysis by removing redundant information.
The "Remove Duplicate Rows" activity allows you to efficiently clean and deduplicate your dataset by eliminating rows with identical values in specified columns.
Optionally, you can choose to save the deduplicated data to a new sheet for further analysis or record-keeping.
Parameters
Path
- Set a value: Specify the path to the Excel file containing the dataset with duplicate rows.
- Calculate a value: Dynamically generate the path using available properties and methods.
- Save the previous step result: Utilize the result of the previous workflow action as the path.

Range
- Set a value: Define the specific range within the Excel sheet where you want to identify and remove duplicate rows.
- Calculate a value: Calculate the range dynamically based on your requirements.
- Save to New Sheet: Optionally, you can choose to save the deduplicated data to a new sheet. When selected, specify the name of the new sheet.
Excel Sheet Name
- Set a value: Enter the name of the Excel sheet where you want to remove duplicate rows.
- Calculate a value: Dynamically determine the sheet name using available properties and methods.
- Save the previous step result: Use the result of the previous workflow action as the sheet name.

Get Dictionary Key
- Use Table Headers: Select this option if the Excel sheet's headers contain user-specified words to represent columns.
- Use Column Letters: Choose this option if you prefer to use standard Excel column letters (e.g., "A," "B") as column references.

Comment
Contains an annotation of the activity: The input text will be displayed above the activity name.
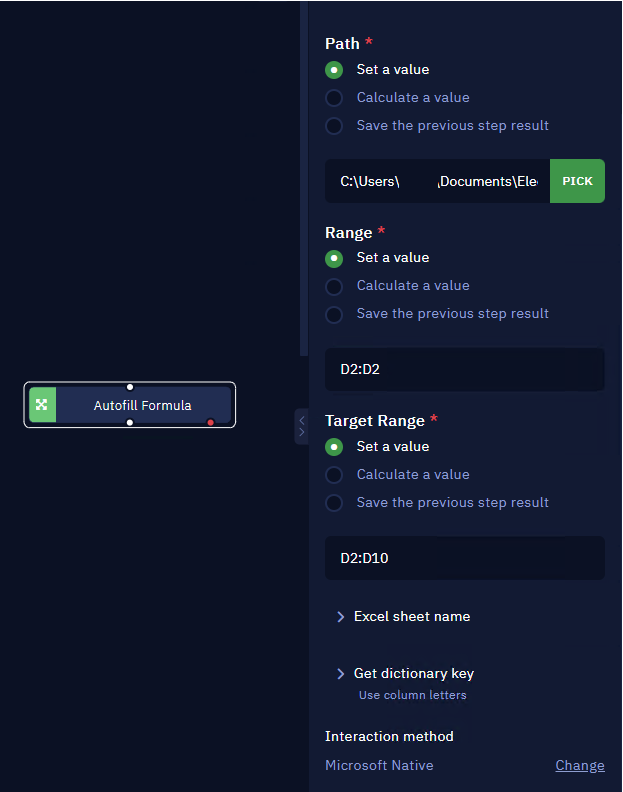
AutoFill formula
Description
Automatically extend a formula across a range of cells.
Parameters
Path
- Set a value: enables you to directly write the desired path. Clicking the 'Pick' button allows you to manually choose the path.
- Save the previous step result: chooses the previous activity result as a path.
- Calculate a value: enables you to use available properties and methods to form a path.
Range
Allows you to specify a start row or rows for reading.
- Set a value: enables you to directly write the desired number of the start row.
- Save the previous step result: chooses the previous activity result as a number of the start row.
- Calculate a value: enables you to use available properties and methods to form a number of the start row.
Target Range
Allows you to specify the range of rows where the formula read in the previous parameter will be auto-filled. This field must include the start of the read range.
- Set a value: enables you to directly write the desired number of the start row.
- Save the previous step result: chooses the previous activity result as a number of the start row.
- Calculate a value: enables you to use available properties and methods to form a number of the start row.
Excel sheet name
By default, the first sheet in an Excel file is used.
- Set a value: enables you to directly specify the sheet name, for example, Employees.
- Save the previous step result: chooses the previous activity result as the sheet name.
- Calculate a value: enables you to use available properties and methods to form the sheet name.
Get dictionary key
The default method is "Use table headers".
- Use table headers: select this option if the header contains of words specified by the user.
- Use column letters: select this option if the header contains of the standard 'Excel' column names: 'A', 'B', 'C' and so on.
Format Data Type Cells
Description
The "Format Data Type Cells" activity in ElectroNeek is used to define and set the data format for selected cells within an Excel worksheet. By specifying the data type category, you can control how the data is displayed and interpreted, ensuring accurate data representation.
Parameters
Path
- Set a value: Specify the path to the Excel file where you want to format data type cells.
- Calculate a value: Dynamically generate the path using available properties and methods.
- Save the previous step result: Utilize the result of the previous workflow action as the path.

Range
- Set a value: Define the specific range within the Excel sheet where you want to apply the data format.
- Calculate a value: Calculate the range dynamically based on your requirements.
- Save the previous step result: Utilize the result of the previous workflow action as the range, if applicable.

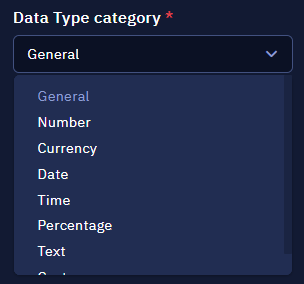
Data Type Category
Choose the appropriate data type category for the selected cells. Available options include:
- General
- Number
- Currency
- Date
- Time
- Percentage
- Text
- Custom (for defining a custom data format)
Excel Sheet Name
- Set a value: Enter the name of the Excel sheet where you want to format data type cells.
- Calculate a value: Dynamically determine the sheet name using available properties and methods.
- Save the previous step result: Use the result of the previous workflow action as the sheet name.

Get Dictionary Key
- Use Table Headers: Select this option if the Excel sheet's headers contain user-specified words to represent columns.
- Use Column Letters: Choose this option if you prefer to use standard Excel column letters (e.g., "A," "B") as column references.

Comment
Contains an annotation of the activity: The input text will be displayed above the activity name.