
MS Outlook
Studio Pro Activities > MS Office > MS Outlook. Includes "Read Emails" and "Send Email".
Activities
| Read Emails | Send email |
|---|---|
| Read emails received in the Outlook mail service | Send an email using the Outlook mail service |
Read Emails
Description
This activity allows you to read emails received in the Outlook mail service.
Read emails from folders and subfolders
With this activity, you can read emails from any folders and subfolders in your mail client. Typically, a mail client has a hierarchy of several folders, e.g:
- Inbox
- Inbox subfolder
- Sent
- Important
- Important subfolder
- Drafts
If you want to read emails from a certain folder, you have to specify its full name with a / character, for example, Inbox/{{Subfolder name}}.
Please note that in this case, you must specify the original name of the folder. If in your mail client the inbox is called "Inbox", you must write the name of the parent folder. For example, if the "Inbox" folder contains the "Work" folder, you must write the path to the folder in the "Mail folder name" parameter like this: Inbox/Work.
Parameters
Outlook account
- Set a value: this allows you to select your account from the drop-down list. Note that due to Outlook restrictions, this option in Studio Pro only displays accounts that were created when Outlook started. If you have opened Outlook and created any account - the mail client must be restarted for Studio Pro to get an updated list of accounts.
- Calculate a value: this allows you to use a special formula or a special method to determine the account.
- Save the previous step result: it takes the result of the activity from the previous workflow step as the email client account.
Date from
If there is no value for the “Date from” parameter, emails from the last 24 hours will be read.
- Set a value: allows you to explicitly specify the date from which the mail messages are to be read. If you click in the corresponding field, the calendar will pop up, in which you can manually select the desired date.
- Calculate a value: allows you to use a special formula or a special method to specify the date from which the messages are to be read.
- Save the previous step result: takes the result of the function from the previous workflow action as the date.
Filter by status
Unread only
Read the emails with the "Unread" status only.
Starred only
Read the emails marked as "Important" only.
Filter by content
Subject contains
Retrieve emails with a specific subject.
- Set a value: allows you to manually write a keyword for the subject of an email.
- Calculate a value: allows you to use a special formula or a special method to specify a keyword.
- Save the previous step result: takes the result of the action from the previous workflow step as the keyword.
Body contains
Retrieve emails that contain a certain value in the body (text) of the email.
- Set a value: allows you to manually set a keyword for the body of the letter.
- Save the previous step result: takes the result of the action from the previous workflow step as the keyword.
- Calculate a value: allows you to use a special formula or a special method to specify a keyword.
Sender
Retrieve emails that came from a specific sender.
- Set a value: allows you to manually specify the sender of an email.
- Calculate a value: allows you to use a special formula or a special method to specify the sender.
- Save result of previous step: takes the name of the sender from the result of the previous step in the workflow.
Attachments
Download attachments
Allows you to download the attachments from all read emails for a specified period.
Save duplicate with a new name
With this option, it is possible to save several files with the same name in the same folder. Thus, the second and subsequent files will not overwrite the first one, but will be saved under a new name - the date in unix format will be added before the name of the file itself.
Mail folder name
If you want to read emails from a subfolder, the path must be specified with |. For example, there is an "Inbox" folder with a subfolder called "Work". The path to the "Work" folder should be set in the following way: Inbox|Work.
- Set a value: allows you to specify explicitly the path to the folder from which you want to read the mail messages.
- Calculate a value: allows you to use a special formula or a special method for specifying a folder name.
- Save the previous step result: takes the folder name from the result of the previous step in the workflow.
When using Microsoft Outlook and Shared Mailbox you may have some issues when it comes to reading emails from subfolders. In order to make it work properly, first you need to disable the Cached Exchange Mode.
Here are the steps you need to follow to disable Cached Exchange Mode:
- In Outlook, go to File > Account Settings > Account Settings.
- Under the E-mail tab, double-click on your email to open the settings.
- Disable "Use Cached Exchange Mode to download email to an Outlook data file".
- Click Next and then Done.
Then restart Outlook to apply changes. You can also check the official Microsoft article here.
Emails Limit
This parameter only takes non-negative integers and allows you to limit the number of emails your bot should process. For example, if the “Emails Limit” is equal to five, then your bot will read only the first five emails.
- Set a value: allows you to manually set the number of emails your bot should process.
- Calculate a value: allows you to use a special formula or a special method to specify the number of emails your bot should process.
- Save the previous step result: takes the result of the action from the previous workflow step as the number of emails your bot should process.
Download original
If you select this checkbox, all downloaded messages will have the new {{keyword}} parameter — original. The original parameter contains a raw email body in the HTML format.
Move to folder
This option allows you to move the read emails to a certain folder in the mailbox.
- Set a value: allows you to manually set the name of the folder, where the emails will be moved.
- Calculate a value: allows you to use a special formula or a special method to specify the folder.
- Save the previous step result: takes the result of the action from the previous workflow step as the name of the folder.
Comment
This parameter allows you to create an annotation to the activity. The input text will be displayed above the activity name.
Result
By default, the read emails are stored in the variable email_messages. This variable is an array of objects, where each object corresponds to one email. The object contains the following keys and values:
[
  {
    "from": [
      {
        "name": "sender's name",
        "address": "sender's email address"
      }
    ],
    "date": "time when this email has been sent",
    "receivedDate": "time when this email has been received",
    "replyTo": [
      {
        "name": "name from the 'reply-to' section of this email",
        "address": "email address from the 'reply-to' section of this email"
      }
    ],
    "to": [
   {
    "name": "receiver's name",
    "address": "receiver's email address"
   }
   ],
    "subject": "this particular email's subject",
    "text": "this email's text processed with an html-parser",
    "textPlain": "this email's text returned by the server",
    "hasAttachment": "Whether the email has an attachment or not",
    "original": {
    "body": "A raw email body, if you have selected the Download original checkbox"
    }
    "cc": [
      {
        "address": "email addresses of secondary recipients",
        "name": "names of secondary recipients"
      }
    ],
    "bcc": [
      {
        "address": "email addresses of tertiary recipients",
        "name": "names of tertiary recipients"
      }
    ],
    "attachments": [
   {
    "path": "path to the first attachment"
   },
   {
    "path": "path to the second attachment"
   }
],
  }
]
It is important to note that some mail services do not return the bcc value. Therefore, in those cases, the bcc cannot be retrieved.
Send email
Description
This activity allows you to send an email using the Outlook mail service.
Parameters
Outlook account
- Set a value: allows you to select your account from the drop-down list. Note that due to Outlook restrictions, this option in Studio Pro only displays accounts that were created when Outloook started. If you have opened Outlook and created any account - the mail client must be restarted for Studio Pro to get an updated list of accounts.
- Calculate a value: allows you to use a special formula or a special method to determine the account.
- Save the previous step result: takes the result of the activity from the previous workflow step as the email client account.
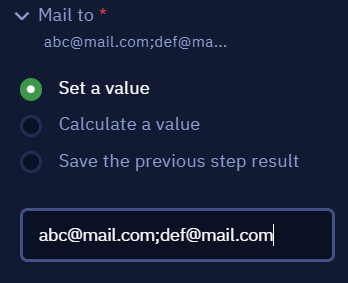
Mail to
- Set a value: enables you to directly write the email to receive a message.
- Save the previous step result: chooses the previous activity result as an email.
- Calculate a value: enables you to use available properties and methods to form an email.
If the 'Send copy to sender' option is selected, then the sender of the email message will be added to the blind copy.
Sending emails to multiple recipients
This activity allows you to send emails to several recipients at a time. To specify two or more email addresses as recipients, use “;” or “,” as a separator.
For example:
Mail CC
- Set a value: enables you to directly write the email which will be added as a copy email address to the message.
- Save the previous step result: chooses the previous activity result as an email.
- Calculate a value: enables you to use available properties and methods to form an email.
Mail BCC
- Set a value: enables you to type the email to be added as a Blind Carbon Copy to the message.
- Save the previous step result: chooses the previous activity result as an email.
- Calculate a value: enables you to use available properties and methods to form an email.
NoteAs of version 8.7, you can fill both parameters (Mail CC and Mail BCC) with multiple recipients by adding email addresses separated by
;or,.
Subject
- Set a value: enables you to directly provide an email subject text.
- Save the previous step result: chooses the previous activity result as a subject.
- Calculate a value: enables you to use available properties and methods to form a subject.
Mail body
- Set a value: enables you to directly write an email message text.
- Save the previous step result: chooses the previous activity result as a text to write.
- Calculate a value: enables you to use available properties and methods to form an email message text.
Attachment
- Set a value: enables you to directly write a path to the file that is to be attached. Clicking the 'Pick' button allows you to manually choose the path.
- Save the previous step result: chooses the previous activity result as a path.
- Calculate a value: enables you to use available properties and methods to form a path
If the "Add directory" checkbox is selected then all files from the specified directory will be sent as attachments. All the options above are applied to a folder path not to a file path.
To specify several files to be attached, use the following format of the path (in “Calculate a value” option):
["C:\\Users\\ElectroNeek\\Desktop\\attachment\\request.neek","C:\\Users\\ElectroNeek\\Desktop\\attachment\\main.neek"]Comment
This parameter allows you to create an annotation for the activity. The input text will be displayed above the activity name.