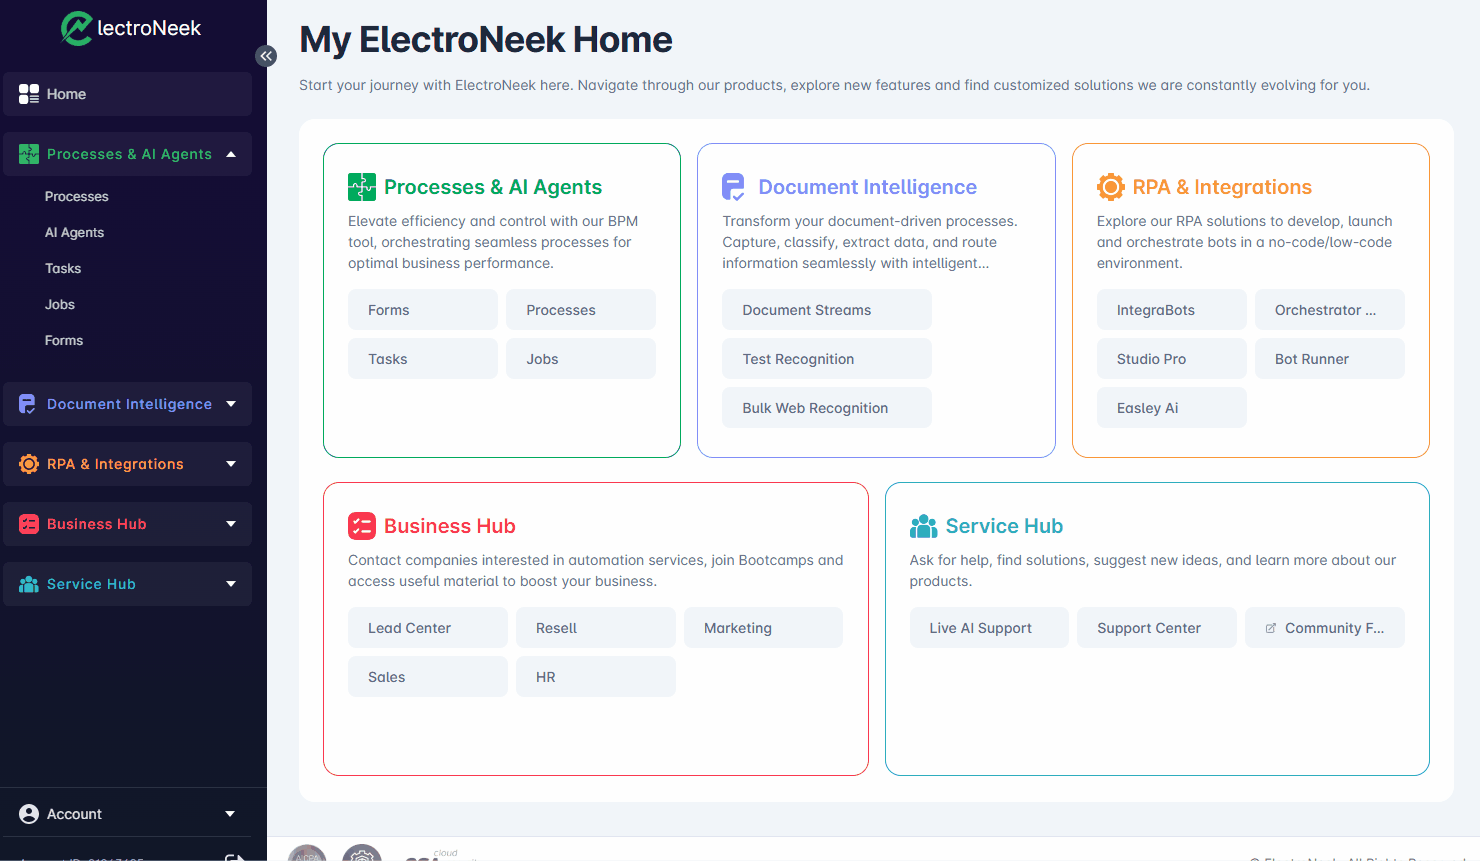
Processes
Overview
Build any workflow for your processes by simply adding Stages. By combining different Stages you can model your process and improve efficiency by delegating activities to AI Agents.
The easy-to-use Process Builder enables users to create managed processes without the complexity of mainstream BPM tools. Build a customized workflow for your operations by integrating multiple Stages of different types.
Your Processes will run after being triggered in one of various ways: manually by an authorized User, automatically after a Public Form is filled by an external user, or via a Webhook integrated into another Process, an RPA Bot, an IntegraBots flow, or any compatible third-party solution.
Begin by mapping out your existing processes using the designated sub-processes, tasks or, as we call them, Stages. Subsequently, determine the best possible "process actor" to perform this Stage: a Human (through a Form), an RPA Bot (for simple, repetitive, rules-based tasks), or an AI Agent (for analytical, content creation and complex decision-making tasks, among others.)
These "process actors", when combined in a Process, can work together and share data, to collaboratively carry out the full process in the most optimal way. You may think of AI Agents as the "brain" of your process, and the RPA Bots as the "muscles" -- AI Agents analyze, make decisions and generate content, and RPA Bots connect and integrate with Cloud and desktop-based apps.
The available Stages are:
- AI Agent
Automate tasks, from simple to complex, using context-aware, memory-enabled smart AI Agents. - Form
Use this stage for Humans. Build forms to request information, notify, or seek approvals. - RPA Bot
Automate tasks using pre-built Robotic Process Automation (RPA) bots, integrated via Orchestrator. - HTTP Call
Perform customizable HTTP requests from your Process, without the need of a local client. - Logic
Control the flow of the process by testing the value of a variable.
Getting Started
Who can create Processes?
Users with the Admin or Process Manager role in Processes & AI Agents are entitled to create or edit Processes.
How does data get passed between Stages of a Process?
All Processes have their own set of Process Variables. These variables are pieces of data stored in the memory of the Process, which may be used as input and output information for all Stages in that Process.
- In an AI Agent Stage, the Agent's response will be saved to a Process Variable. You may also include Process Variables in the Prompt.
- In a Form Stage, all fields of the Form create a Process Variable automatically, with the field's Name as the variable name, and its value reflecting the content of that field at the time of Form submission.
- In an RPA Bot Stage, you may optionally send Process Variables as Input values for the Bot and/or save Output variables from the Bot into Process Variables to be used in later Stages.
- In an HTTP Call Stage, the obtained HTTP response will be saved to a Process Variable. You may optionally use Process Variables to configure aspects of the HTTP request such as Headers, Query Params and Body.
- In a Logic Stage, the selected Process Variable will be evaluated to determine the outcome of the configured Cases.
When the Process is launched, and a new instance of the Process (called a Job) is created, each Job will have its Process Variables reflected as Job Variables, with their values corresponding to the Job's specific context.
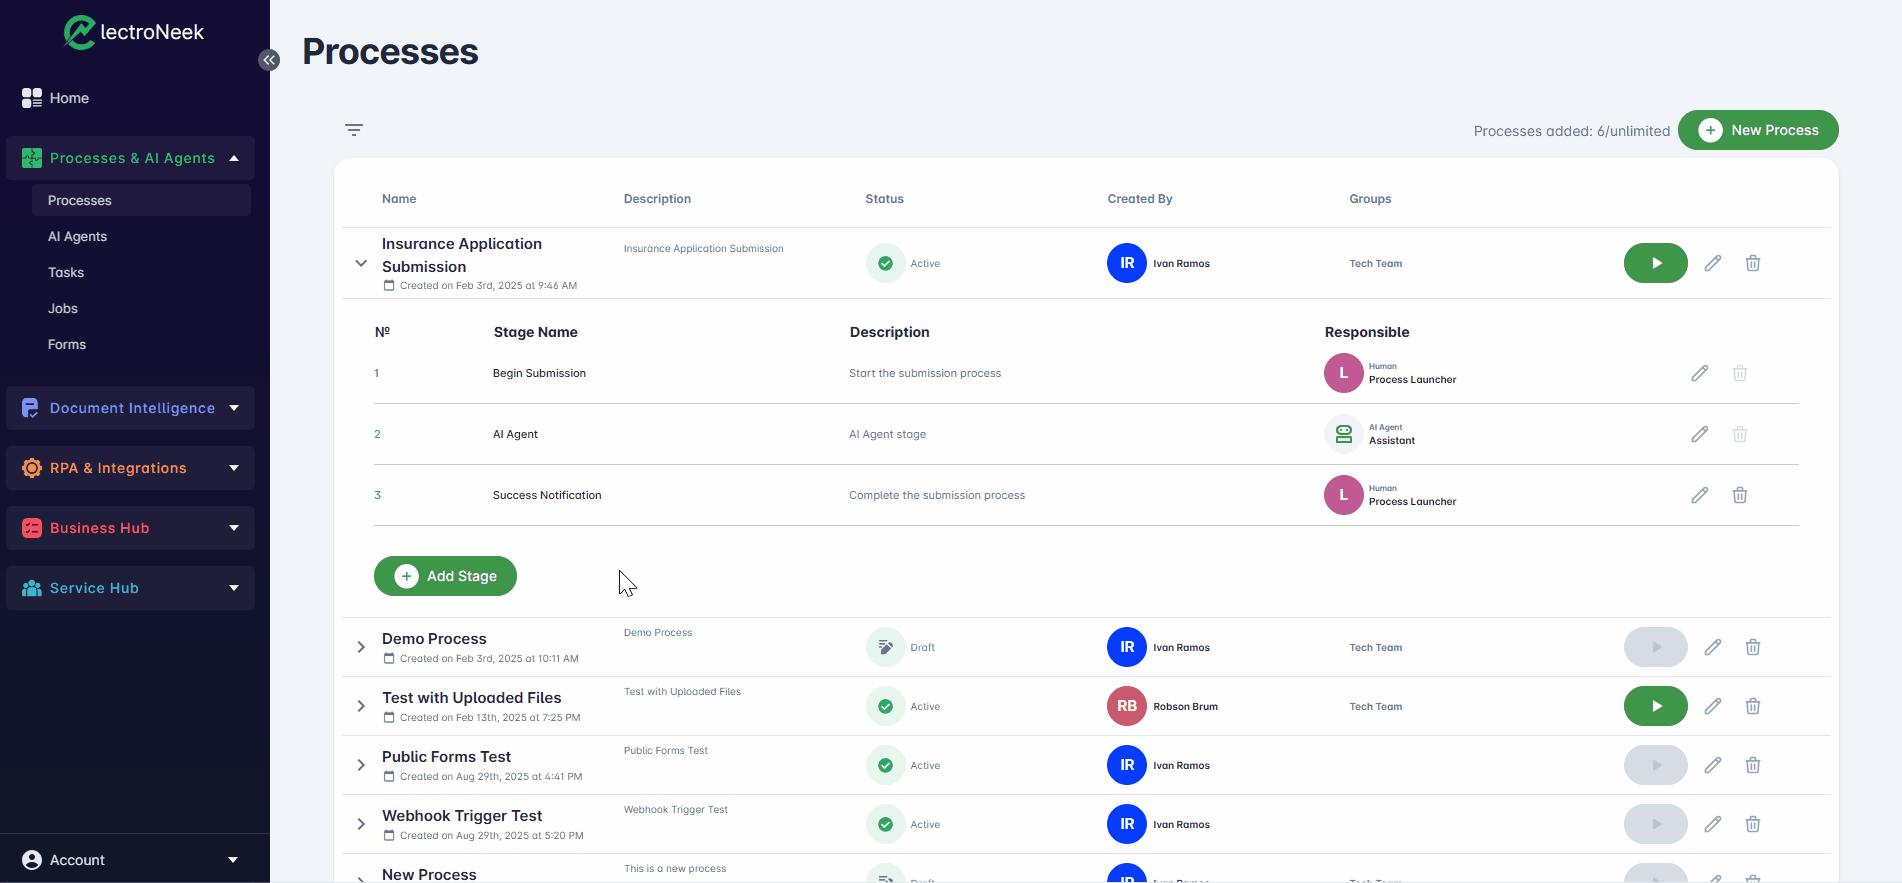
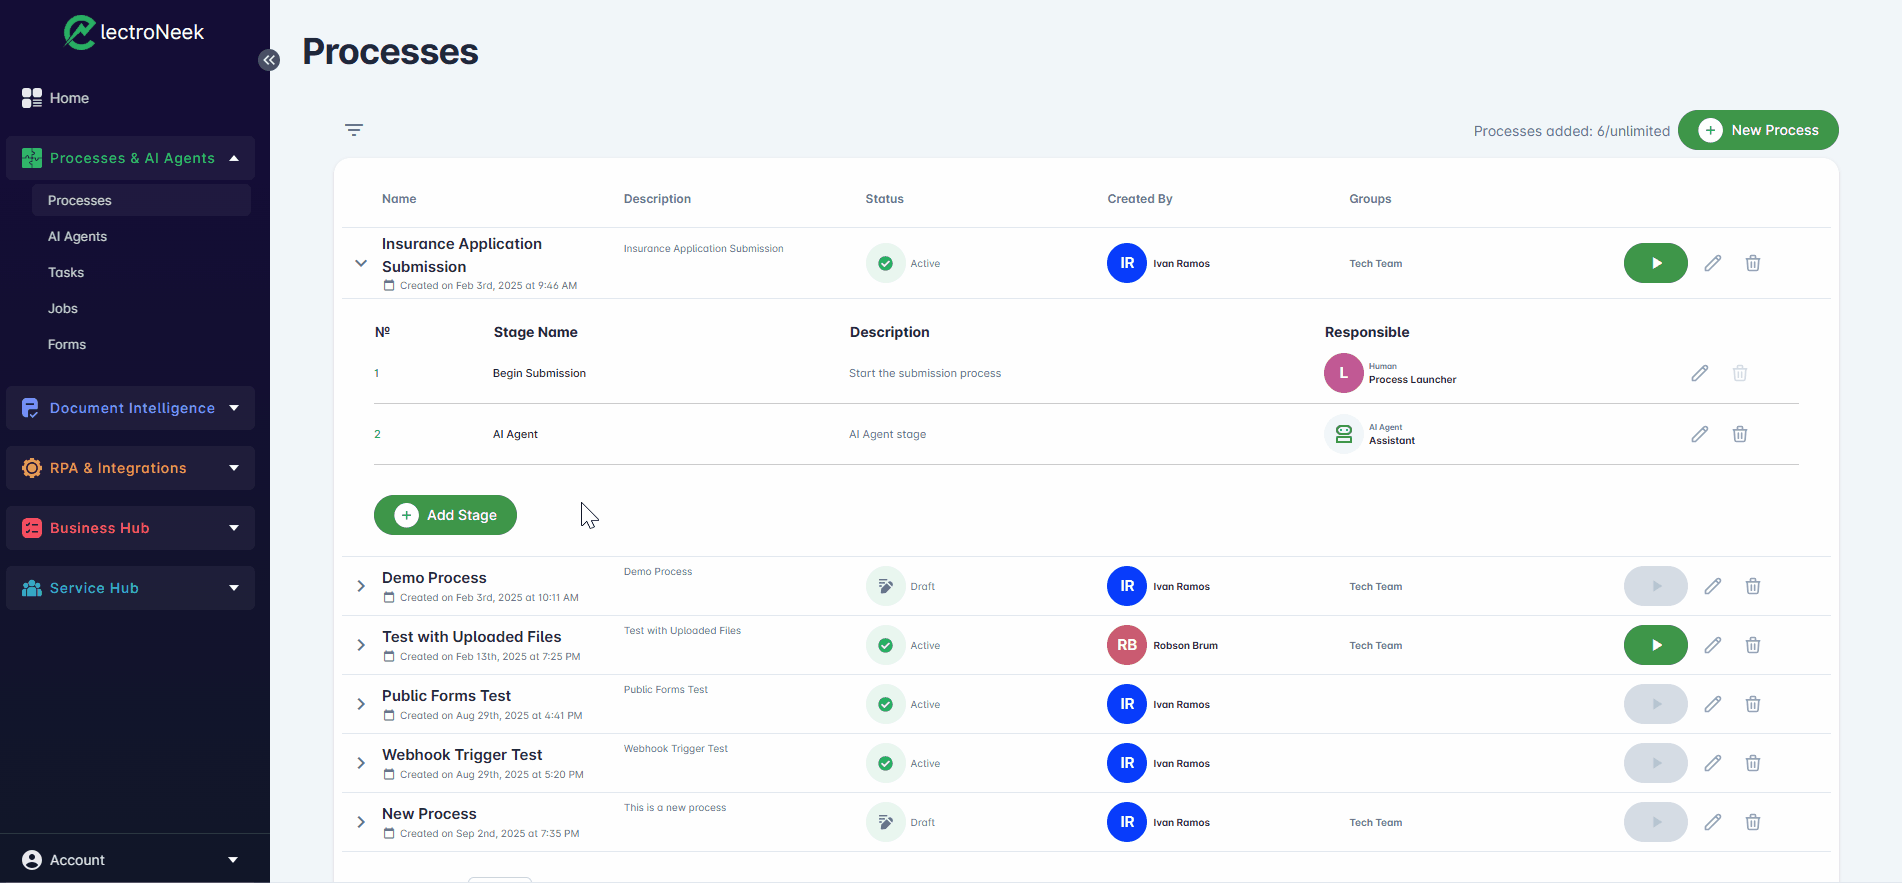
Create a New Process
- To create a Process, go to the Process section in Processes & AI Agents and click the “New Process” button.
- Provide a Name, a Description and specify which group (Security Group) is allowed to see and execute the Process.
- Set up the Trigger. It will be Manual by default.
- Leave the status in Draft until the Process is completed.
- Click “Save”.
- Start adding stages. Expand the newly created process and click “Add Stage”. There is no limit on the number of stages that can be added to a process.
Triggers
Starting on the September 2025 Platform Update, all Processes have a Trigger. This Trigger determines the method through which the Process will be launched. There are currently three types of supported Triggers: Manual, Form and Webhook.
All processes created before the September 2025 Platform Update will have their Trigger set to Manual by default.
Manual Trigger
This is the default trigger type.
All Processes created with the Manual trigger can only be launched manually by authorized Users, by clicking the "play" button.
Form Trigger
This option allows you to trigger a Process by launching the selected Public Form. Every time that the selected Form is submitted from its Public Link (as long as the Public Link is active), a new Job will be created for that Process, with the Form's fields included in the Job Variables from the start.
You may only select one Public Form to trigger a Process. However, you may use the same Public Form as trigger in multiple Processes.
Usage Examples
- Create a Form and set its "Public Link" to the "on" position, then copy its URL.
- Share the Public Link with any user (internal or external), which will allow them to fill out the Form.
- Once the Public Form is submitted, the Process will be triggered, and a new Job will be created.
- The first Task of the new Job will represent the Public Form, and will be completed automatically after a few seconds. The Job will then proceed with the next Stage.
Webhook Trigger
This option allows you to trigger a Process by using a Webhook. When you create a Process with this trigger type, a unique Webhook URL will be created for that Process.
You may then use that Webhook URL to trigger the Process, in two different ways:
- Using the Webhook URL on a web browser
- Using an HTTP Request
Trigger a Process with a Webhook on a Web Browser
You can use the Webhook URL on a web browser such as Chrome or Edge. This method is similar to the one used to trigger workflows in Orchestrator.
Launching the Webhook URL of a Process will trigger that Process immediately, creating a new Job. The ID of that Job will be shown in the browser. This option allows you to set up easy ways to remotely trigger the process, such as Chrome bookmarks or desktop shortcuts.
Usage Example
- Create a Process with Trigger type "Webhook"
- Once the Process is set up and in "Active" state, copy its Webhook URL.
- Open a new tab in your web browser, paste the Webhook URL, and press the Enter key.
- The Process will be triggered, a new Job will be created, and you will see a message such as this one:
{ "success": true, "message": "Webhook processed successfully", "processJobId": "...", "timestamp": "..." }When you trigger a Process with this method, a new Variable will be added to the Job, called "method", with a value of "GET". This may be used within the Process to determine the launching method.
Trigger a Process with an HTTP Request
You can set up a HTTP Request (POST) to trigger the Process from any compatible software, including third-party apps, API tools such as Postman, and from ElectroNeek tools that enable HTTP Requests, including Studio Pro, IntegraBots and even other Processes.
This option allows for passing Input Variables to the Process. These variables will be available in each Job launched from the Process from the very first step.
In order to add Input Variables for your Process, you must set up a JSON object in your HTTP Request's body, with a key called "variables". This key will also contain a JSON object within it, in which you will be able to define as many values as you want -- the key to each value will be the Input Variable Name.
Here's an example:
{
  "variables": {
    "user_name": "John Smith",
    "user_id": 52314,
    "user_access": {
      "level": 3,
      "role": "Manager"
		}
  }
}
In this example, once the Process is triggered with this payload, the newly created Job will start with these 3 Job Variables filled out: "user_name", "user_id" and "user_access". Of course, other Job Variables generated by the Stages of the Process will be present as well, but they will start off empty, and will be filled by the corresponding Tasks.
Usage Examples
The following are examples of how to trigger a Process through its Webhook by the use of an HTTP Request, using some of the most common methods:
ElectroNeek RPA Bot (Studio Pro)
- Create a new workflow in Studio Pro.
- Add an HTTP Request activity block (from the Programming > API section)
- In the "URL" parameter, paste the Webhook URL.
- Set the "Method" to "POST".
- Set up the Input Variables in the "Body parameters" parameter, with the format described above.
- Launch the workflow. The "HTTP Request" block will trigger the Process, and create a new Job with the specified Input Variables.
IntegraBots flow
- Create a new flow in IntegraBots. Set up any Trigger you wish.
- Add an "HTTP" Step with the "Send HTTP request" Action.
- Set the "Method" to "POST".
- Paste the Webhokk URL into the "URL" field.
- Set up the Input Variables in the "Body" field, with the format described above.
- Test, publish and launch the flow. The "Send HTTP request" action will trigger the Process, and create a new Job with the specified Input Variables.
ElectroNeek Process
- Create a new Process in the "Processes" page of the Processes & AI Agents module.
- Add a new Stage to the Process, with Stage Type "HTTP Call".
- Paste the Webhook URL into the "URL" field.
- Set the "Method" to "POST".
- Set up the Input Variables in the "Body" field, with the format described above.
- Set up the "Output Variable Name" and Save the Stage.
- Launch the new Process. In the newly created Job, when the "HTTP Call" stage is reached, the original Process (for which the Webhook was created) will be triggered, and a new Job for it will be created with the specified Input Variables.
Postman
- Open Postman, and create a new Request.
- Set the HTTP Method to "POST".
- Paste the Webhook URL into the "Enter URL or paste text" field.
- Navigate to the "Body" tab, and select the "raw" option. In the type selector to the right, change it from "Text" to "JSON".
- Set up the Input Variables in the box below, with the format described above.
- Launch the HTTP Request by clicking the "Send" button. You will see a Response Body that looks like the one below, and the Process will be triggered, creating a new Job with the specified Input Variables.
Response Body Example:
{
  "success": true,
  "message": "Webhook processed successfully",
  "processJobId": "...",
  "timestamp": "..."
}
Command Line (cURL)
- Open a Command Prompt in Windows, or any other terminal tool you wish.
- Set up a cURL command as such:
curl -X POST [Webhook URL] -H "Content-Type: application/json" -d '[JSON object with Input Variables]'- Submit the command. The Process will be triggered, and a new Job will be created with the specified Input Variables.
Stages
AI Agent Stage
Adding an AI Agent to a Process means you can connect it to other actors involved in your Process, including RPA Bots, Humans and other AI Agents.
In order to add an AI Agent Stage to your Process, you must follow these steps:
- Navigate to the Processes section of the Processes & AI Agents module of the Portal.
- Create a new Process, or edit an existing one.
- Click on the "Add Stage" button.
- Select the Stage Type = AI Agent.
- Enter an appropriate Stage Name and Description.
- Select the AI Agent that will be integrated into the Process using the "Select an AI Agent" dropdown.
- If you need the current AI Agent Stage to continue the thread of a previous AI Agent Stage, you may check the "Continue conversation on thread" option and select the previous AI Agent Stage's corresponding Thread Variable. If you don't follow an existing Thread, your AI Agent Stage will create a new one. This step is optional.
- Enter the Prompt for this interaction with the AI Agent. You may enter both static text as well as dynamic values in the form of Process Variables. You may add these Variables by clicking on the "Variables" button or typing their names in the following format:
##variableName## - If you wish to add additional rules, limits or restrictions to the current prompt, you may do so in the Guardrail Text field. This step is optional.
- Provide a Output Variable name for the Process Variable that will store the AI Agent's response. This field is optional; if you don't provide a name yourself, the Variable will be given an automatic name.
- Optionally, you may set a timeout for this stage. However, consider that AI Agents deliver their responses in a matter of seconds, so timeouts will likely not be needed.
- Click the "Save Stage" button to add the new Stage to the Process.
Form Stage
Use this stage for Humans. Build forms to request information, notify, or seek approvals.
Configure a Form Stage as follows:
- Use the Form Builder to create a Form for this stage.
- Add a new Stage to the Process.
- Provide an appropriate Stage Name and Description.
- Select Stage Type = Form.
- Select the Form you created from the "Select a Form" dropdown list.
- If the Process has Trigger Type "Manual", set a Responsible User for this stage. The form can be assigned to the Process Launcher (the User who manually launched the Process by clicking the button), or to an Assignee, which may be any User with access to the Tasks section of the Processes & AI Agents module.
If the Trigger Type is either "Form" or "Webhook", the Process Creator (the User who first created the Process) will be the one assigned to Forms which have the "Process Launcher" option selected. They Process Creator will also show up as the Job owner when the Process is triggered.
RPA Bot Stage
Automate any process by using pre-built AI Automation bots.
Configure an RPA bot Stage as follows:
- Build an RPA workflow with ElectroNeek Studio Pro and publish it to the Orchestrator.
- Add a new Stage to your Process.
- Provide an appropriate Stage Name and Description.
- Select Stage Type = RPA Bot.
- Select the Orchestrator where the Workflow was published.
- Select the Workflow.
- Select the Bot Runner that will be used to execute the bot.
- If you need to add Manual Variables, open the “Data” tab and provide them one by one. All other Process Variables, including those coming from Webhooks and Public Forms, will be sent as input variables to the Bot automatically.
- Specify the name of the Output Variables the RPA Bot will return after the execution. You just need to declare the names of the variables as they were named in the RPA bot.
- These output variables can then be used in other Stages of the Process.
Example of how to send data to an RPA bot
In the RPA Bot Stages of your Processes, the workflows will receive all of the Process Variables into the "webhook_data" variable. This variable is available by default in all RPA workflows, despite not being defined specifically in Studio Pro by the developers.
The "webhook_data" variable will be a dictionary where each key contains the name of a Process Variable, and its value is the corresponding variable's value. This also applies to all incoming values tied to the selected Trigger Type: Form or Webhook.
When a Job runs an RPA Bot Stage, all of the Job Variables are passed to the selected RPA Workflow as input variables automatically.
Send data to an RPA Bot from a Public Form
The following is an example of passing values to an RPA Bot with a Public Form:
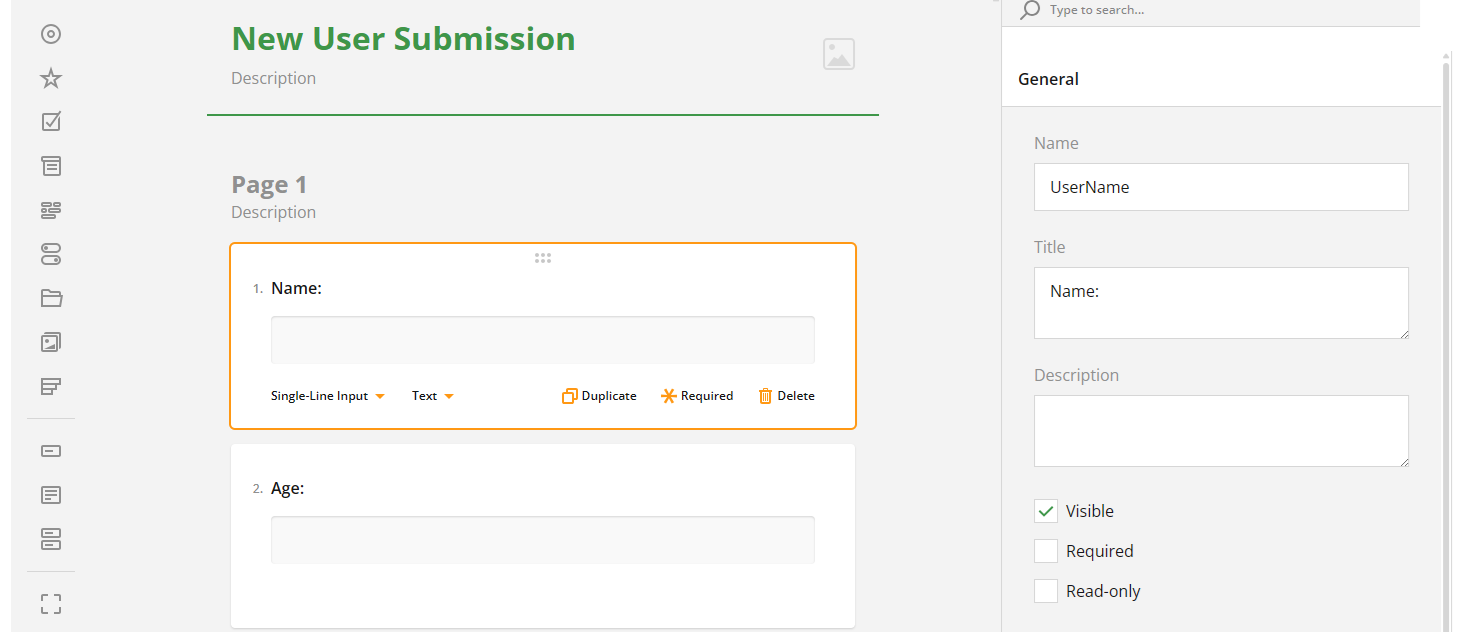
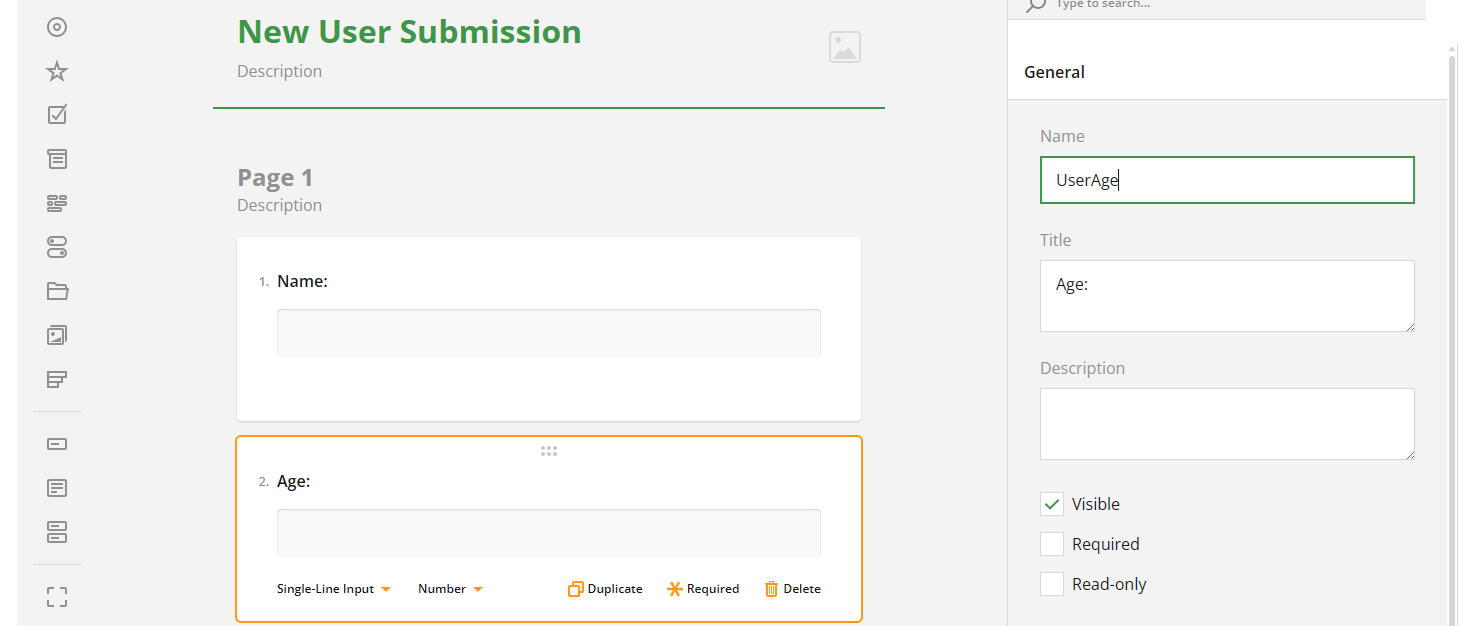
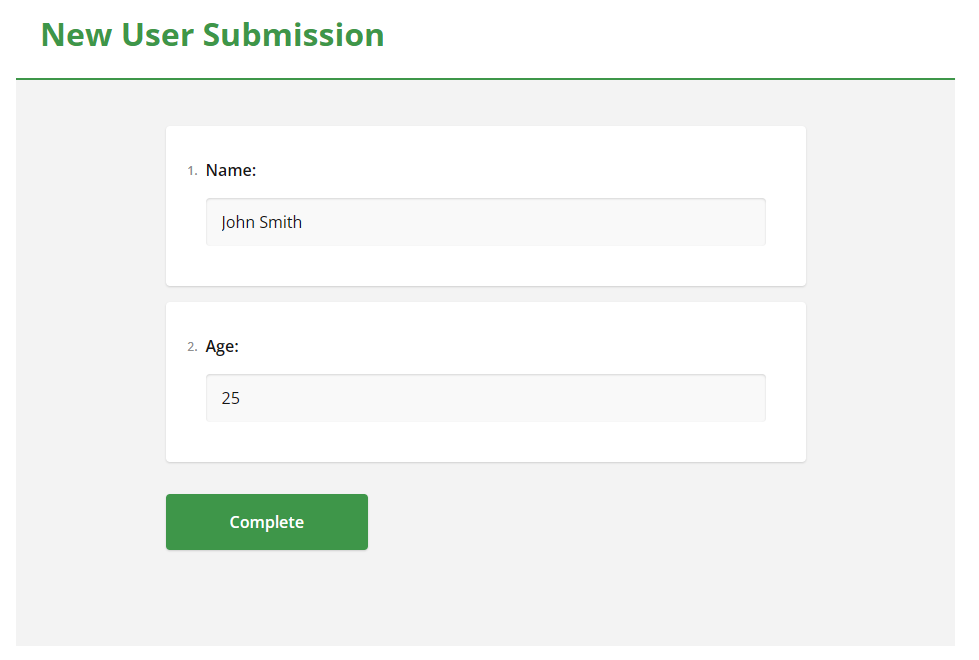
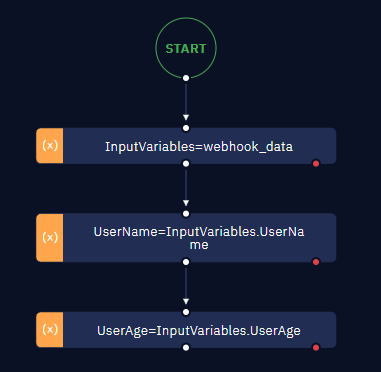
The "Name" field is called UserName, and the "Age" field is called UserAge. So these will be received as is by the RPA Bot in the "webhook_data" internal variable as a dictionary. For this case, it would be:
{
  "UserName": "John Smith",
  "UserAge": 25
}
Note that the variables are passed in the type that they are received in. Since the Form's "Name" field is set to Text, its value is a String. And in the case of the "Age" field, it's a Number -- so its value is Numeric.
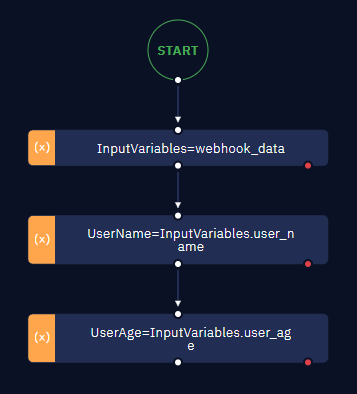
Send data to an RPA bot from a Webhook trigger
The following example shows how to pass values from a Webhook trigger to an RPA Bot:
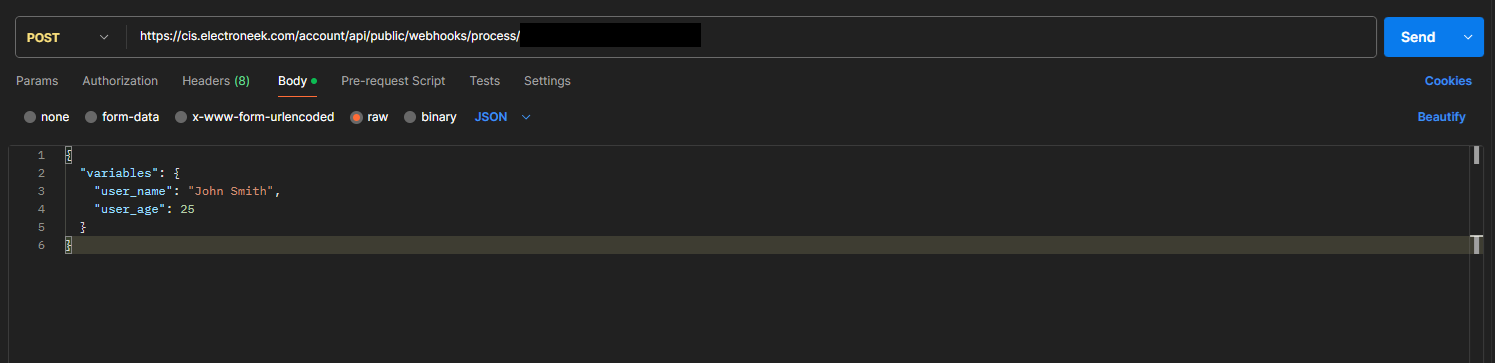
In this case the variables are called "user_name" and "user_age". This is how the RPA Bot will receive them:
{
  "user_name": "John Smith",
	"user_age": 25
}
Example of how to receive data from an RPA bot
In an RPA Bot Stage, you may also set Output Variables, values that are generated by the RPA Workflow and that you wish to use in the following Stages of your Process.
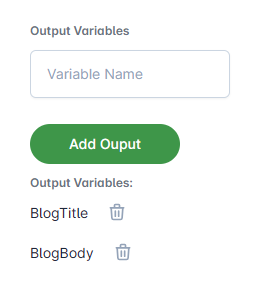
In this example, we have configured two Output Variables that the stage expects to receive from the selected RPA Bot:
In Studio Pro, we'll configure those variables within the RPA Workflow as follows:
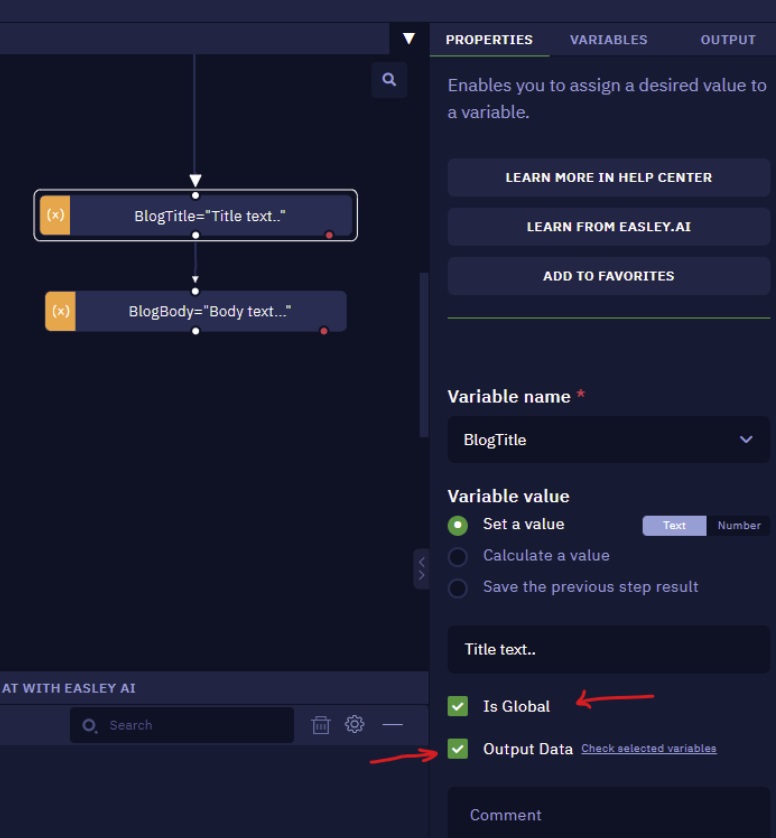
Be sure to select the options Is Global and Output Data in the Assign value to variable blocks
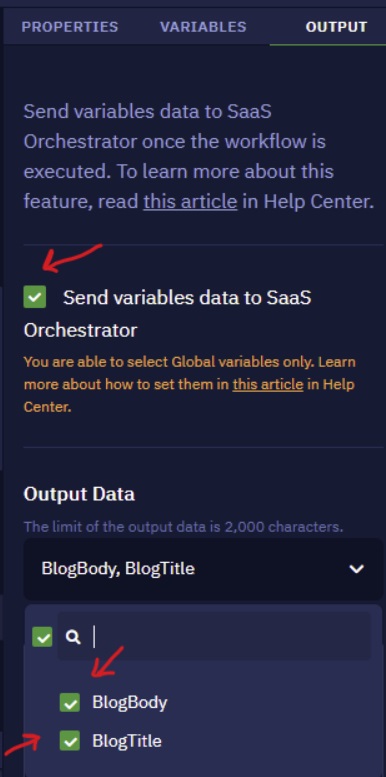
In the “Output” tab of Studio Pro, enable the "Send variables data to SaaS Orchestrator" option, and then mark the desired Output Variables, as shown below:
HTTP Call Stage
Perform HTTP requests from within your Process.
Configure an HTTP Call Stage as follows:
- Add a new Stage to the Process.
- Provide an appropriate Stage Name and a Description.
- Select Stage Type = HTTP Call.
- Enter the URL of the endpoint you want to interact with. This field is required.
- Select the HTTP Method you want to use. Available methods are: GET, POST, PUT, DELETE, PATCH. This field is required.
- Optionally, you may set up the Headers of the HTTP call. You may add as many Headers as you need. You can add a new Header by following these steps:
- Click the "Add" button next to "Headers".
- Assign a Key to the Header. You may type it manually, or select from a dropdown list of common Header Keys, such as "Authorization" and "Content-Type".
- Enter a Value for the Header. You may enter it manually, or link it to a Process Variable by clicking the "Link to a process variable" button and selecting it from the list, or by simply typing its name between double "#" symbols (eg. ##apiToken##).
- Optionally, set up Query Parameters for your HTTP call. You may add as many as you need. You can add a new Query Parameter by following these steps:
- Click the "Add" button next to "Query Params".
- Assign a Key to the parameter by typing it manually.
- Enter a Value for the parameter. You may enter it manually, or link it to a Process Variable by clicking the "Link to a process variable" button and selecting it from the list, or by simply typing its name between double "#" symbols (eg. ##userID##)
- Set up the Body of the HTTP call, in JSON format. You may include Process Variables by entering their names between double "#" symbols (eg. ##invoiceNumber##)
- Enter an Output Variable Name to determine the name of the Process Variable that will hold the HTTP response obtained when the HTTP call is performed.
- Optionally, you may set a timeout for this stage. However, consider that HTTP requests may take shorter or longer times depending on multiple factors.
- Click the "Save Stage" button to add the new Stage to the Process.
Logic Stage
Control the flow of the process by testing the value of a variable.
Configure a Logic Stage as follows:
- Add a new Stage to the Process.
- Provide an appropriate Stage Name and a Description.
- Select Stage Type = Logic.
- Select the Variable that will be tested. There are two options:
- Process Variable: Use this option if you wish to evaluate a Variable generated by any of the Stages that have been added to the Process. Simply select the desired Variable from the dropdown list.
- Manual: Use this option if you wish to evaluate a Variable that is not generated by any of the Stages of the Process, such as Webhook input variables or Variables from Public Forms. Type the name of the Variable in the box below.
- Set up new Cases by defining their Value (what the Variable value must be equal to in order for the Case to be executed) and its corresponding Action. Actions include:
- Go to next stage
- Jump to specific stage
- Mark process as Success
- Fail the process.
- After adding all your Cases, you may set up a Default Case. This is the Case that will execute if none of the other Cases that you defined occur.