
Strings
Studio Pro Activities > Programming > Strings. Includes "Text found?" and "Extract text".
Activities
| Text found? | Extract text |
|---|---|
| Searches through a text and check if it contains a string | Extract portions of text placed between the specified words |
Text found?
Description
This activity searches through a text and checks if it contains a string. If the initial text contains a string, then the 'Yes' branch will be executed. Else the 'No' branch will be executed.
Parameters
Input text
- Set a value: set an input text to search inside of it.
- Save the previous step result: chooses the previous activity result as a text.
- Calculate a value: use JS to form a text.
Text to check
- Set a value: set a string to look for.
- Save the previous step result: chooses the previous activity result as a string.
- Calculate a value: use JS to form a string.
Case sensitive check
Check this checkbox if you need to perform a case sensitive search. In this checkbox is checked, and you look for ElectroNeek, but the initial text contains only electroneek, the 'No' branch will be executed.
Usage example
This activity is useful if you need to check for some keywords in a text. For example, after you've recognized a document you can check if there an invoice keyword in it. If the document contains this keyword, then you can classify it as an invoice.
Extract text
Description
This activity is used for extracting portions of text placed between the specified words.
In general, its usage looks like this:
- Set the input text. For example, we have the following text:
My name is John, my surname is Snow and I am 25 years old. - Specify the keyword(s) that start extraction or start extraction from the very beginning. We can set the word
Johnas a starting point. - Specify the keyword(s) that end extraction or extract the remaining text until the end. We can set the word
Snowas an end point. - The text portion will be extracted according to the setup parameters. All the text between words
JohnandSnowwill be extracted not including these words themselves. We will get the following text: , mysurnameis. - Use the output text portion in other activities (for example, you can display it using ‘User notification’).
Parameters
Now we will describe its parameters. We will use this sentence as a more detailed example:
Lorem ipsum dolor sit amet, consectetur adipiscing elit, sed do eiusmod tempor incididunt ut labore et dolore magna aliqua.
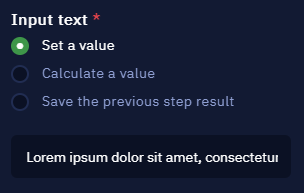
The first parameter here is Input text. It lets you set the text to extract a string from. It is required.
Input text parameter section
The options here are the following:
- Set a value is used to set an input text to search inside of it as a string.
- Calculate a value is used to form a text with JS methods.
- Save the previous step result is used to pick the previous activity result as an input text.
Next we can see the Extraction parameters section. It is divided into After and Before.
After lets you set the starting point for extraction. Here we use amet as a keyword. This means that extraction will start after this keyword. The keyword itself is not included into the output.
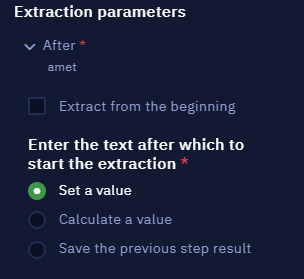
Here we can set the After parameter
If the Extract from the very beginning checkbox is active, the keyword input line will be hidden. In this case it is not required to set a specific keyword.
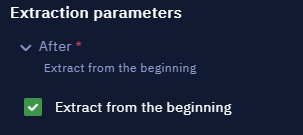
Extract from the very beginning checkbox
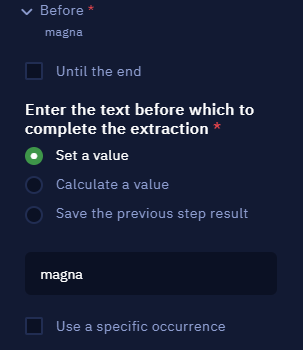
Now that we have defined the starting point, we need to define the end point for extraction. This is set in Before.
In this case magna is used as a keyword. This means that extraction will stop once this word is reached. The word itself is not included into the output.
Setting the Before parameter
If the Until the end checkbox is active, the keyword input line will be hidden. In this case it is not required to set a specific keyword.

Until the end checkbox
Use a specific occurrence is one more important option that is present both in After and Before. It is useful when there are a few same words in the input text. It lets you specify which one of them is taken into account here (the first one, the second one etc.).
Let us slightly modify our Before parameter to illustrate this. We can see that in our example text there are two dolor words: one of them is close to the beginning and one of them is close to the end of the input text.
The algorithm iterates the words in the input text by order. If we try to extract the text using "amet" as in the example above (After), the algorithm will stumble upon the first dolor word (which we set as Before keyword) earlier than it finds the After keyword (amet). This will lead to an exception.
That is why we set Use a specific occurrence for this keyword to 2. This means that only the second dolor word will be taken into account here.
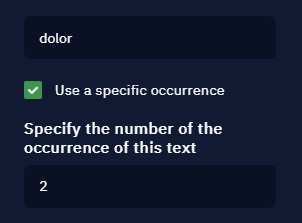
Here we specify that we only need the second word
And this is how the output looks. We extracted the portion of text between "amet" and the second dolor words and displayed it using the ‘User notification’ activity.
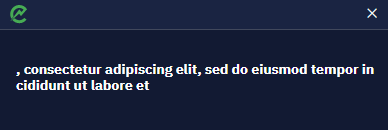
Output of the extracted text