
How-tos: Studio Pro Starter Kit
Building and running your first bot
In this article, we are going to build the first bot that produces some actual results. This example will help you try Studio Pro in action.
Our goal here is to create a bot that shows a simple notification with ‘Hello, World!’ text. In this example, we are going to use the User notification activity located in Human in the loop section.
Now let us start diving into RPA development!
- Launch Studio Pro. You will see this window.
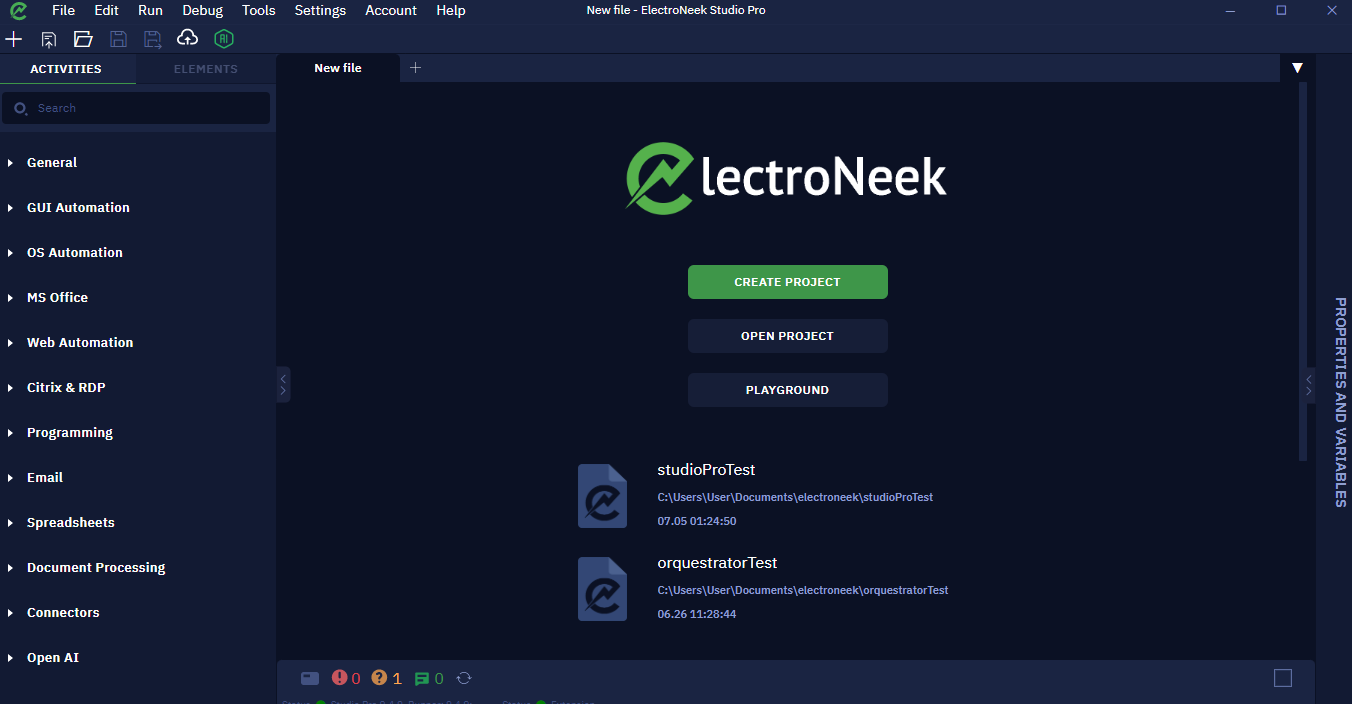
- Click on "Create project" to create your first bot. For more information, please refer to this article.
- Complete the following information:
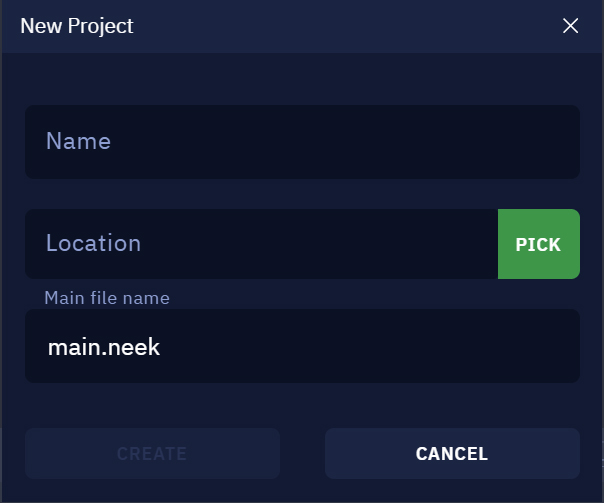
- Name: the name of your project, you can choose any name.
- Location: the location of the new project on your computer.
- Main file name: the name of your main file in the .neek format.
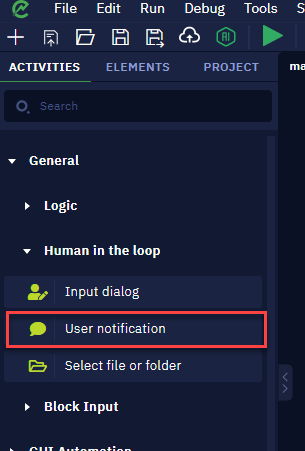
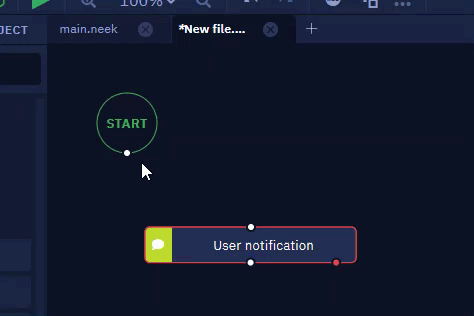
- In the left tab, you can see a list of all the available activities. Go to General > Human in the loop > User notification.
- Drag and drop this activity onto the canvas or double click it. It should automatically connect to the START block. It should look like this:
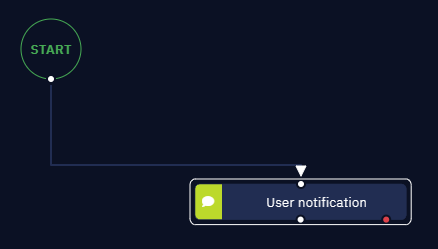
If the activity did not connect to it automatically, place your cursor at the small white circle on the START block. Your cursor will turn into a cross icon. Hold your left mouse button and drag the appeared button onto the activity block.
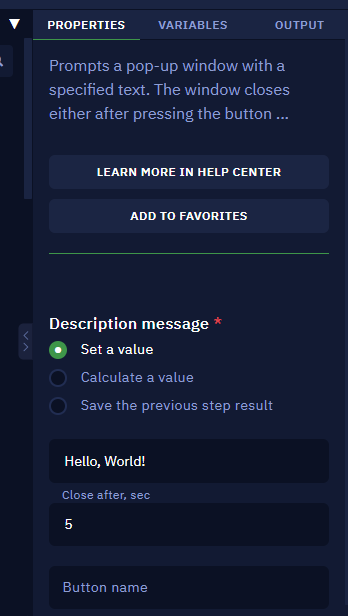
- Doble click the User notification block. You will see the Properties tab in the right. Type
Hello, world!text in the Description message field. This is the message that will be displayed in the notification. Also, let us set Close after, sec to 5. This means that the notification will be shown for five seconds. Other parameters can be left untouched in this case.
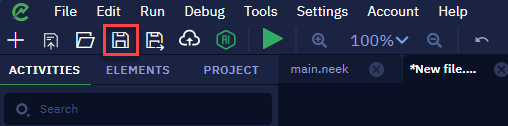
- Press "Save" in the toolbar.
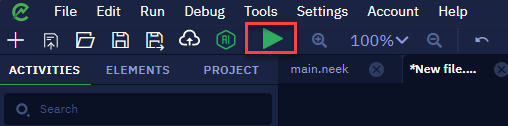
- Your bot is ready now! Launch it by clicking the Play button in the toolbar or by pressing the F5 key.
- Studio Pro will be minimized and in a few seconds you should see the following result:
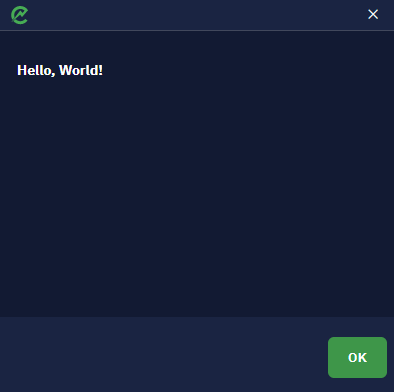
This is it, you have just created your first bot! This simple example only shows the most basic capabilities of the platform. Be sure to check other articles in our "Studio Pro Activities" section to find detailed explanations of what can be achieved with them!
Studio Pro Hotkeys
Hotkeys are the keys or key combinations used for the software to perform a preprogrammed action.
File
| Hotkey | Function |
|---|---|
| CTRL+N | Create new file |
| CTRL+O | Open file |
| CTRL+S | Save the current version of the file. If the file is saved for the first time, there will appear a file explorer window where you can specify the directory where to save the file |
| CTRL+SHIFT+S | Save as. There will always appear a file explorer window. That is how you can re-save the current file with the new name or replace the previous file |
| F5 | Run the bot |
| CTRL+[ | Stop the bot |
| ALT+F4 | Exit Studio Pro |
Edit
| Hotkey | Function |
|---|---|
| CTRL+Z (CTRL+SHIFT+Z) | Revert the last action |
| CTRL+Y | Repeat the last action |
| CTRL+X | Cut the block and put it to the clipboard |
| CTRL+C | Copy the selected block to the clipboard |
| CTRL+V | Paste the copied or cut block from the clipboard to the visible part of the canvas |
| CTRL+F | Find. Find the required block on the canvas by its name |
| CTRL+A | Select all the blocks on the canvas |
| DEL | Delete the selected block |
Additional Actions
| Hotkey | Function |
|---|---|
| CTRL+SCROLL UP (MOUSE) | Zoom in |
| CTRL+SCROLL DOWN (MOUSE) | Zoom out |
| CTRL+D | Deactivate the selected block |
| F9 | Run in Debug Mode |
| F6 | Resume Debug Mode |
| F7 | Step into |
| F8 | Step over |
| F8+SHIFT | Step out |
How to work with the Elements tab
Introduction
Some activities in Studio Pro involve working with elements of desktop apps, browser, or terminal. When you define an interface element you want using the Desktop Picker , Browser Picker, or Terminal Picker, that element will be stored both in the parameters of the activity itself and in the Elements tab, allowing you to easily work with the already selected elements, modify them, or define new ones.
Elements tab
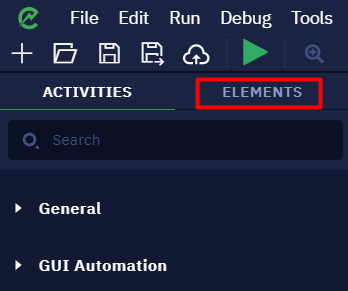
You can find the "Elements" tab in the left side of the Studio Pro interface, next to the "Activities" tab.
Navigate to this panel to see a list of already defined elements. If you have not yet selected any elements within your algorithm, the tab will be empty. The screenshot below shows the "Elements" panel with a defined element of the "Notepad".
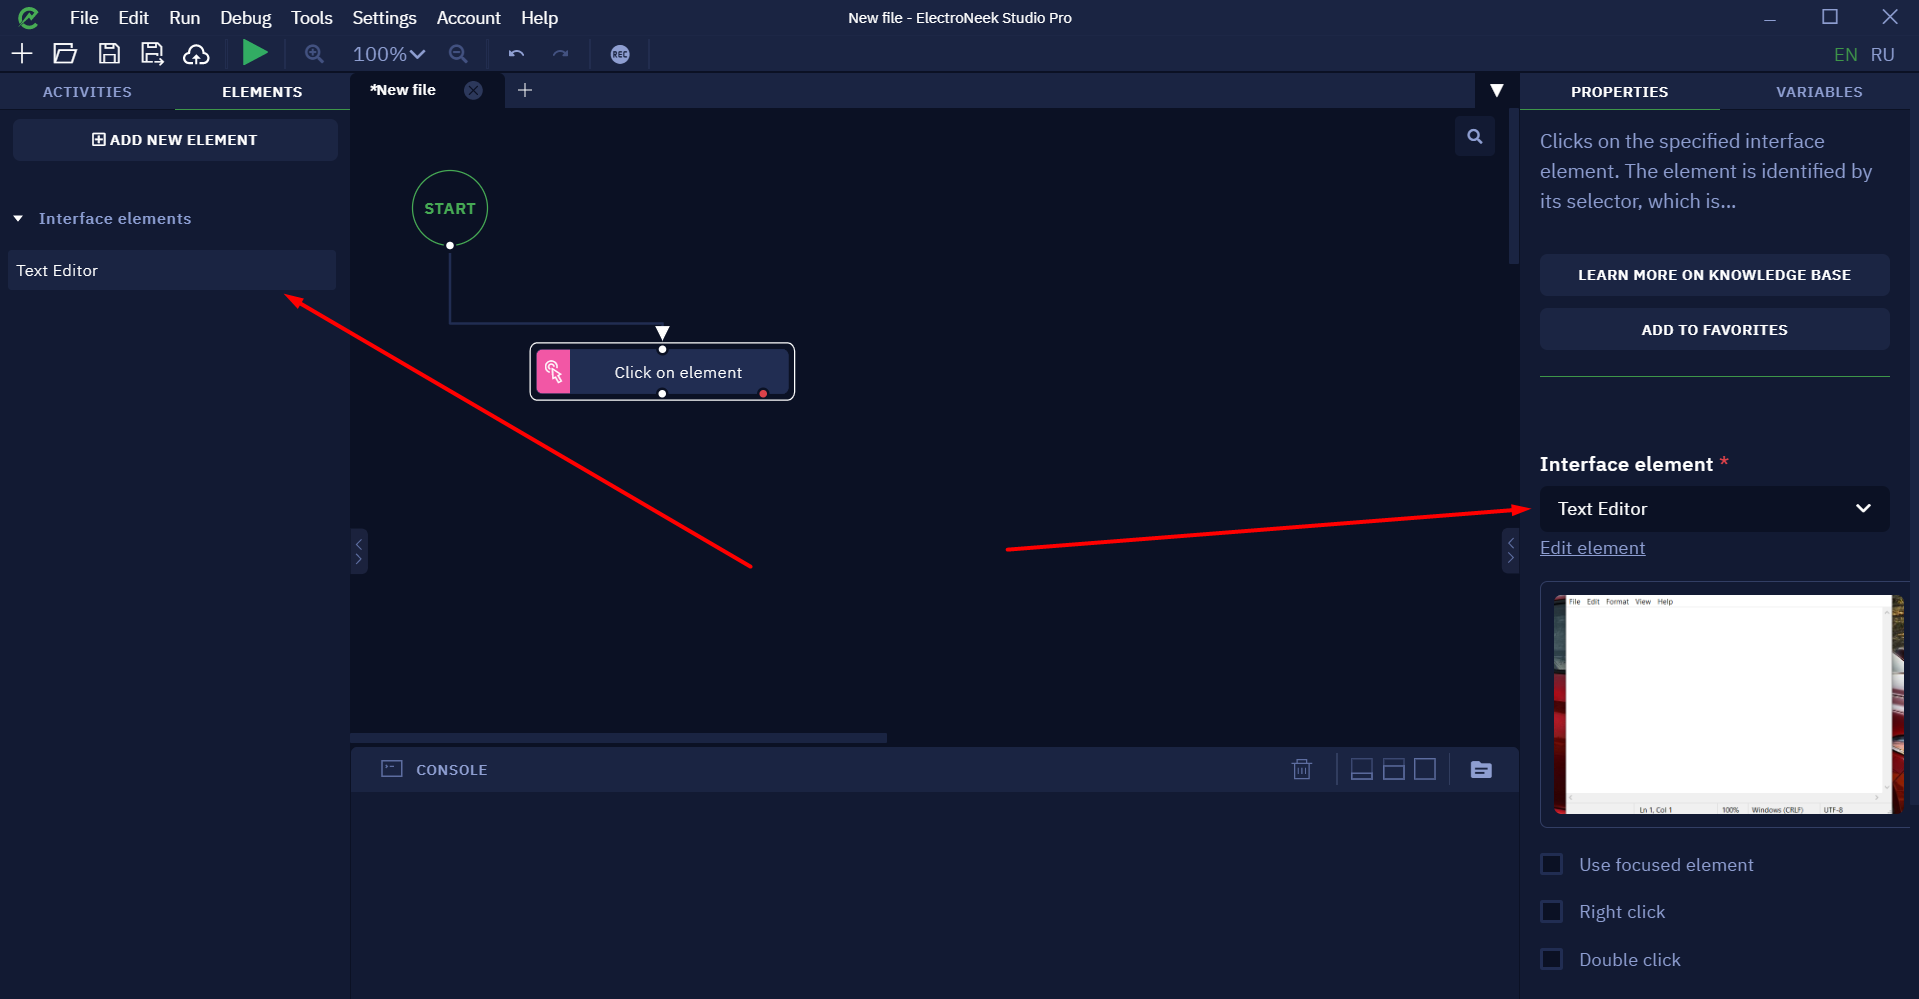
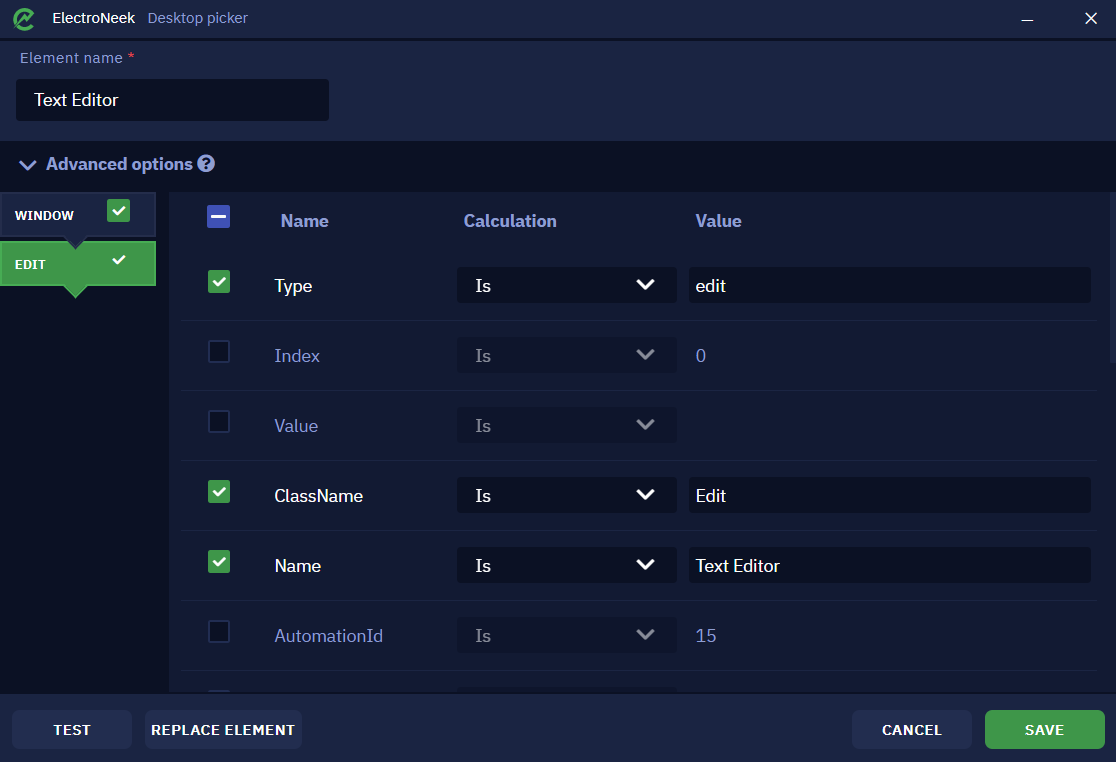
Click the button with the name of the element. Look at the screenshot below: in the right panel you will see the properties of the element. You can see the same properties in the Browser Picker when defining the element for the first time.
Changing elements
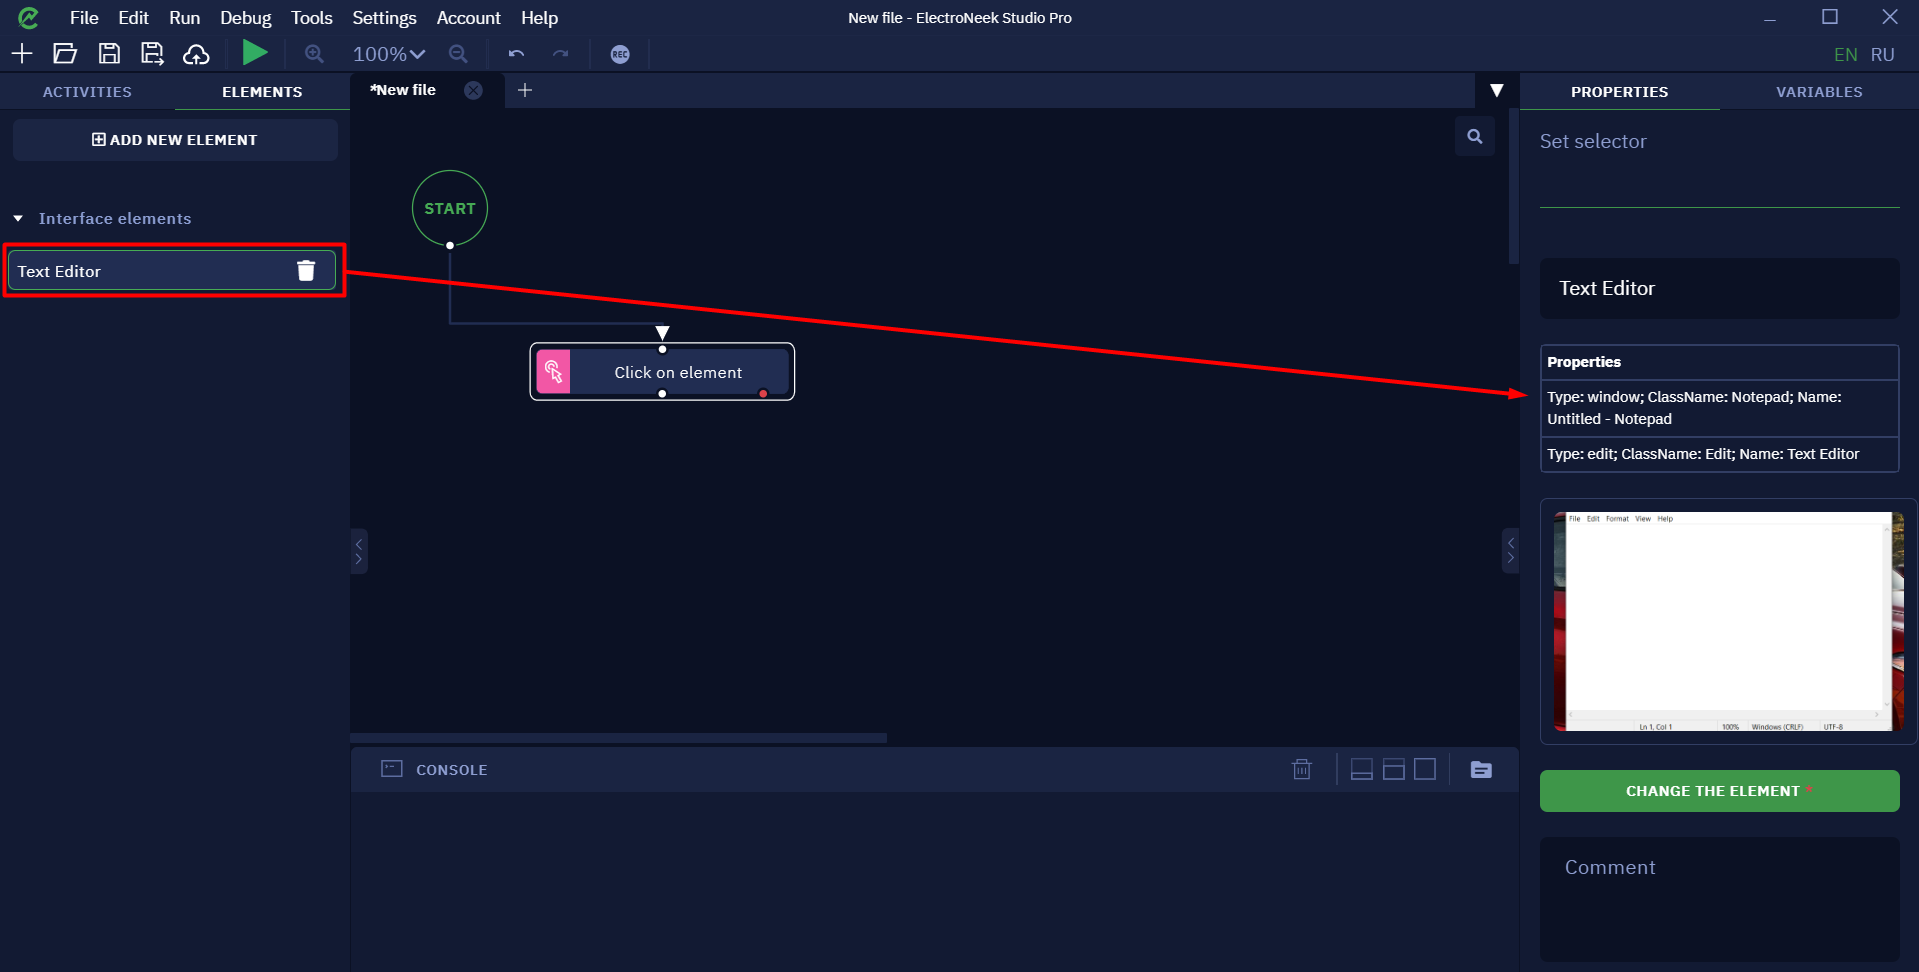
To replace an already defined item, click the CHANGE THE ELEMENT button.

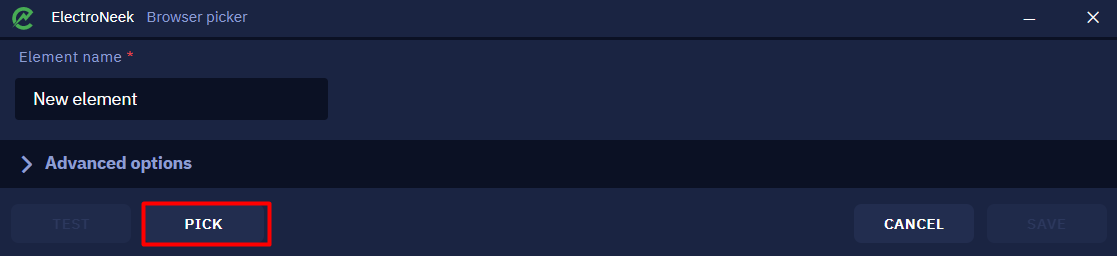
This will open the Browser Picker window, where you can replace the selected item by clicking on the REPLACE ELEMENT button. The advanced options allow you to configure the selected item in more detail. The TEST button helps to find out if the item is defined correctly if any of its attributes have been changed.
Adding new elements
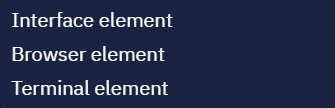
To define a new element, click on the ADD NEW ELEMENT button. Select the type of element you want from the drop-down list.
The element appears in the toolbar. Now you need to define the element directly in the application, browser, or terminal interface. You can do this by using the CHANGE THE ELEMENT button in the right toolbar. There you can also specify the name of the new element or leave a comment to it. Clicking the CHANGE ELEMENT button opens the Browser Picker window.

Note that the names of the elements in the "Elements" tab are displayed in different colors. White color means that this element is used in this particular file. An element name displayed in a dimmer color is not used in this file (it may not yet be defined through the Picker or imported from another file).
Click the PICK button to define a new element.
Importing elements
Studio Pro also allows you to import elements from other workflows. To do this, navigate to the tab Tools → Import elements. The file explorer will appear. Find the folder where the algorithm with the selected elements is saved. Inside this folder, you will see the folders "elements" (for desktop elements), "webelements" (for browser elements), or "termelements" (for terminal interface elements). After that you will only need to select one or more elements and click OPEN. The imported elements will appear in the "Elements" tab.
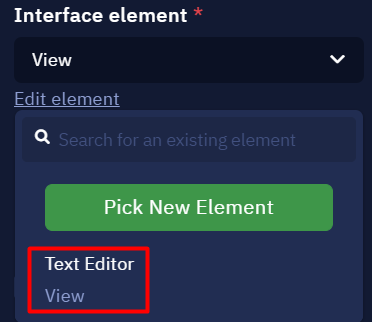
After you have selected an element, you can return to the parameters of the activity. All the defined items will appear in the drop-down list in the "Interface element" parameter. This way you can switch between the elements and select the one you want at the moment.
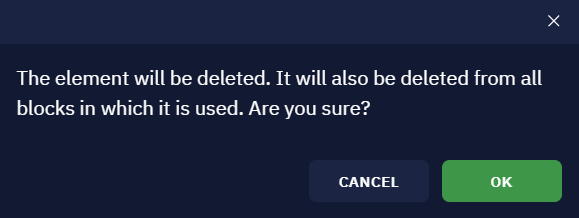
Deleting elements
To delete an element, click on the corresponding icon next to the name of the item. Keep in mind that if you delete an item that is in the current workflow (the name of the item is highlighted in white), you will disrupt the action, which means that the bot will not be able to work as you expect.
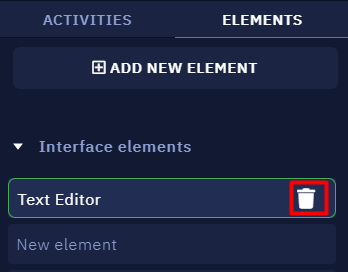
Click OK in the pop-up window.
How to work with the Output tab
Introduction
To transfer data through different tools, you need to collect and organize the output data generated by your workflows. After that, you can use this data as input to any other application obtaining it through an API request.
Good news: you can do that using Studio Pro — and in just a few clicks. In this article you will learn how to work with the Output tab to manage data generated at any stage of your workflows. Also, you will find a realistic example of the whole process: from collecting output data to sending it to SaaS Orchestrator.
ImportantThis feature is available as of version 9.2 of Studio Pro and Bot Runner.
The Output tab
You can find the Output tab on the right side of Studio Pro interface, next to Properties and Variables tabs.

How does it work?
Keeping in mind what output data you want to send to other applications, you can use them in 3 easy steps:
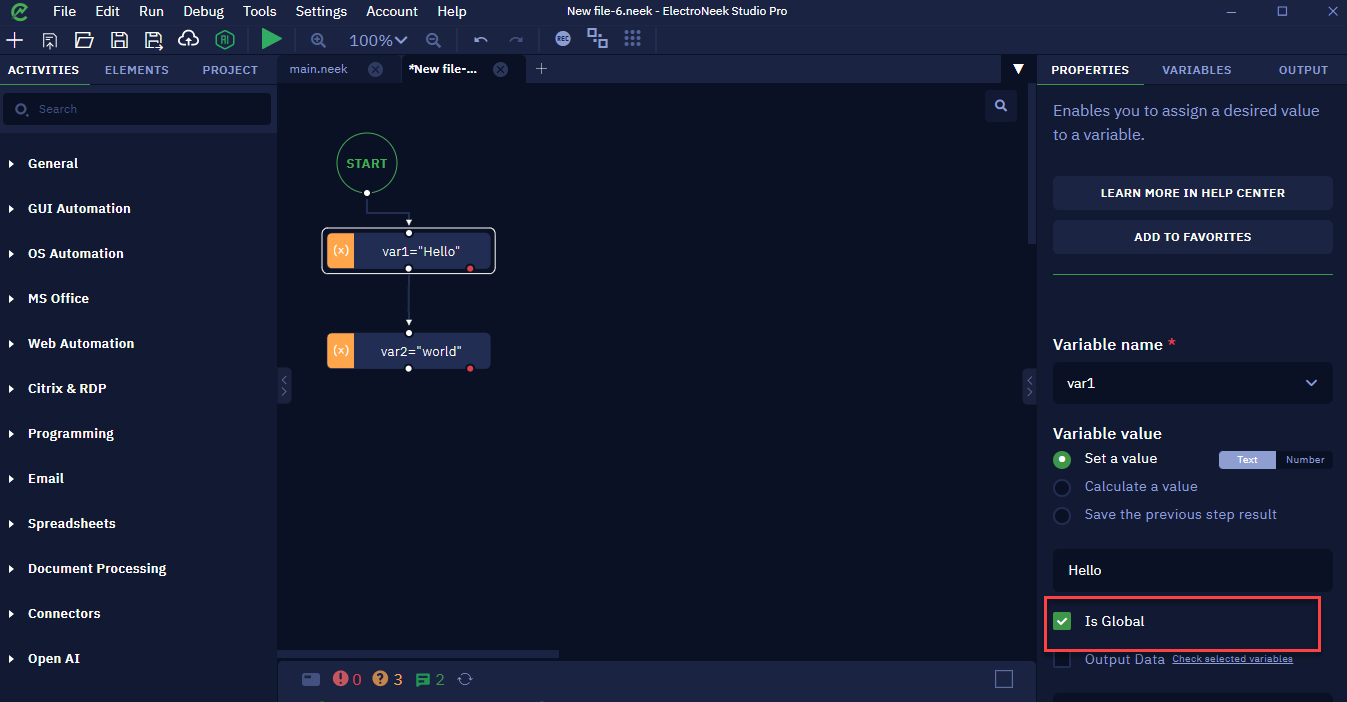
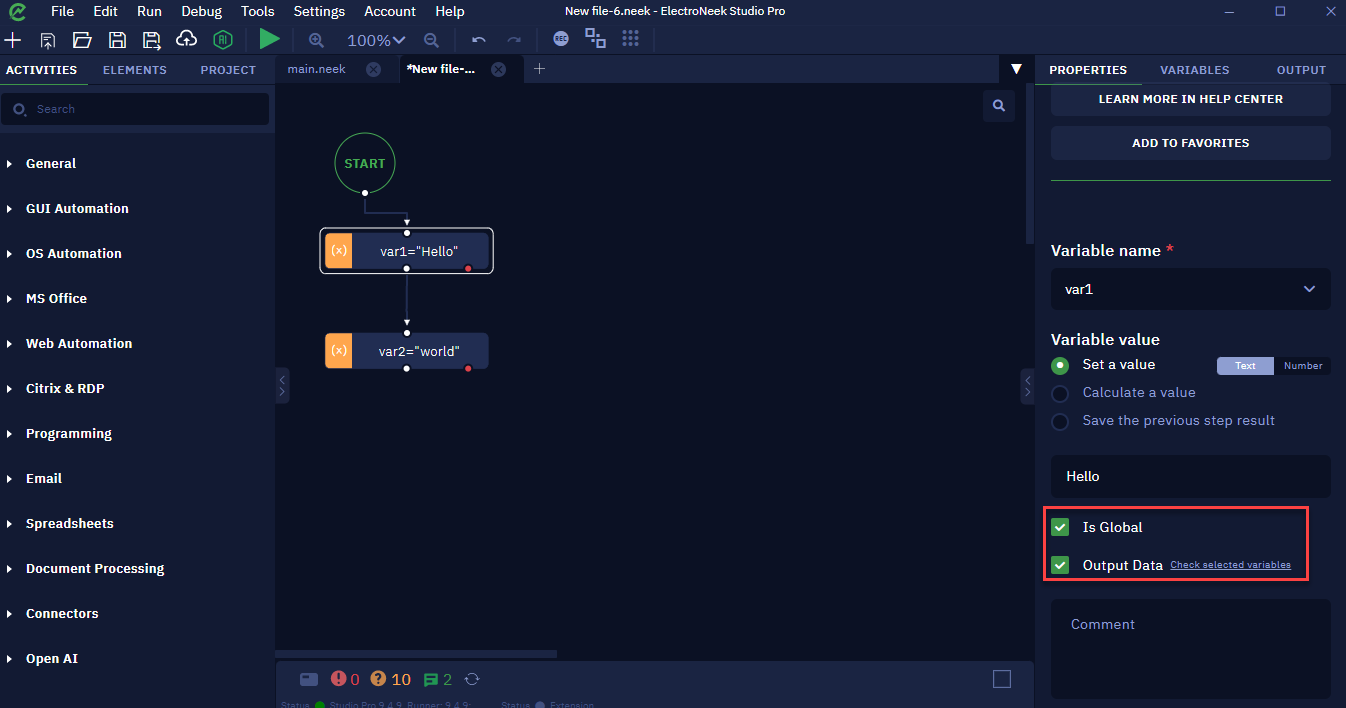
- Make sure they are saved as global variables. So, make sure you toggle the Is Global parameter when creating them. Read more in our article about Variable scope.
NoteThere is a maximum amount of characters allowed for the sum of all Output Variables. Starting from Studio Pro 12.0.14, that limit is 2,500,000 characters (2,5 million) -- in earlier versions, this limit is 2000 characters.
If you select variables whose data are big enough to exceed this limit, an error message is displayed on Studio Pro console. In these cases, if you publish the workflow to Orchestrator, no output data will be uploaded. So make sure you keep your output data under the characters limit.
- On the Output tab, check the “Send variables data to SaaS Orchestrator” option.
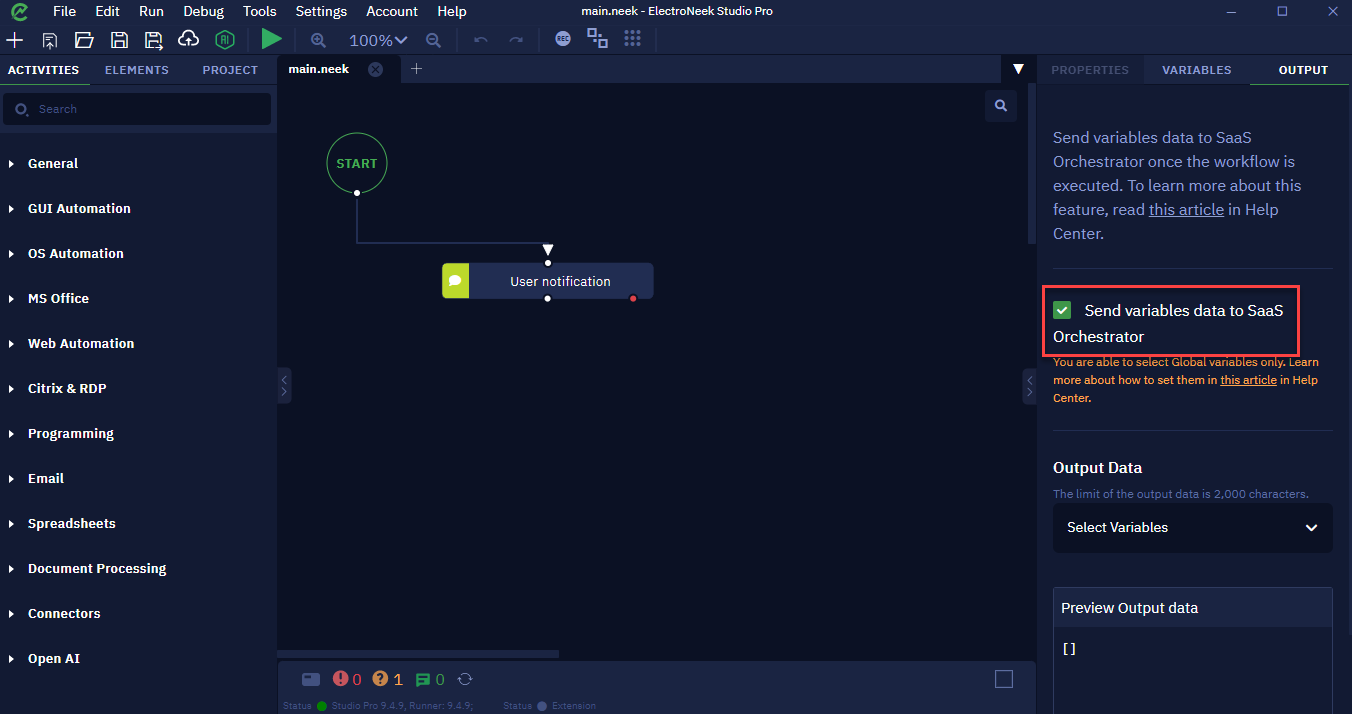
NoteBy collecting and transferring your output data to SaaS Orchestrator, you can easily get them by sending API requests from other tools. This way, you are able to create a wider, integrated network of applications and expand your hyperautomation activities.
- Below, open the drop-down list and select the variables from which the output data must be generated.
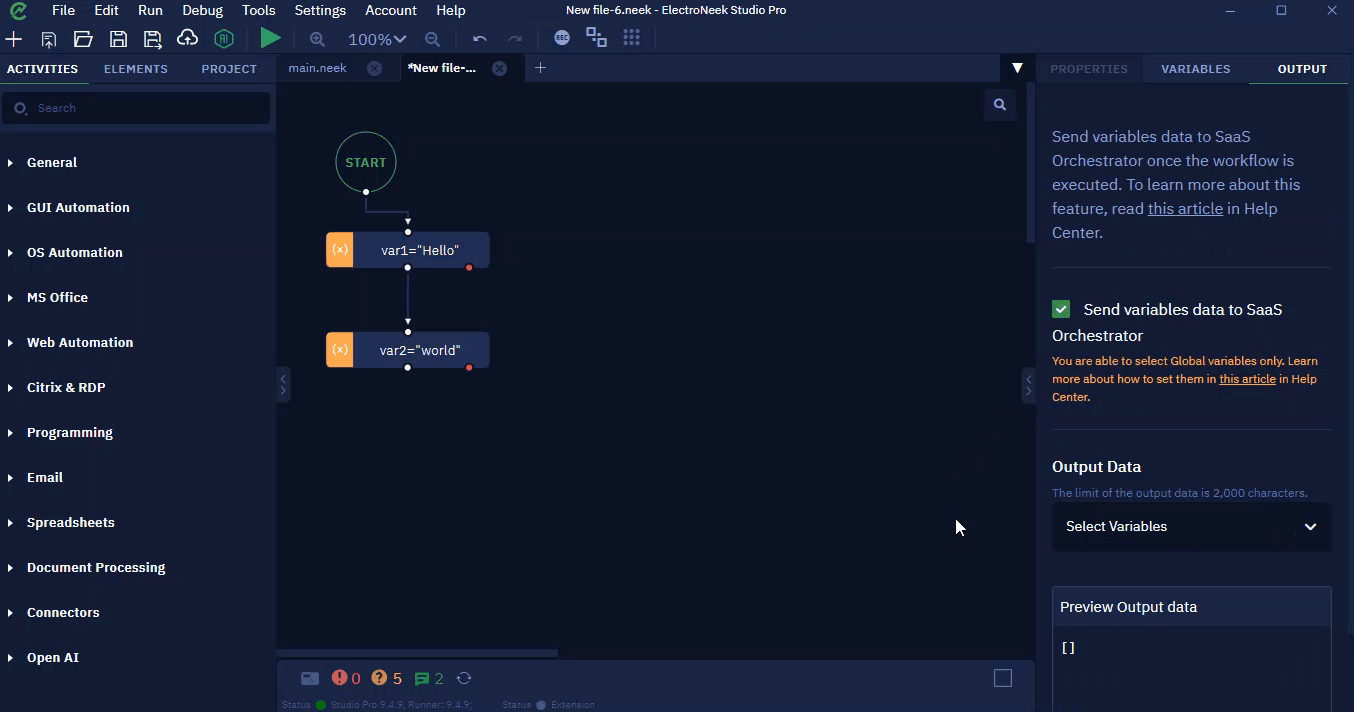
Done! Now you are able to collect output data when running your workflows. Read more about how to use it as input to other applications in this article.
NoteBear in mind that you need to run the bot from SaaS Orchestrator in order to store its output data.
How to quickly choose a single variable?
You have a shortcut if you want to set a variable as output data at the moment you create it. Once you click “Is Global”, you just need to check the “Output Data” option below it.
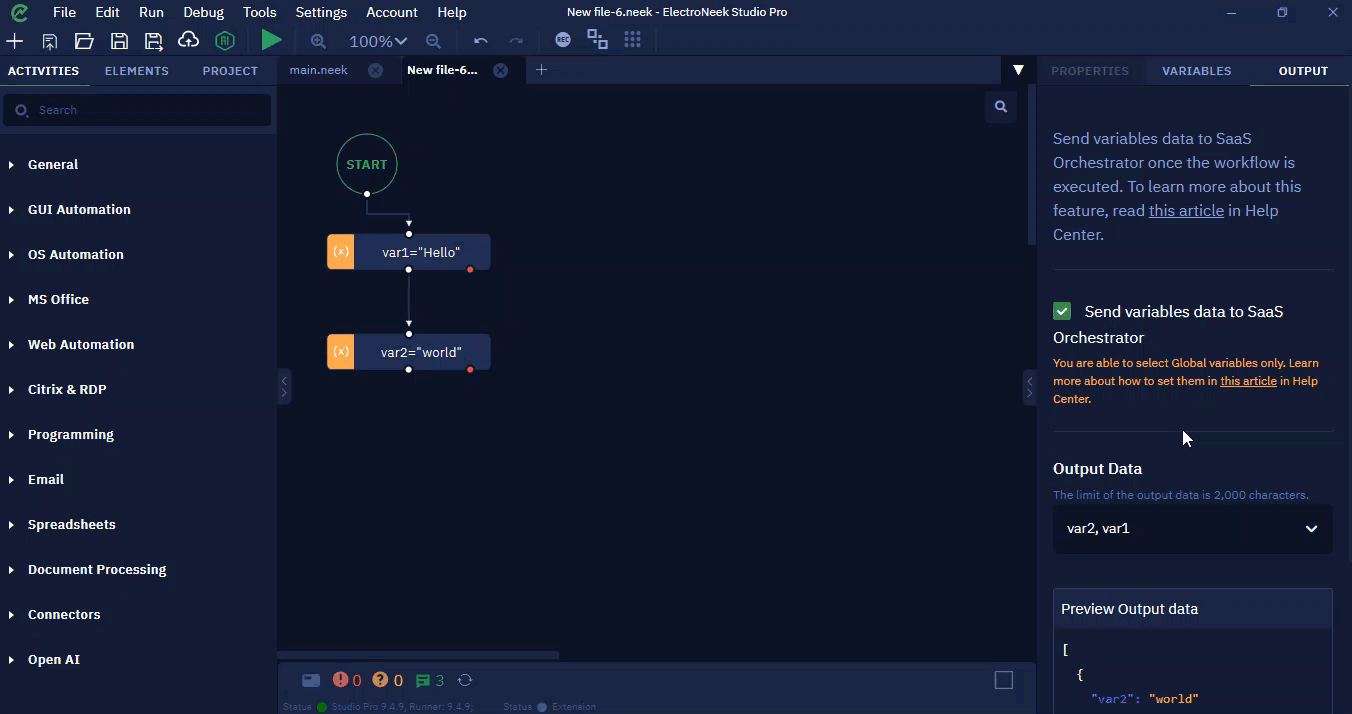
How to preview the output?
After selecting the variables to get their output, Execute the workflow in Studio Pro and go to the Output tab to check the Preview feature on the bottom. Click on the “View” icon to visualize how the output data looks like.
Desktop and browser recorders
Introduction
Studio Pro features two tools meant to simplify working with elements: Desktop Recorder and Browser Recorder. They allow you to create a sequence of interaction with elements without the need to define each element separately.
How to launch the tool
In this section, we will go through the usage of both Desktop and Browser recorders, because the process of working with them is pretty much the same. The only and crucial difference is that the Desktop recorder is used to work with desktop apps, whereas the Browser recorder interacts with browsers.
To open the tool, navigate to Tools → Process recorder → Desktop/Browser.
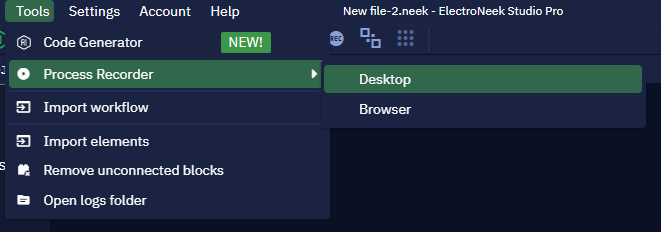
You can also start the tool by clicking on the "REC" icon in the top toolbar.
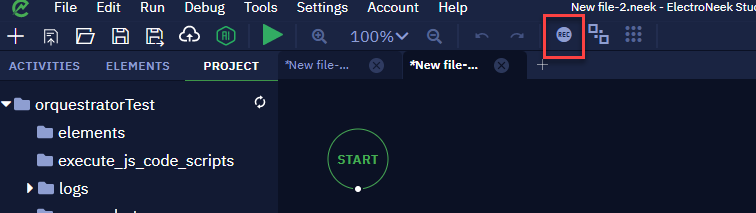
After opening the Desktop/Browser recorder, you will get into the selecting mode. Studio Pro will minimize and you will see a tool status window:
The status window looks the same for both recorders
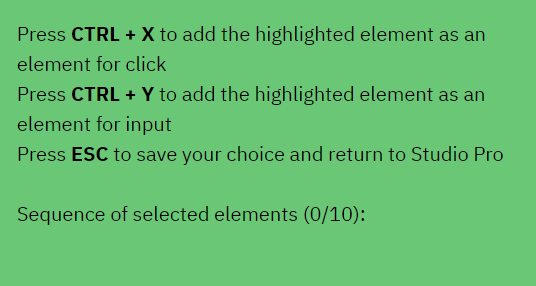
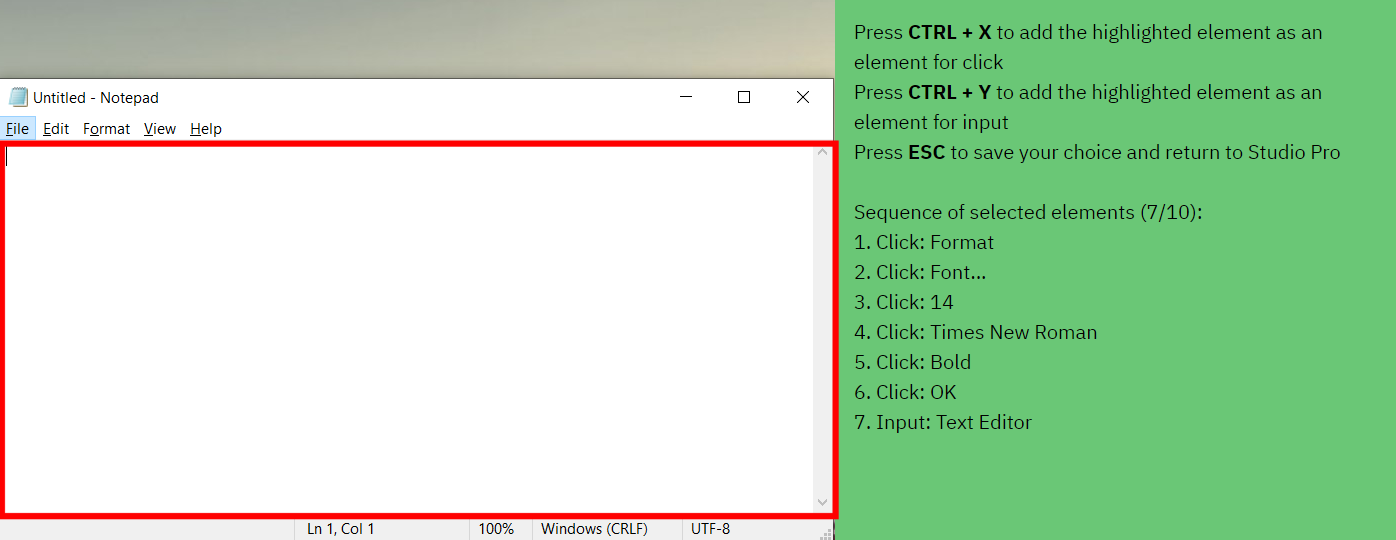
Now you can start creating a sequence. There are two selection options: you can select an element to be clicked or an input field to be filled with a value.
To select an element to be clicked:
- Point the mouse cursor on the element
- Press CTRL+X
Create a sequence of clicks by just repeating the actions described above.
To select an input field to be filled:
- Point the mouse cursor on the input field
- Press CTRL+Y
Create a sequence of inputs by just repeating the actions described above.
A summary of the sequence of elements is displayed in the tool status Window.
NoteYou cannot select more than ten elements at once. After selecting the last (the tenth) element, you will automatically return to Studio Pro. If you need to select more elements, just open the Desktop Recorder tool again and create a new sequence.
When you are done with selecting elements, press ESC to save the elements and return to Studio Pro.
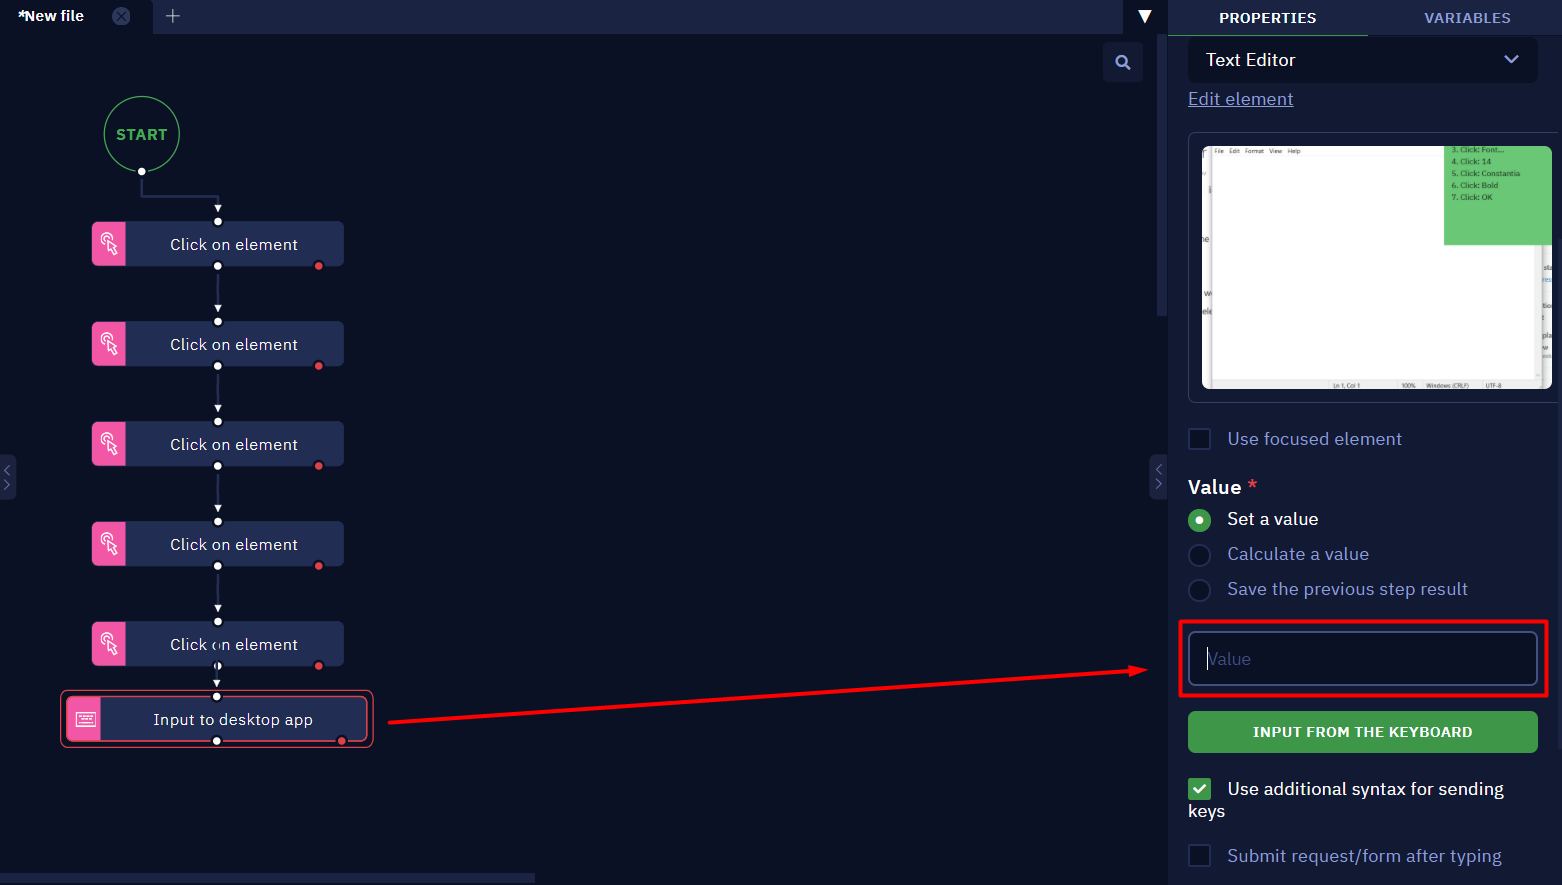
Result
As a result, you will see activity blocks on the canvas. The only thing left to be done is to fill in the "Value" parameter of the Input to desktop app or Input to browser activity.
Example
Here is an example of a workflow created with Desktop Recorder.
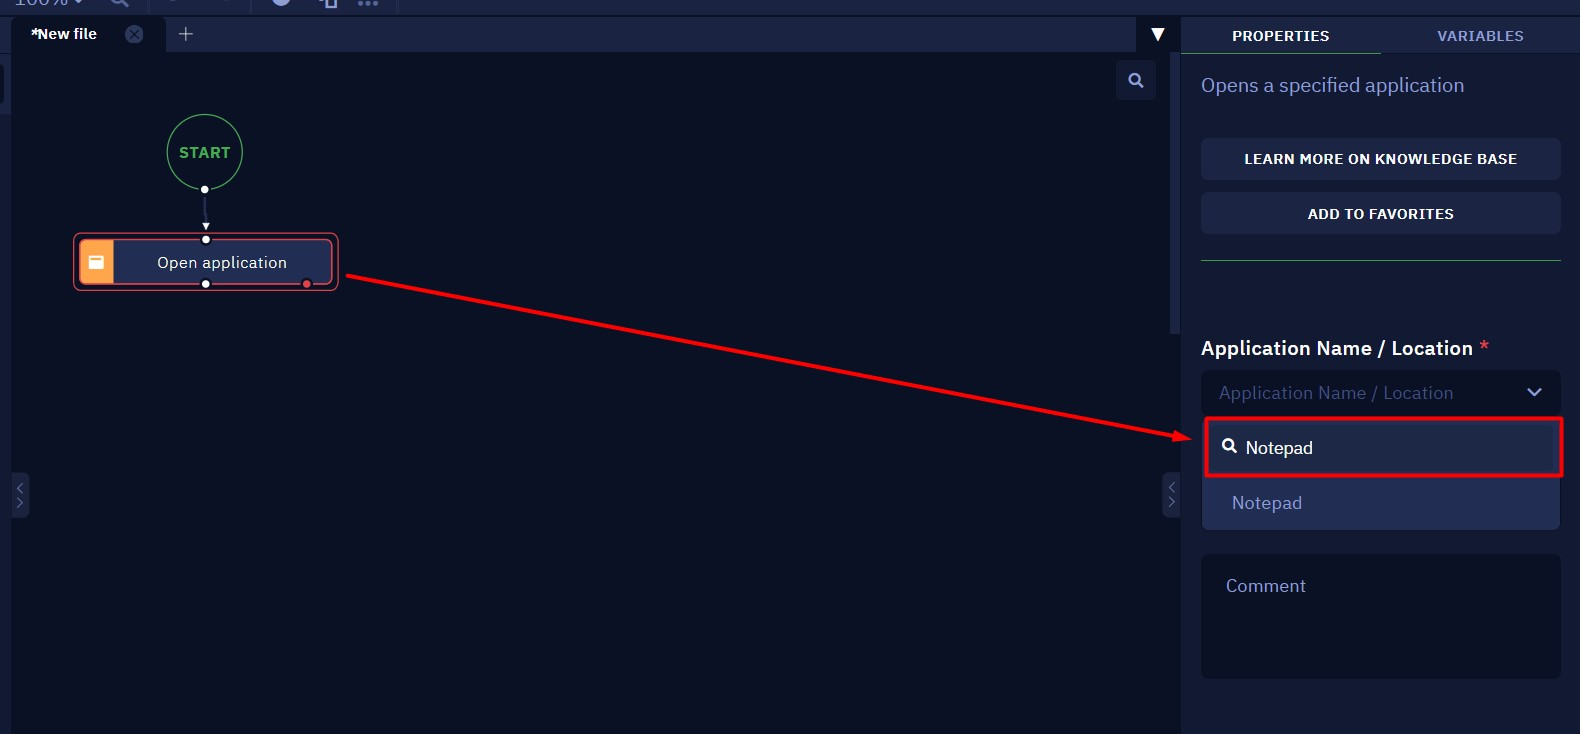
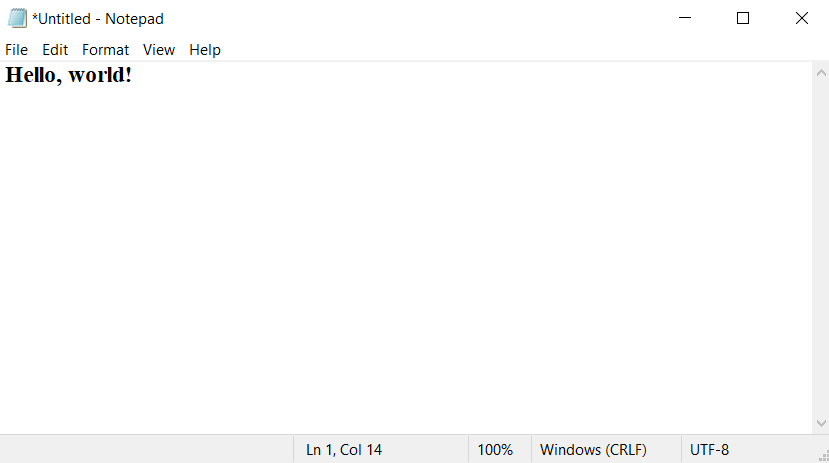
Let us create a simple bot that will open Notepad, change font and font size and input the "Hello, world!" text.
- Open Studio Pro, log in, and create a new file (as a project or in a "Playground" mode).
- Put an Open application activity block on the canvas and select Notepad to be opened.
- Navigate to the menu "Tools" → "Process recorder" → "Desktop".

- Create a sequence of clicks:
- Format → Font → 14 → Times New Roman → Bold → OK
NoteDon't hurry with selecting the elements. After each selection, wait until the action is displayed in the "Sequence of selected elements" in the status window.
- Select an input field.
- Press ESC to finish working with the Recorder.
- Navigate to the Input to desktop app activity and type "
Hello, world!" text into the "Value" parameter. - Run the bot. If everything is done correctly, you will see the text with correct formatting in the input field.
Import Workflows and Elements
Introduction
Studio Pro features different tools meant to simplify the process of developing workflows. Sometimes, high-loaded workflows designed by several developers require several parts of the project to be merged. As another example, there can be a situation where it is necessary to reuse already created workflows in some projects.
That is why Studio Pro features a couple of tools specifically for those purposes: Import workflows and Import elements. In this article, we will go through the process of working with these tools and cover some of the scenarios of using them for collaboration, merging workflows, or duplicating pieces of the workflow.
Import Workflows
This tool allows you to import a workflow (.neek-file) to the project you are currently working on.
To use the "Import workflow" feature:
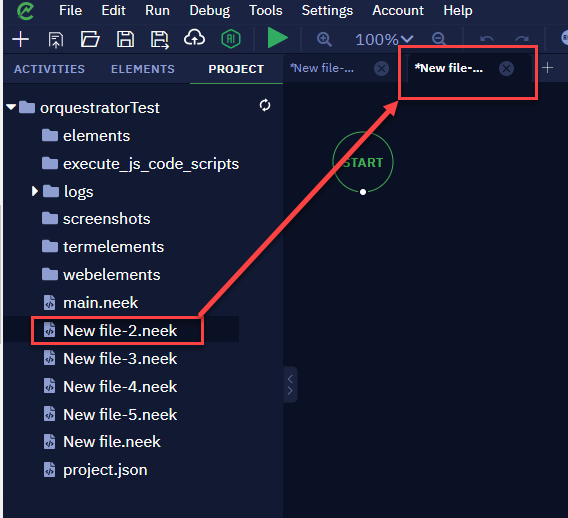
- Navigate to Tools → Import workflow
- In the pop-up window, click "Pick"
- Navigate to the directory with the desired .neek file
- Select the .neek file and click "Open"
- Click "Import".
The opened .neek file is displayed in the project tree in the left sidebar:
Import elements
This tool allows you to import elements (elements, termelements, webelements) from one project to another.
elements— desktop elements.termelements— terminal interface elements.webelements— browser interface elements.
To use the Import elements feature:
- Navigate to the menu Tools → Import elements.
- Navigate to the folder with the desired elements (elements, termelements or webelements).
- Open the folder and select the .elm file.
- Click "Open".
The imported elements will be displayed on the Elements tab in the left sidebar. You will also see them in the dropdown list in the Interface element* parameter in the activity that requires picking elements.
How to export bots to .neex and run them on other machines
Introduction
The .neex format allows you to run the created workflow on any computer without having to install Studio Pro. To run an algorithm in this format, you only need the free Bot Runner program installed on your computer. The use of the .neex format allows you to build a system of so-called attended automation when the work of the bot and/or its launching is performed with the participation of a user.
NoteThis feature is now only available for Projects and is no longer available for Playground.
Procedure
- Create a bot in Studio Pro.
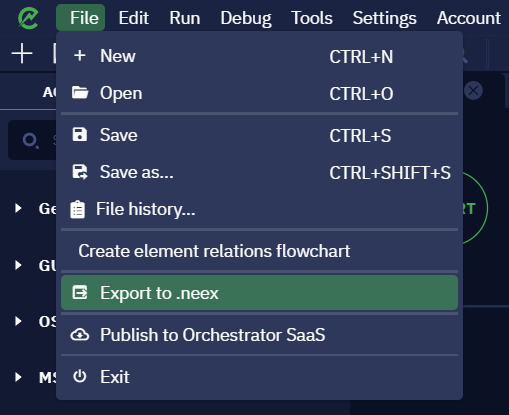
- When the bot is ready - navigate to "File" → "Export to .neex.".
A pop-up message will remind you that Bot Runner must be installed on your computer to run the bot.
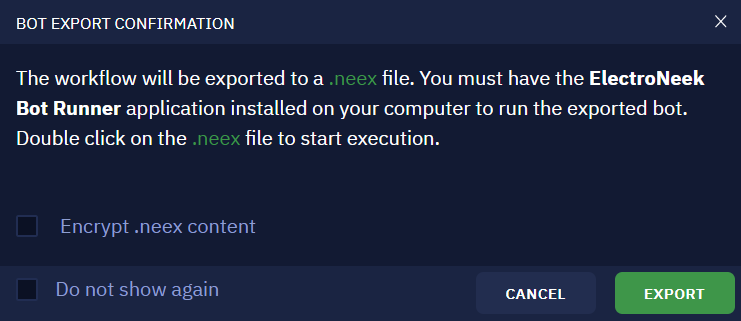
You can encrypt the .neex file using the **"Encrypt .neex content" checkbox. This option protects the bot file from attempts to read the content by third-party programs.
- Click "Export". In the file explorer window that opens, you can choose where to save the bot file.
NoteYou need an existing entry point to execute these steps. In case the file was deleted, you must assign a new one under Settings → Project Settings → Project entry point.
Launching the bot
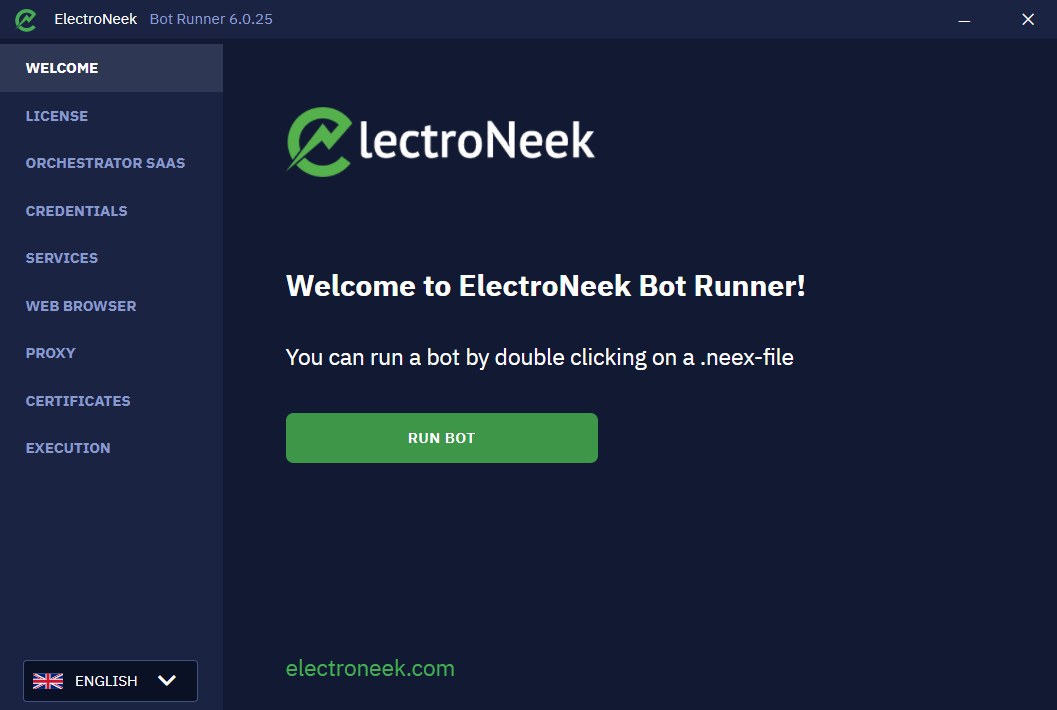
After the .neex bot is saved, you can run it by double-clicking the left mouse button. If Bot Runner is installed and running on the computer, the workflow will start. You can also run the workflow directly through Bot Runner. To do this, click the "RUN BOT" button in the "Welcome" tab.
Bots can also be launched via the command prompt. In this case, you can pass some arguments for launching. For example, in the command prompt you can write the following command:
echo This is a test argument > example.txt & main.neex
Such a command will pass the argument to example.txt and launch the main.neex file.
Transferring bots and files
Subprogram
If the Subprogram activity was used when creating the bot (the .neek files), the subprograms will be automatically taken into account in the final file when converting the algorithm to the .neex format. As a result, it is not necessary to additionally transfer the subprograms themselves or perform any actions to make the subprograms work in the .neex file.
Interaction with elements
If your workflow contains activities that interact with desktop elements, web-elements, or terminal elements, you can also transfer only the .neex file to another computer without having to manually transfer the element files or any other files.
Interaction with images
First of all, if your workflow contains activities that interact with images (Click on image, Find image, etc.), then all images generated by Studio Pro, such as screenshots, will be stored in your project folder. Therefore, you do not need to manually transfer images, when converting your algorithm to the .neex format. But most importantly, you can port the generated .neex file to another computer without any issue.
The same is true for any external image, if you transfer them into the project folder. Thus, you can also use the generated .neex file to another computer without any issue.
However, if images are not stored in the project folder, then only the paths to the images are stored. Therefore, when porting the .neex file to another machine, in order for the algorithm to work correctly you will have to somehow calculate the picture paths in the algorithm itself (for example, this can be done by creating a config-file) or to reproduce exactly the same picture path as on the machine where the workflow was developed.
Interaction with files
If your workflow contains actions that interact with files on your computer (Read text file, Append to file, etc.), then the path to these files must either be calculated within the workflow or reproduced exactly on the machine that runs it.
How to handle multiple versions of the same project
Managing multiple versions of a project on Orchestrator can be necessary for various scenarios. For instance, you might need to reuse the same project for different clients or execute it at distinct times.
Instructions
- Open the Project in Studio Pro
- Go to File >Save as project .
- Give your project a new name, so it's not confused with the original or other projects.
- Save and open this new version of the project.
- Go to the File > Publish to Orchestrator SaaS.
- Provide the new name for the workflow in the parameter's field and add a description if needed.
- Click on Publish.
NoteThe workflow name must be different from other already published workflows. Otherwise, it will overwrite the published workflow.