How-tos: Orchestrator SaaS
How to transfer data to an API request
Introduction
In this article, you find everything you need about the mechanism of API request generation and data transfer through it.
NoteTo send output data from your workflows to Orchestrator SaaS, you can work with the Output tab in Studio Pro. To retrieve this data via API requests so you can use it in other applications, check this article.
Prerequisites
Before working with API requests, it is important to make sure that:
- The workflow is published in Orchestrator SaaS. You can learn more about publishing workflows here.
- Orchestrator SaaS has at least one Bot Runner connected. Learn more about connecting Bot Runner to Orchestrator here.
- At least one active Bot Runner is assigned to a workflow. Learn more about assigning Bot Runners to workflows here.
Sending an API request and transferring data through it
Testing requests using ElectroNeek API documentation
An API request can be tested using the tool available in our documentation or using external tools.
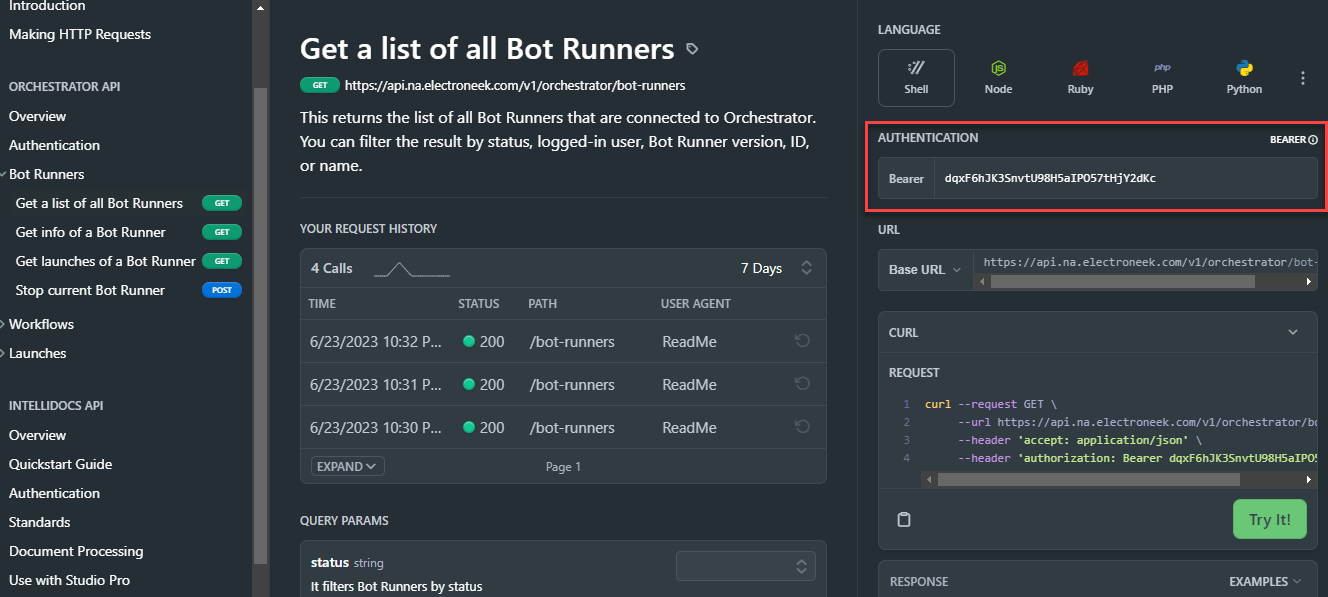
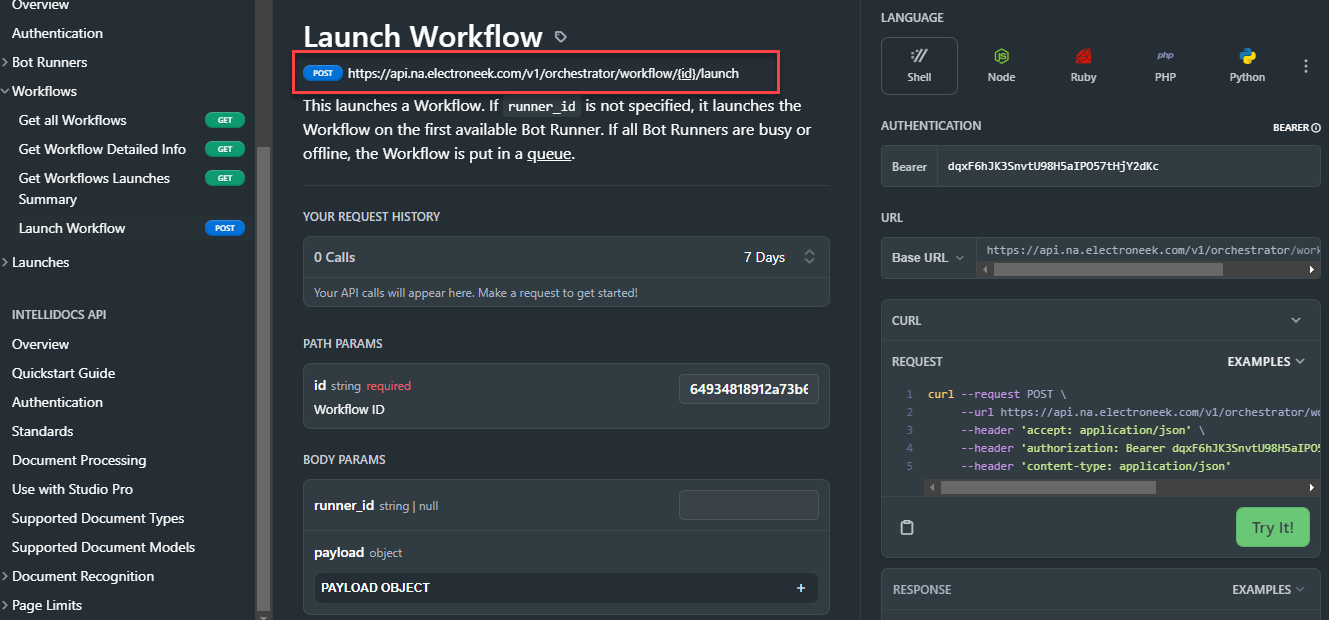
If you choose our API Documentation site to test a request, follow these instructions:
-
Navigate to the ElectroNeek API documentation portal.
-
Select a Request Type.
-
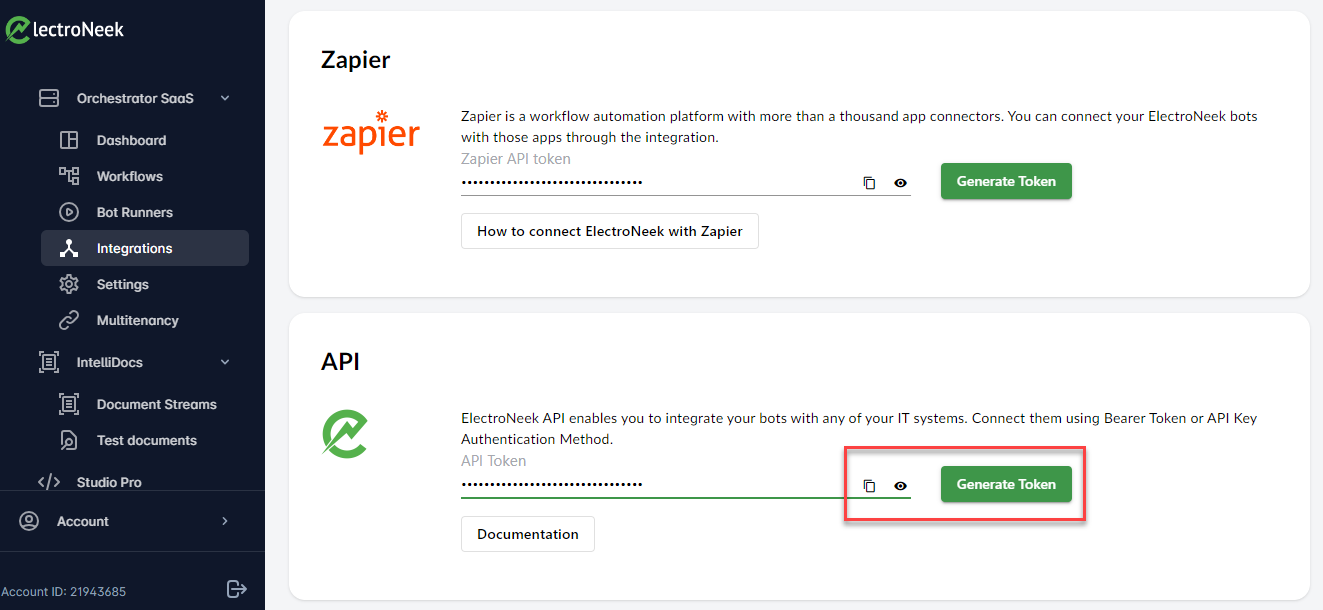
Generate and copy a Token from Orchestrator SaaS → Integrations.
- Paste your Token into the Authentication Bearer field.
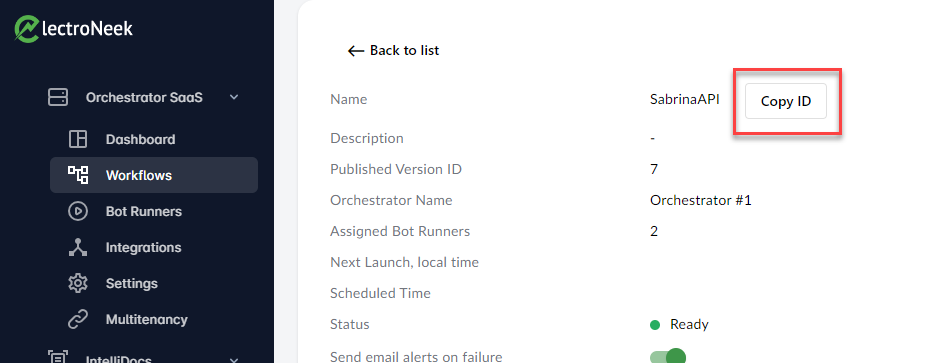
- Copy your Workflow ID.
- Paste the ID into the Path Params**.
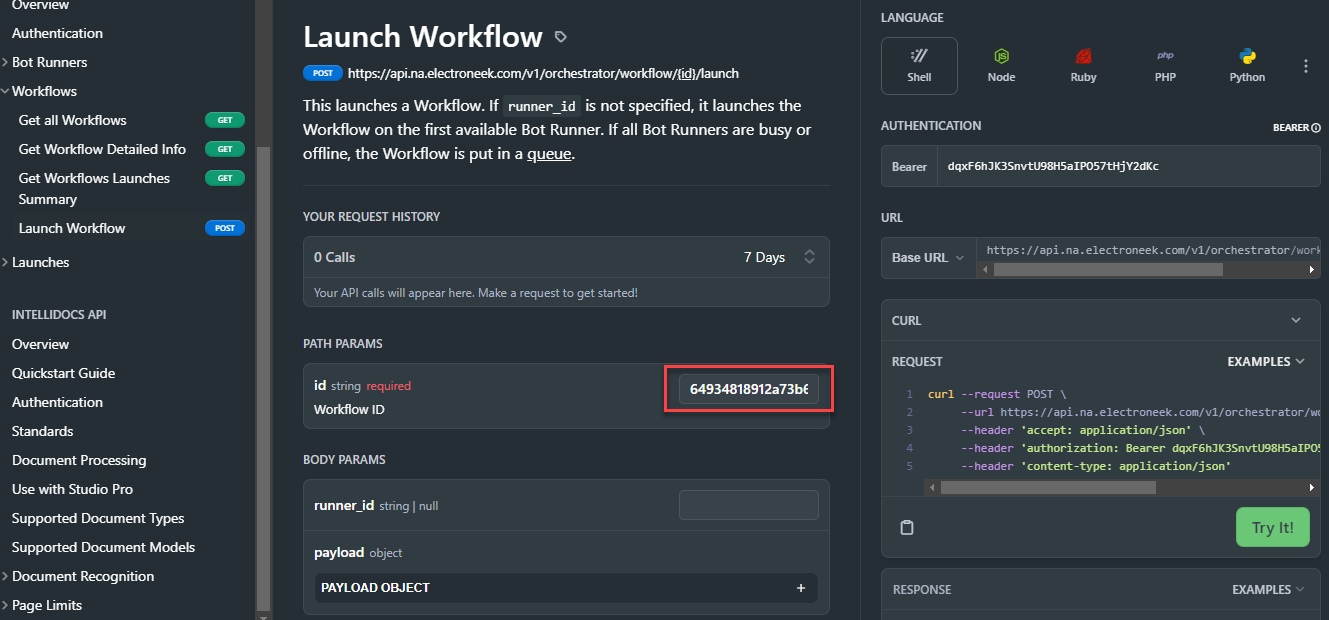
- Complete the Body with any desired information.
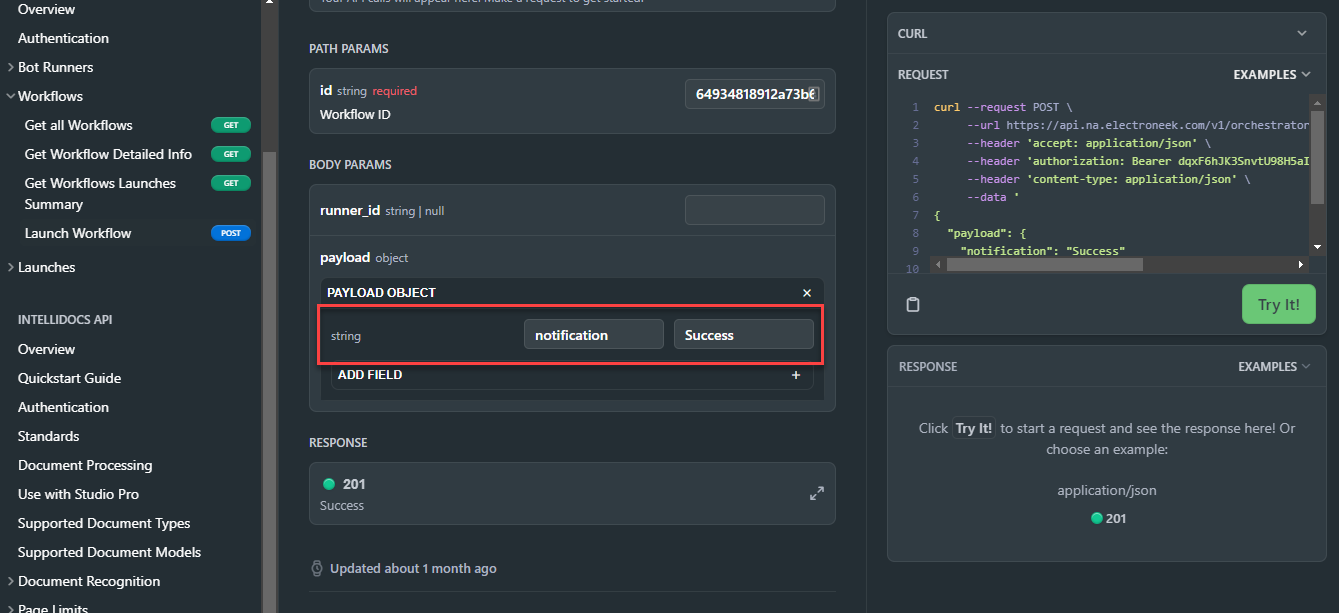
- Click on Try it! and see the result.
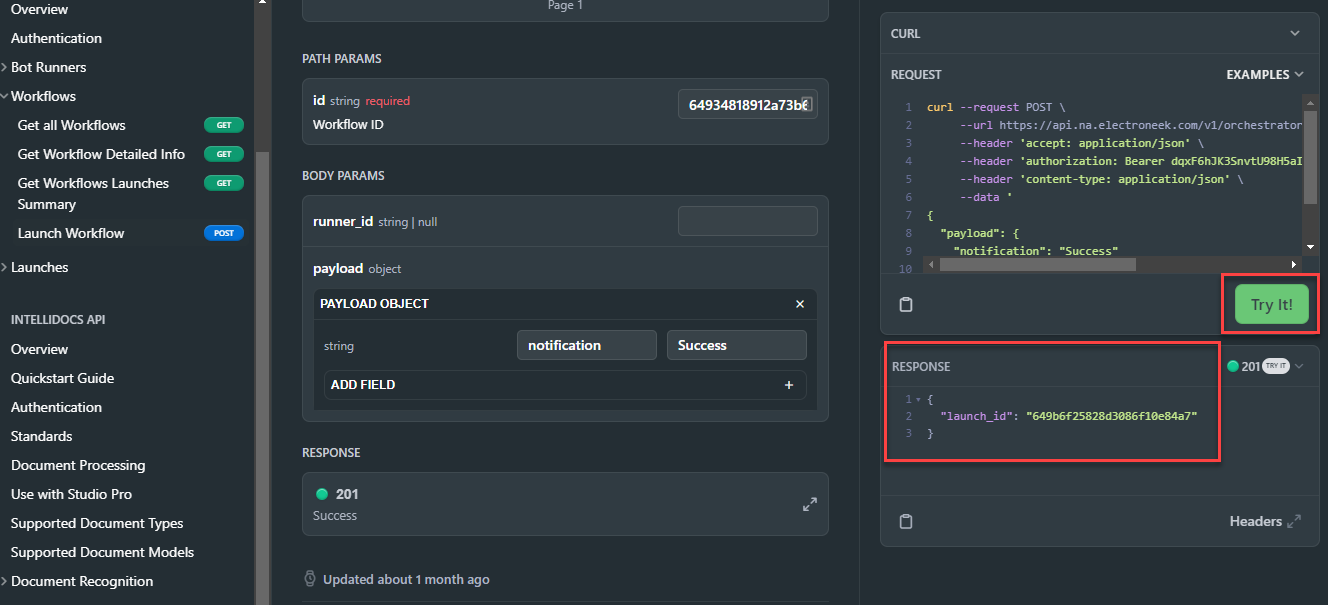
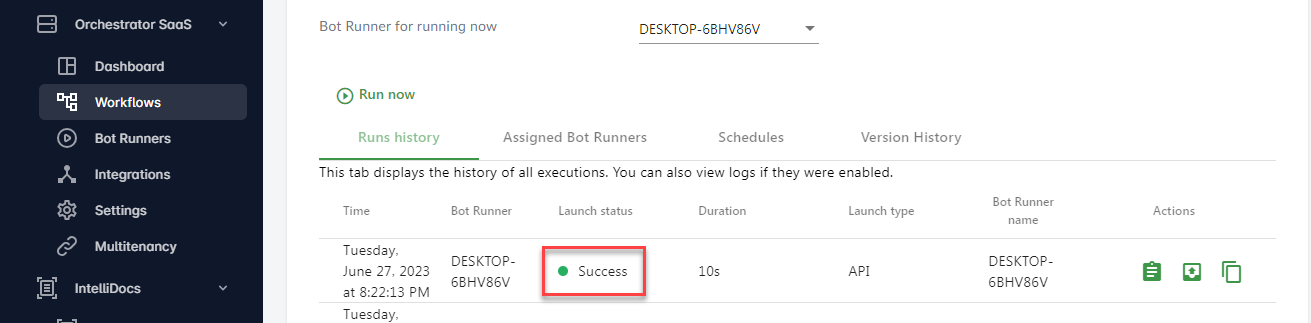
- You can also check that it was launched correctly in the Workflow's Run History.
Testing requests using other tools
Another possible way to test a request is by using another tool. Look at the steps you need to follow if, for example, you use Postman.
Bearer Token method
-
Navigate to the ElectroNeek API documentation portal.
-
Select a Request Type and copy this link.
- Go to Postman and paste that link.
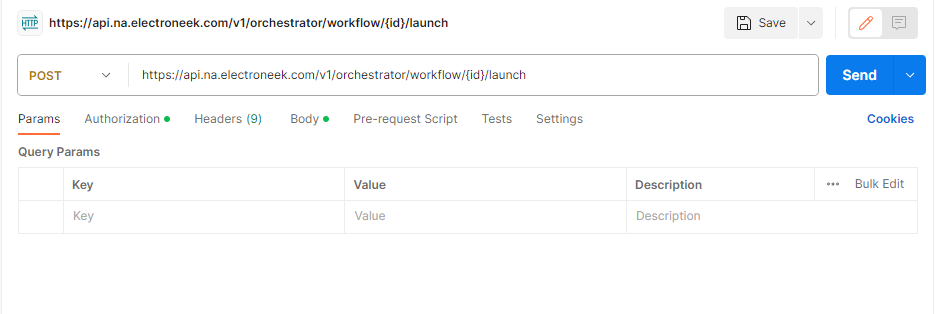
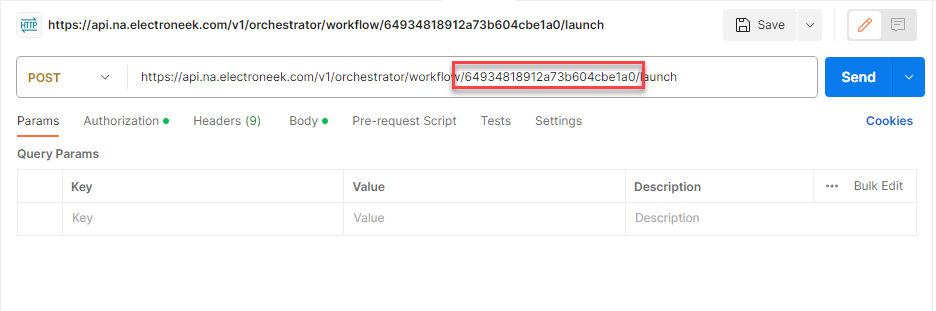
- Copy your Workflow ID.
- Paste this ID in Postman's URL, replacing the
{id}.
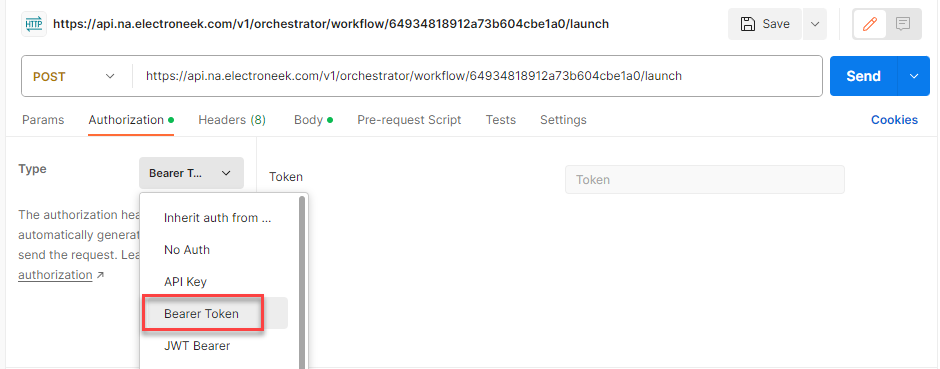
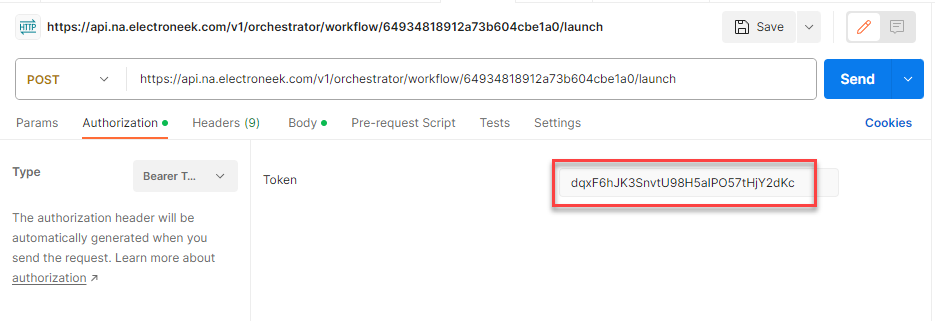
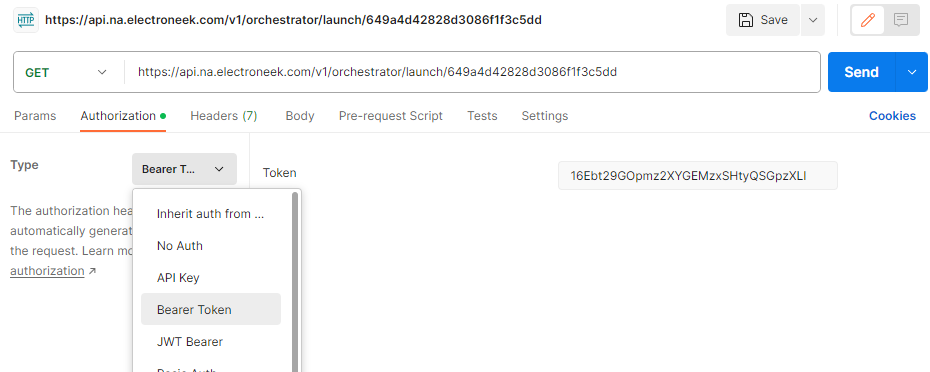
- Go to the "Authorization" tab and select the type "Bearer Token"
- Generate and copy a Token from Orchestrator SaaS → Integrations.
- Paste the Token in Postman.
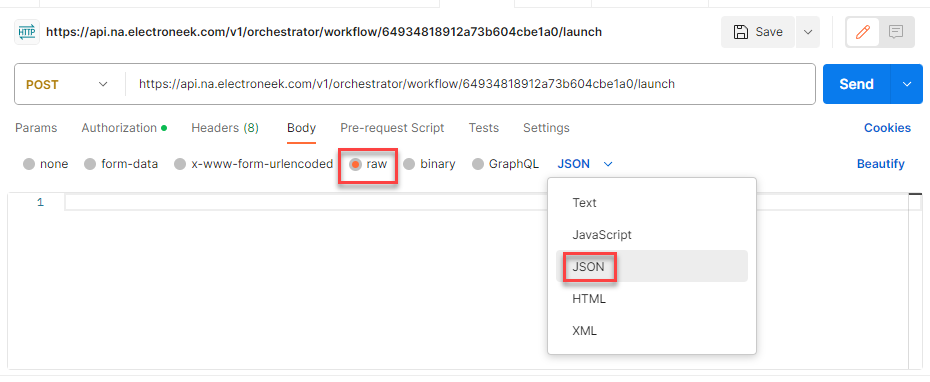
- Go to the Body tab. Select the data type raw and the format JSON.
- Fill in the body with any desired information.
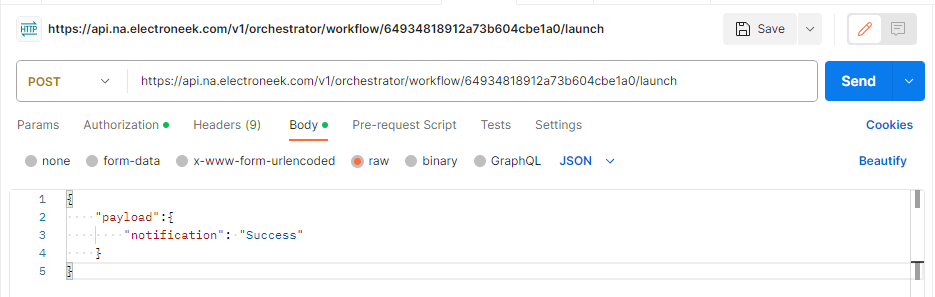
- Click on Send and receive the response.
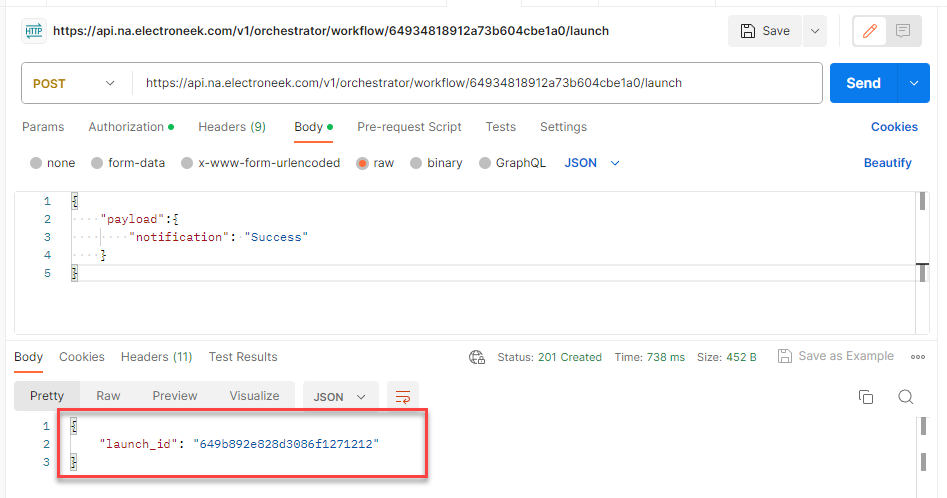
- You can also check that it was launched correctly in the Workflow's Run History.
RDP Connection in Orchestrator SaaS
Introduction
This functionality makes it possible for Bot Runners to maintain the active RDP session, including multiple console sessions. This is very useful when executing workflows on remote machines because you do not have to interact with RDP sessions in any way - the Bot Runner will maintain an active RDP session in the background.
Prerequisite
To use this functionality, the virtual machine where the Bot Runner is installed must allow a Remote Desktop connection and it must be online. Look at the following screenshot on how the Remote Desktop connection can be enabled on the machine.
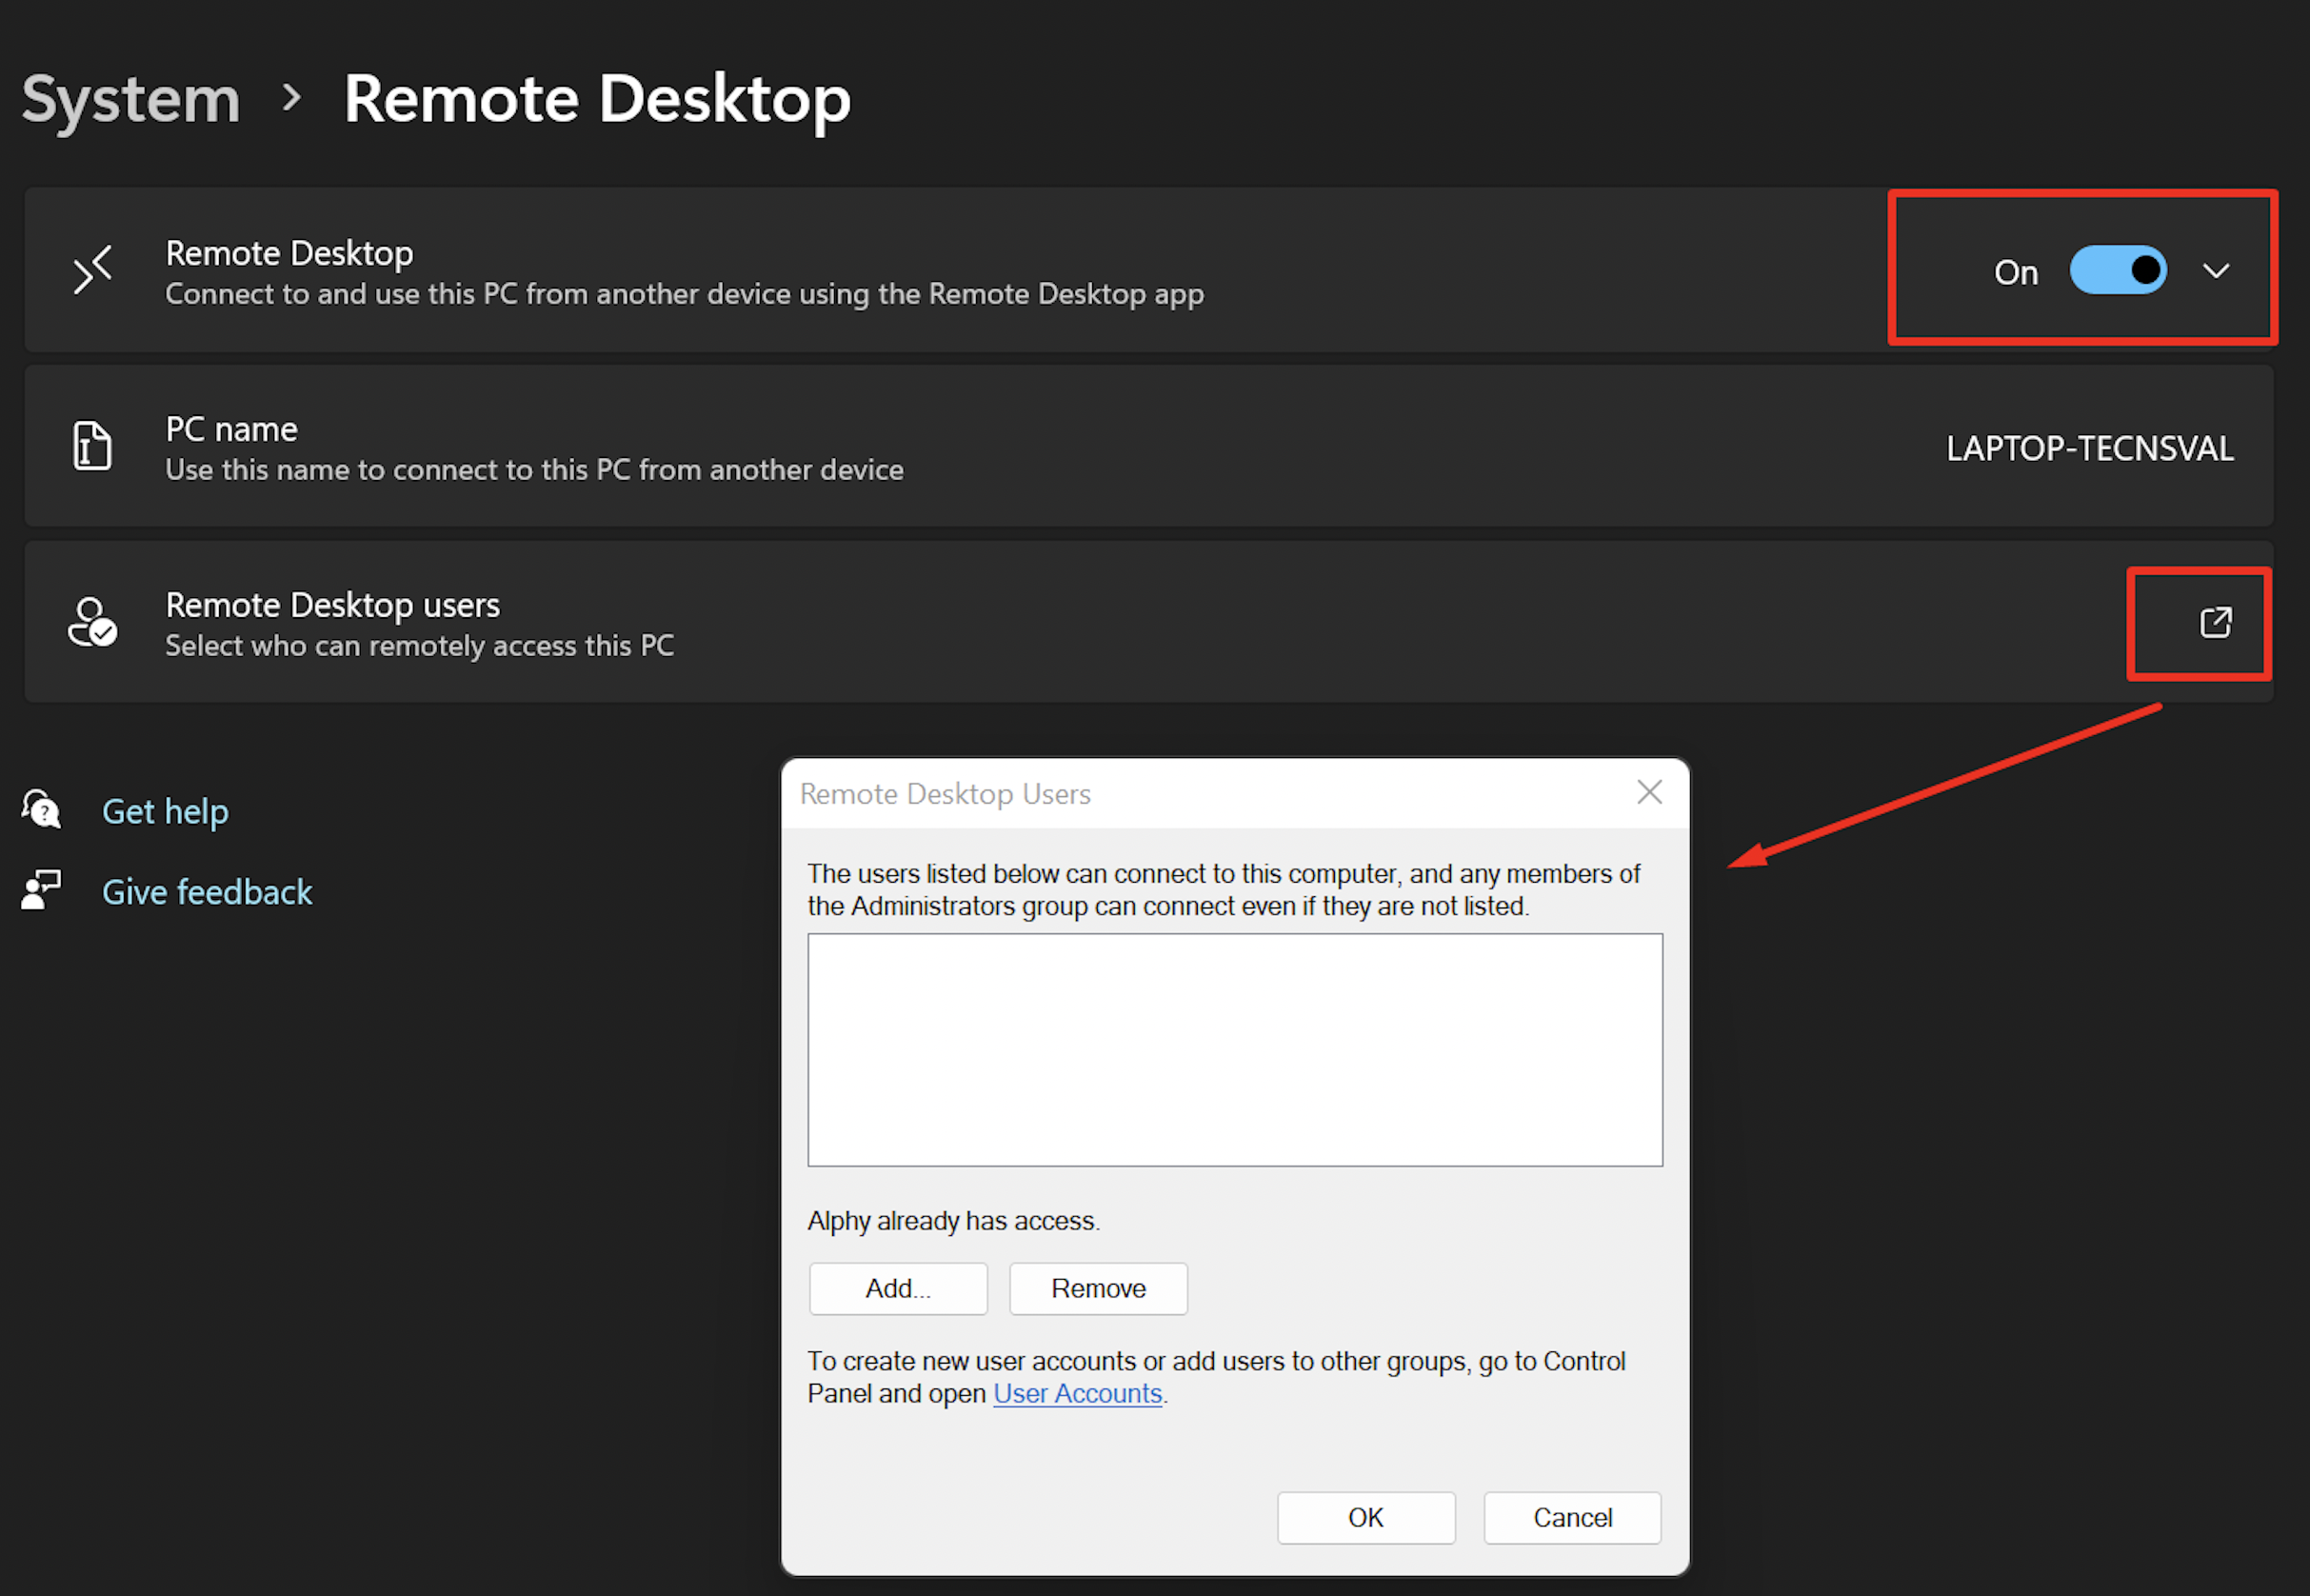
NoteIf the Remote Desktop connection is already enabled, check that the correct IP Address is entered. The following steps will help you obtain the correct IP Address:
- Run the
ipconfigcommand in CMD on the VM/machine.- The IP Address corresponding to the IPv4 Address is the IP Address of the machine.
Also, make sure Bot Runner is online so your bot can interact with the GUI.
Establish an RDP connection
To use the feature, navigate to the "Bot Runners" tab → Click on the desired Bot Runner to open its settings → Navigate to the "RDP Connection" tab.
To establish an RDP Connection:
- Click "Set up Credentials".
- Fill in the required fields:
- Address: IP Address (without port number).
- Username. This field may contain two different formats:
usernameorusername@domain. If one format does not work, please try using the other one.
Password.
- Click "Save".
When the credentials are set, you can test the connection. To do that, click "Test Connection". You will see the connection status. If necessary, you can delete the credentials or change them.
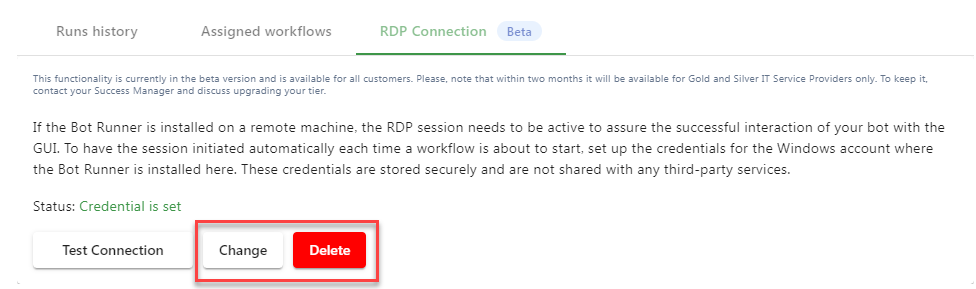
The "Successful" test status means that the connection is established and the Bot Runner is ready to run workflows on a remote machine.
NoteIf you configure the RDP connection in order to launch bots remotely and maintain the remote session active automatically, we store the credentials in a secure encrypted vault hosted on our end. If you use credentials directly in your bots, for example, to access a third-party system as a part of the workflow, then such credentials are safely stored by means of Windows Credential Manager.
How to work with input/output data in your workflows
Introduction
There are scenarios where we want to use data from our workflows in other applications — or vice-versa. This is the core of hyperautomation because it helps us connect processes across multiple applications and platforms.
In this article you find an overview of the whole journey:
- Selecting output data from your workflows (Studio Pro).
- Visualizing the output data on the cloud (SaaS Orchestrator).
- Retrieving this data from Orchestrator as input to other tools (API request).
ImportantThis feature is available as of version 9.2 of Studio Pro and Bot Runner.
How to choose and set up your workflow output data?
Make sure you read this article beforehand to learn how to work with the Output tab.
Once you're ready, assign a Bot Runner to the workflow in ORC and execute it with any launch type (Manual "Run Now" button, Schedules, API, Zapier, Webhook, etc.)
Done! You have just executed your bot and SaaS Orchestrator now has the outputs.
How to see the output data?
Once you execute the workflow — triggered from SaaS Orchestrator — the output data is available for you. To see it, follow these steps:
-
Go to User Portal → Orchestrator SaaS → Workflows.
-
Click on the workflow and visualize the Runs History tab.
-
Click on the “Output Data” action.
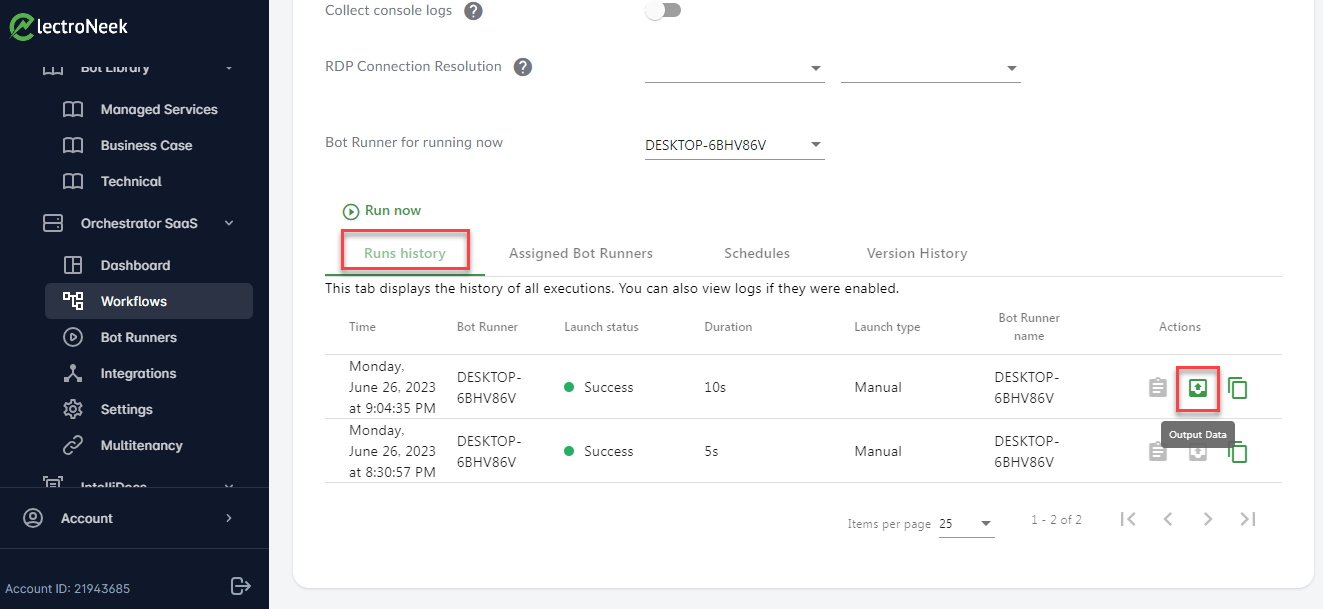
On this page you can see a tab with all the output data you have collected from the workflow. The tab is also available in case you open the Console logs or Automatic logs tabs.
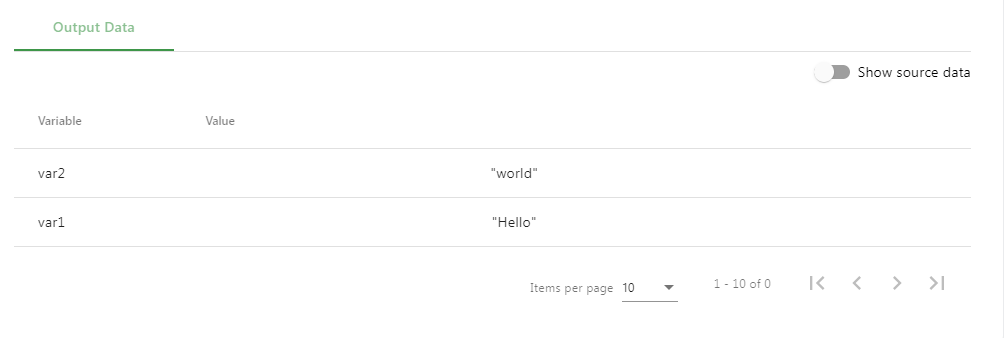
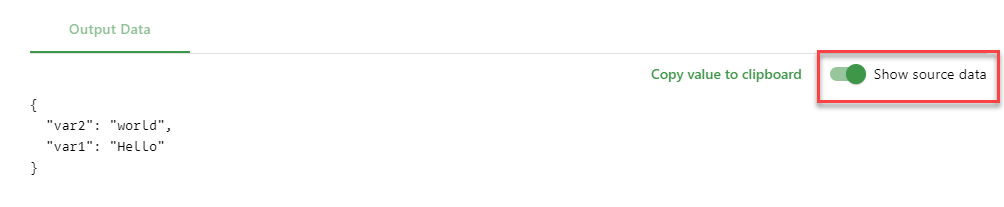
As you can see, the variables are organized in rows. To see this data structured in JSONformat, toggle the "Show source data" option on the right side. Your screen now shows this "raw" view and you can see the "Copy value to clipboard" option on the right side.
How to transfer this data?
Having this output stored on SaaS Orchestrator, you can get it by sending API requests from other tools, so you can use this data as input in other applications or tools! To do so, follow these steps.
- Get the launch ID:
First, you need the launch ID: the identification number of a specific execution of a workflow. The idea is that you can use it to get all launch information, including the output data. You have two ways of getting it, and the simplest one is:
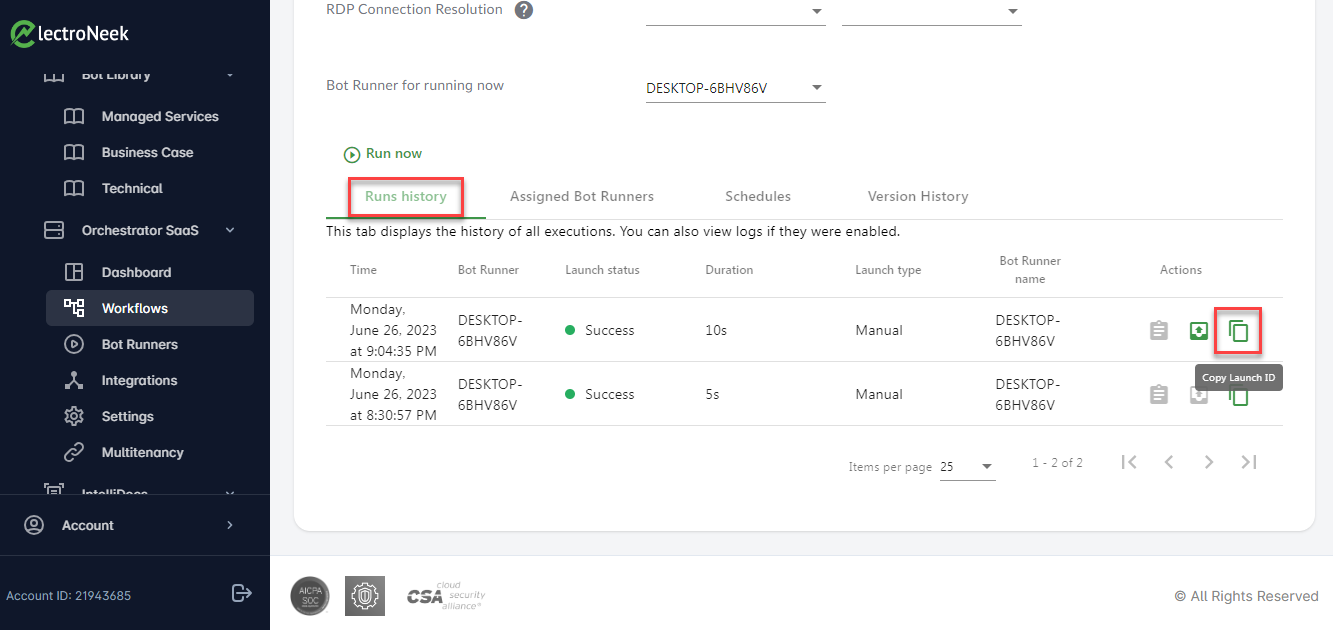
- Go to User Portal → Orchestrator SaaS → Workflows → Click on a workflow
- On the “Runs history” tab, you have the list of executions. For each of them, you find the “Copy Launch ID” button on the “Actions” column. Click on it.
NoteAnother way for you to get the launch ID is using this API method: Get Workflows Launches Summary. Each ID from the IP response corresponds to a Launch ID.
- Send an API request: Get launch info
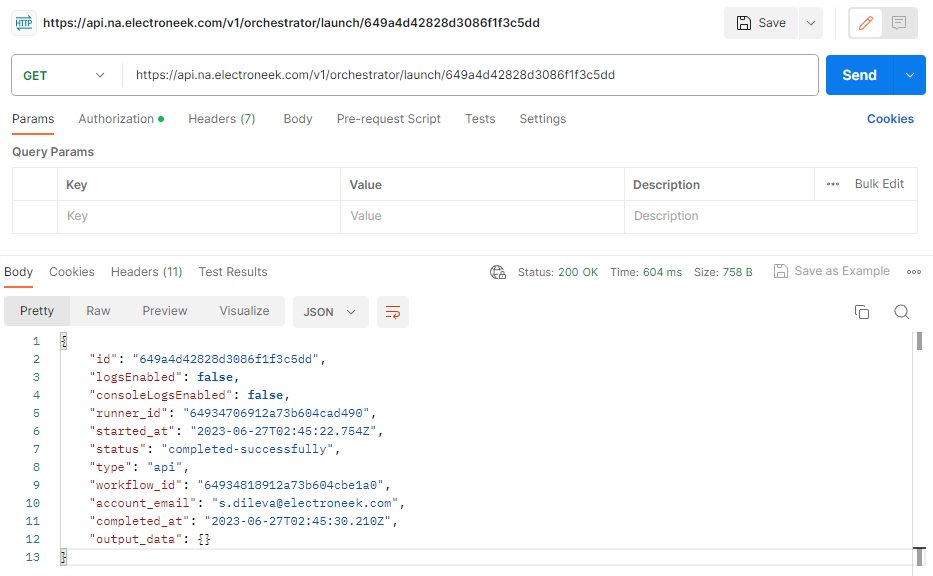
With the launch ID you can send an API request to SaaS Orchestrator. In this example, we use Postman, but you can do it with any similar tool. Create a new request and set the parameters as below. In the URL field, replace the {id} with your launch ID.
- Type or request: GET
- URL: https://api.na.electroneek.com/v1/orchestrator/launch/{id}
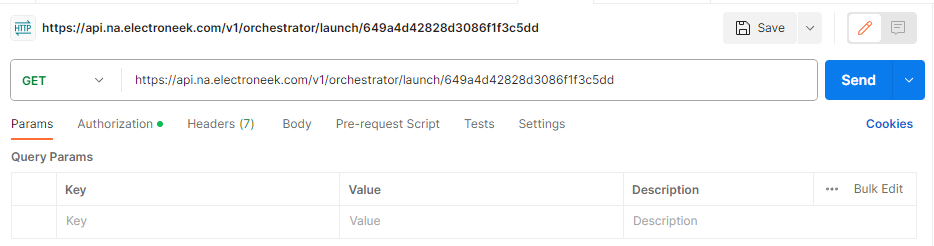
- Authorization tab:
- Type: Bearer Token
- Token: [Insert the token generated in SaaS Orchestrator]
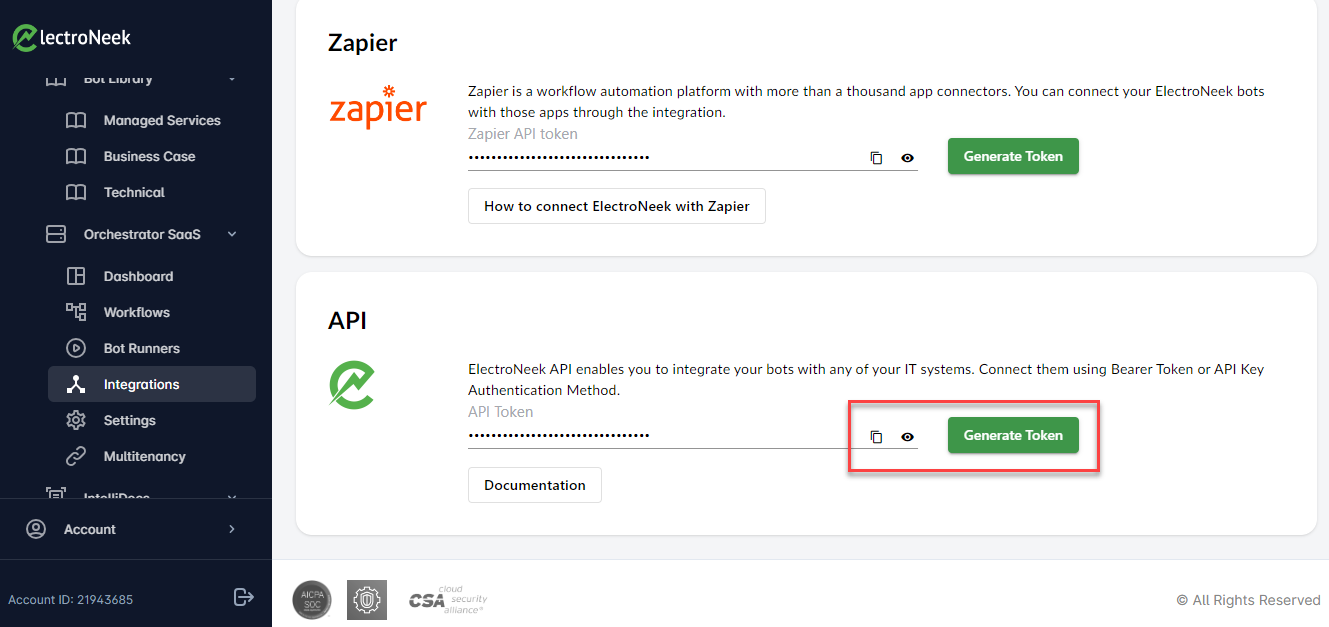
NoteIf you have doubts about how to generate your Bearer Token, please check this article.
Also, make sure the body of the request is blank.
Is everything set up? Click Send and check the result: the information related to the execution is included at the end of it — including the output data variable, as you can see below:
NoteFor more information about API requests, please check our API documentation page and this article.
How to publish your workflow in Orchestrator SaaS
Once a bot is developed and tested, you may want to publish it to Orchestrator SaaS so that you can manage this bot remotely, set schedules, and more. This is the instruction on how to do it with Studio Pro.
NoteYou need to have an Admin role in Orchestrator to publish bots.
We assume that you have prepared your bot and are ready to publish it. In order to do that:
- Open Studio Pro. Log in under your account. If you exist in multiple Teams, select a Team under which you want to log in.
- Open your workflow.
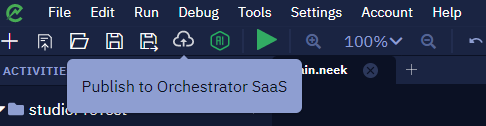
- Click "Publish to Orchestrator SaaS" in the menu bar.
- You will see a window where you need to fill a few parameters:
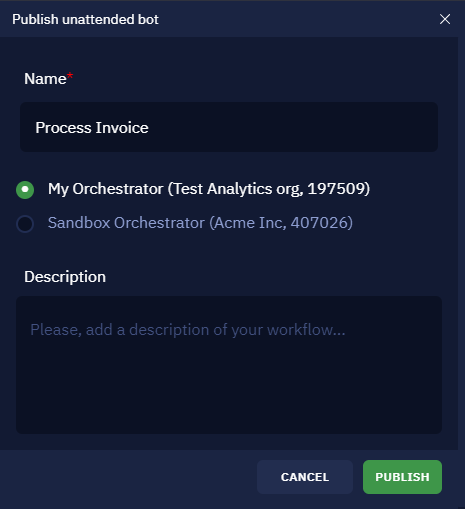
- Name - you can write a descriptive name so you can easily find it in a list.
- Orchestrators - if there is an Orchestrator connected to the Orchestrator of your Team, you will see it in the list. You will be able to choose where to publish the bot: to the Orchestrator that belongs to the account you're logged in under at this moment or to one of the connected Orchestrators.
- Description - give a description if needed.
- Click "Publish". Once you've clicked "Publish", Studio Pro will upload it to Orchestrator. The bot will be stored there.
NoteWhile publishing a bot to Orchestrator, our system will publish everything that is located in the same folder where the .neek file is placed and in the subfolders. If the size of the whole package is more than 20 MB then the publishing will be cancelled.
- You will see the workflow in Automation Hub → Orchestrator SaaS → Workflows. Assign Bot Runners to the workflow so that you can run this bot now or schedule them.
Important facts
- If you exist in multiple Teams and you want to publish a bot under the other team you belong to, you should log out from Studio, then enter your credentials to log in, and then select the desired Team. Then you can publish the bot to the Team's Orchestrator.
- If you have made changes to the bot, you need to repeat the publishing process so that Orchestrator works with the latest version of the bot. Orchestrator will not need to reconfigure bot launches: settings such as APIs, webhook links, or schedules will be saved.
- If you make changes to the bot and republish it to Orchestrator, it will replace the previously published workflow with its latest version. If you need to publish multiple versions of the workflow, you need to save each of them as a separate file and publish them to Orchestrator separately.
Token Connection
Introduction
Starting with release 7.0, connection to Bot Runner will only be possible using a token. Users with Analysts Roles are not allowed to change settings or generate Access Tokens. Read this article for more information about the roles available in Orchestrator. Bot Runner will no longer be tied to a specific user (via username and password) but will be available to any user within the organization via Orchestrator.
Creating a Token
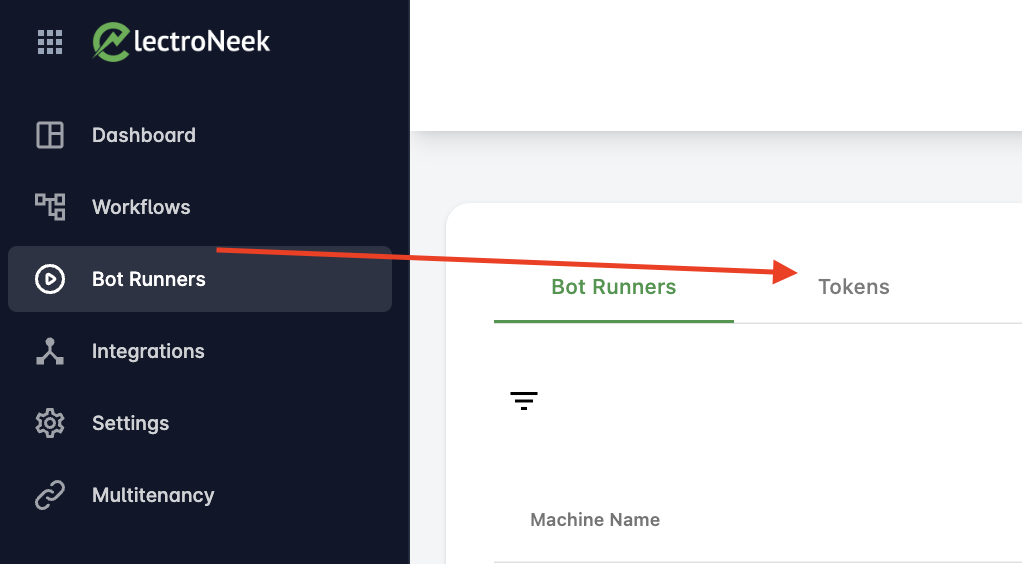
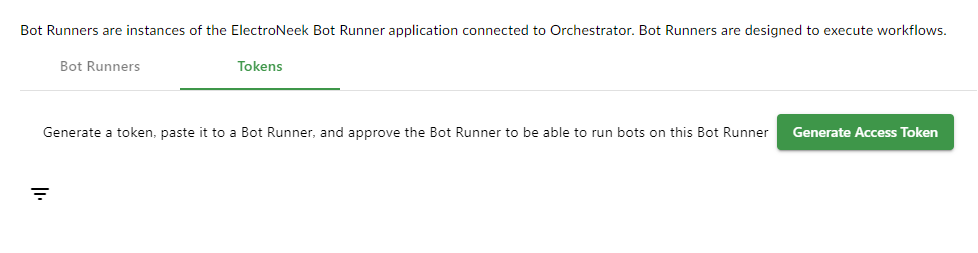
To create a token, go to the "Tokens" page on the Bot Runners Orchestrator page.
Click on the "Generate access token" button.
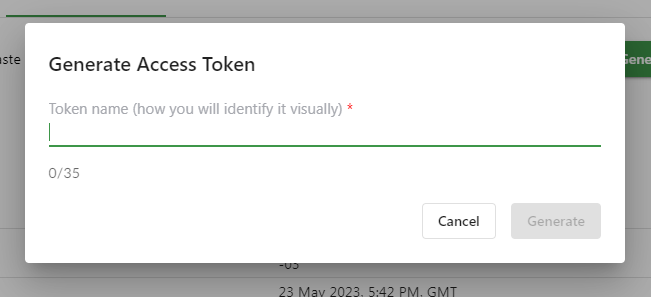
After that you will see a window for creating a token. Enter the name of the token (this is necessary to make the token easier to find in the list) and click "Generate".
Copy the token and paste it into the "Token" field on the Bot Runner Log In page. The Bot Runner is now connected to Orchestrator.

After you have connected the Bot Runner via token, you will need to do one more step. On the "Bot Runners" page in the Orchestrator, you will see the Bot Runner connected, but it will be in the "Not approved" section. To approve the Bot Runner, click on the "tick" symbol.
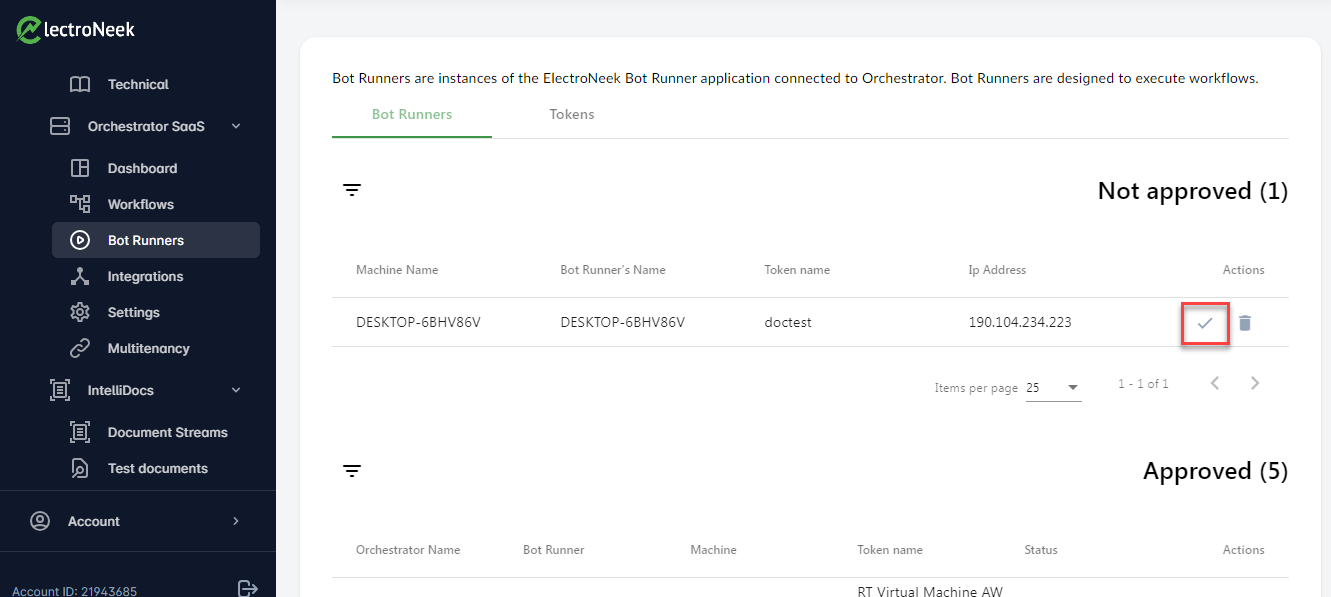
Note
Whenever you connect to a Bot Runner via a token, that Bot Runner will automatically assume a "Not approved" status.
A token that you have already generated cannot be generated or viewed again. Therefore, if you need to distribute a token across multiple Bot Runners, save it.
Multiple Bot Runners can be connected via a single token. However, if you deactivate this token, all Bot Runners connected through it will be deactivated.
How to assign Bot Runners
To run a workflow through Orchestrator, you must first load a bot into Orchestrator and assign one or more Bot Runners to that bot. To do this:
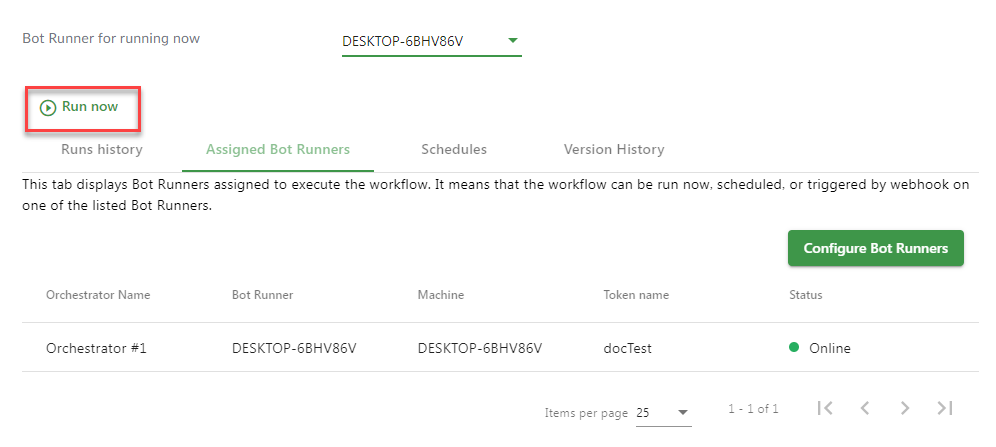
- Go to the "Workflows" page in your Orchestrator product and select a workflow.

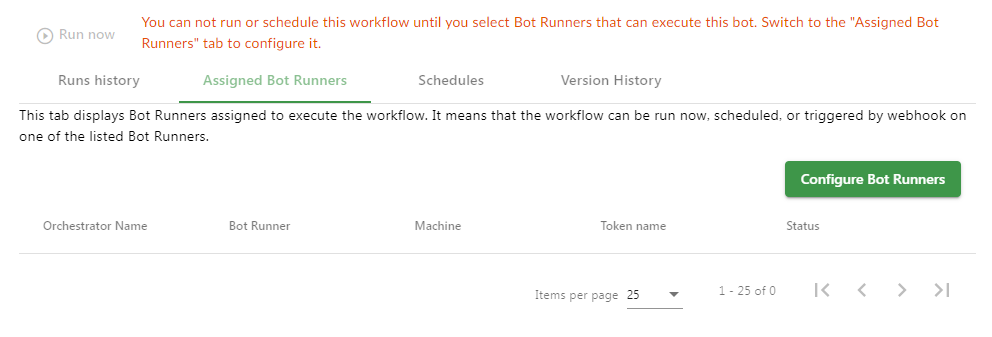
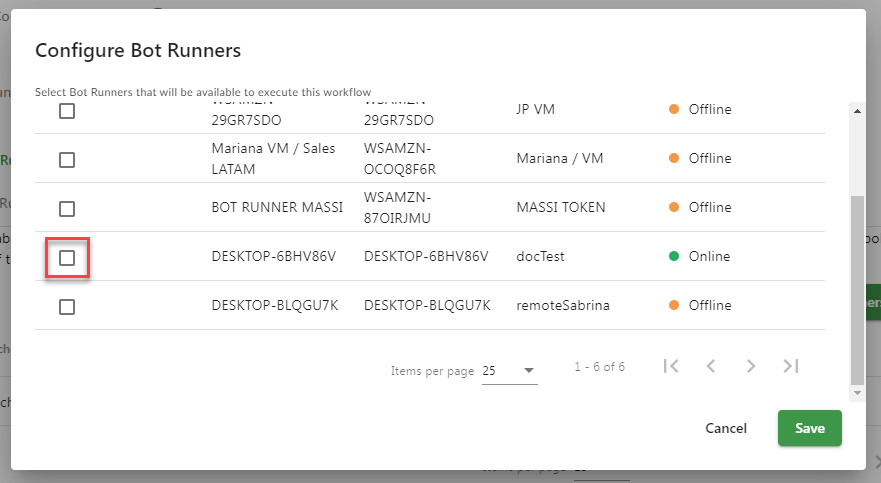
- Go to the Assigned Bot Runners tab and click on Configure Bot Runners.
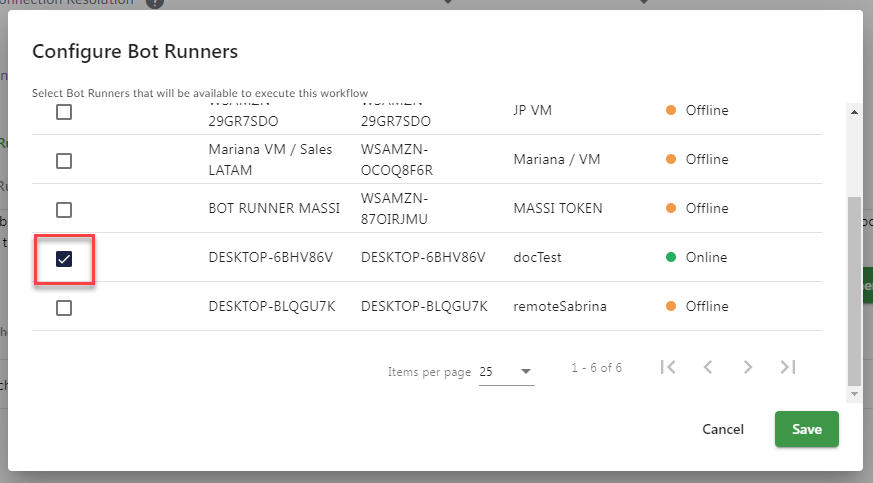
- Choose a Bot and Save.
- Select the same Bot in the dropdown menu at Bot Runner for runnung now.
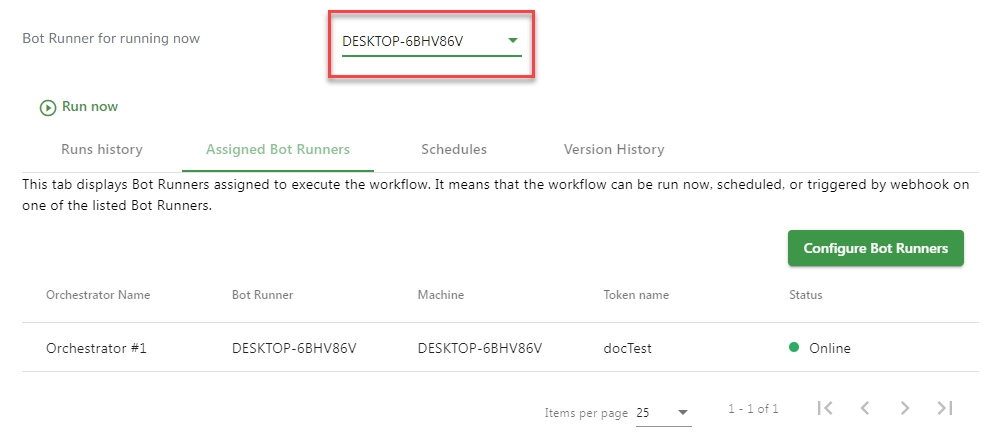
- Your Bot is ready to run.
Launching a Bot
There are three ways of launching bots:
- The "Run now" button in the Workflow page. Use this option to run the bot right here right now.
- "Scheduling". You can set a schedule for launching bots.
- Weebhook-link. This way allows you to run workflow by HTTP-request.
Deleting Bot Runners
- Navigate to the workflow page, click on the "Configure Bot Runners" button.
- Untick the previously selected Bot and Save.
How to schedule a workflow
When a workflow is published to Orchestrator, it is possible to set up a schedule for it. In order to do that:
- Go to the "Orchestrator SaaS" page and go to the "Workflows" page. Find your workflow in the table and open it.
- Switch to the "Schedules" tab, and then click on "Schedule".
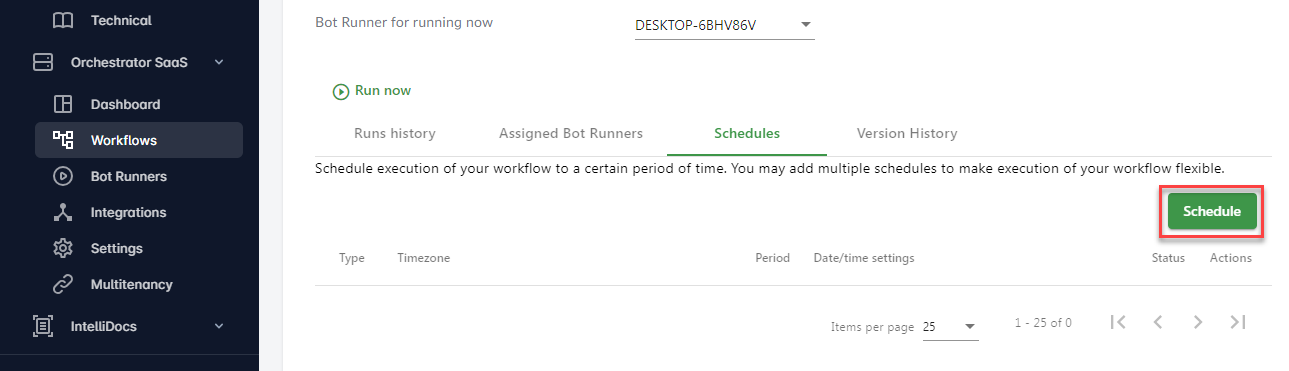
- Fill the parameters and Save.
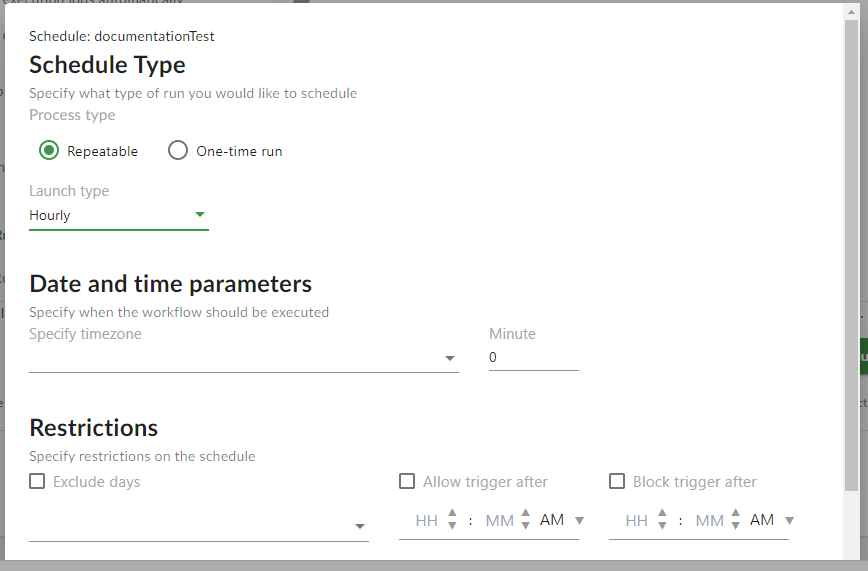
Schedule and Launch Types
Select the type of the schedule:
- Repeatable - you want this workflow to run on a regular basis.
- Hourly - the workflow will be triggered every hour at a specific minute.
- Daily - the workflow will be triggered every day at a specific time.
- Weekly - the workflow will be triggered every week at a specific day and a specific time.
- Monthly - the workflow will be triggered every month at a specific day and a specific time.
- Custom - the workflow will have a custom trigger schedule, for example, "every 3 hours".
- One-time run - you want this workflow to be executed once at a specific day and time.
Date and time parameters
Date and time parameters depend on the process type and launch type. For each process type and launch type there is a common parameter - Specify timezone. This parameters sets up the time zone in which the workflow must be executed. We will not mention this parameter below any more.
Repeatable type
These are the other parameters for each launch type:
- Hourly:
- Minute - at which minute this workflow must be triggered every hour.
- Example: if you specify "
30", the workflow will be triggered every hour at the 30th minute: 12:30 PM, 13:30 PM, 14:30 PM, and so on.
- Daily:
- Time - at which time this workflow must be triggered every day.
- Example: if you specify "
3:30 PM" then this workflow will be triggered every day at 3:30 PM.
- Weekly:
- Day - at which day this workflow must be triggered every week.
- Time - at which time this workflow must be triggered every week.
- Example: if you specify "
Monday" for the Day parameter and "4:25 PM" for the Time parameter, the workflow will be triggered every week on Monday at 4:25 PM.
- Monthly:
- Day of month - at which day of month (by number) this workflow must be triggered every month.
- Time - at which time this workflow must be triggered every month.
- Example: if you specify "
5" for the Day of month parameter and "2:00 PM" for the Time parameter, the workflow will be triggered every fifth day of month at 2:00 PM.
- Custom:
- Hour, Minute, Second - the duration between triggers.
- Example: if you specify "
3" for the Hour parameter, "30" for the Minute parameter, and "30" for the Second parameter, the next trigger will happen in 3 hours 30 minutes 30 seconds. For example, the bot was executed at 1:00 PM, then the next execution will be at 4:30:30 PM.
One-time run
If the one-time run is selected, the parameters are the following:
- Date - on which exact day the workflow must be triggered.
- Time - at which time the bot must be triggered.
Example: if you specify "05.09.2021" for the Date parameter and "3:00 PM"for the Time parameter, the workflow will be executed on September 5, 2021 at 3:00 PM.
Restrictions
In some cases you may want to put restrictions on execution of a specific bot. For some launch types, there is no the ability to set up restrictions, for some launch types, you have this ability. Overall, three possible restrictions exist in the system:
- Exclude days - specify on which days this workflow should not be executed.
- Available for launch types: Hourly, Daily, Custom.
- Start trigger after - specify after which time the bot can be triggered. Before this time the trigger will not work.
- Available for launch types: Hourly, Custom.
- Block trigger after - specify before which time the bot can be triggered. After that time the trigger will not work.
- Available for launch types: Hourly, Custom.
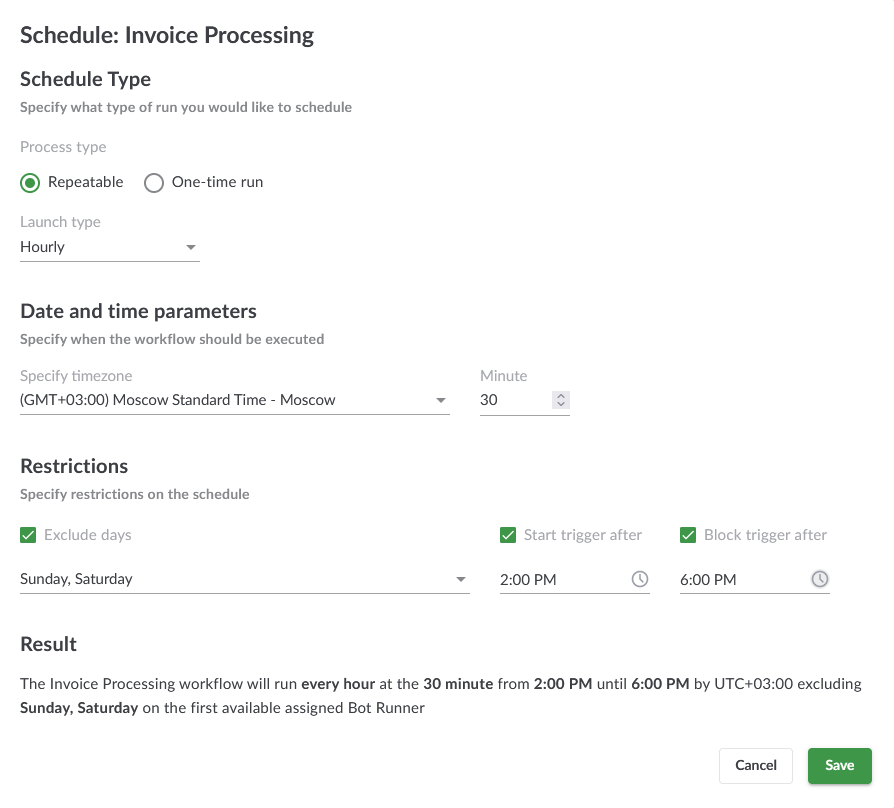
Example:
- Launch type is set to "Hourly".
- Exclude days is enabled, the value is "Saturday, Sunday"
- Start trigger after and Block trigger after are enabled and set to "2:00 PM" and "6:00 PM" respectively.
- Result: the bot will be triggered every hour from 2 PM until 6 PM and will not be triggered on Saturdays and Sundays at all.
- Once you've set up all the parameters, click "Save". The schedule will be added to the list of schedules. You may want to add another schedule. If so, repeat all the steps above.
An example is provided in the screenshot below:
Editing Schedules
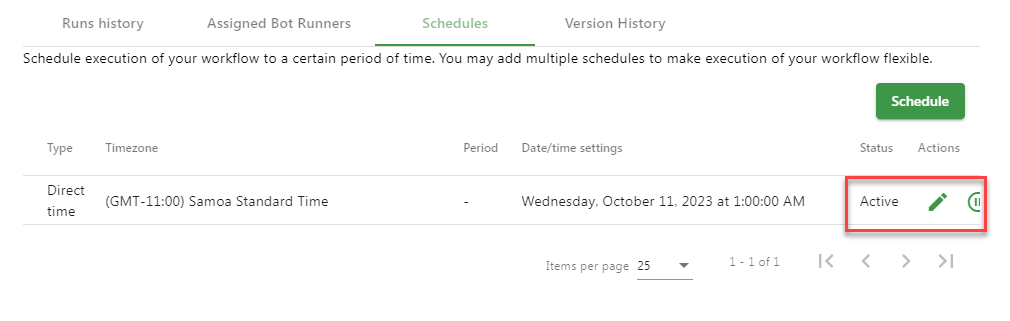
Every schedule has its status:
- If it's set to "Active", the schedule is in use. You may click on the "Pause" button to disable it.
- If it's set to "Inactive", the schedule is not applied. You may click on the "Play" button to enable it.
If you click on the "Edit" button, you will be able to edit the schedule. If you click on the "Delete" button, you will be able to delete the schedule from the list.
How to deal with CAPTCHA
Description
Nowadays solving CAPTCHAs on websites is an extremely common but monotonous task. Thus, it can be automated using bots. For this reason, an automatic captcha solver has been implemented in Orchestrator SaaS.
NoteOnly the users with Owner and Billing contact roles have access to that page.
How to set it up?
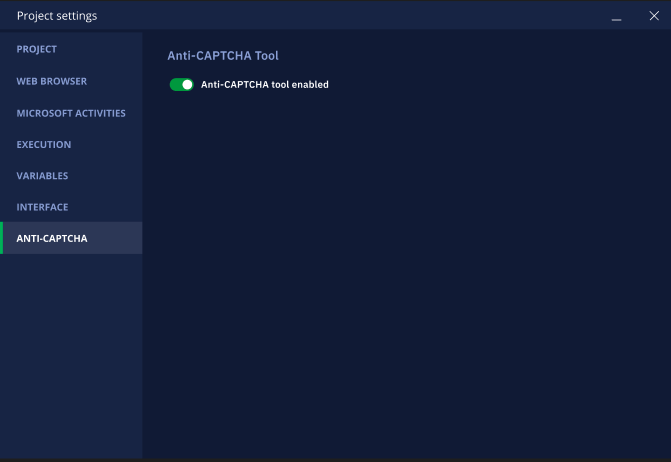
Studio Pro implements an automatic algorithm for solving CAPTCHAs and is available to all users by default. You can find the anti-CAPTCHA feature on the "Billing" page of the User Portal. To access it, expand the Account option and click Billing. On the page, scroll down until you see the Anti-CAPTCHA add-on.

How to use it?
At the moment, our bots can solve reCAPTCHA v2 and only work with the Chrome Native web browser. This Anti-CAPTCHA option is automatically enabled in Studio Pro. However, if you want to disable it, access the Project Settings window.
Our Captcha solver launches automatically when a bot interacts with your web browser, for example by the "Open URL" activity. Therefore, you do not need to perform any additional actions with the bot. However, if problems arise while solving the captcha, the bot will try to solve the captcha three times. If the bot still cannot solve the captcha, the workflow will follow its actions according to the logic.
If several web pages have been opened, only the last opened page with the captcha will be solved.
As an example, take the following workflow: the bot opens the https://www.google.com/recaptcha/api2/demo page and clicks the "Submit" button.
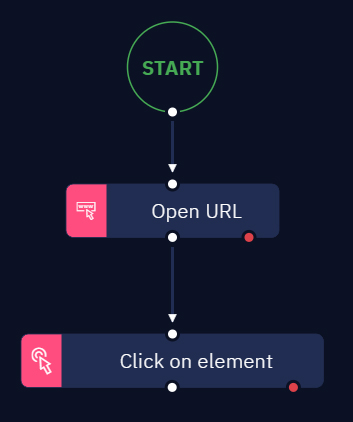
When a bot is running, in the status window you can see the Anti-Captcha activity running with a message that reads Solving CAPTCHA...This is useful especially when the workflow takes a long time to be completed.
How to work with webhook links
What is a webhook link?
A webhook link is one of the ways to launch bots via Orchestrator SaaS. Such a link allows you to start a workflow via an HTTP request.
How to use it?
One possible scenario for using webhook links is to run a workflow from programs and applications that are not associated with ElectroNeek, but in which you want to integrate the ElectroNeek bot.
For example, if your company already has a program in a specific programming language that addresses a particular business problem, you can enhance its functionality by integrating it with the ElectroNeek bot using a webhook link.
How does it work?
You can generate a webhook link from the bot management page in Orchestrator.
- Publish the created bot in Orchestrator SaaS.
- Make sure that the bot's status is displayed as "Ready".
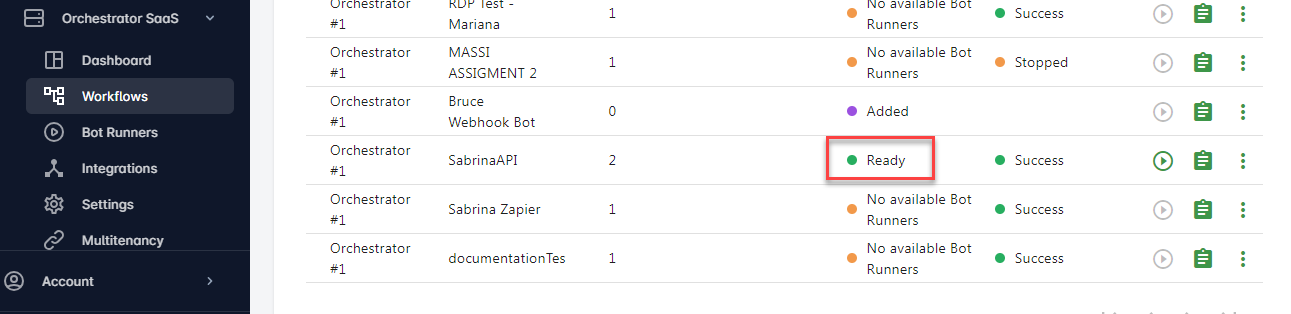
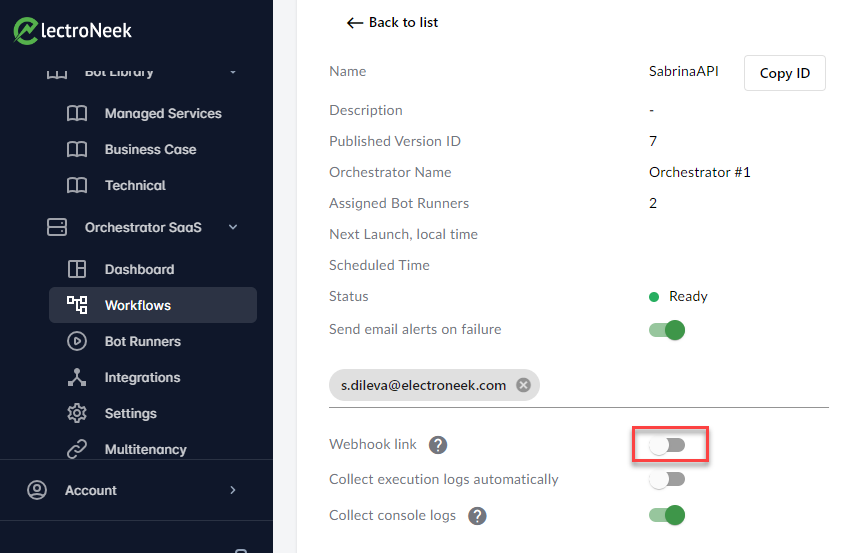
- Go to the "Webhook link" line in the bot's settings. Turn on the switch to create a link.
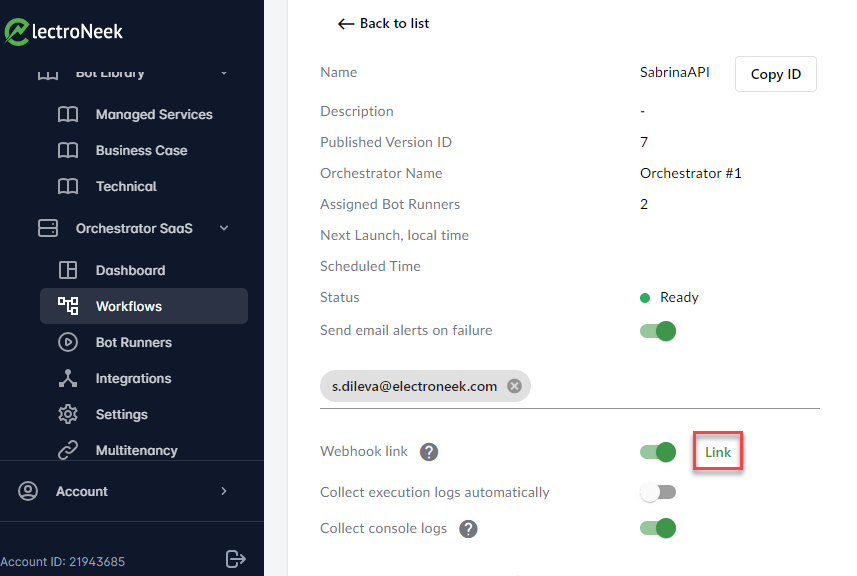
- Click the "Link" button to copy the webhook link to the clipboard.
Passing parameters into an HTTP request
It is possible to pass any parameters "inside" the bot when using a webhook link. In Studio Pro there is a variable webhook_data. This is where the parameters you set will be passed to.
You can use a webhook agent, such as Postman, to pass the parameters you want to the variable. Select the "POST" option, copy the webhook link and paste it into the line next to it. In the "Body" section, write down the parameters you want to pass to the variable.
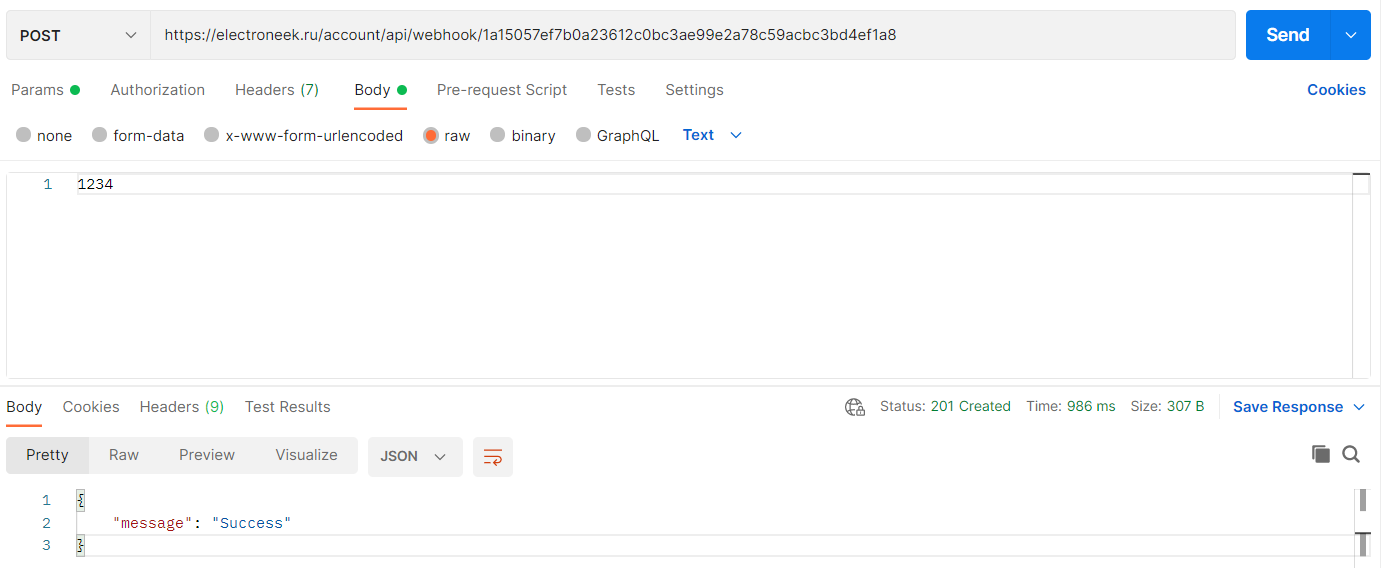
Example of parameters transferred to the bot through Postman
This is an example of how the workflow could be structured for passing the parameters:
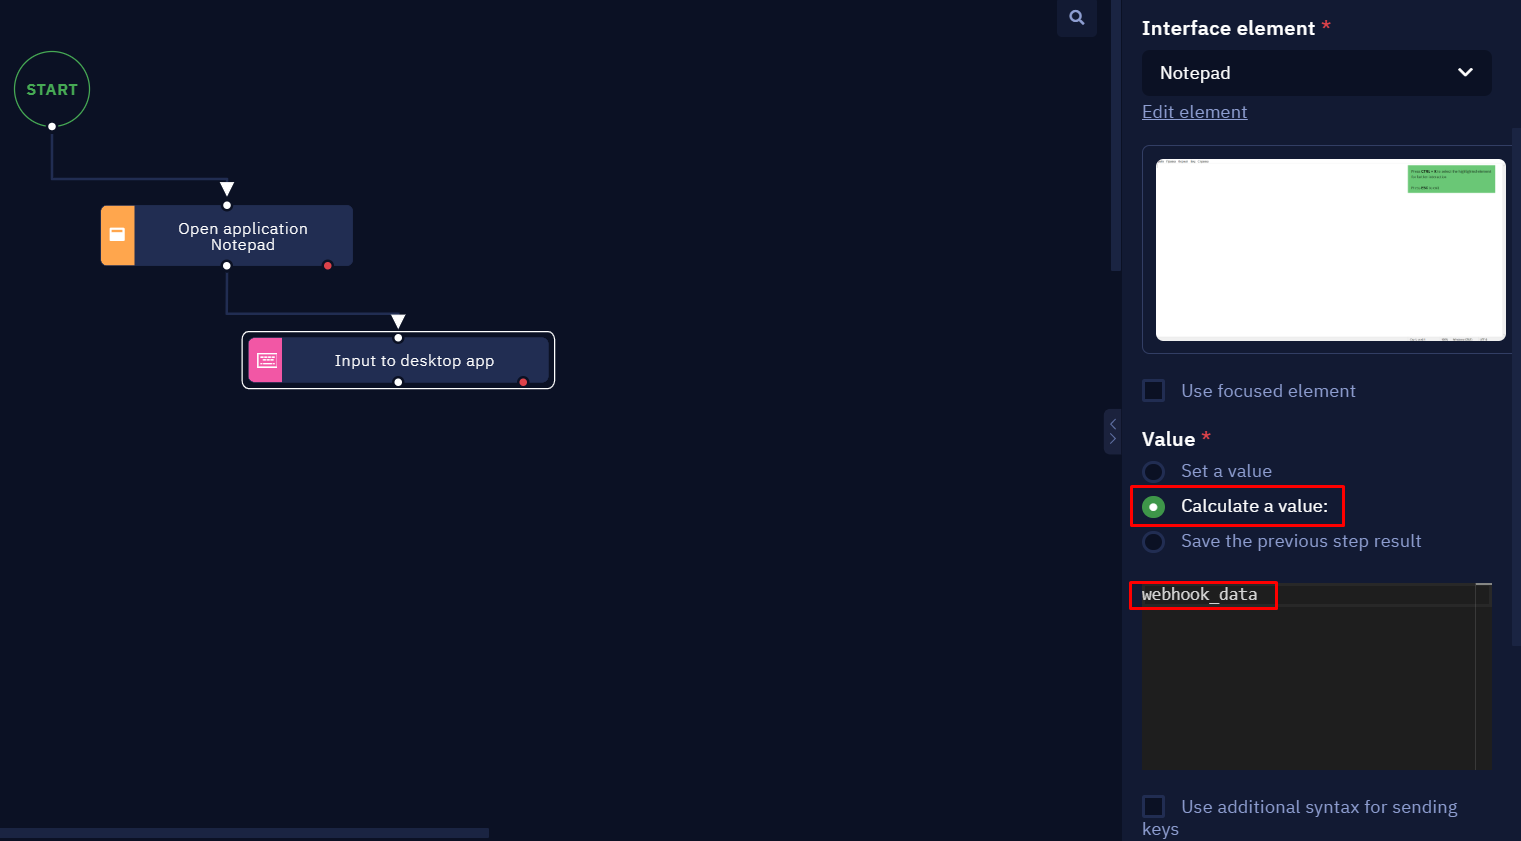
The "Value" parameter of the "Input to desktop app" activity uses the "Calculate a value" option and the webhook_data value is written down in the input field. This is necessary for the parameters passed to webhook_data to be used by this activity.
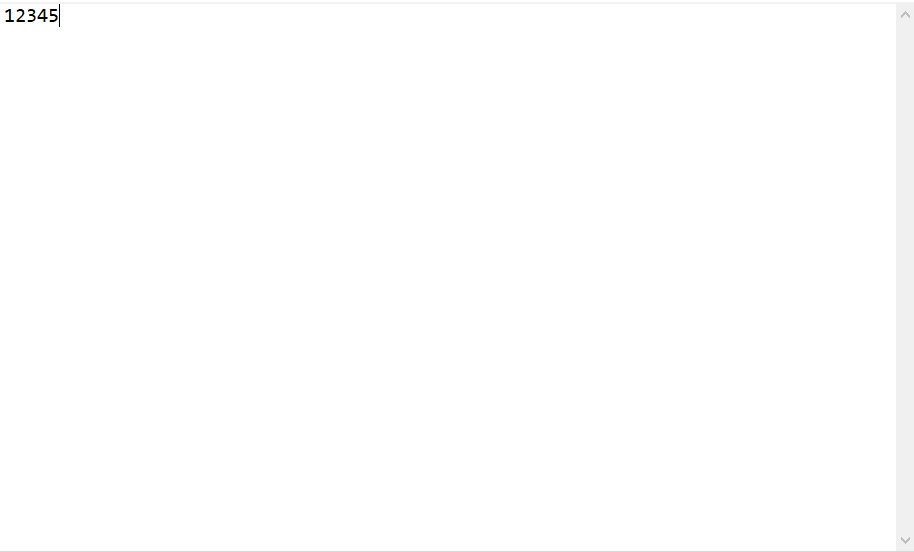
Thus, the result of this bot's actions in the Notepad will look like this:
How to run workflows sequentially using Webhook links in Orchestrator
Here is an example of a use case:
- The workflow_2 should be uploaded to Orchestrator SaaS and have the “Webhook Link” enabled.
- Copy the webhook link of the workflow.
- Open the workflow_1 and add the HTTP Request activity with the webhook link as a URL.
Note“HTTP Request” is usually added as the last activity. Otherwise, it is added to the queue of the Bot Runner and will only be launched when the Bot Runner is available.
- Upload workflow_1 to Orchestrator and schedule it.
The workflow_1 will be launched by schedule and will trigger workflow_2 at the end of its execution.
Queue in Orchestrator
Introduction
Workflows connected to Orchestrator can get into a queue. For example, you may have one Bot Runner assigned to multiple workflows, and those workflows, in turn, may have the same scheduled start time. Multiple workflows cannot be run simultaneously by the same Bot Runner, so they will get into the queue.
Principles of queueing
-
If the workflow is scheduled:
- The system looks for all the Bot Runners with an "online" status, which are assigned to this workflow.
- The first "online" Bot Runner executes the workflow.
- If all of the Bot Runners are busy, the workflow goes into a queue. If the workflow already exists in the queue, it won't be put into the queue again.
-
If the workflow is run by a click on the "Run now" button:
- The selected in the drop-down list Bot Runner executes the workflow.
- It is impossible to select a "busy" or "offline" Bot Runner in the drop-down list.
-
If the workflow is run by the webhook-link:
- In this case, the principle will be the same as in the case of the schedule, with the only difference that if the same bot is already in the queue, and some parameters are passed to the new bot to be launched, that new bot will still be added to the queue.
-
If the workflow is run by the API:
- In this case, the principle will be the same as in the case of the webhook-links.
Launch management
Workflows in the "In queue" and "In progress" statuses can be seen on the "Run history" page in the "Workflows" and "Bot Runners" tabs. If you want to cancel the execution of the workflow, you can perform the following actions:
- Delete the workflow from the queue. To do that, click on the symbol by the corresponding workflow:

- Perform a "soft-stop" or a "hard-stop" of the workflow. To do that, click on the required symbol:

The soft-stop finishes the execution of the bot alowing it to complete the action (or activity) and stop after that. The hard-stop forces the bot to stop without executing any further actions. It's better to use the hard-stop only when it's absolutely necessary, for example, when the system is frozen or a critical error has occured. The reason for that is that the hard-stop may disrupt files or system fucntions, the bot interacts with.
How to trigger an ElectroNeek bot from Zapier
Introduction
The ElectroNeek platform supports integration with the Zapier automation service. Zapier has only one action applicable to ElectroNeek - "Launch bot". This action serves as a trigger for the bot published to Orchestrator. In this article, we will look at a simple example of an algorithm that is triggered by Zapier.
Preriquisities
Let's assume that you already have access to Zapier and the ElectroNeek RPA is available there. Basically, there are 4 steps required for ElectroNeek bots to work with Zapier:
- Create a bot in ElectroNeek Studio Pro.
- Publish the bot in Orchestrator SaaS.
- Assign Bot Runner to this bot.
- Create Zap.
So, in the ElectroNeek ecosystem, you need to have access to Bot Runner and Orchestrator SaaS. Access to Studio Pro is optional, as you can work with a bot already created by someone else.
Connecting to Zapier
Once everything is ready on the ElectroNeek side, you can proceed to create the Zap. To do this:
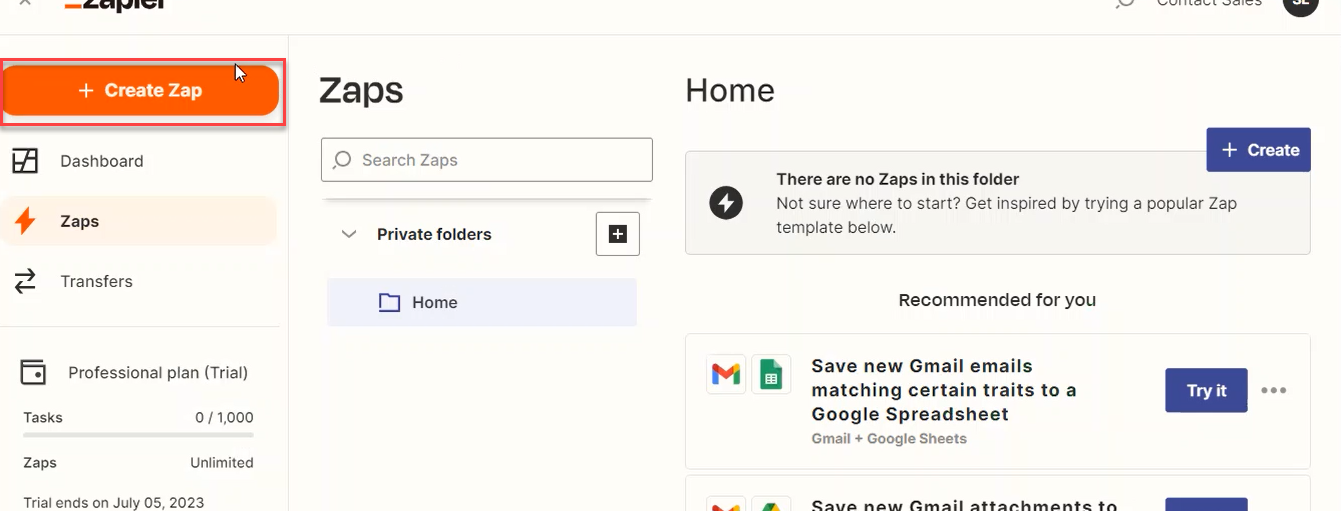
- Navigate zapier.com and log in.
- Click on "Create Zap".
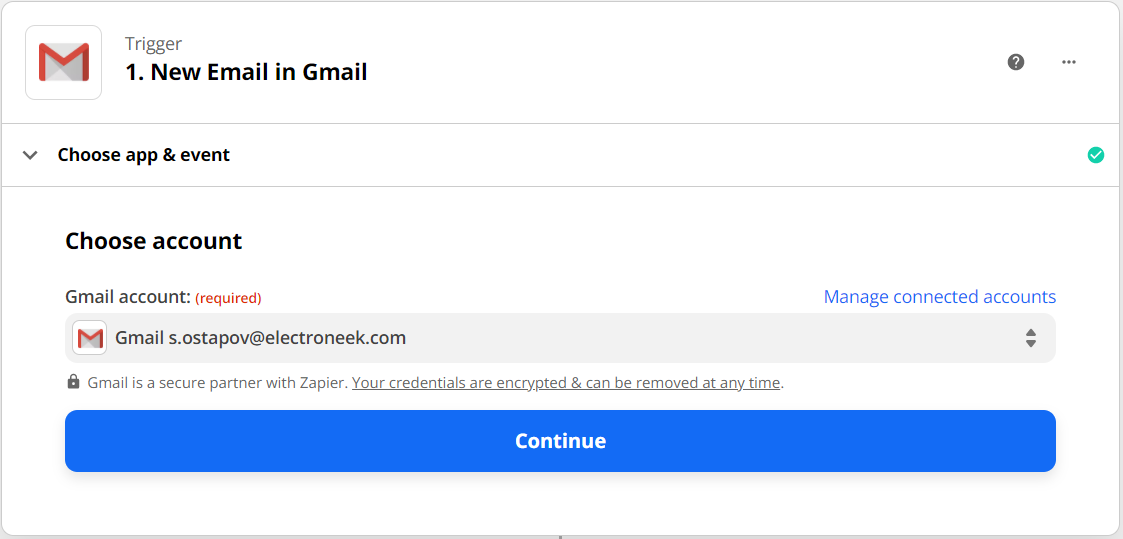
- Select the trigger you want. Follow the instructions on the screen. In some cases you need to check the trigger, authorize accounts, and so on.
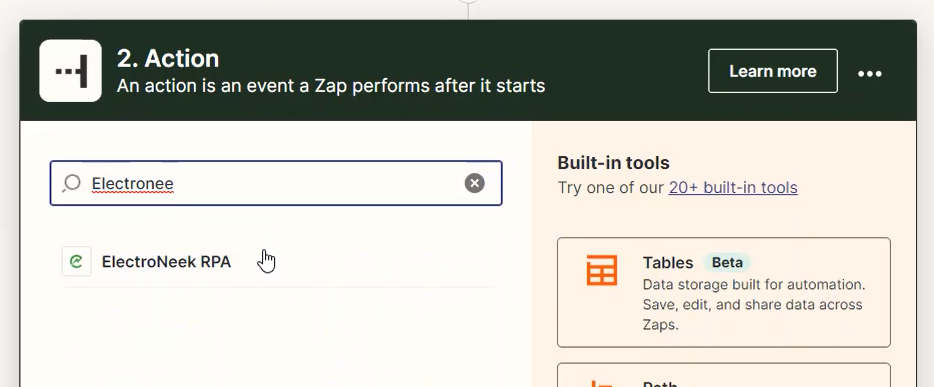
- On the "Action" page, select "ElectroNeek RPA".
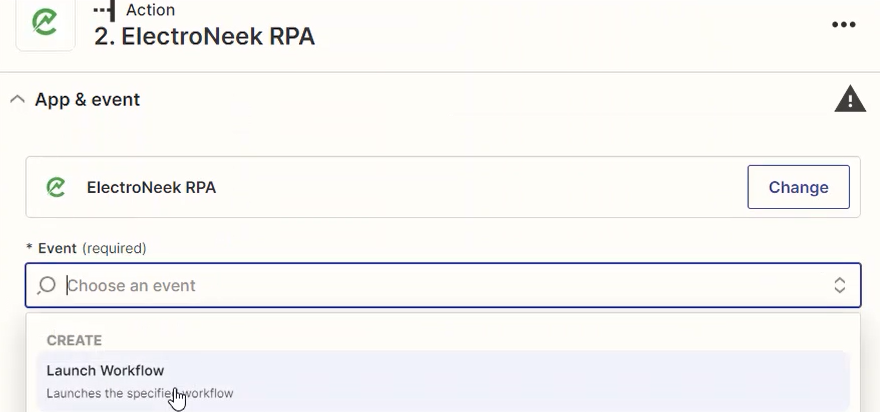
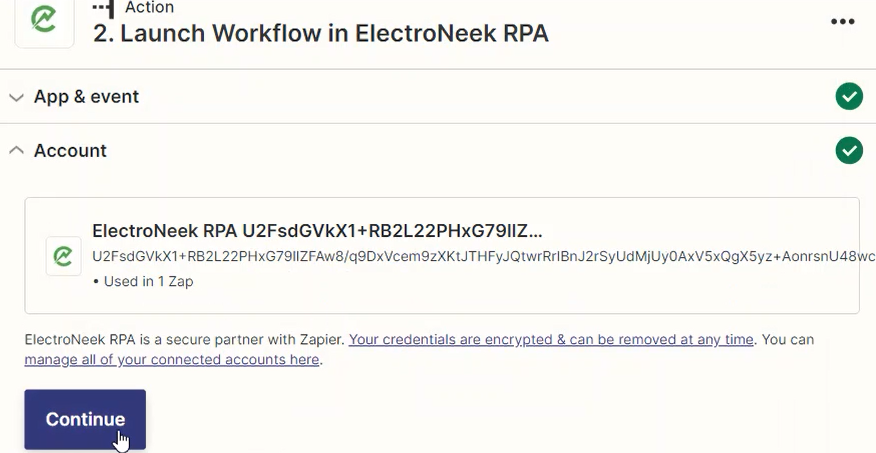
- In the "Event" parameter, select "Launch workflow".
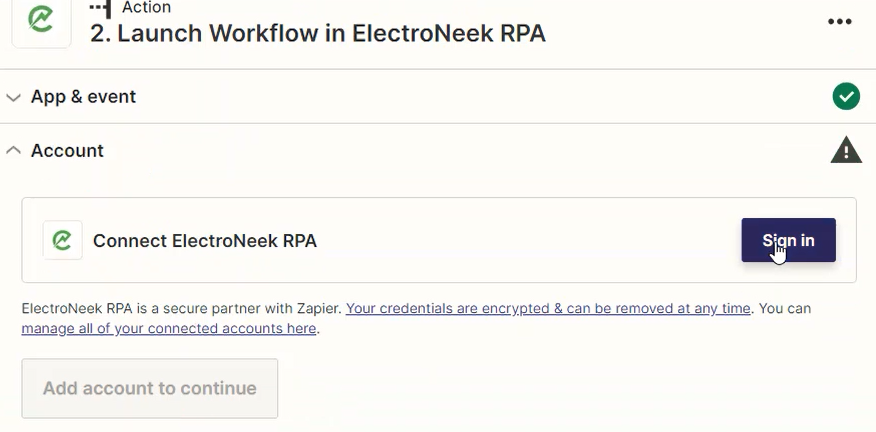
- In "Account" go to "Sign in".
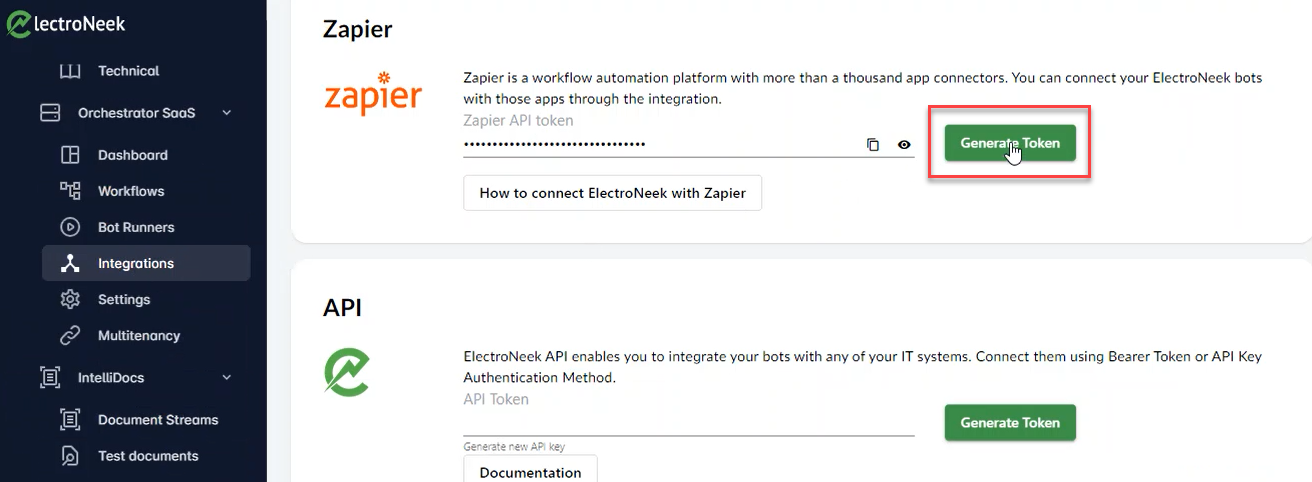
- A pop up window will appear. Go to Orchestrator SaaS > Integrations and generate a Zapier Token.
- Paste this token in the pop up window and continue.
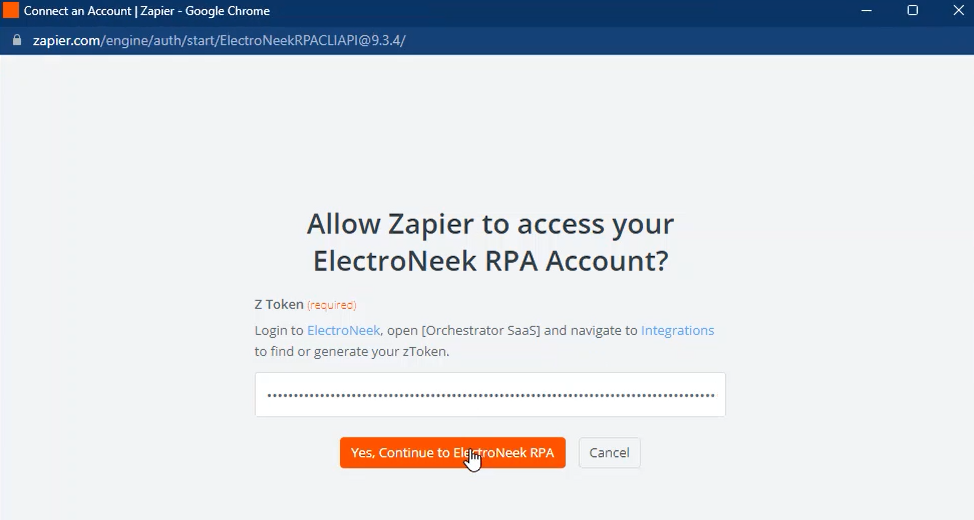
- Return to Zapier and continue.
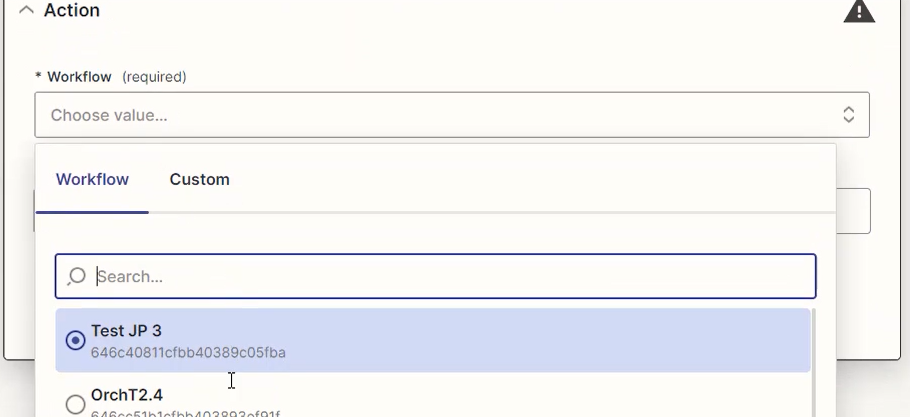
- Select your workflow.
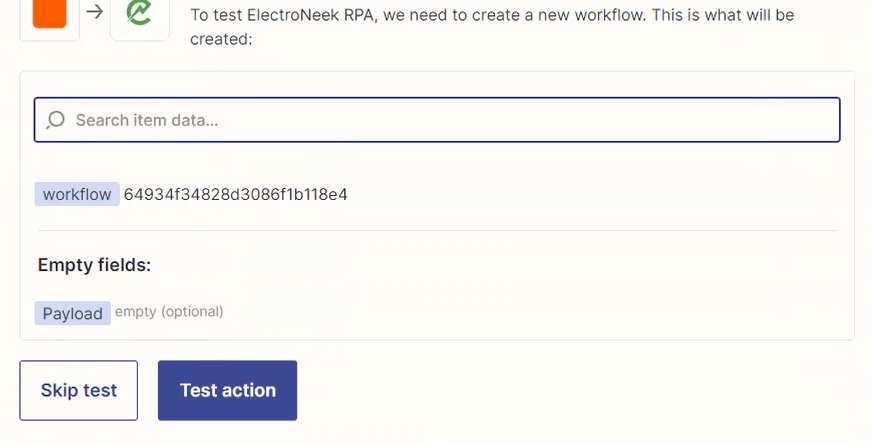
- Continue and click on "Test action".
- Click on "Publish".
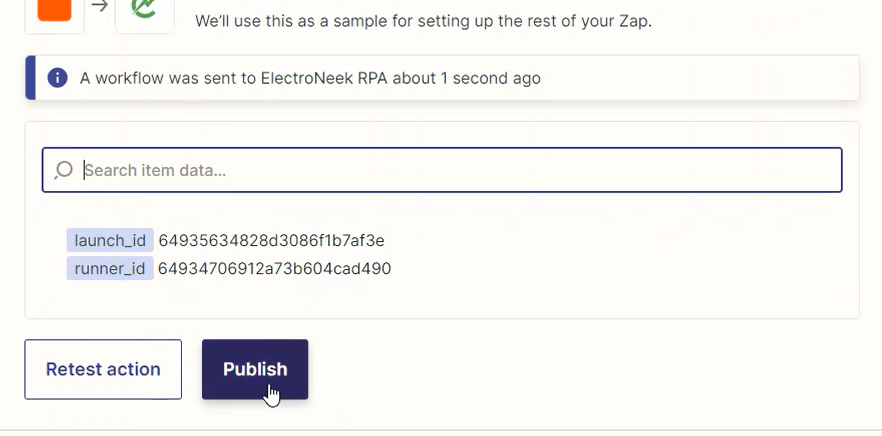
- You'll see the following success message:

- You can check your workflow's run history and you'll see a new execution was triggered.
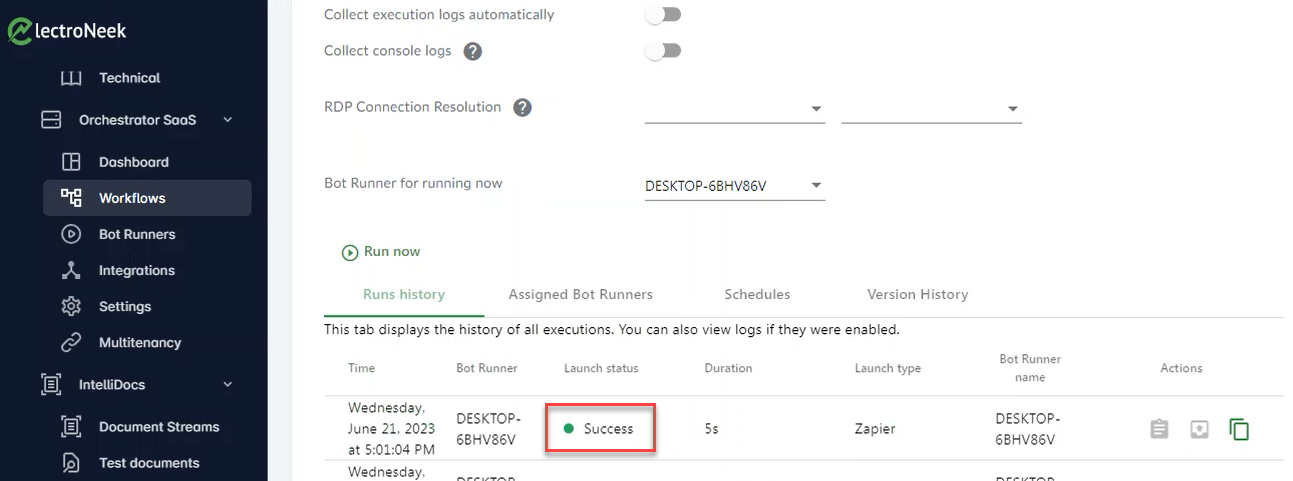
- The bot will be lunched automatically by the trigger selected in step 3.
Logging
Studio Pro and Bot Runner can register logs about each workflow you run. Here are two options for you to collect and save this data with Orchestrator SaaS.
Collecting execution logs
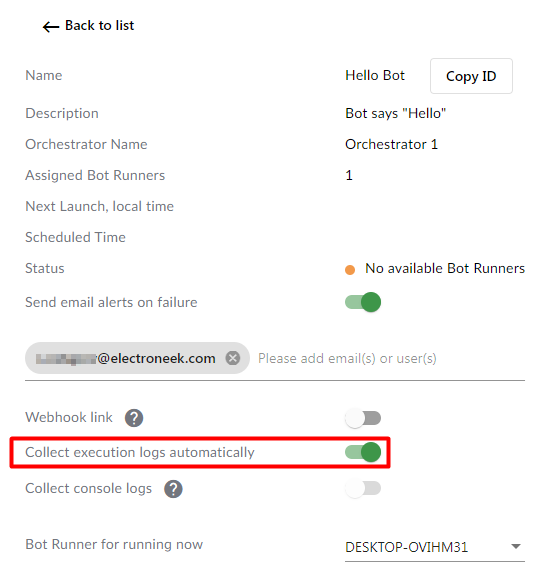
Orchestrator SaaS can collect execution logs automatically. This data shows every execution of the bot. Follow these steps to enable this option:
- Navigate to the "Orchestrator SaaS" page of the User Portal.
- Open the "Workflows" tab.
- Select a workflow.
- In the list of parameters, enable the "Collect execution logs automatically" option.
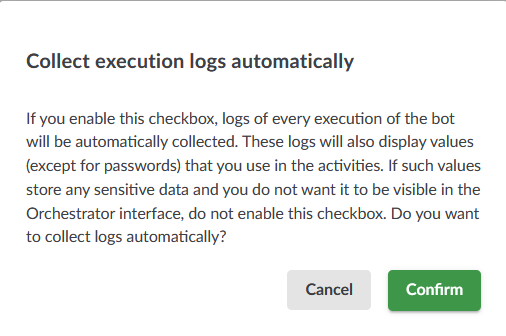
- A confirmation window displays. Click "Confirm".
Checking results
If the option is enabled, you can see execution logs after running the bot. To do that:
- Navigate to the "Workflows" tab.
- Go to the list of workflows and click on the desired one.
- Go to the "Runs history" tab.
- Among the list of launches, choose one and press the "sheet" symbol to see its logs.
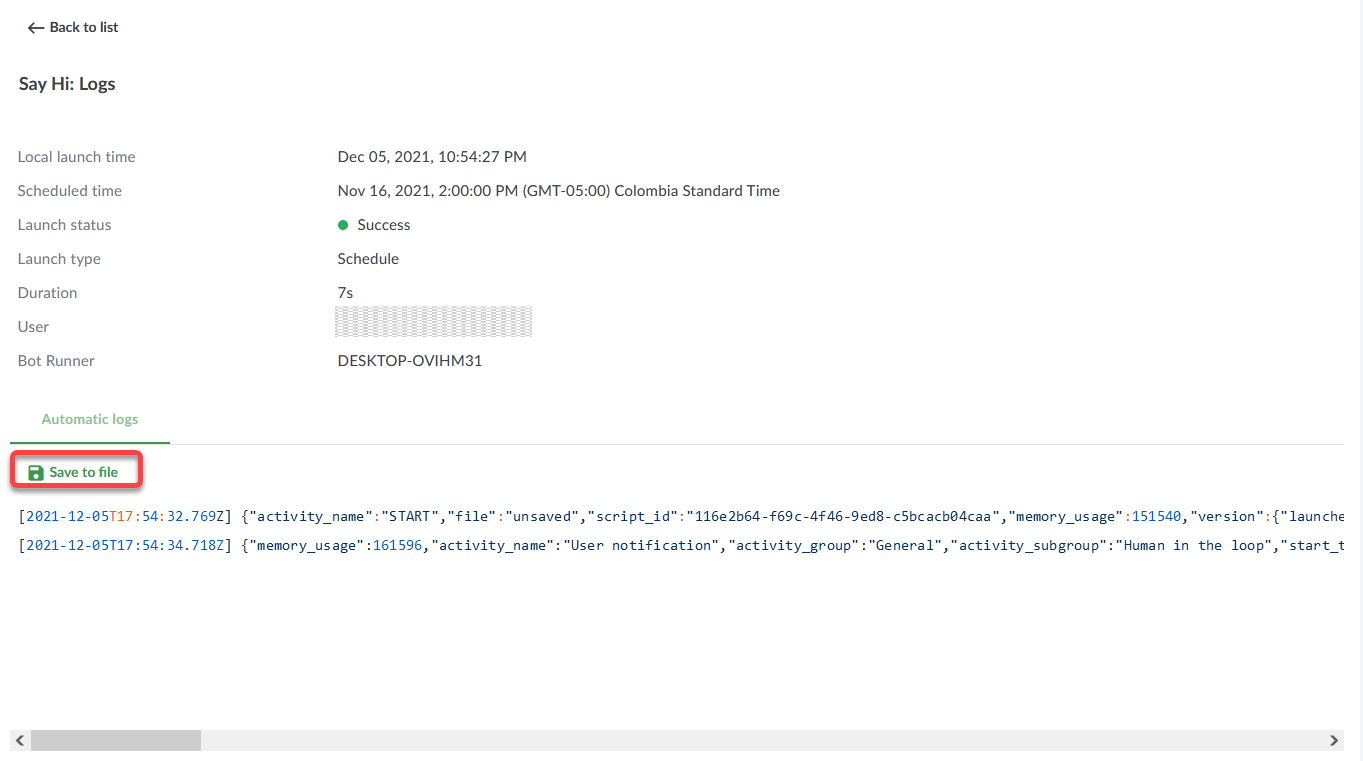
- Click on the "Automatic logs" tab.
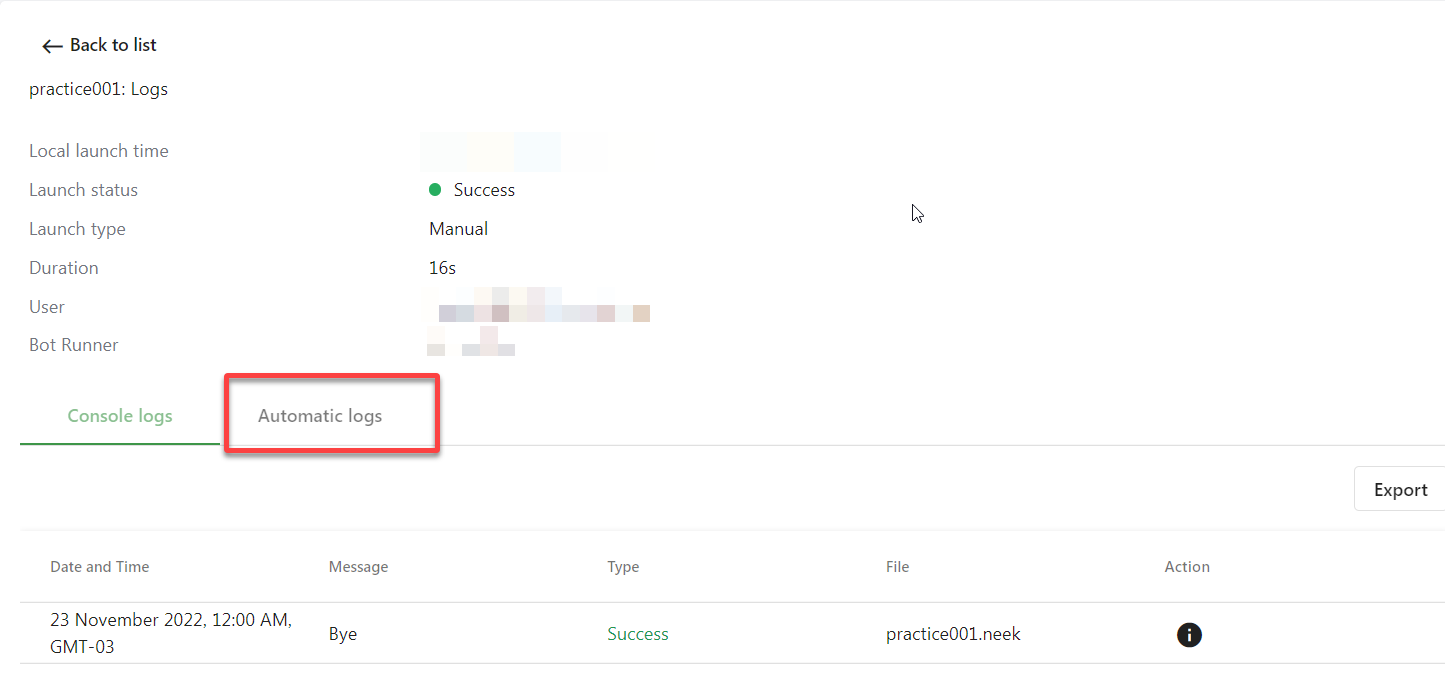
To download logs as CSV files, click "Save to file".
Collecting console logs
Users can collect data obtained from the Console log activity in the workflow.
PrerequisiteMake sure the Console log activity is used in the workflow.
This Studio Pro activity allows you to see information such as time, warnings, success messages, errors, etc. From these details, you can check, for instance, if a business parameter fails and then a business owner with an Analyst role in Orchestrator SaaS can access the platform and see what happened.
Checking results
If the logging option is enabled, you can see bot logs after executing them. To do that:
- Navigate to the "Workflows" tab.
- Go to the list of workflows and click on the desired one.
- Go to the *"Runs history"* tab.
- Among the list of launches, choose one and press the "sheet" symbol to see its logs.
- There you see the "Console logs" tab.

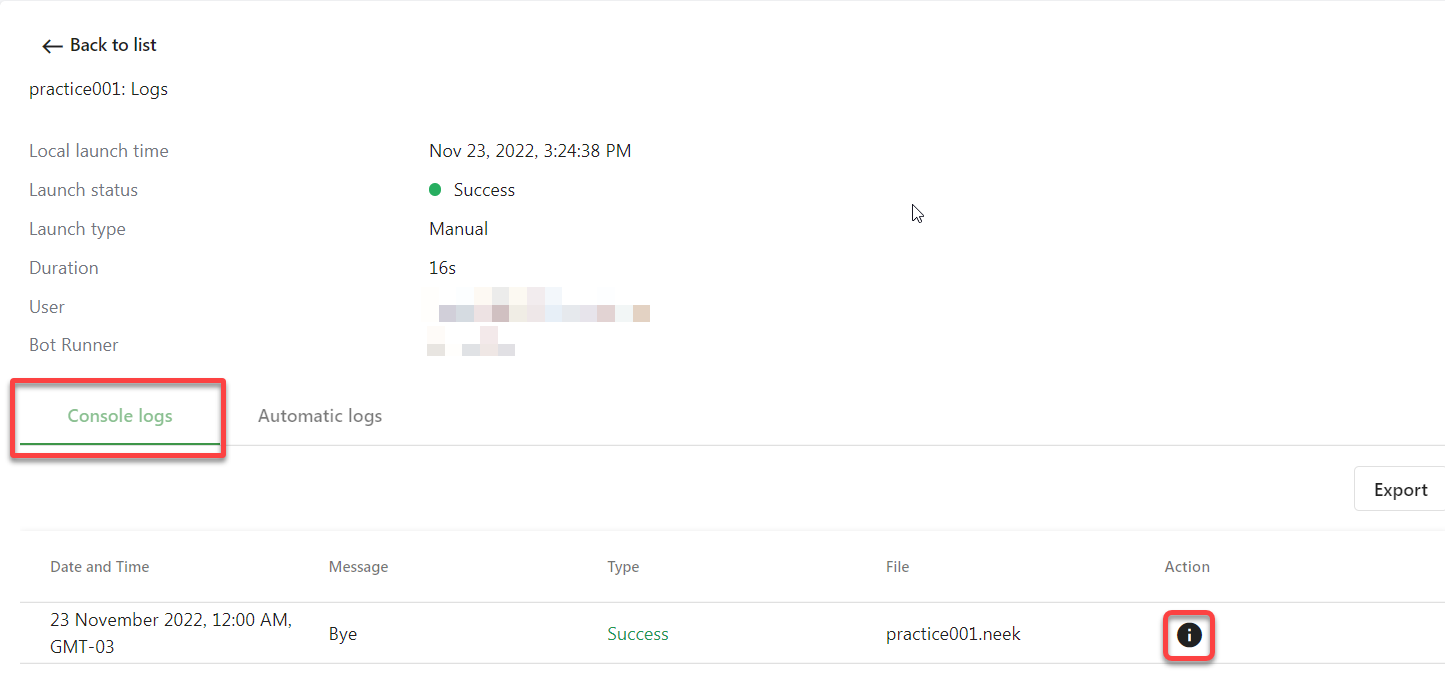
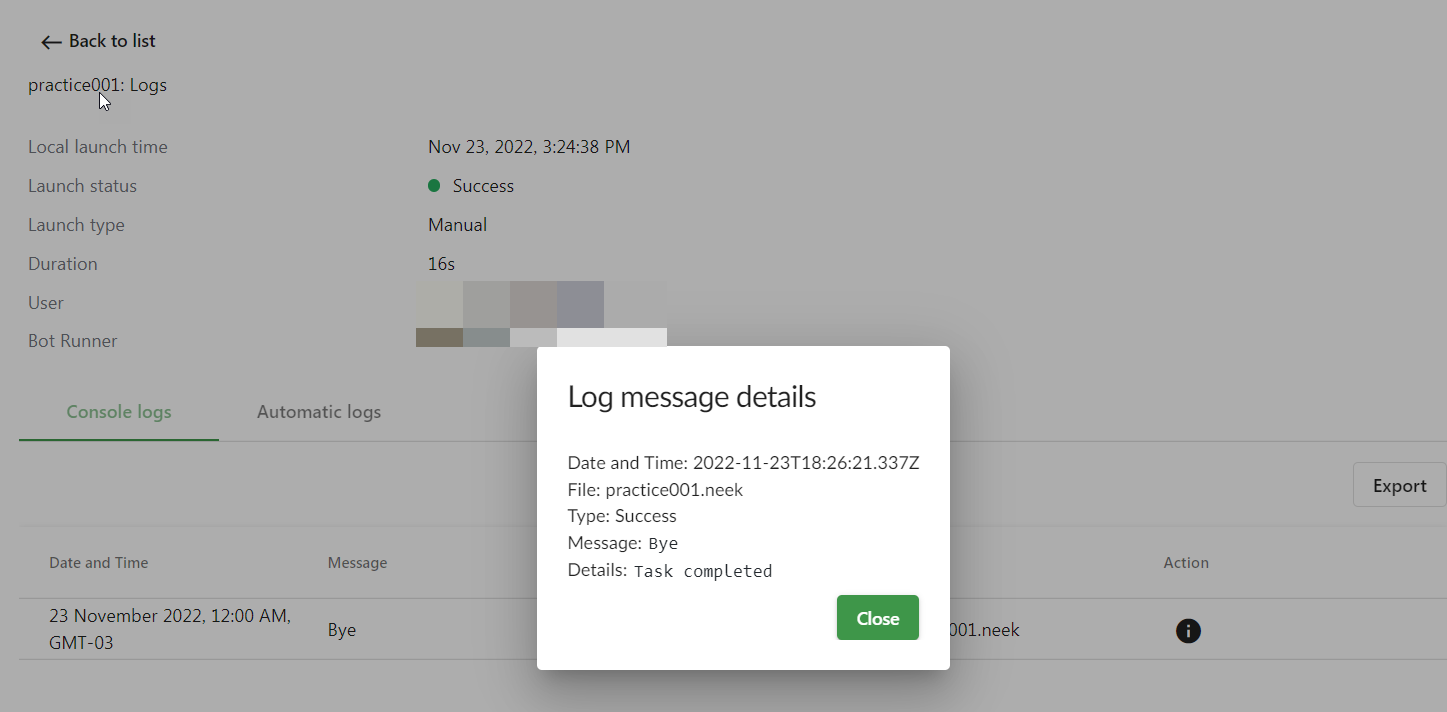
Click the *"More information"* icon to see more details in a pop-up:
Bot Runner and workflow statuses
Introduction
There are sets of statuses for the workflows loaded into Orchestrator and the Bot Runners connected to them. The statuses state the work of algorithms and Bot Runner at the current moment, and may also indicate the need to perform certain actions. In this article we will look through the statuses of workflows and Bot Runners in more detail.
Bot Runner statuses
- Online - Bot Runner is connected to Orchestrator, but the user is not authorized in Bot Runner with rights to use Orchestrator at this time.
- Offline - Bot Runner was previously connected to Orhcestrator, but the user is not currently authorized in Bot Runner with the rights to use Orchestrator.
- Busy - Bot Runner is currently performing a workflow.
Workflow statuses
- Added - the workflow is loaded, but no Bot Runner is assigned to it.
- Ready - the workflow is loaded and ready to run on the available Bot Runner.
- In Progress - the workflow is currently in progress.
- Pending - the workflow is in the queue and waiting to be performed.
- No available Bot Runners - the workflow is loaded, but all the assigned Bot Runners are either offline or busy.
Multiple Orchestrators in a team
Introduction
This functionality allows you to have multiple Orchestrators within one organization, choose which one to publish bots to, and manage those bots independently of each other. The ability to have multiple Orchestrators is useful, for example, for MSPs for which the separation of work environments of different clients is an important aspect. Also, multiple Orchestrators allow you to have a production and test environment in the same organization, which in turn simplifies the process of developing and maintaining RPA technology in a company.
Setting up multiple Orchestrators
Adding multiple Orchestrators to one Team
There are two ways you can have multiple Orchestrators in the same team:
Multiple Orchestrators can be part of your plan.
Additional licenses can be requested as an Add-on.
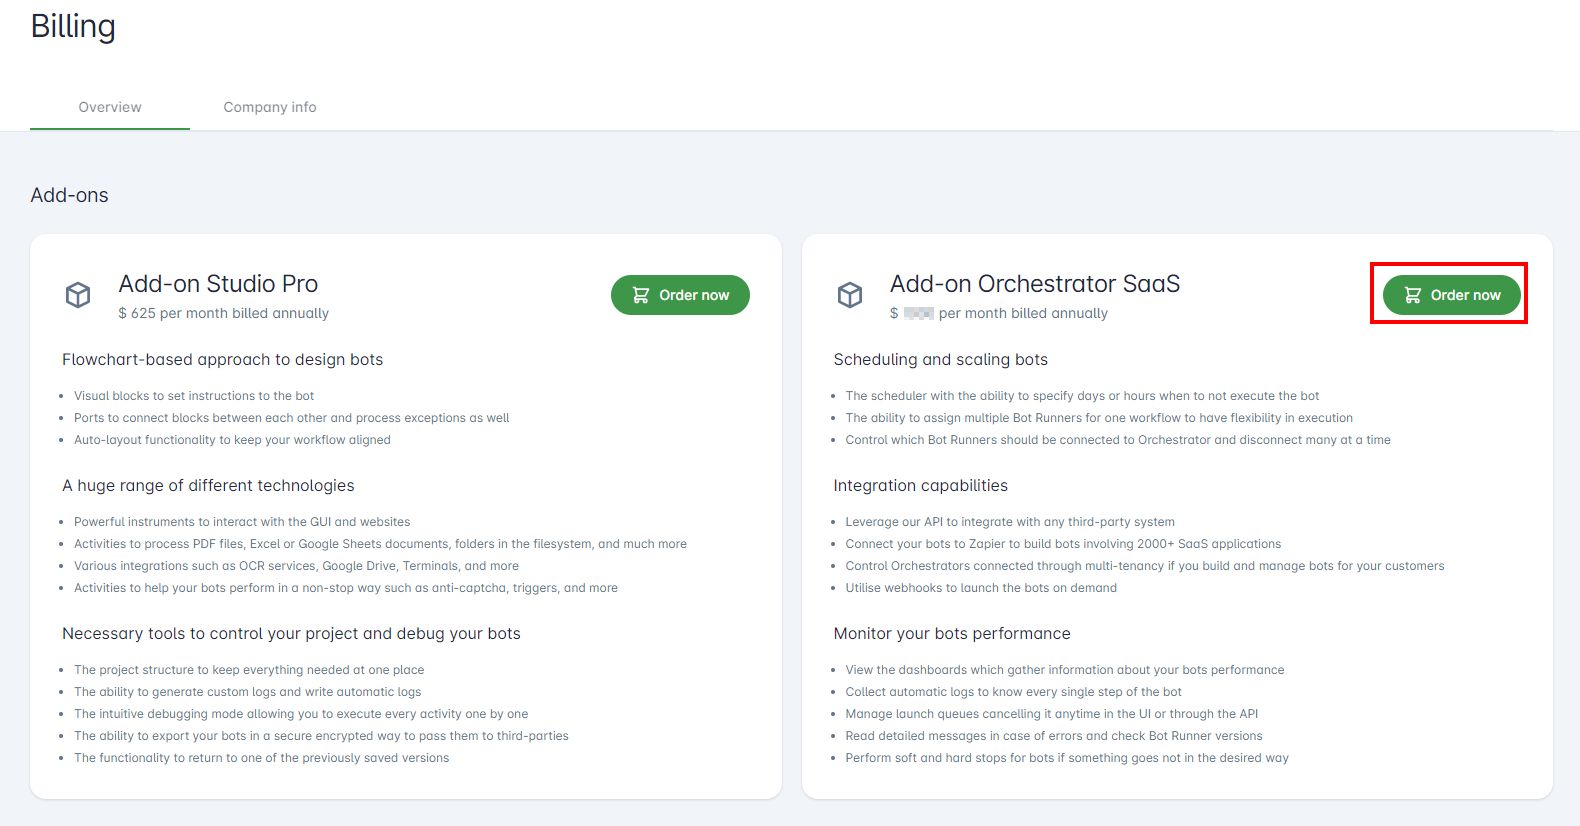
To add multiple Orchestrators, you must have the "Administrator" role and order an extra Orchestrator Add-on. Follow these steps:
- On the User Portal, go to the "Billing" page → "Teams"
- Scroll down to the "Add-ons" tab
- Click on "Manage Add-ons"

- On the right side, click on the "Order now"* button to request an extra *"Add-on Orchestrator SaaS"**.
Managing multiple Orchestrators
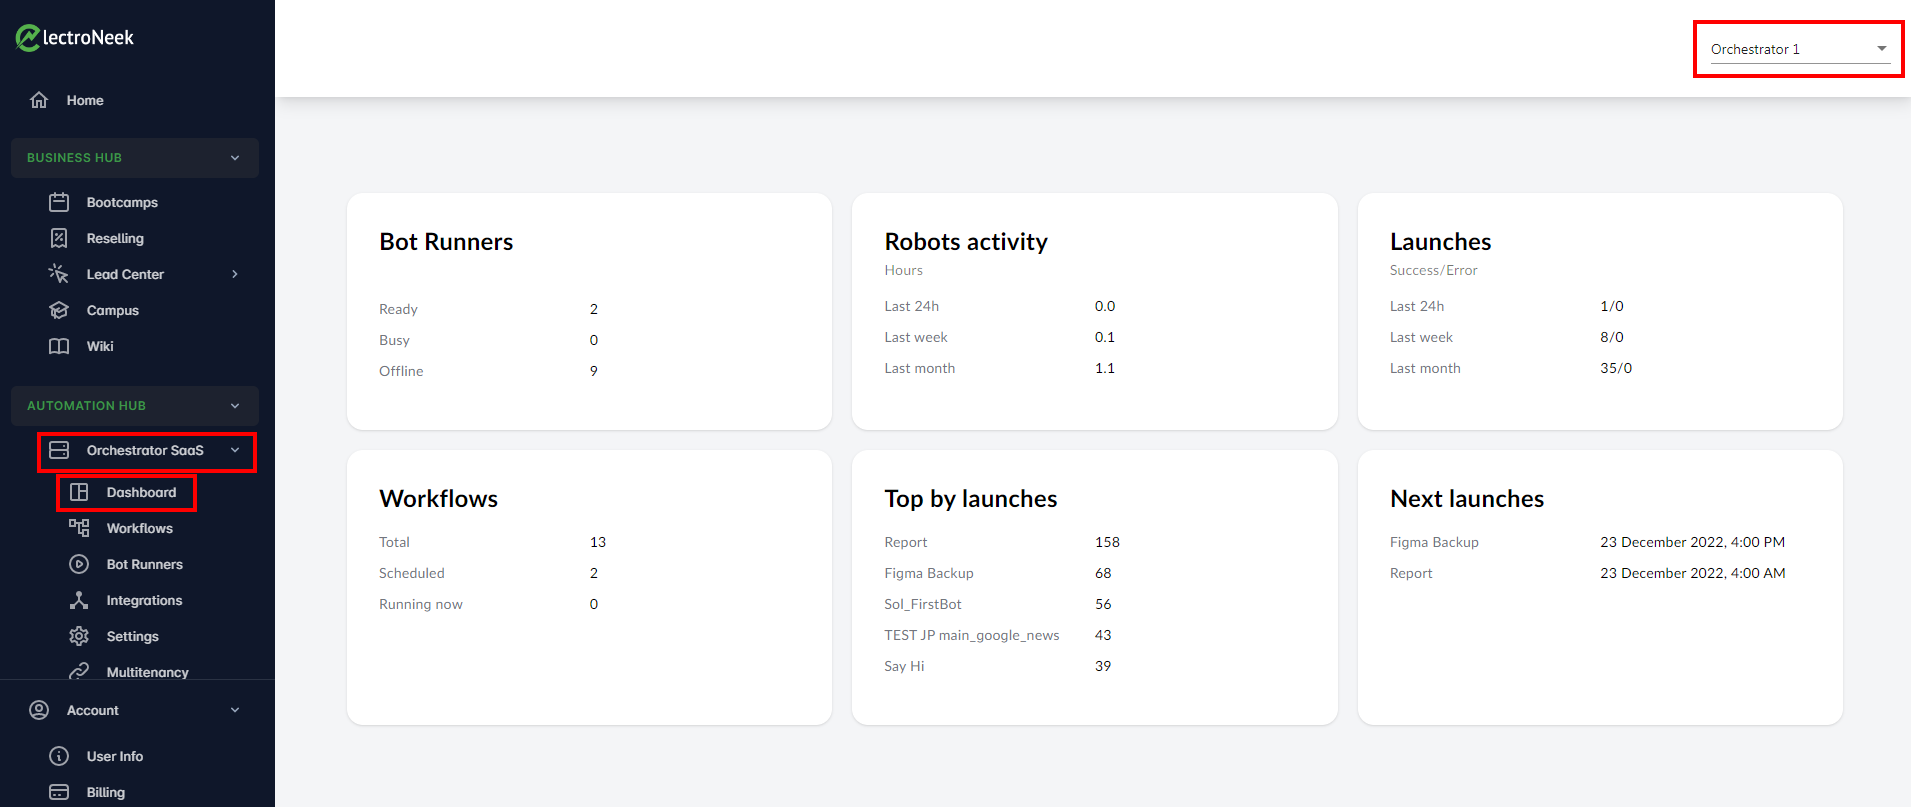
How to use another Orchestrator:
- On the User Portal, navigate to "Orchestrator Saas" → "Dashboard".
- On the upper right side of the screen, you can see the drop-down list where you can change the Orchestrator you are using.
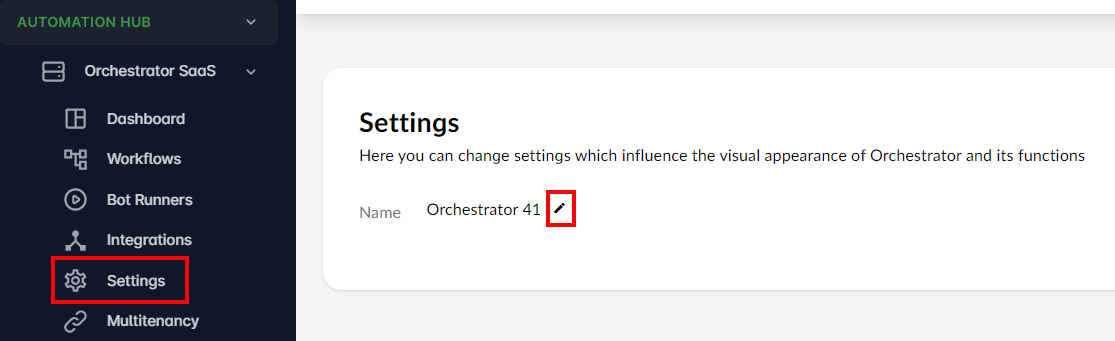
- To rename an Orchestrator, go to "Settings". Click the pencil icon to edit directly in the field.
Operating multiple Orchestrators
Publishing bots
After creating a bot or opening an already existing one, you can select the desired Orchestrator when publishing the bot via Studio Pro.
Connecting a Bot Runner
Suppose your organization has three Orchestrators. Thus, to connect Bot Runner, a user with access to Orchestrator must:
- Generate a token in Orchestrator 1.
- Insert the token into Bot Runner.
The result is as follows:
- The user sees the Bot Runner in Orchestrator 1.
- The Bot Runner does not appear in Orchestrator 2 or Orchestrator 3.
- A Bot Runner connected to Orchestrator 1 can be assigned to bots published to Orchestrator 1.
- A Bot Runner connected to Orchestrator 1 cannot be assigned to bots published to Orchestrator 2 and Orchestrator 3.
You can also publish the bot to all purchased Orchestrators at once. Learn more about publishing bots in this article.
How to know the details of errors in bots
Introduction
There are two ways to know the details of errors that may occur in the bot's execution. Detailed information about errors allows you to handle them properly and debug the algorithms.
Message on the "Workflows" page
If an error occurs during the execution of the bot, the corresponding icon will be displayed on the "Workflows" page. Click this icon to see detailed information about the error. It will contain the date and time the error occurred, the file and activity where the error occurred, and the error message itself.

Error email
Orchestrator SaaS has the ability to send messages to users regarding bot failures. This feature is enabled by default and can be disabled on the Orchestrator page.
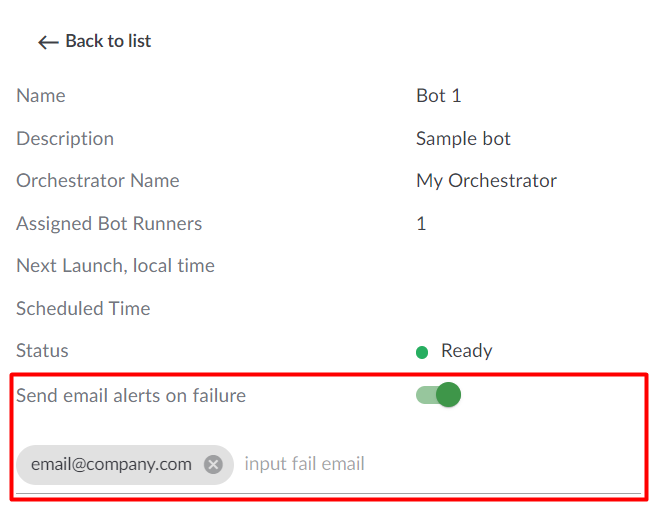
The email address of the user who published the bot is taken as the address to send messages to. If necessary, this address can be changed or more addresses can be added.
The error message will look like this:
The execution of the bot on Bot Runner {Bot name} is stopped due to: {Error message}
Date: {Date}, {Time}
Link: {Link to bot}
How to connect another tenant to your Orchestrator or give access to your Orchestrator
Introduction
The multitenancy feature allows you to control bots from other Teams in your interface or to give access to your Orchestrator so that another Team can manage your bots within their interface.
In this article, we will explain how you can connect another tenant to your Orchestrator to manage their bots within your interface and how to give access to your Orchestrator so you become a tenant.
How to Connect
In order to connect another Orchestrator, you need to be provided with a key generated by the Team to which the other Orchestrator belongs. Once you have the key, perform these steps to connect another tenant:
- Log in under your account to https://electroneek.com/account
- Make sure that you have a new version of the portal (6.0 or higher).
- Go to the "Orchestrator SaaS" page.
- Go to the "Multitenancy" page within the Orchestrator SaaS product.
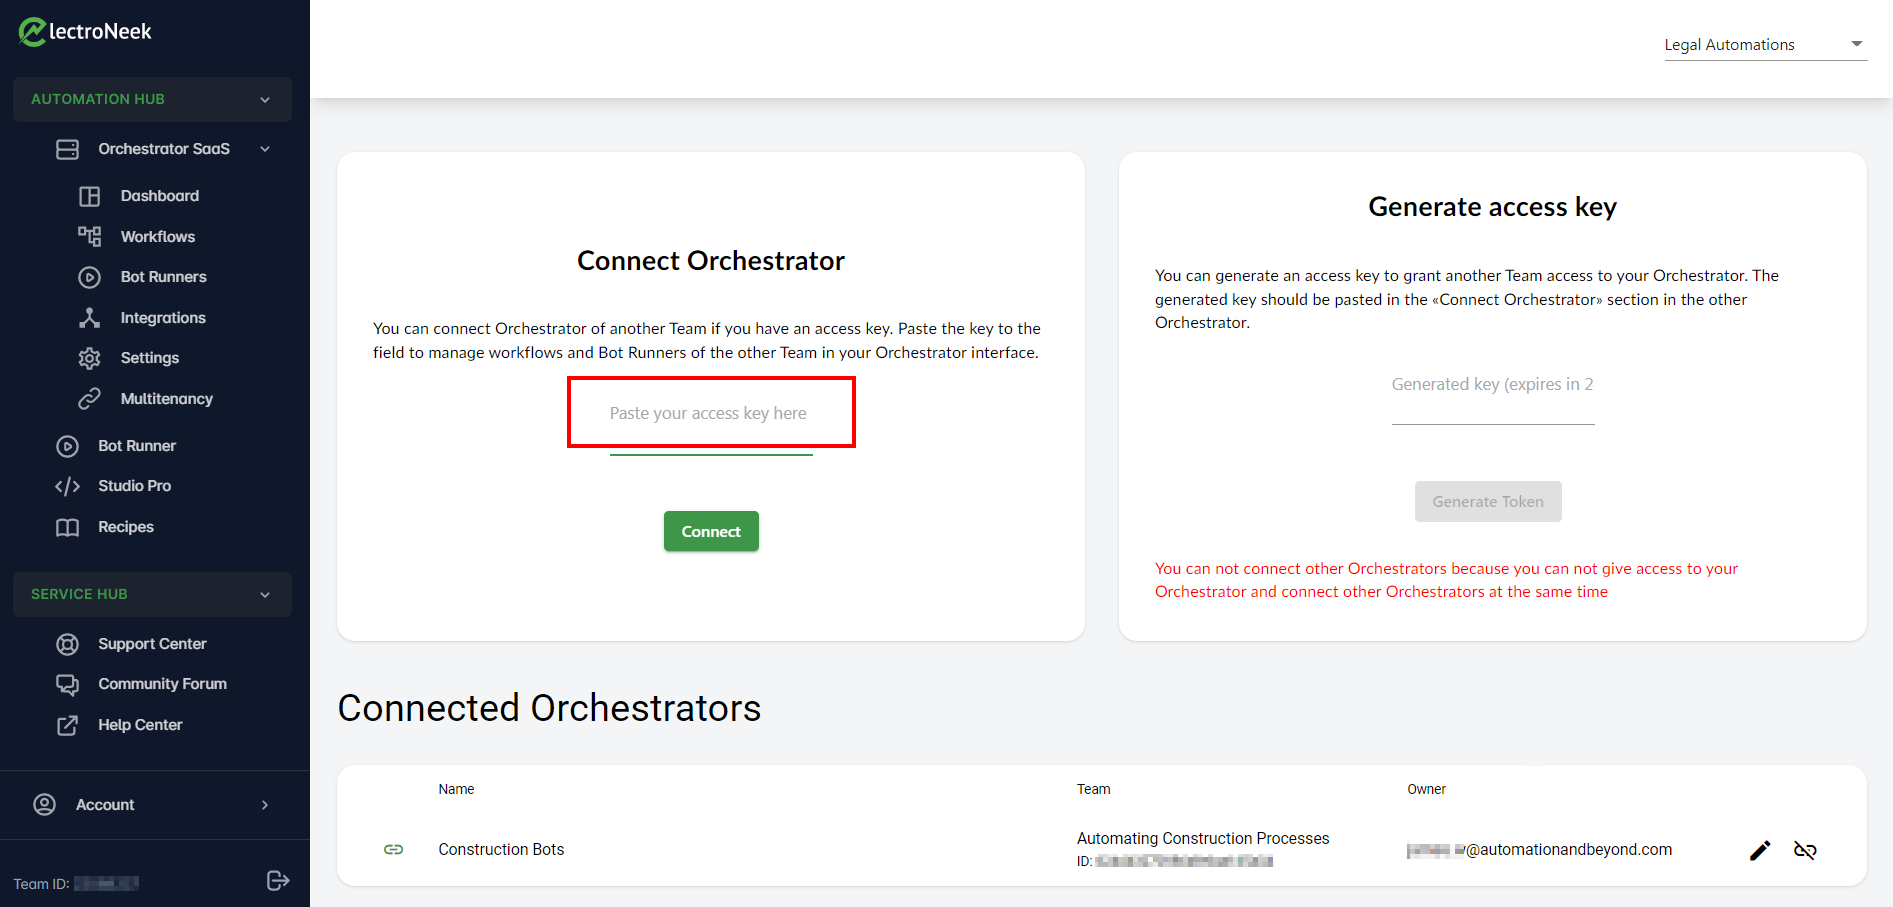
- Paste the key provided to you by the other Team to the "Paste your access key here" field of the "Connect Orchestrator" card and press "Connect".
- You will see a notification at the bottom of the page that the other Orchestrator has been connected successfully. You may press "Close".
- In the "Connected Orchestrators" card, you will see a table with a list of connected Orchestrators.
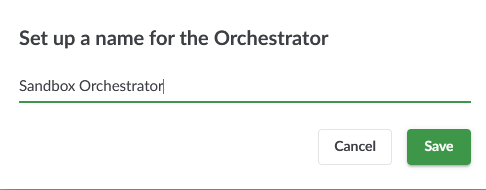
- By default, when a new Orchestrator is connected, it takes a standardized name such as "Orchestrator 1". We recommend you to change the name to any desired one so that you can easily identify this Orchestrator afterwards. For that, click on the "Edit" icon in the table row and type a name in the opened popup window. Click "Save" to exit.
How to Disconnect
If you want to disconnect a connected Orchestrator, then:
- Proceed to the "Connected Orchestrator" table.
- Find the Orchestrator you want to disconnect and click "Unlink".
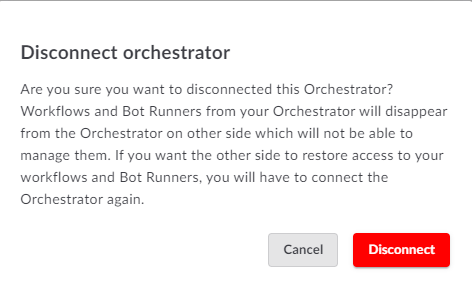
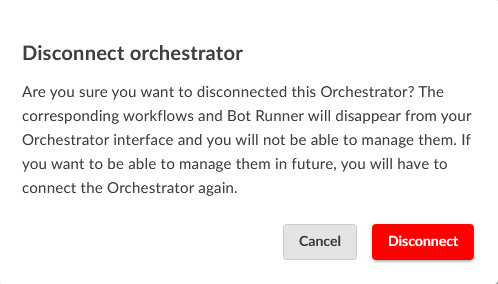
- You will see a popup window explaining the details of the operation
- Click "Disconnect".
Managing Bots
If you want to manage bots or Bot Runners of connected Orchestrators, you need to go to either the "Workflows" page or the "Bot Runners" page depending on what you need. In the tables, you will be able to filter bots and Bot Runners by the Orchestrator name. If you see "My Orchestrator" in the tables, then these bots or Bot Runners are related to your own Orchestrator. If you see another name, for example, "Sandbox Orchestrator" from the previous example, then such bots and Bot Runners are related to the Orchestrator of the other Team.
You can perform all the same operations with the connected Orchestrators:
- Publishing bots to the connected Orchestrators from Studio Pro.
- Deleting bots and Bot Runners from the connected Orchestrators.
- Managing schedule of the bots from the connected Orchestrators.
However, you will not be able to assign Bot Runners to bots of a different team. It means that you can't assign a Bot Runner from your Orchestrator to a workflow that belongs to another Team. This is made to ensure the data doesn't interfere with the data from another company.
How to give access to your Orchestrator
If you are client and your automation is run by a managed service provider, you will want to give access to your Orchestrator so the managed service provider could manage your bots within their interface which increases the productivity, efficiency, and speed of automation management.
To give access to your Orchestrator:
- Log in under your account to https://electroneek.com/account
- Make sure that you have a new version of the portal.
- Go to the "Orchestrator SaaS" page.
- Go to the "Multitenancy" page within the Orchestrator SaaS product.
- Click "Generate key" on the "Generate access key" card.
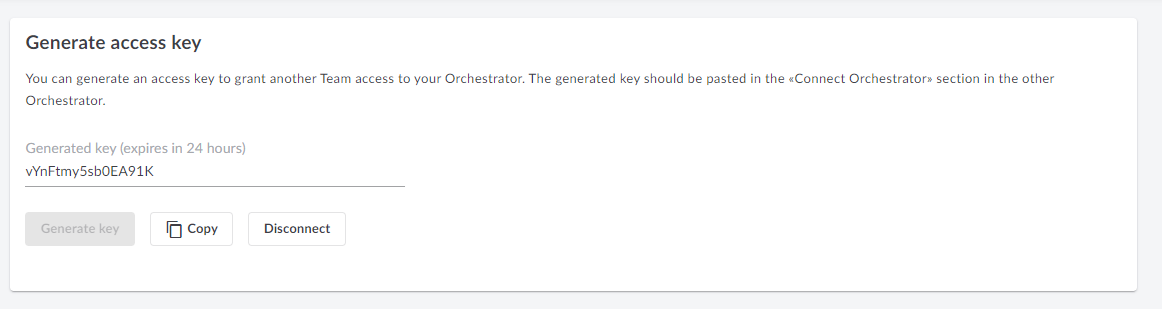
- Pass this key to your managed service provider so that it can be connected in the way described above.
- The key can be activated within 24 hours starting from the time of generation. After 24 hours it expires so it can not be activated anymore. You'll have to generate a new key if you still want to give access to your Orchestrator.
If you want to disconnect your Orchestrator from the managed service provider:
- In the "Generate access key" card, click "Disconnect".
- You will see a popup window explaining the details of the operation.
- Click "Disconnect".