How-tos: Studio Pro Web Scraping
How to Interact with the Web Scraper Tool
Prehistory
A popular use case in RPA is a process in which you need to extract a bunch of structured data from a website. For example, we may want to extract the result of a search request in Google, items data in an online shop (from multiple pages), or anything else - there are a lot of examples. These processes have the following things in common:
- We work with structured data. It means we know what we want to extract, for example, prices, links, and ratings. We also know where these fields are located.
- We want to do it on a regular basis.
A question is how to build solutions for such cases.
- We need to learn how to extract data. For that, activities such as Get element property or Get element value. Besides, if you want to extract, say, four positions (title, link, price, rating), then we'll have to use this activity four times specifying different UI elements.
As we want to extract these positions for all elements of the same type on the page, we will need to run a loop iterating through each element on the page. There is also an alternative option - the "Several elements" option in the parameters of the activities mentioned above.
This option would allow you to extract a specific property of the whole range of elements which shortens the number of actions you need to do. - We need to learn how to save the data. When we extract data, we typically want to save it to either a variable (so that we can process it further) or to a file (for example, Excel, Google Sheets, CSV files). Since the data we extracted is stored in a variable, we will have to process the variable to save it to, say, Google Sheets.
This all doesn't sound trivial and intuitive. Also, if we want to apply it to multiple pages on a website, it will become even more difficult (though not much more) as we will have to run another loop.
As a result, we've developed a separate instrument that will simplify significantly all of the actions listed above.
What is Web Scraper
Web Scraper is an instrument that allows you to extract a portion of data from a website without coding the algorithm of running through the elements on the website. All you will need to do is to specify from which type of elements we want to extract data.
Currently, this tool will not allow you to extract data from multiple pages (you will still have to run a loop for that) but the part with data extraction will become much more intuitive and easier to construct.
What Web Scraper consists of
Before demonstrating the instrument, let's take a look at what is included in the instrument:
- A new type of file - .rel. This type of file needs to be created through Studio Pro. It has a separate canvas with a different list of functions. The purpose of this file is to store the structure of the elements from which we need to extract data. You do not have to develop the whole algorithm and you do not have to code. It is just the structure of data.
- A new activity - Scrape structured data. This activity is placed in the section Web Automation - Browser and accepts a path to a .rel file. It returns extracted data and saves it to a table. If needed, the data can be saved to a variable (you will need to disconnect the table block and replace it with the Assign value to variable activity saving the previous step result).
- A new selection mode in the Desktop Picker tool. This mode is launched when you click on the "Pick new element" button in the "Data element" function that relates to the .rel file. This mode allows you to select a range of elements at a time.
The Web Scraper tool will keep improving and receiving new functions, watch our updates.
Example
Let's learn how to work with the tool through an example. Let's suppose that we want to open Amazon, find best-selling American history books, and extract all links, titles, and prices of the search result.
In the picture above, purple rectangles refer to the titles, and blue and green rectangles - to the prices. We didn't highlight links because they correspond to the titles (they are clickable).
We will extract data from the first result page only and save it to an Excel table.
Step 1 - Creation of data structure
Setting up environment
We do not need to emulate opening "Amazon" and navigating to the category. We will replace all these actions with just one link that already contains the search result. Open manually the Google Chrome or Microsoft Edge browser and copy and paste this link.
Creation of element relations file
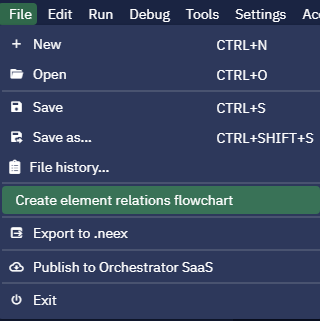
Let's start with the most interesting, time-consuming, and yet fairly simple step - preparing a file that will store the data structure (or relations between elements, those phrases have a similar meaning in this context). Open Studio Pro, click "File" - "Create element relations flowchart".
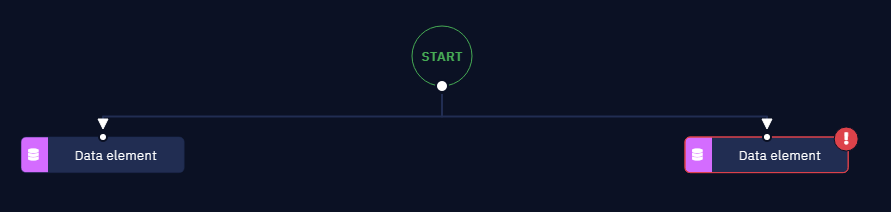
You will see how a separate canvas will be opened. There will be a "Start" block on it and a separate list of functions on the left panel. Currently, Web Scraper has only one function - "Data element".
Save the file, let's call it scrape_bestsellers.rel.
Building data structure
Drag and drop the "Data element" function to the canvas and connect it with the "Start" block. If the block is highlighted with a red exclamation mark then it only means that some required parameters are not filled. We will fill all of them during the process.
Selection of elements
Let's select elements from which we want to extract data. Click on the "Pick new element" button to launch the selection mode. You will see that when you hover your mouse over different elements, there is a blue rectangle highlighting them.
Hover your mouse over an element so that the first title of the search page becomes highlighted with the blue rectangle and press CTRL + X. As you can see, a few elements of the same type were selected as well. Now you need to check if all titles are selected. If not, hover the cursor over unselected titles and press CTRL + X again. The number of selected elements must increase.
If you do not want to select some highlighted elements, hover the cursor over them and press CTRL + Y. The number of selected elements must decrease.
This way, by combining CTRL + X and CTRL + Y, you can highlight all the desired elements.
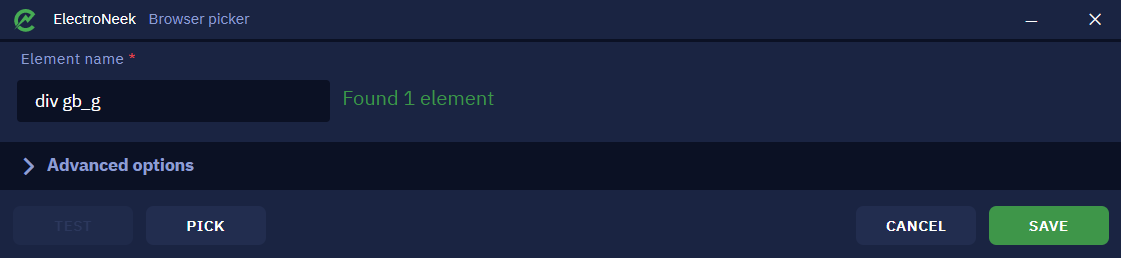
After you select all desired elements, press ESC. You will see the Browser Picker window with the number of found elements shown.
Previewing data
In the Browser Picker window, there's the "Test" button - it shows the selected elements. This way you can make sure that your choice is correct (see the screenshot below).
You can also see the "Preview Data" button. Click on it - you will see the extracted links.
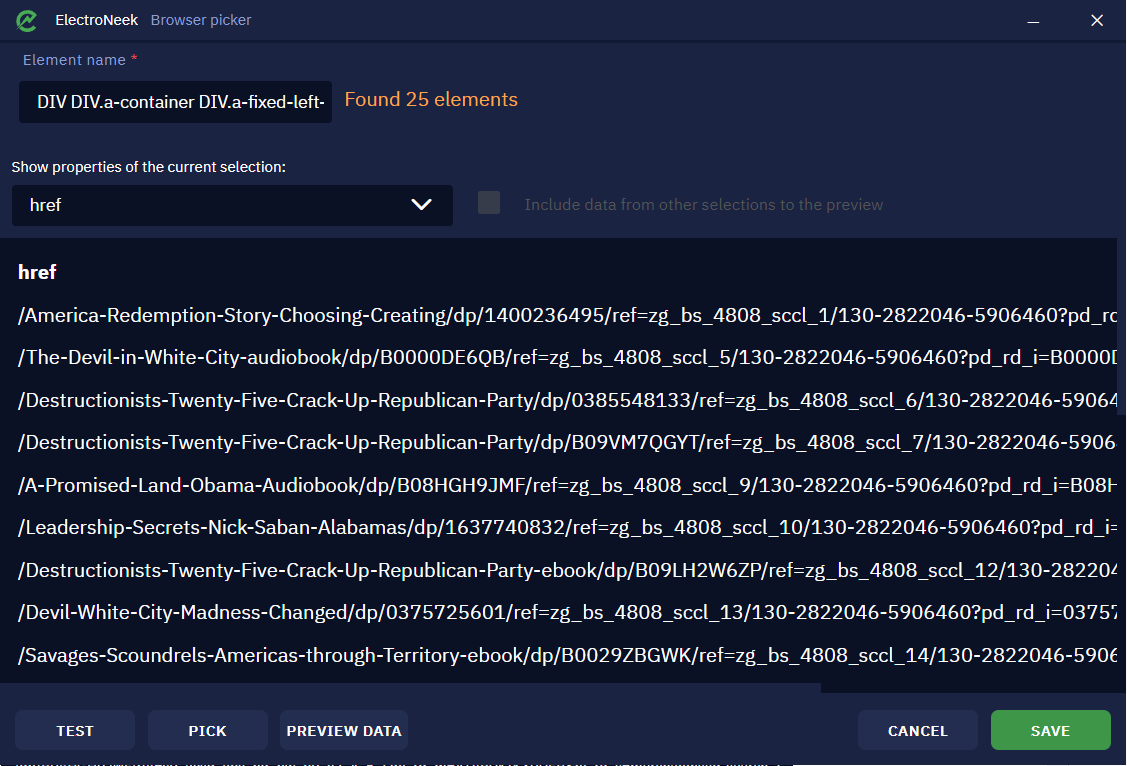
In the drop-down list, you will see attributes from which we read the data. As we selected titles, that are links essentially, the default output attribute will be href. However, we can add more attributes and read data from them. Click on the drop-down list and select another attribute - innerText.
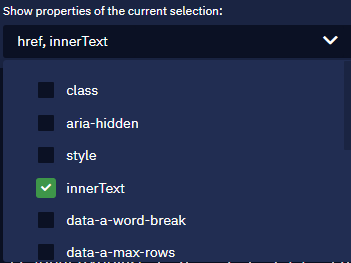
This attribute will be used to extract the titles (the text itself). After you've added this attribute, there will be another column. You may not see it explicitly because of the size of the first column so you just need to scroll to the right.
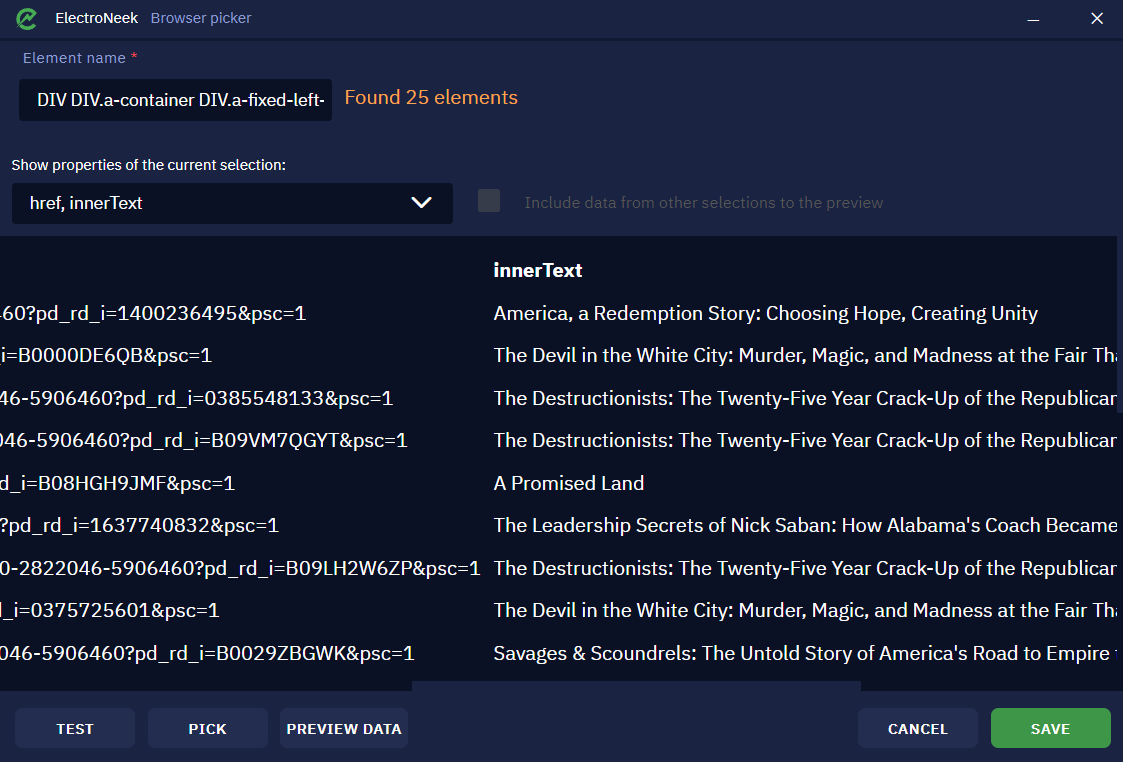
You may also use the vertical scroll to view the whole range of data. This is how you can test your selection.
You can also change the name of the element to something intuitive, for example, "Book titles". Click "Save" to return to the canvas.
Finishing working with function
In the "Data element" block, there are only two parameters left - "Properties to extract" and "Output name". We will use the same attributes in the "Properties to extract" parameter that we used when previewing the data - href and innerText.
"Output name" is how the corresponding column in the resulting table will be named. Let's call it title. Then in the resulting table, we will have two columns: title_href and title_innerText.
Adding more functions
Now let's set up the canvas so the prices get extracted as well. Drag and drop another "Data element" function and connect it with the "Start" block. We will adjust the position of the "Start" block to put it in between the two functions as this reflects the hierarchy and relations better - there is the start node (the Amazon page itself) and two elements of the same type from which we want to extract data.
Let's set up the second "Data element" block similarly to how we did it with the first one. Only this time we will select the prices.
There is also one more interesting thing with the selection mode. If you press CTRL + H, elements from the previous selection (from another "Data element" functions on the canvas) will be highlighted or hidden. This is meant to help you orient in what you are selecting.
Press ESC to save your selection of prices. You can also test it again.
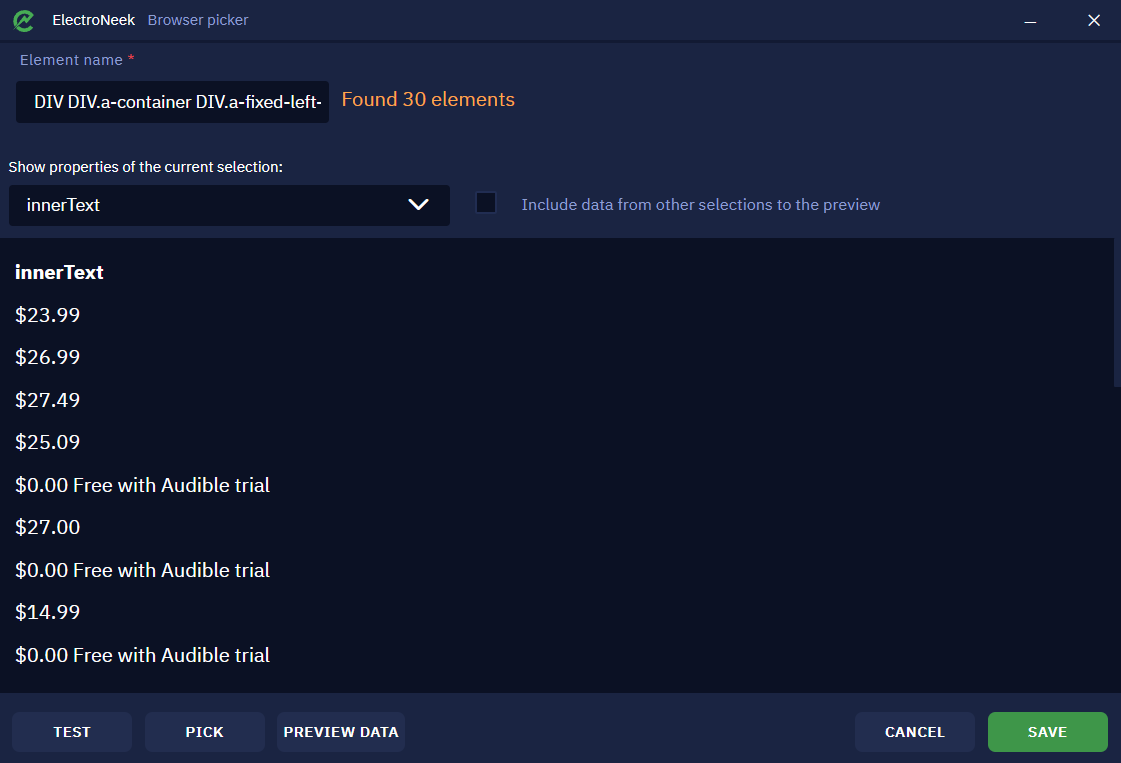
We will not change the extracted property this time, but we will make use of the "Include data from other selections to the preview" checkbox. If you enable this option, you will see two columns from the other "Data element" block on the canvas. Now you can check the data and see if it actually matches. Click "Save" to exit.
Let's finish setting up the block. We will specify innerText as the property to extract and price as the output name.
We've prepared the data structure of Amazon and are ready to test it.
Testing structure
Before creating a .neek file, we can make a final test to see how it extracts data from the page. Click on the "Start" and paste the link we posted above to it. The "Test scraping" button will become active.
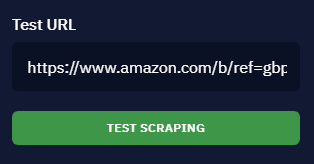
Make sure you use the "Chrome Native" method of interaction with the browser ("Settings" - "Interaction with browser"), then just leave the Amazon page opened in Chrome. Click on the "Test scraping" button - the bot will open a new tab and scrape data from there. The result will be saved to the data_preview variable on the "Variables" tab.
Save changes to the .rel file.
Step 2 - Setting up a bot
Create a new .neek file and save it. Drag and drop the Open URL activity. In the URL parameter, specify the link to the page. Drag and drop the Scrape structured data activity from the "Web Automation" - "Browser" section. We already have a file with data structure so we do not need to click on the button "Create new data relation file". Click "Pick" and select the previously saved .rel file.
Click on the Save Table activity that follows the Scrape structured data activity. It is already set up in a way that the resulting Excel file will be placed in the same folder where the bot is located. But you may modify it if needed. For example, you may save the result to a Google Sheets table. We leave it as it is.
Save changes to the .neek file.
Step 3 - Launch
Since we haven't added any activities related to opening a browser instance and we use the "Chrome Native" method (see above), we need to make sure that Google Chrome is opened, the Amazon page is opened there as well, and that there is no another tab with the exact same content.
Launch the bot. It will scrape the data nearly simultaneously and save it to a table. Navigate to the folder with the bot, open the table, and check the result.
How to extract data from multiple pages
Suppose we want to extract data not only from the first page (or row of data) but from the first two (or three, four, or until the end). Let's suppose that we would like to focus on one category only, say, "Best Sellers". In the row with the book, you will notice the right arrow button on the right-hand side. We will make use of this button.
All we need to do is to create a loop:
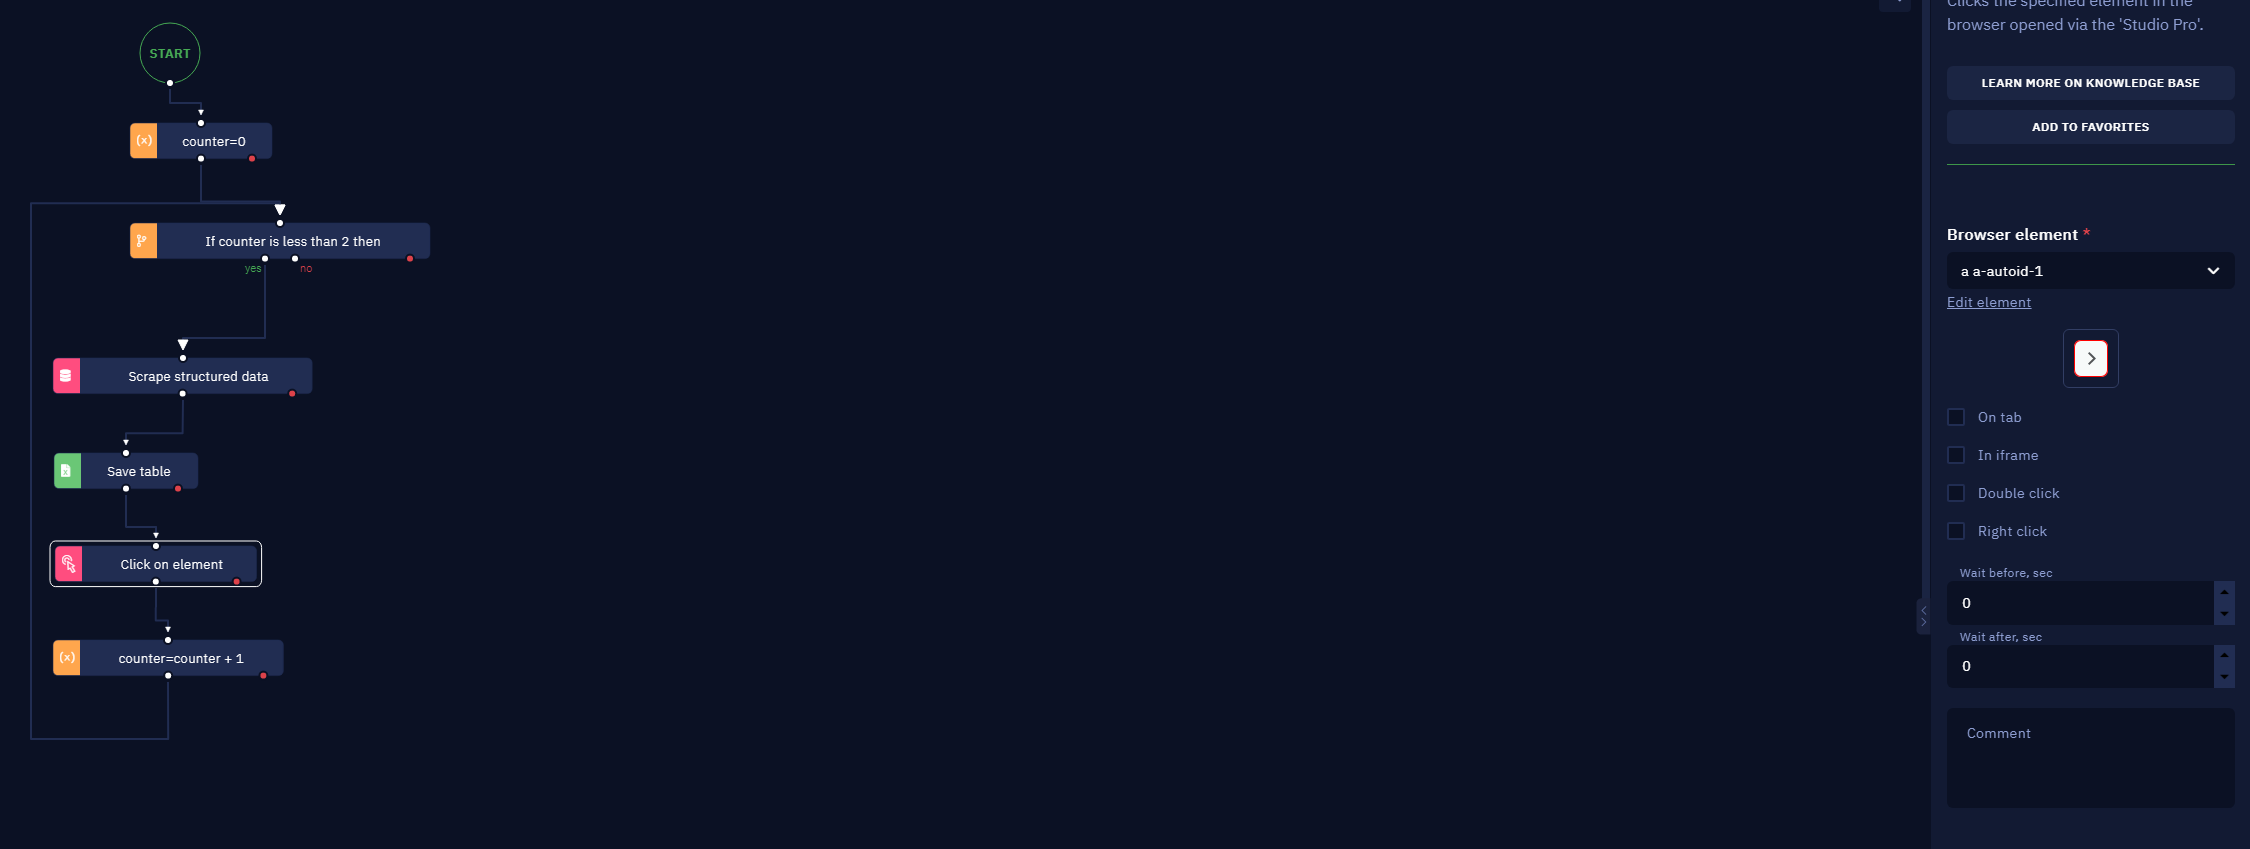
The loop is simple:
- We create a counter variable
counter = 0, that will count the number of iterations. - We create a condition for the loop in the If...then activity:
counter \< 2(since we want to make two iterations).- In the body loop, the bot scrapes the data from the current row of data (or page in another possible example).
- In the "Save table" activity, we'll need to adjust the path. Let's select the "Calculate a value" option and set it to
"data\_" + counter + ".xlsx". This way, a new file will be generated for each iteration. - Then we click on the "Next" button.
- The bot goes to the next iteration.
- A similar method should be used with other websites when you want to extract structured data from multiple pages or sets of data.
How to edit existing data structure
To open and edit an already existing data structure in Studio Pro, do the following:
- Click "File" - "Open"
- Change the filter to the .rel extension.
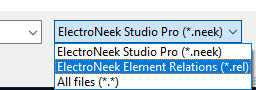
- Search for the desired file and open it.
- Download ru_yandex_search_result.rar.
- Download en_amazon_scraping_result.rar.
How to Install the Browser Picker Extension
Introduction
This page describes how to install and activate the "ElectroNeek Browser Automation" extension in the Google Chrome and Microsoft Edge browsers.
Installation
There are two ways to install the extension: through Studio Pro and directly from the extension store in the browser.
Installation through Studio Pro
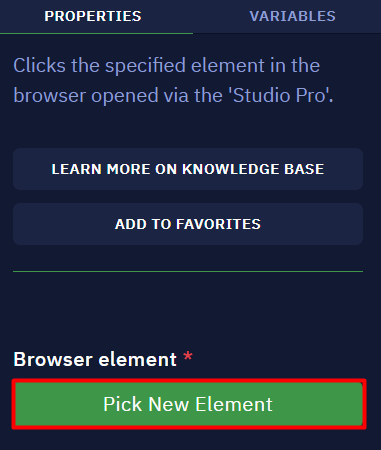
You can install the extension by clicking "Pick New element" in the "Properties" tab of one of the Web Automation group activities.
Direct installation (Google Chrome)
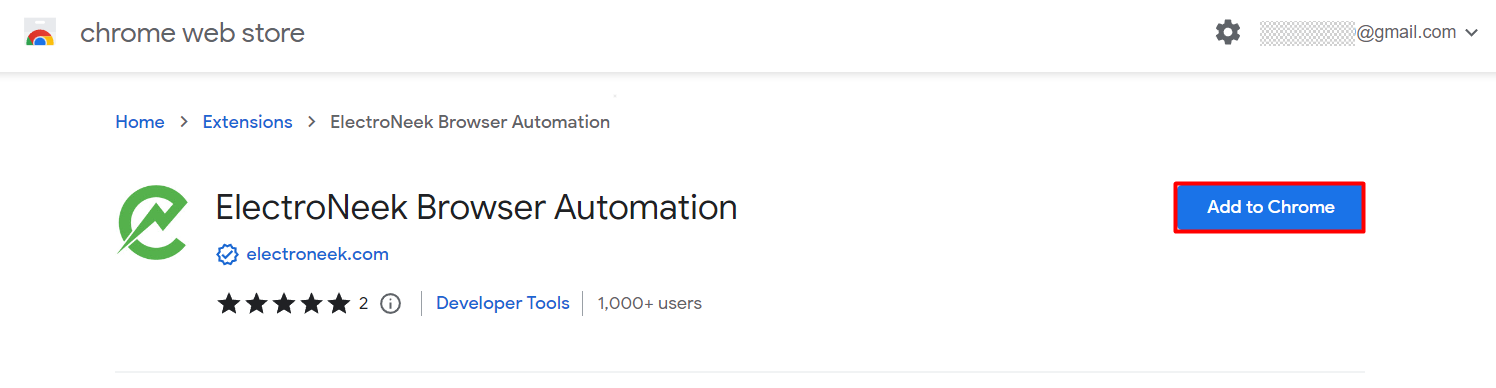
To install the extension directly from Google Chrome, follow this link and click "Add to Chrome".
Activation
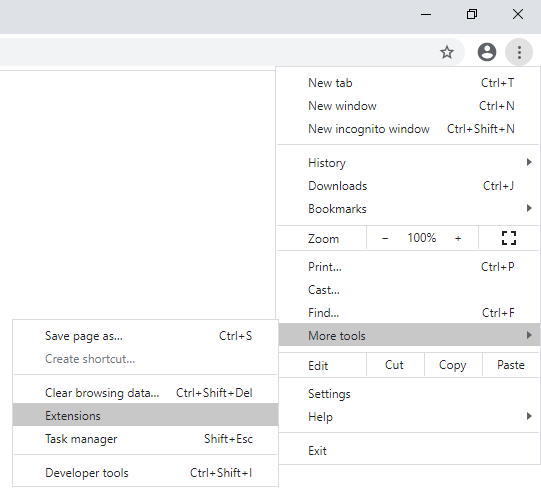
Google Chrome requires activation of the extension when it's installed. To do this, launch "Google Chrome" and navigate to "Settings" → "More Tools" → "Extensions".
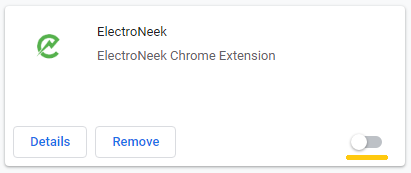
After that you will see a list of your extensions, find the 'ElectroNeek' extension there and turn on the switch.
Direct installation (Microsoft Edge)
Microsoft Edge can be installed the same way: by following this link and then clicking "Get" on the Microsoft Edge Add-ons screen.
Result
Restart your browser and try clicking "Pick New Element" on one of the Web Automation group activities again. If everything was done correctly, the Browser Picker window should appear.
Working with ElectroNeek Chrome Automation extension and Selenium
Description
Studio Pro can interact with the Google Chrome browser via two tools - the ElectroNeek Chrome Automation browser extension and Selenium.
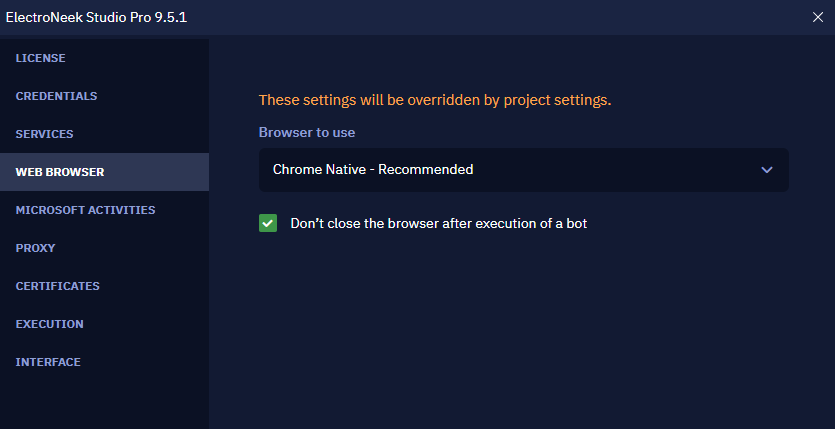
You can choose which tool you feel more comfortable with. To do this, go to "Settings" → "Interaction with browser". In the "Browser to use"option, you can select one of the options:
- Chrome Native (interaction through an extension, the default option).
- Chrome Selenium (interaction via Selenium).
Chrome Selenium and Chrome Native
Previously, Studio Pro supported working only via Selenium. This imposed some restrictions on working with the browser, for example, you could not use web automation with a browser already open, i.e. the first activity in the workflow always had to be the "Open URL" activity.
We've improved the ElectroNeek Chrome Automation extension, making it easier to work with:
- You don't have to open the browser directly with the bot (you can use web automation in an already open browser).
- You don't have to specify the browser tab number: the platform will automatically detect the tab with the desired item. At the same time, the ability to specify a tab explicitly saved - this will help build a solution in some non-trivial cases.
- Increased speed of the extension working.
An example of working without Selenium
- Make sure you have "Chrome Native" option selected in "Settings" → "Interaction with browser" menu.
- Open any page in Google Chrome, for example google.com.
- Launch Studio Pro.
- Choose the "Click on element" activity in the "Web Automation" section.
- Click on the "Pick New Element" button to select an element on the webpage, such as the "Gmail" button.
- Make sure the selector is formed correctly.
- Go back to Studio Pro and run the bot.
- If everything is done right, the bot will work correctly.
NoteYou may expect to notice some differences in behavior between Chrome Native and Chrome Selenium since they function very differently from each other. Hence, if you create a workflow or specific activity designed for one of them, we suggest that you keep using that same browser since the other version is likely to present unexpected behavior.
How to interact with web-elements and desktop elements
Browser Picker
Browser Picker is a tool that allows you to determine which elements of the browser interface the bot needs to interact with.
There are three ways to open the Browser picker:
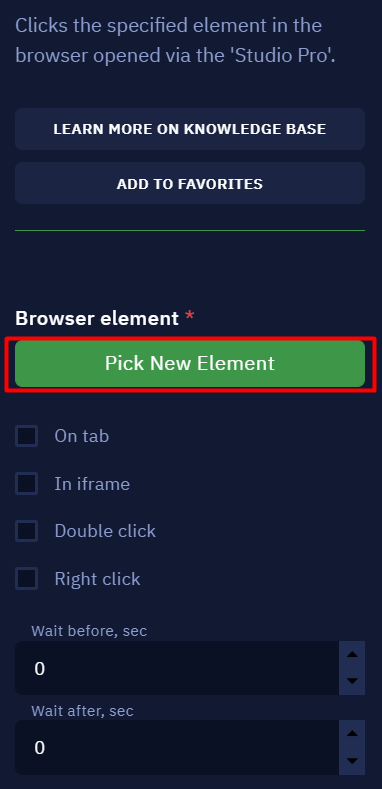
- Using the "Pick New Element" button in the activity parameters. When clicking this button a selection mode starts with which you can specify the desired item. After selecting the item, the Browser Picker window opens.
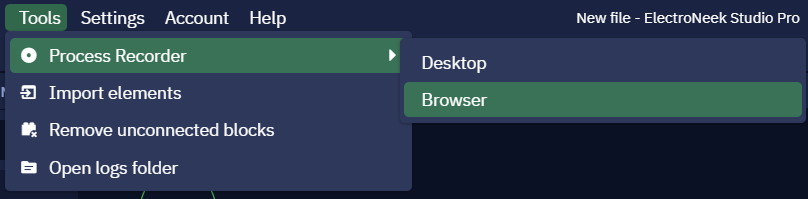
- Accessing Tools → Process Recorder → Browser. When you use this function, the selector mode starts, but the selector window does not open. In this mode, you can specify several browser items to click or enter, and then return to the Studio Pro window. New activity boxes display in the workspace.
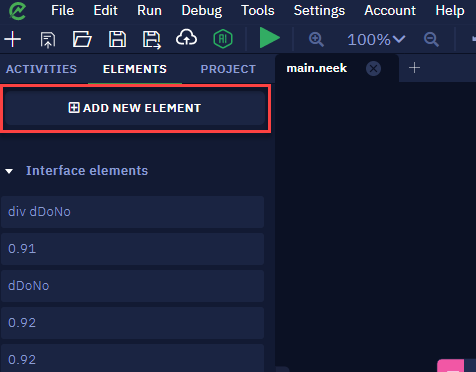
- Through the "Elements" toolbar. Within this panel, you have the option to either create a new element or select an existing one. You can choose a new element from the browser interface by clicking the "Add new element" button. And by clicking the "Change the element" button, you gain access to the editing functionality for the selected element.
Working with the tool is quite easy. When you click the "Pick New Element" button, Studio Pro minimizes and a browser will be opened. In the browser, you can select the element you want to work with. When you hover your cursor over an item, it is framed in red. Pressing the Ctrl+X key combination fixes the selected item. The Esc key allows resetting item selection mode.
After the item is selected, the "Browser picker" window opens.
To the right of the item name, its status is displayed, showing whether the item was found or not.


Advanced options
The advanced options represent the structure (selector) of the selected element, which usually consists of tabs, and each tab consists of attributes and their values. This is how the hierarchy of how the interface element was designed is displayed. You can change, select or exclude attributes to achieve greater accuracy and stability in your interaction with the element.
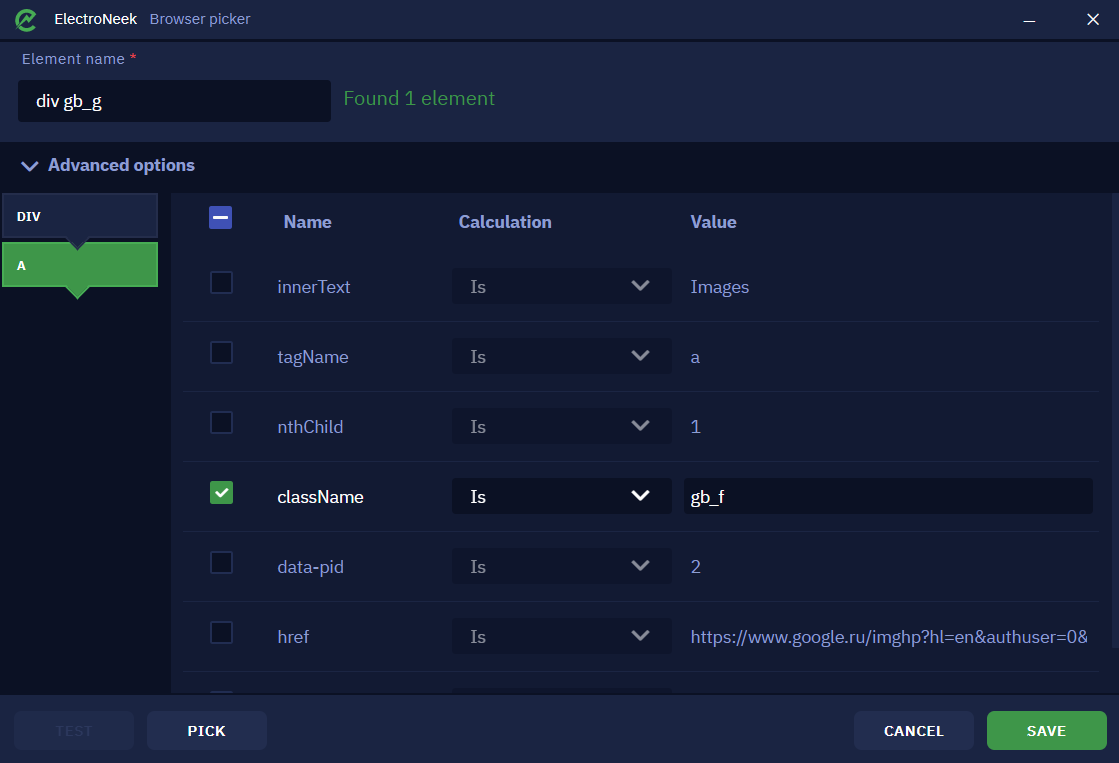
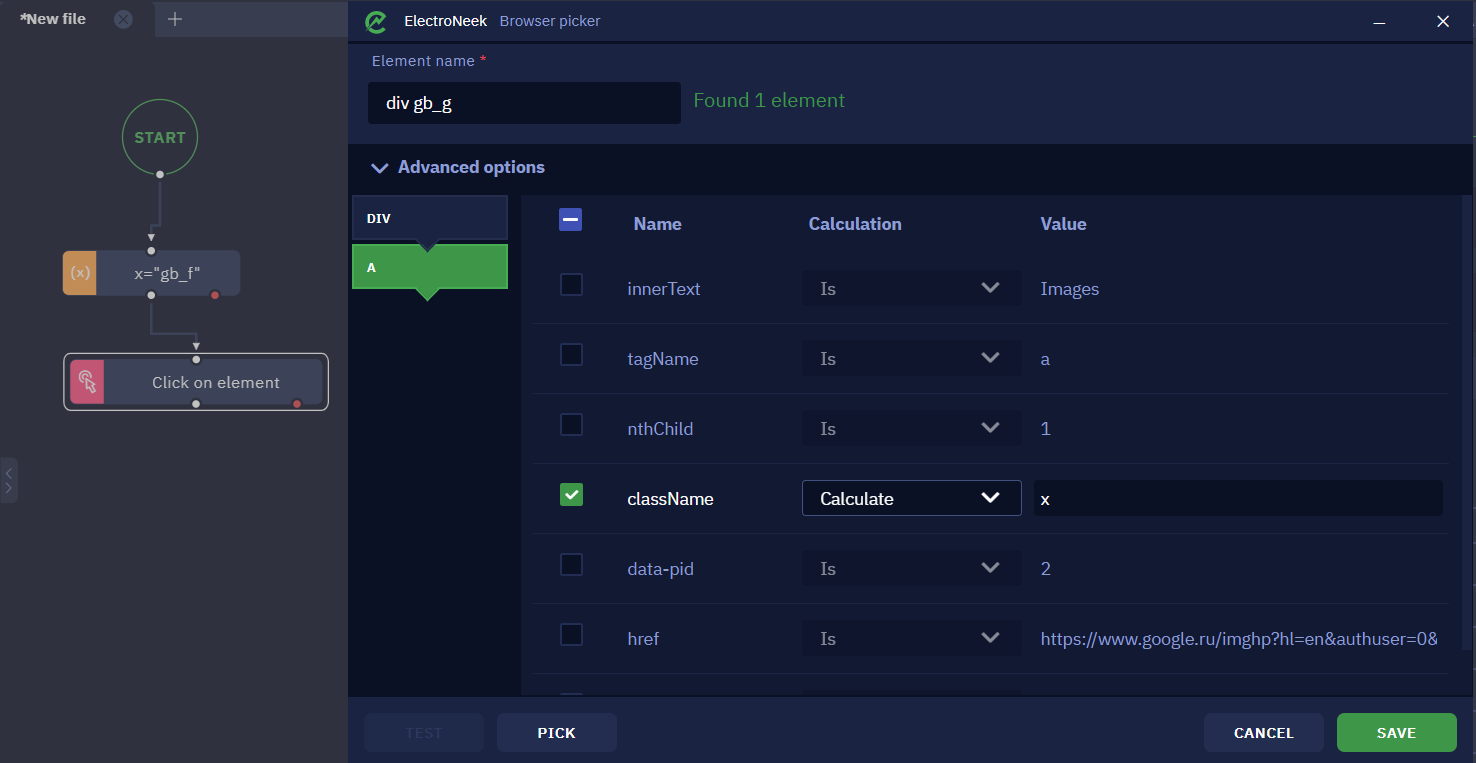
On the left side of this window, there are two tabs - "DIV" and "A" representing the hierarchy of the element's design.
Within each tab, there are three columns titled "Name", "Calculation", and "Value". Let's look through the example:
- Column Name shows
className, determining the class name of the element. In this particular case - gb_f. - Column Calculation shows
Is. This parameter allows you to specify how the attribute value should be defined. In this case, the class name must be exactly the same as the selector defines. We'll look at what each option means below.
- Column Value shows the content of that element.
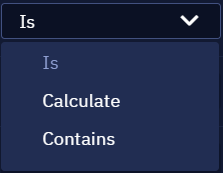
There are several options for defining an attribute value. Let's take a closer look at the Calculation options:
- The "Is" option means that the value of the attribute in the selector must be exactly the same as the value of the selected item. In the example above, the option "Is" means that the class name of the element should exactly match the value gb_f.
- The Calculate option allows you to substitute the variable used in the workflow as the attribute value. In this way, the attribute value can be determined by performing activities.
- The Contains option allows recognizing if a specified value is found in the defined attribute. For example, if the attribute Сontains - gb_f is specified in the selector, and the value of the className attribute is set to gb_fb, the selector will still be able to identify the element.
The "TEST" button in the selector window allows you to test if an element with the specified selector is detected correctly
Desktop elements
Desktop elements can be selected in the same way showed above.
Advanced options
The advanced options represent the structure (selector) of the picked element, which usually consists of tabs, and each tab consists of attributes and their values. This displays a hierarchy of how the interface element was created by the application developers. You can change, select or exclude attributes to achieve greater accuracy and stability in your interaction with the element.
Take a look at an example of a selector on the Notepad application.
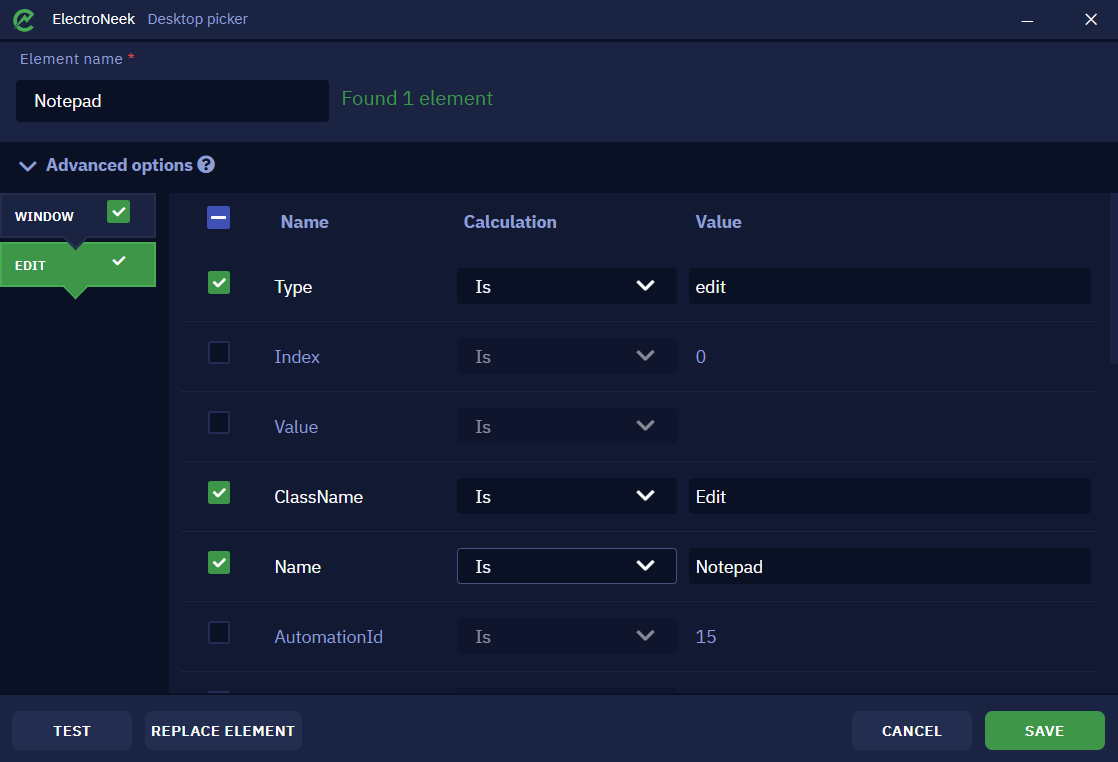
On the left side of this window there are two tabs - "Window", indicating the application window itself, and "Edit", indicating the selected input field in Notepad.
Note the checkboxes to the right of the tab names. These checkboxes allow you to exclude tabs from the selector. In some situations, the number of tabs can be quite large, which can make the selector less stable. At the same time, these tabs are not always necessary for the unambiguous definition of the item (as a rule, we mean "intermediate" tabs - tabs between the first and the last one). In this case, excluding these tabs from the selector may make the selector more stable and at the same time less cumbersome. However, keep in mind that excluding any tabs from the selector in some cases may cause the Desktop Picker to run slower.

Depending on the scenario of working with the selector, the values of some attributes can change dynamically. For example, if you start typing text in Notepad, the title of the window will change - a symbol "*" will appear before the title (which is true - look at the title of the Notepad window itself to see this). The same change will happen to the attribute in the Desktop Picker.
This means that the previous version of the selector (without the "*" in the Name attribute) is not adapted to the case when some text was initially written to notepad, which would lead to a bot error.
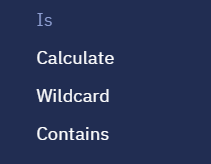
To avoid such errors, there are ways to adapt for dynamic attribute changes. These ways are embedded in the "Calculate" column in the table with the selector. Let's take a closer look at them:
- Is indicates that the value of this attribute must be checked for strict equality when searching for an element. In the Notepad example, this means that the window title must be strictly equal to
New Text Document - Notepad. That is, an element that has a Name attribute equal to, say, Text Document - Notepad will no longer be taken into account by the bot. - Calculate allows you to set a variable defined in workflow as an attribute value. When searching for a selector with a computed attribute, equality is also strict (only the attribute value is no longer defined by fixed text, but by a variable).
- **Wildcard allows you to set a character substitution rule in the value string. This allows you to adapt to dynamic attributes. There are two characters with which you can set the wildcard rule:
- "*" replaces any number of characters. For example, if you set the value _Notepad, the bot will search for all items with the
Nameattribute equal to any character set, followed by a space, a dash, a space and the word Notepad. - "?" replaces only one character. Thus, if you set
?New Text Document - Notepad, the bot will search for all items that contain any character (one) and then exactly the phraseNew Text Document - Notepad.
- "*" replaces any number of characters. For example, if you set the value _Notepad, the bot will search for all items with the
- Contains allows you to specify the part of the text that must be contained in the attribute value. That is, when searching the bot will search for items where the attribute exactly contains the specified text. For example, if the attribute Name is specified in the selector, which "Contains" the value
Untitled - Notepad, and the name of the Notepad window is*Untitled - Notepad, then such a selector will be found.

The "Test" button in the selector window allows you to test if an item is correctly detected with the selected selector.
Replace element
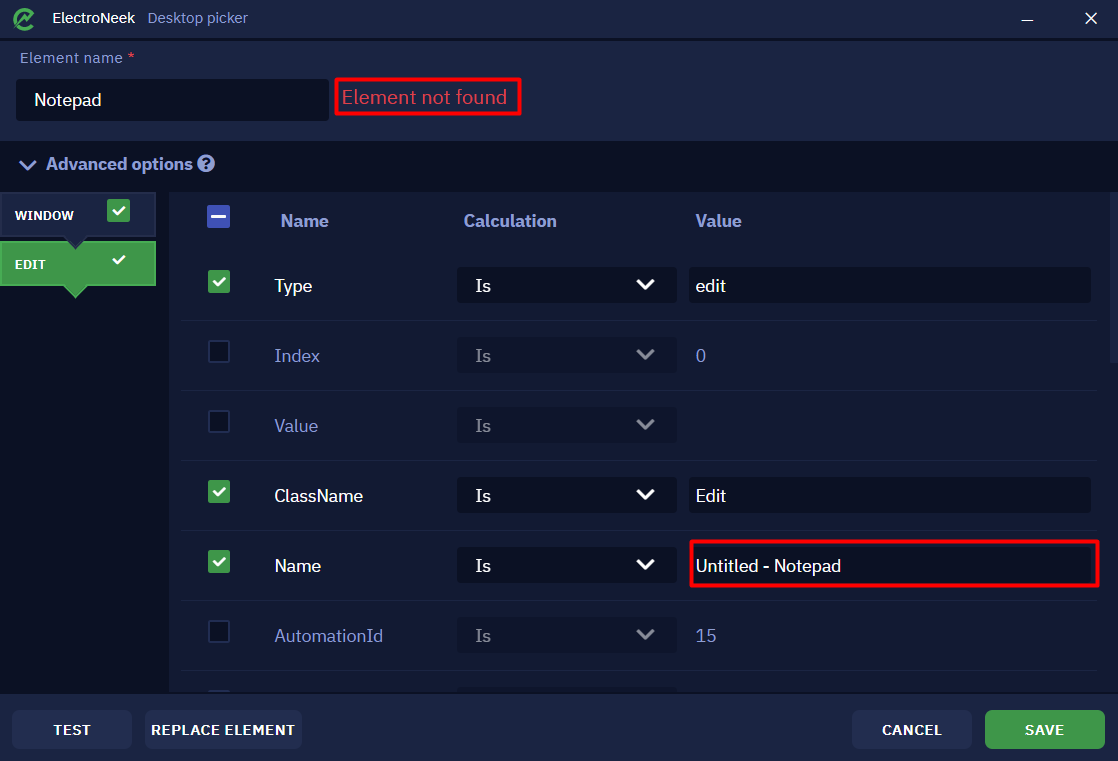
To understand how the replace element function works, let's analyze the basic scenario of its application. Suppose you select an element, run the bot - everything works as it should. After making some changes in the application, the bot, for some reason, stops working correctly (or doesn't start at all). Next, you are likely to try selecting the item again, repeating the same actions and launching the bot. But this may not work either. This situation can occur due to dynamic changes in the parameters of the application which the bot interacts with.
Let's take an example of such situation when working with the standard "Notepad".
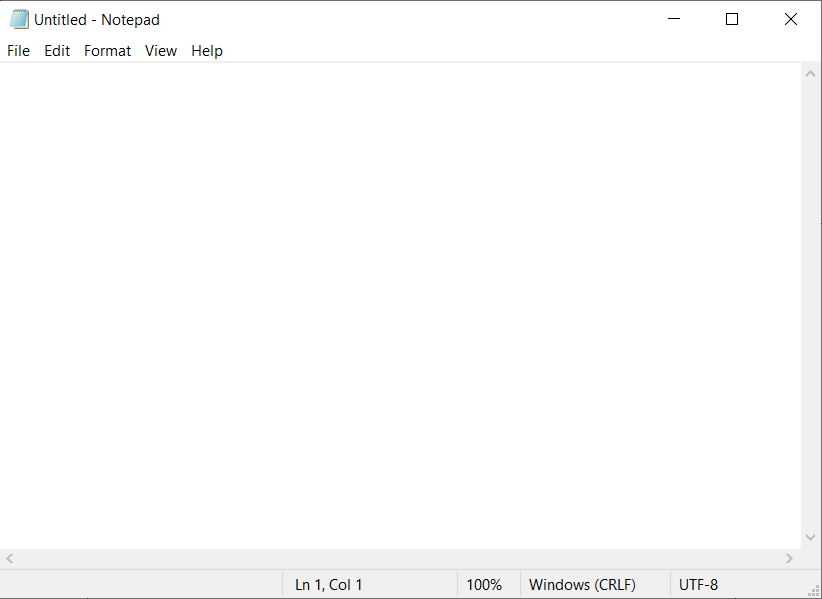
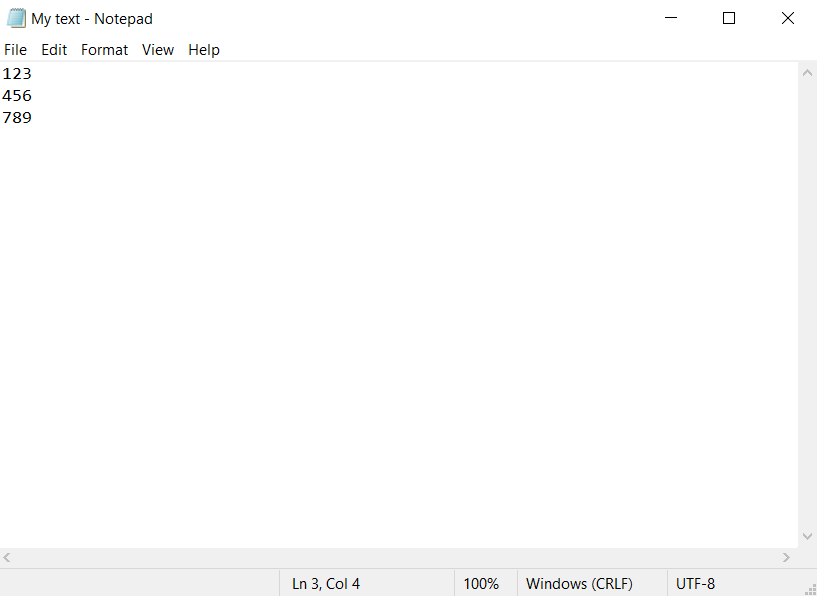
If you have just opened "Notepad" and have not yet entered any text, the name of the text file at the top of the window will be as Untitled - Notepad.
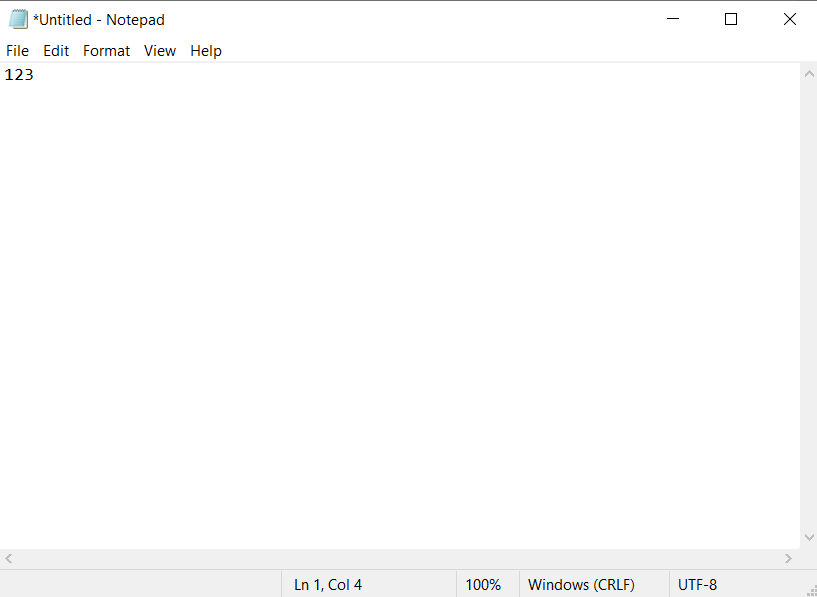
If you start typing any text in the input box, the name at the top will change. Now it will look like *Untitled - Notepad.
Let's explore another case: you open an already created text file with some content and the name you set when you saved it.
It becomes clear that at different stages of working with the "Notepad", its name and contents will change. These are the dynamic parameter changes we mentioned above. Let us have a closer look at them.
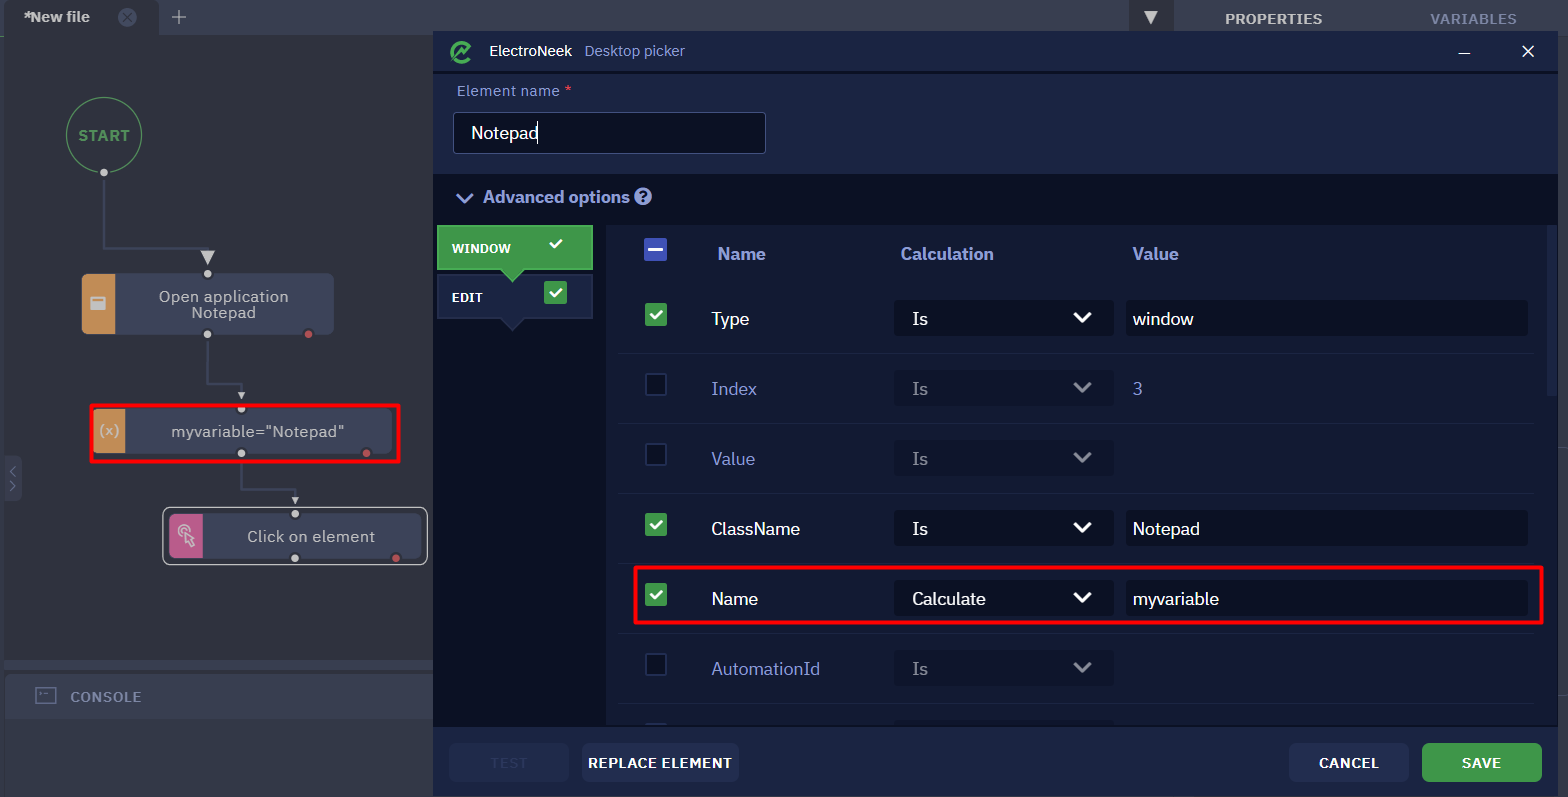
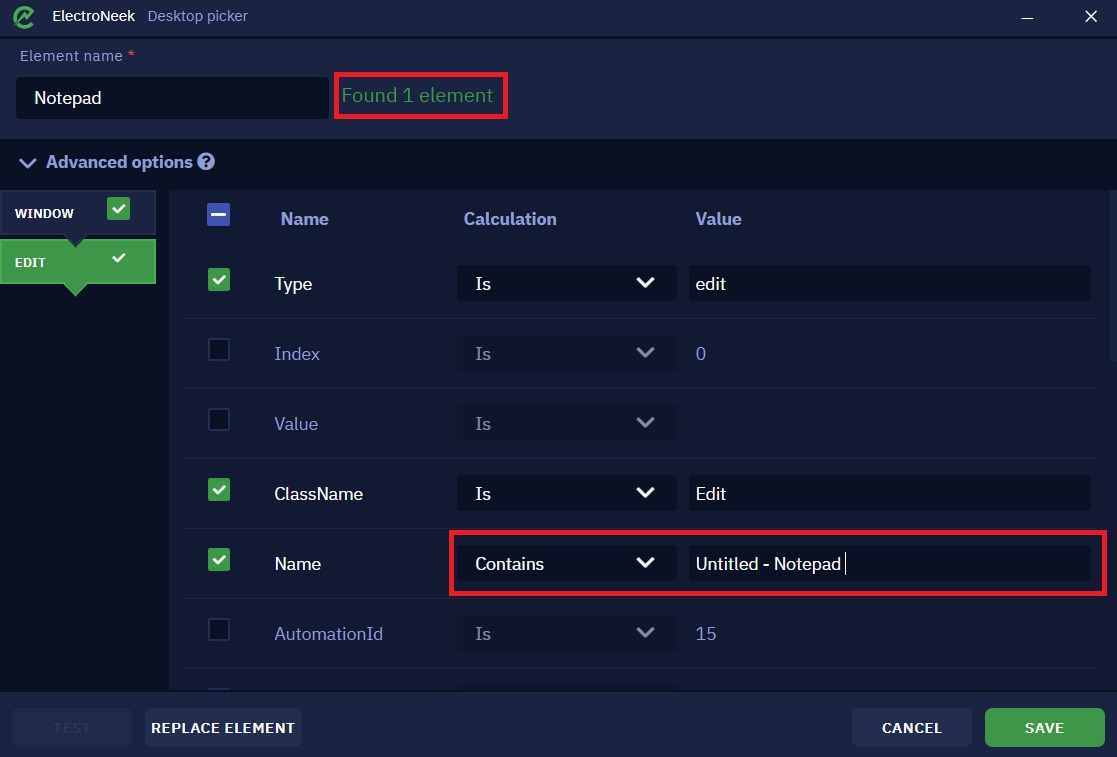
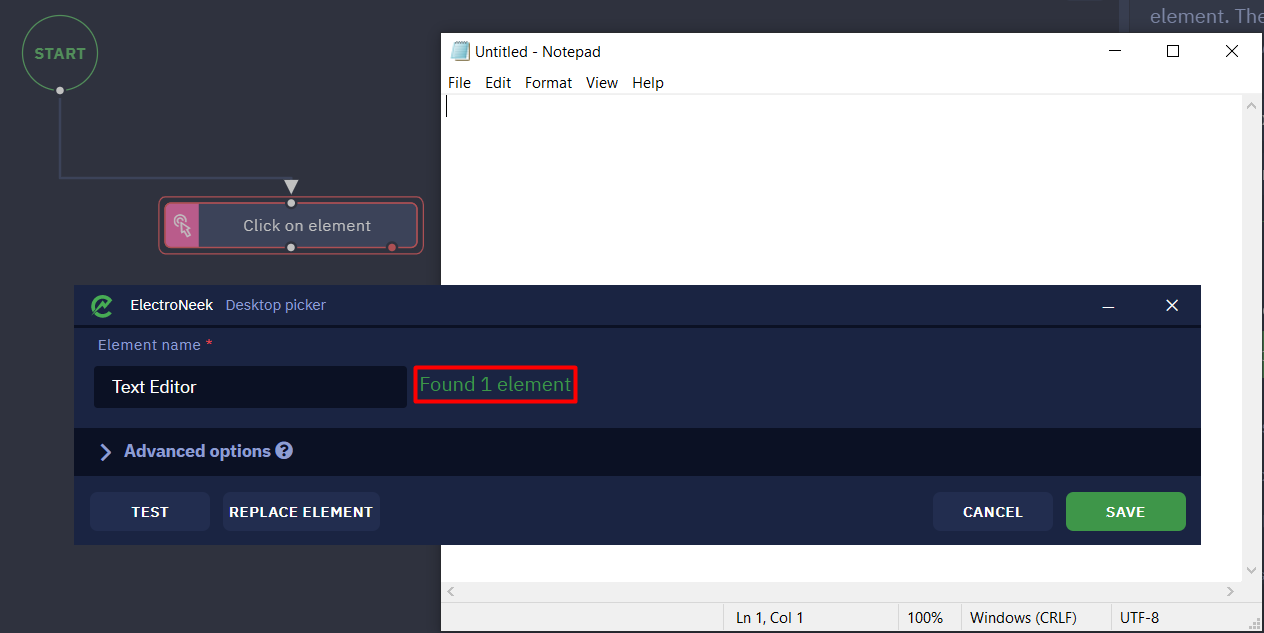
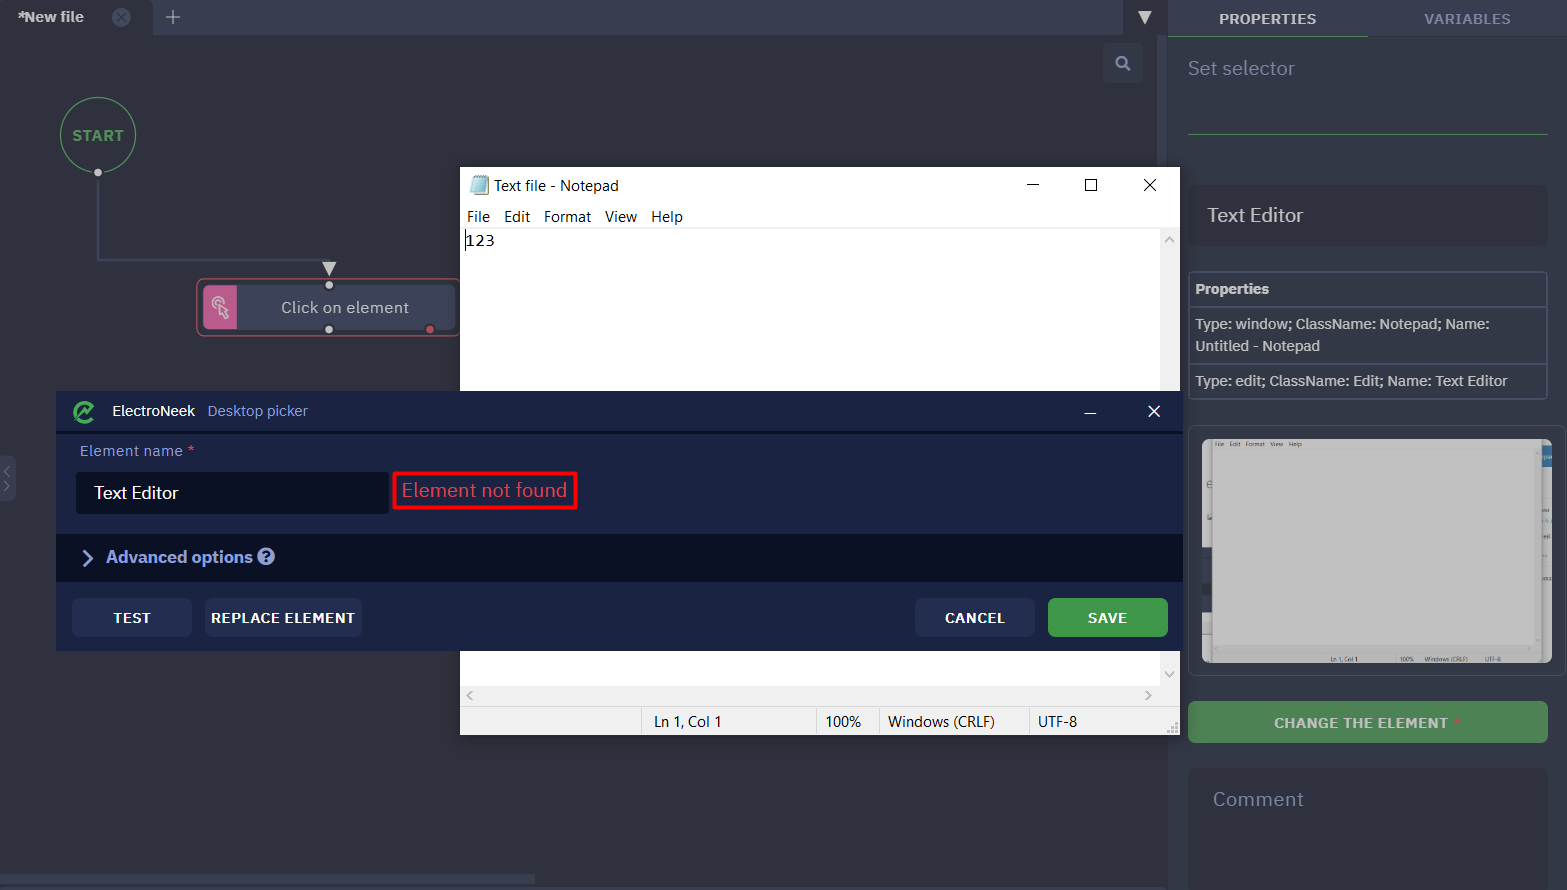
Let's take the Click on element activity as an example. Let's select any "Notepad" element via the Desktop Picker. For example, you can select the input field or the "File" button. The item will be detected without any problems and the bot will be able to interact with it, you will see the message "Found 1 item". Save the current current item with the "SAVE" button. Run the bot, make sure it works.
However, you may encounter a scenario where the bot needs to work with different text files. Let's go back to "Notepad" and enter the number 123 in the input field, then the title of the "Notepad" window will change - until the file is saved, the "_" symbol will appear before the title. Thus, the entire header will have the look of *Untitled - Notepad. Let's try to run the bot: it won't work and we will see an error message in the console.

Let's consider another scenario. In the current "Notepad" window, open an existing text file. Note the "Notepad" title - it will look like {{Document name}} - Notepad, which means that the title can be anything. In the screenshots below, the document name will look like a Text file.
Let's try running the bot again. In this case the bot will not work either and we will see an error.
Let's analyze what goes wrong and how to fix it.
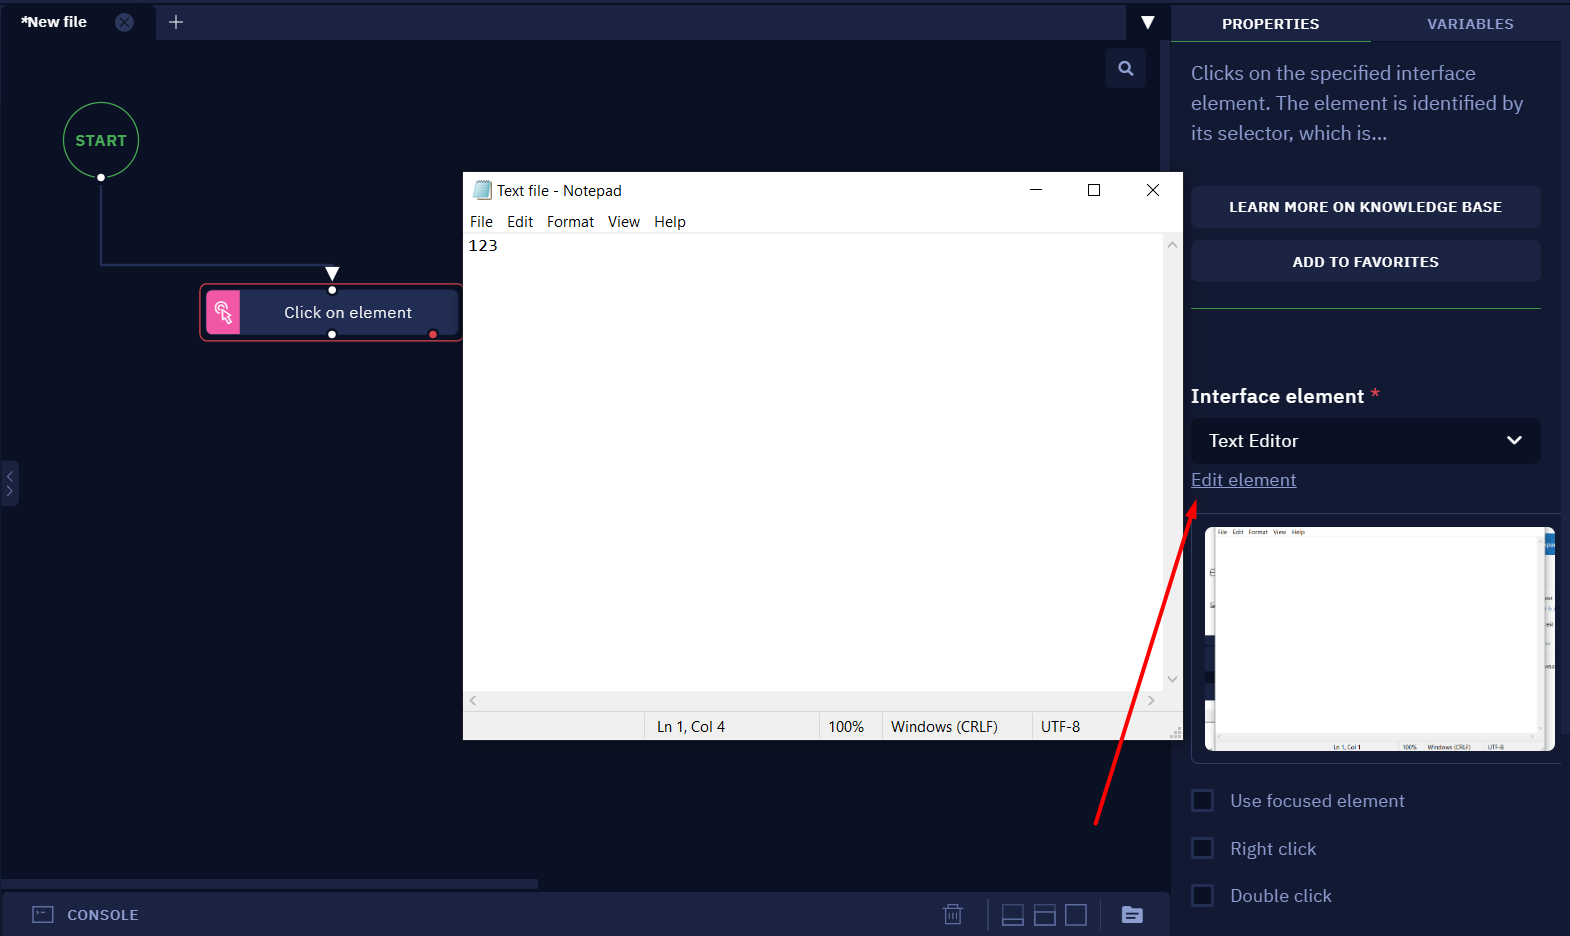
- Navigate to the "Edit element" tab in the activity parameters.
- Press on the "CHANGE THE ELEMENT" button.
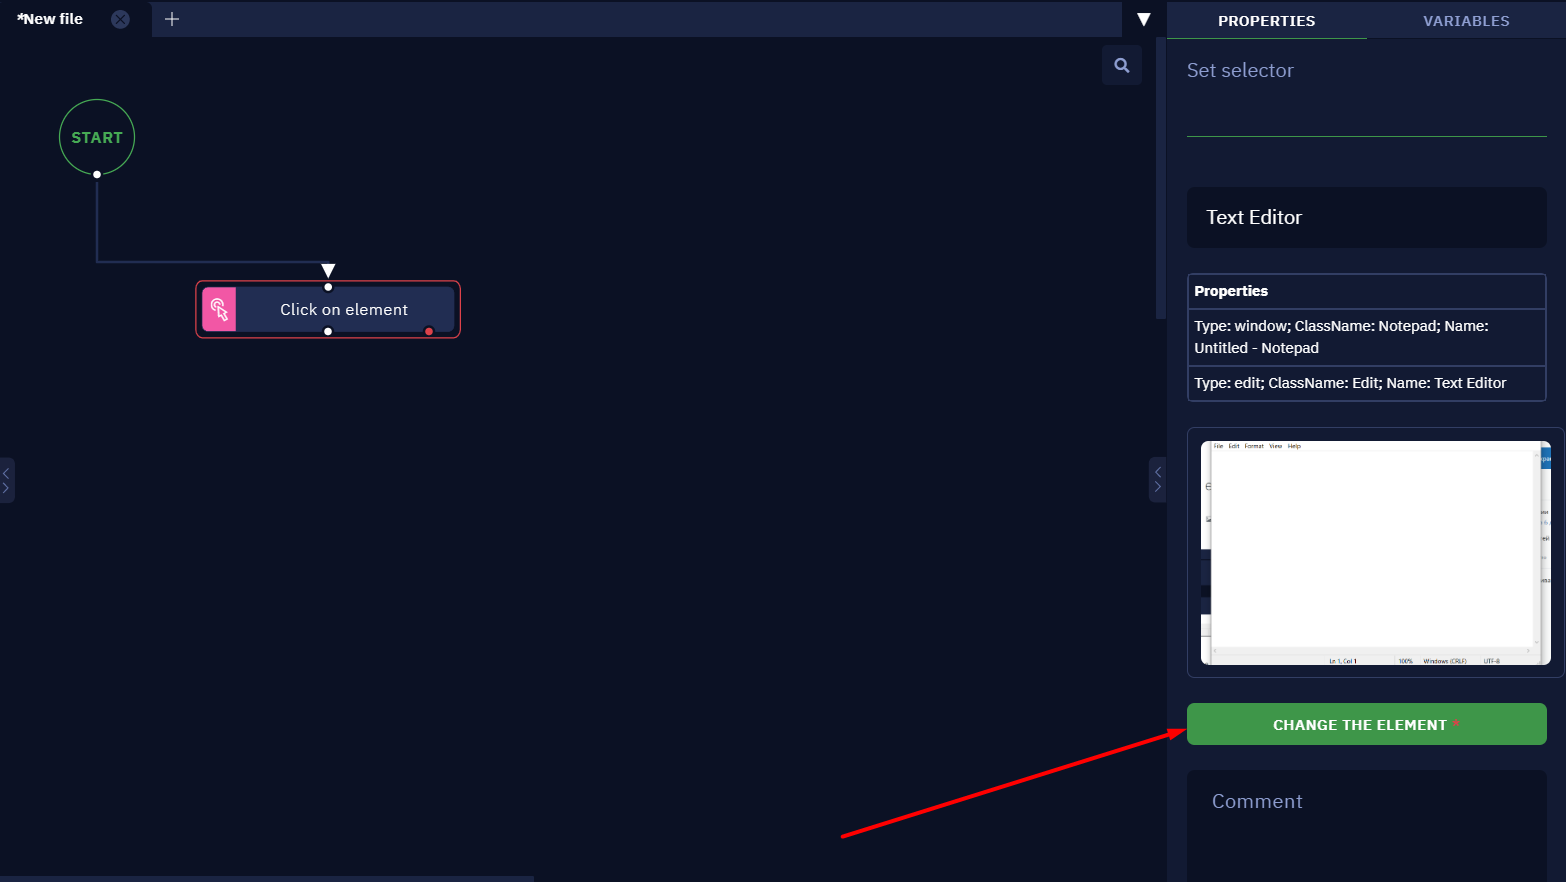
- Test it by pressing the "TEST" button. The element will not be found.
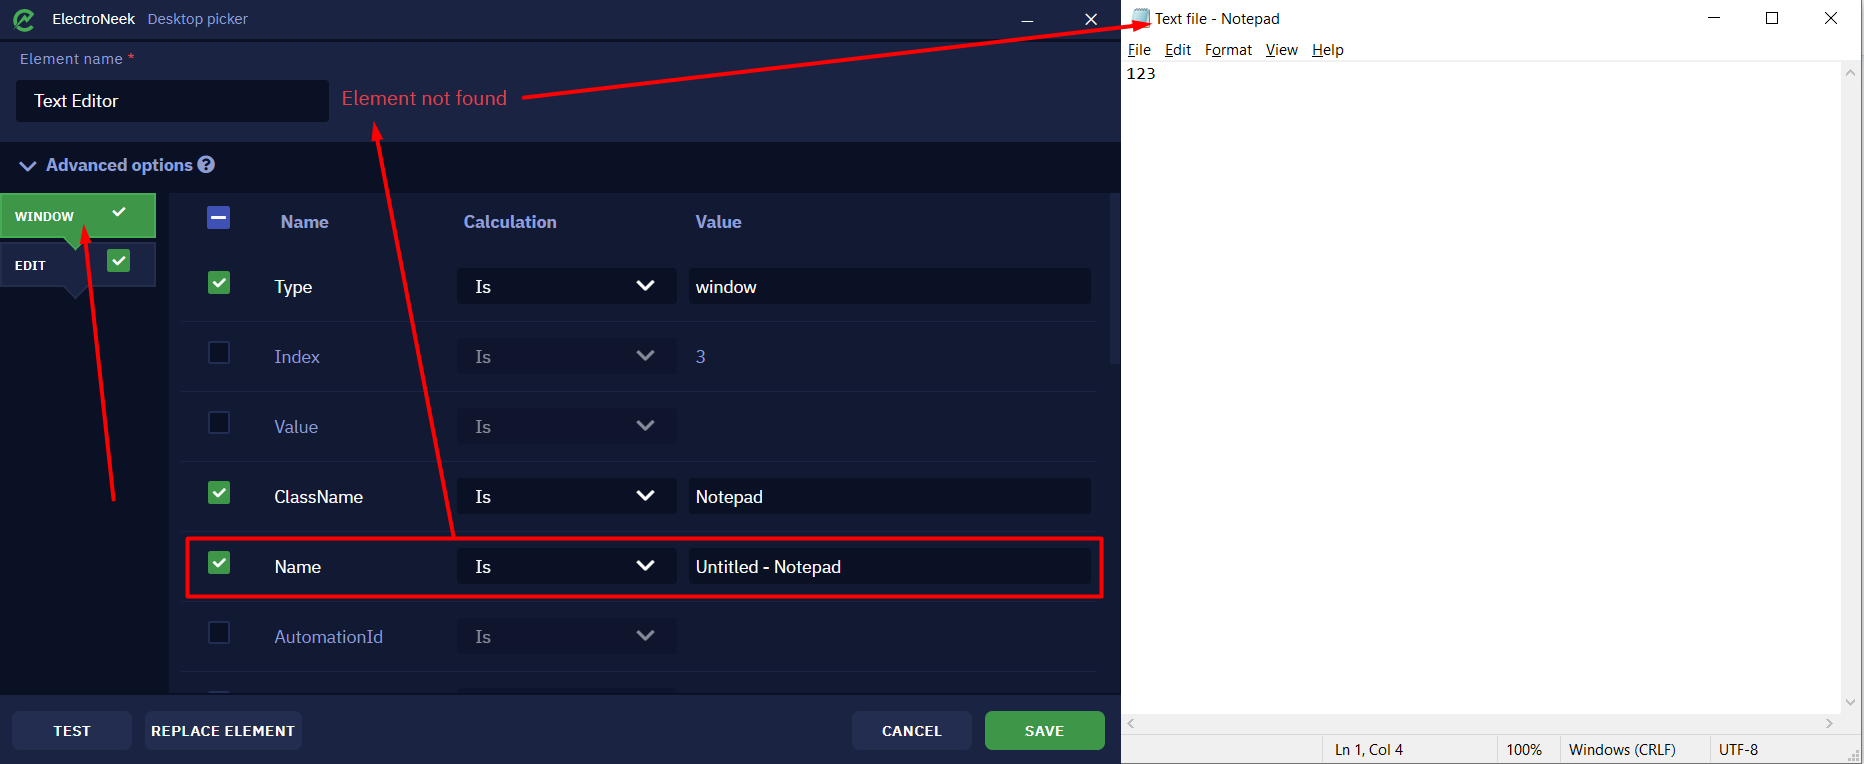
Let's expand the "Advanced щptions" to take a closer look at the parameters of the selected item. Let's go to the "Window" tab, which has a Name attribute showing the title of the "Notepad" window. Since the attribute value is set so that the title must be strictly equal to the Untitled - Notepad value, Desktop Picker cannot detect the file with the changed title.
Thus, because of changes in certain parameters (and they can also change during bot execution), the element is not found and the bot cannot work correctly.
Now let's see how we can easily solve this situation. Let's click the "REPLACE ELEMENT" button in the Desktop Picker window, select the item of the last opened "Notepad" again and press CTRL+X. This will open a window like this:
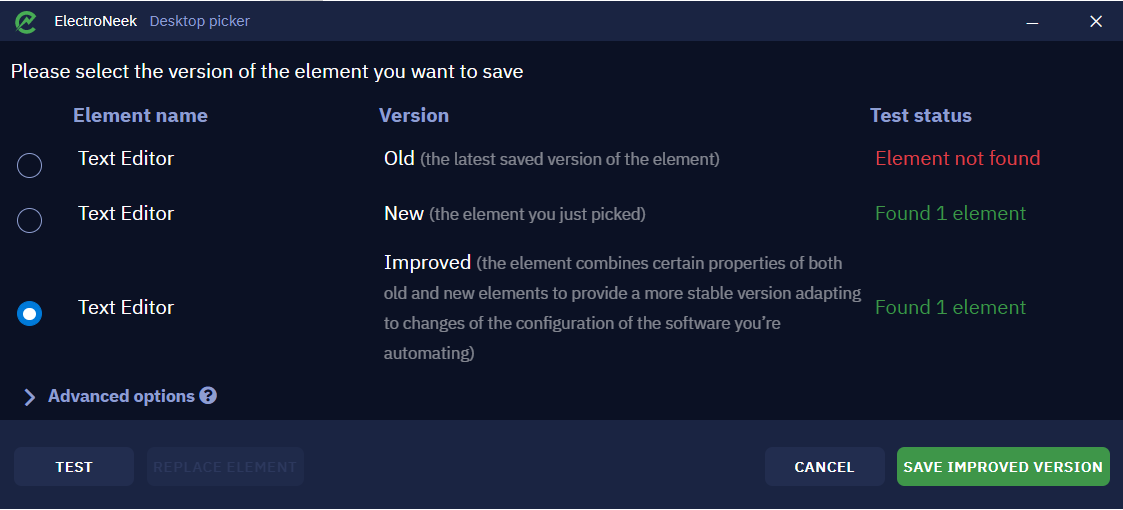
The top of this menu shows the three available versions of the workflow:
- Old version. This is the version of the element that was last before you clicked "REPLACE ELEMENT". In our case, it is the version where the Name attribute is
Untitled - Notepad. - New version. This is the version of the element we just selected. That is, the
Nameattribute is{{Document name}} - Notepad. - Improved version. This version of the element combines the features of the old and new versions to create a selector that can detect the element with any "Notepad" window title.
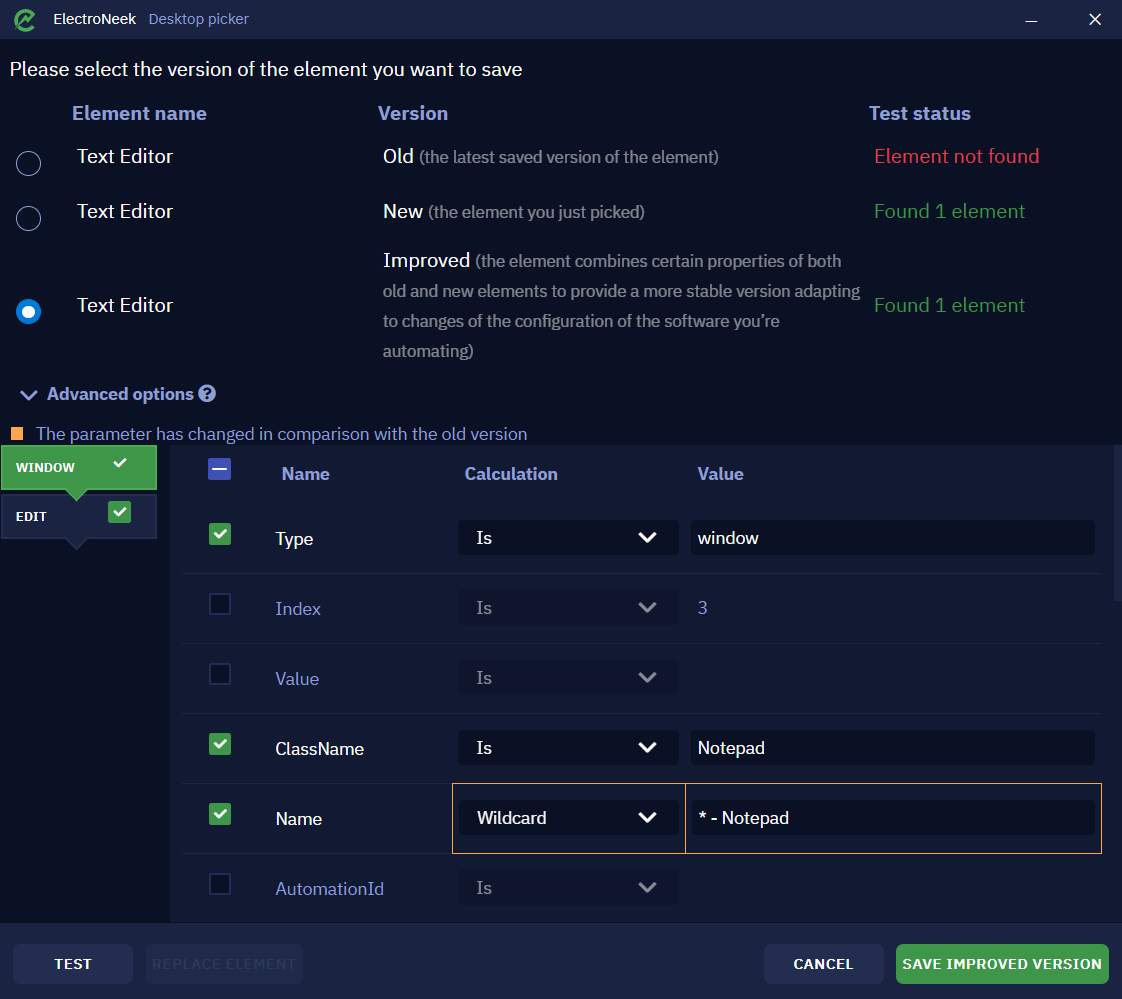
Select the " Improved" version of the selector and expand the "Advanced options". Here we will see that the changed parameters are highlighted in orange. Now the item will be detected in any case, since the parameters Wildcard→*- Notepad will be selected for the Name attribute, i.e. the platform will search for elements that have in the Name attribute the phrase - Notepad and any number of any characters up to this phrase.
Next, all you have to do is save the element selection in this form. You can also manually adjust the "Name", "Calculation" and "Value" so that the elements you want are defined. We told you more about that earlier in this article.
Getting images from a table
Description
Sometimes we need to extract an image from inside a table on a web page. In this quick tutorial, you will learn how to interact and extract such elements.
Instructions
Follow these steps:
- Look at the page structure and check how the image is displayed inside the table. Typically, it would be contained inside a tag like
<img src='sourcepage'>
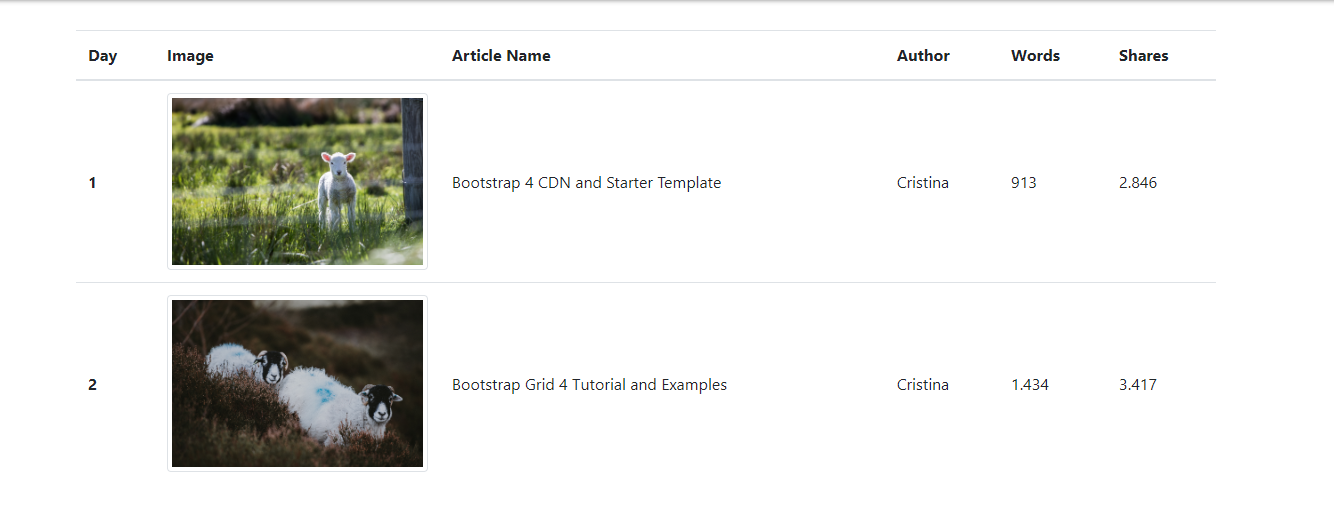
In the image below it’s possible to see that there are tags <img src=""> in each line of the table.
- Create the workflow to extract the image from that table. We can divide our workflow into three main sessions
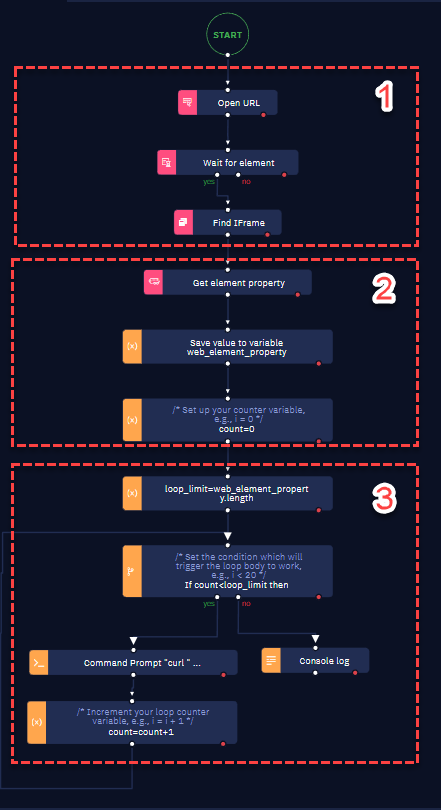
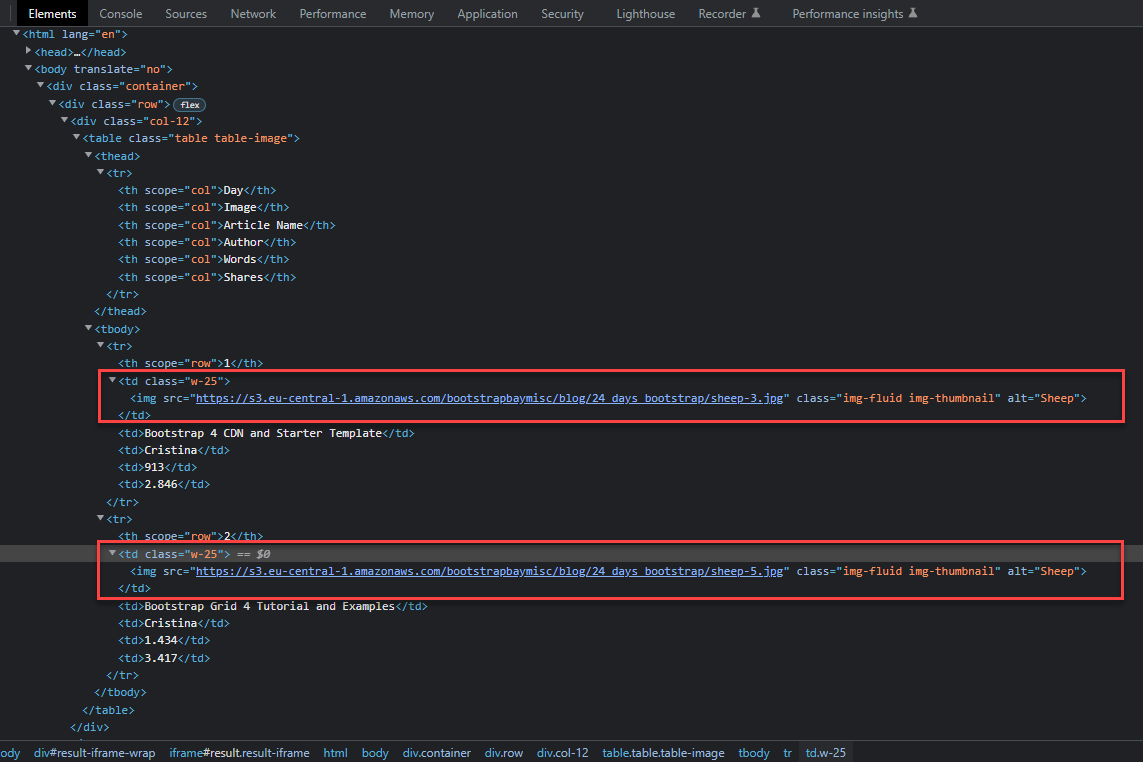
In session 1 you open the website and do the proper navigation. Note that the website in this case has an iFrame — which leads you to search for the iFrame before doing the extraction.
Session 2 consists in using the Get element property activity to extract the src property from the img tag. For that, use the Browser Picker to select the element on the web page. In the example, our selectors return 2 elements, which are the two images on the web page.
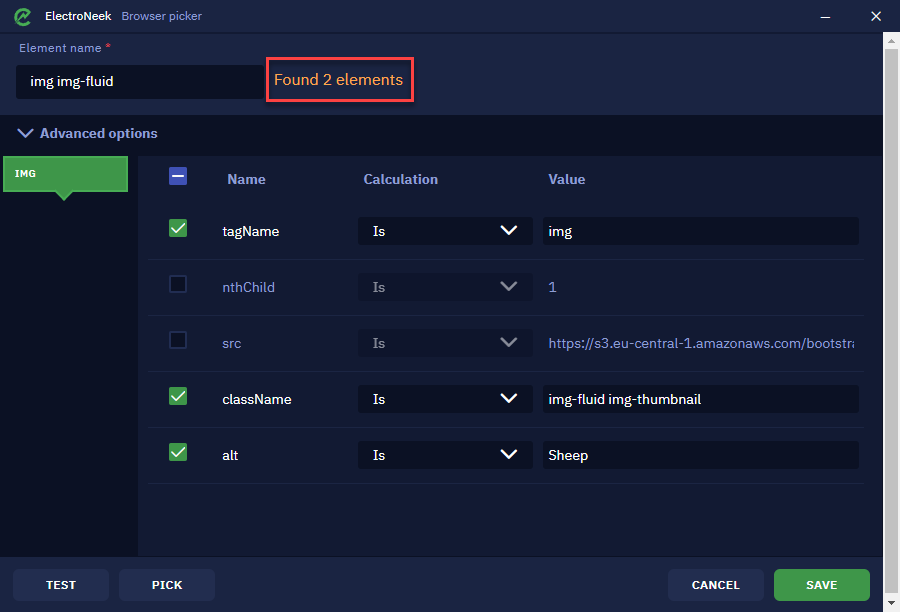
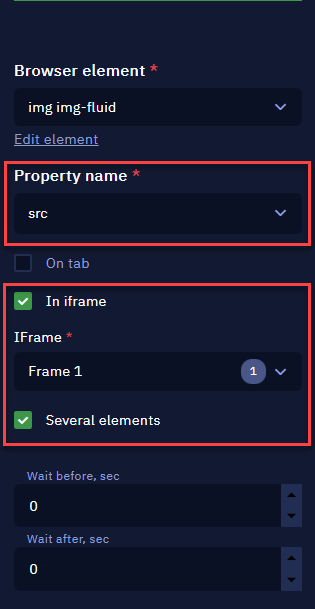
In the Get element property activity properties, it is necessary to select the src in the "Property name" field.
NoteIn our example, it's necessary to select the "In iframe" and "Several elements" due to the fact that the selector picked is for multiple elements in the page. If your selector is for only one element, it’s not necessary.
The result is an array with the image URLs in it:

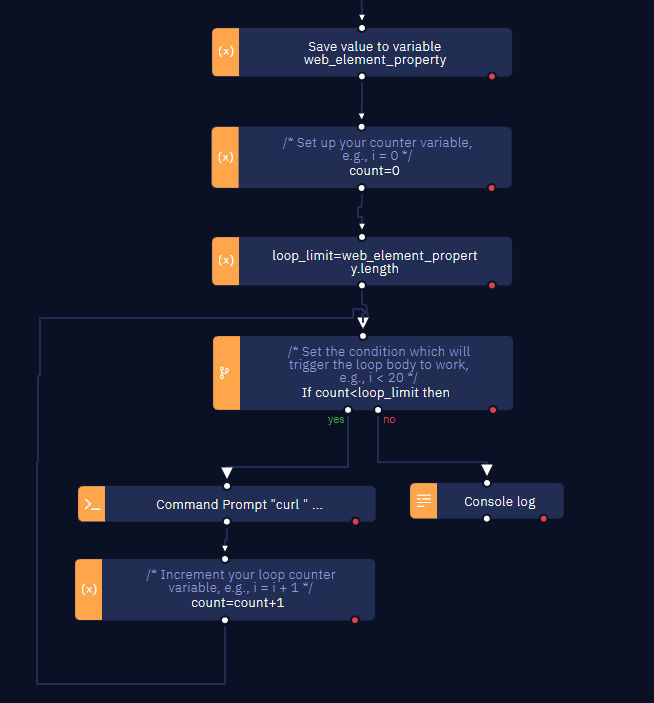
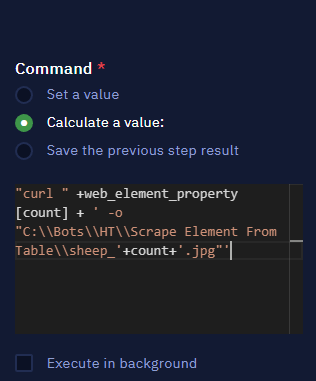
In session 3 you must download the images. To do that, loop through the array created as the result of the Get element property activity and use the Copy file activity.
Use this command prompt: curl <url> -o <output_path>
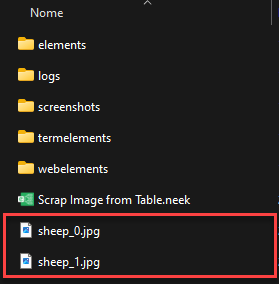
Your final result is simple: the files downloaded in the specified path.
Clicking on an image using a screenshot
Description
We can use the Click on image activity for difficult-to-capture elements on a webpage/GUI application. To do that, keep in mind that the screen resolution must match between the development machine and the target machine.
So, let us see how to perform this action.
Instructions
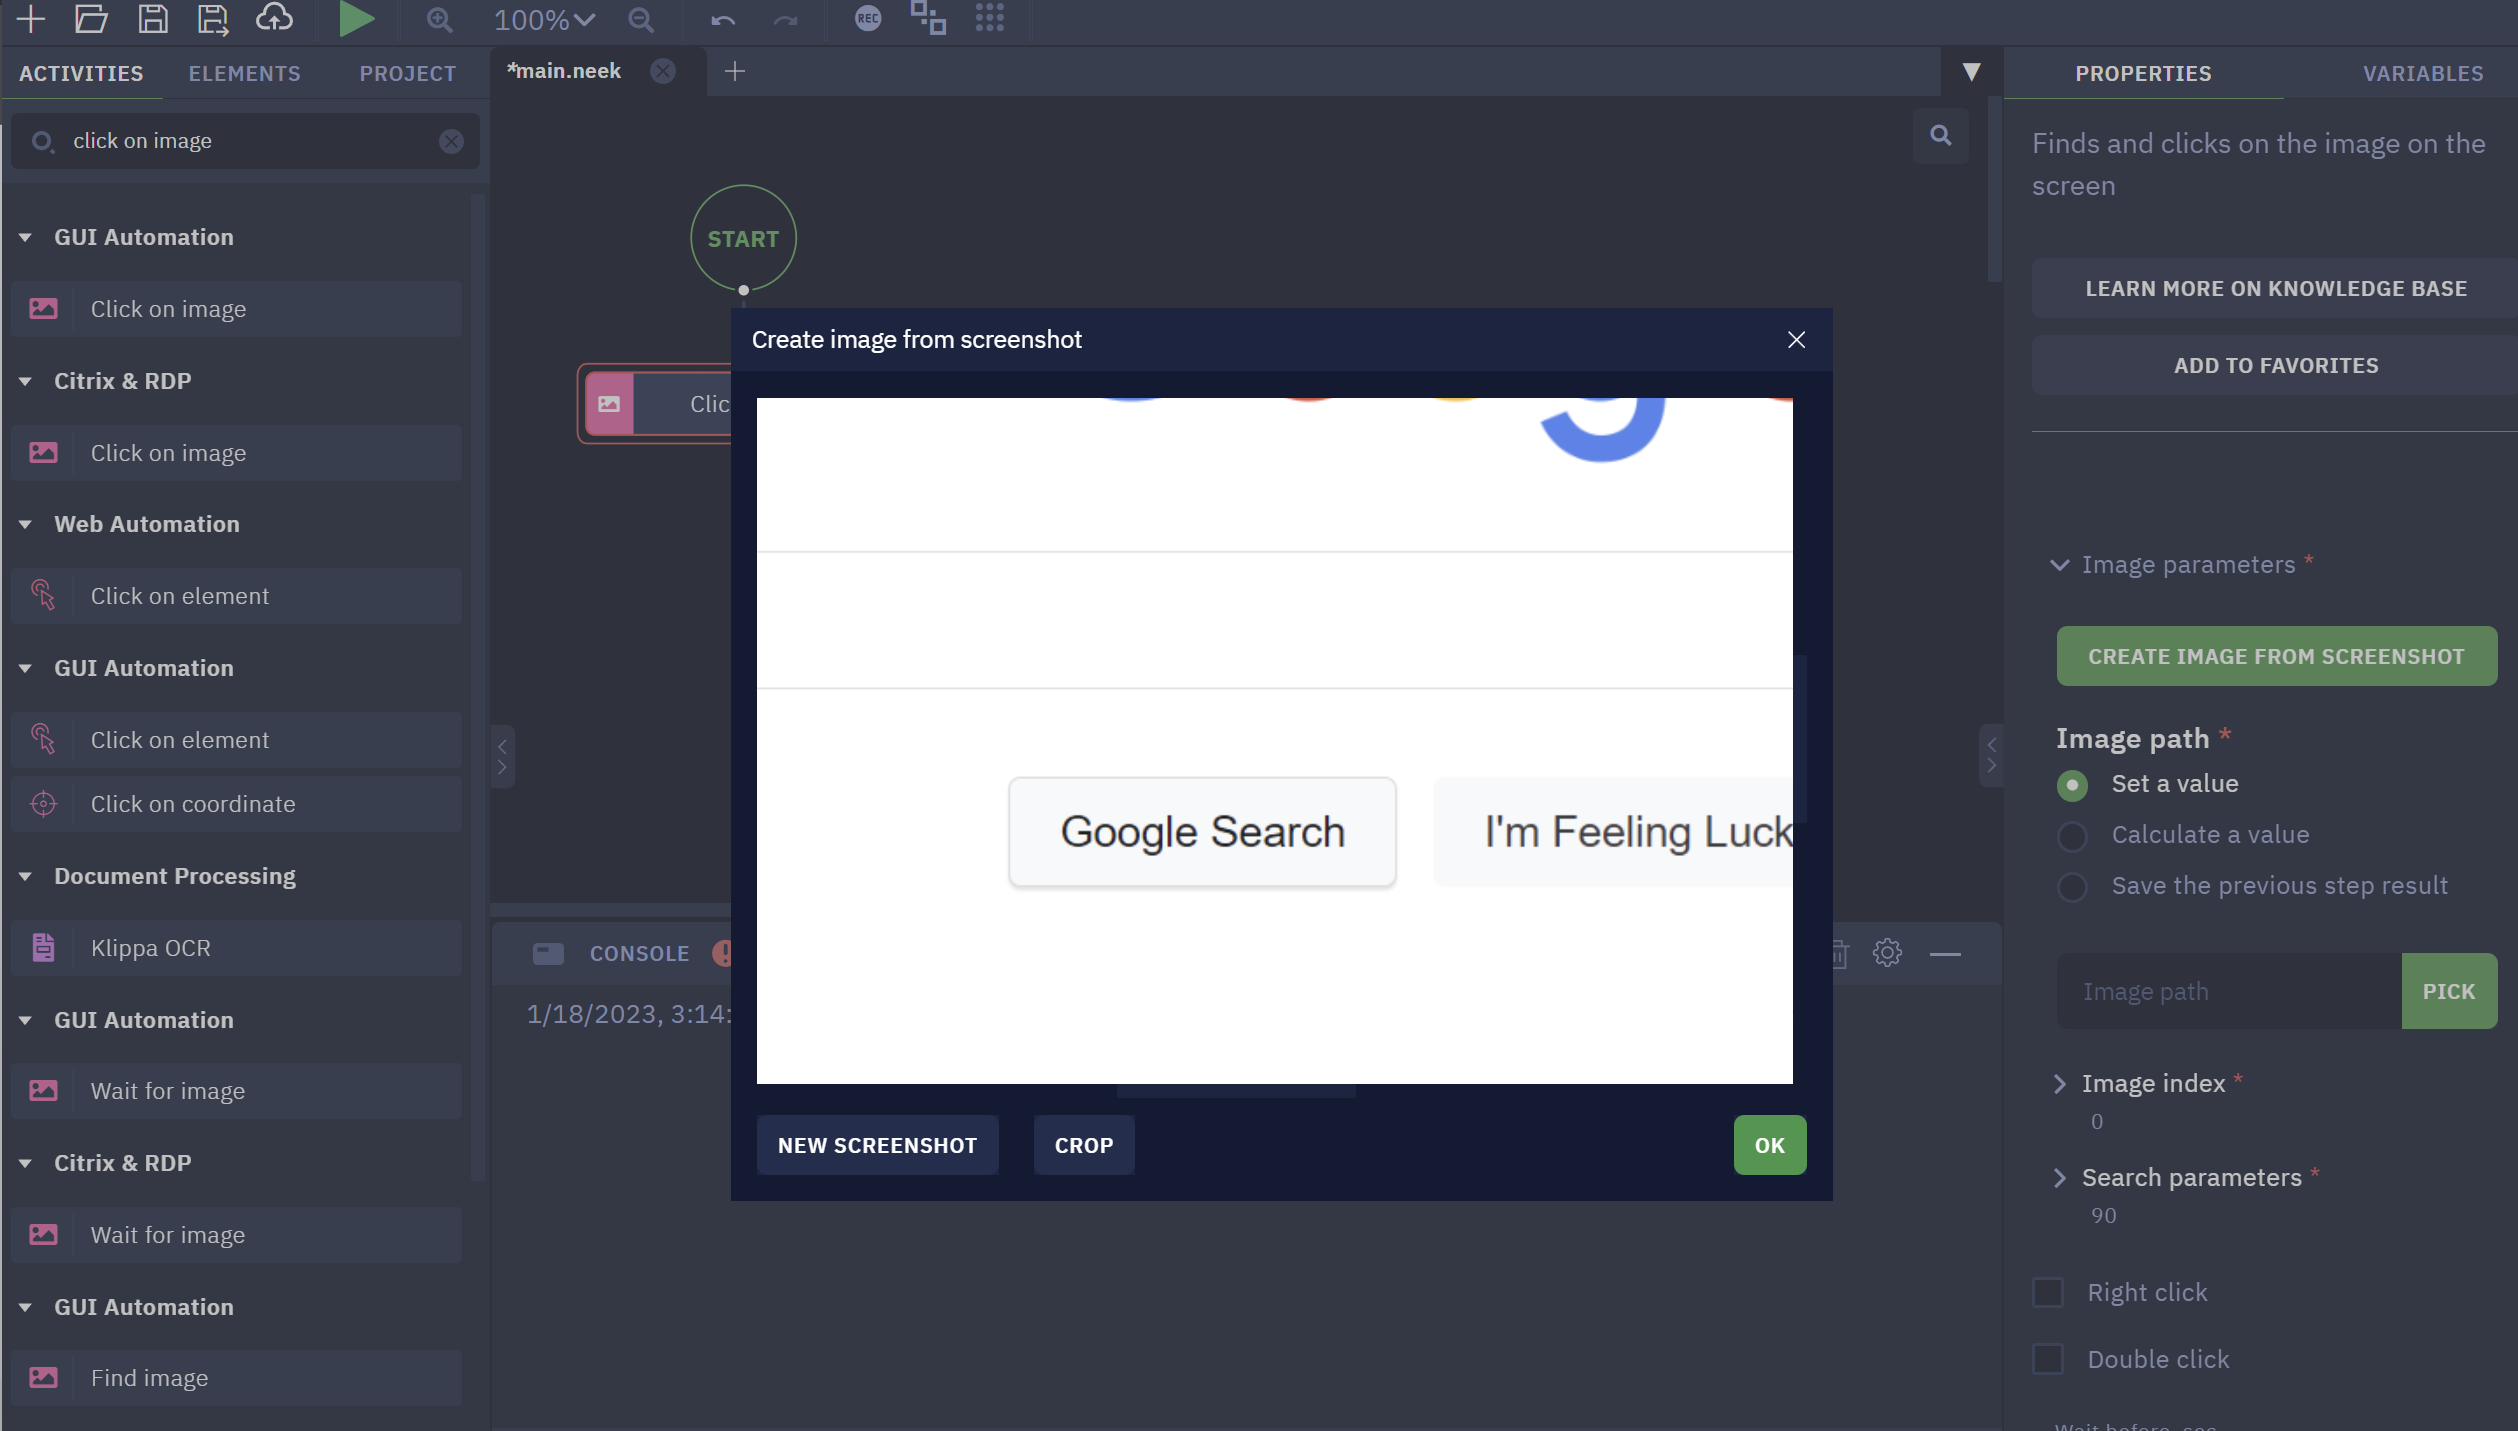
- Insert Click on image activity in canvas
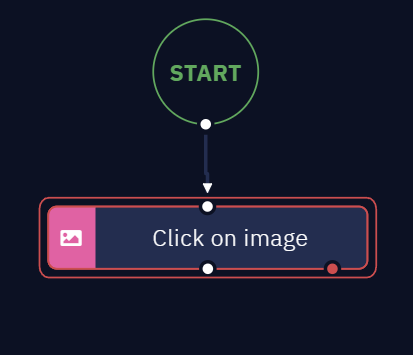
- Click on "Create image from screenshot"
- After taking the screenshot by pressing Ctrl, need to crop the image to the exact part where the click should be executed
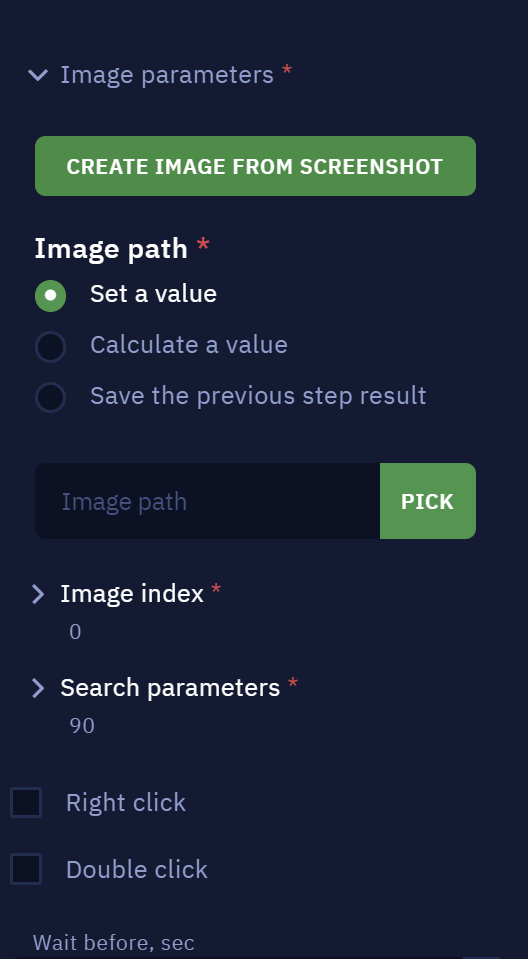
- On the option “Click on image to select click point“, select the exact place where you want your bot to click
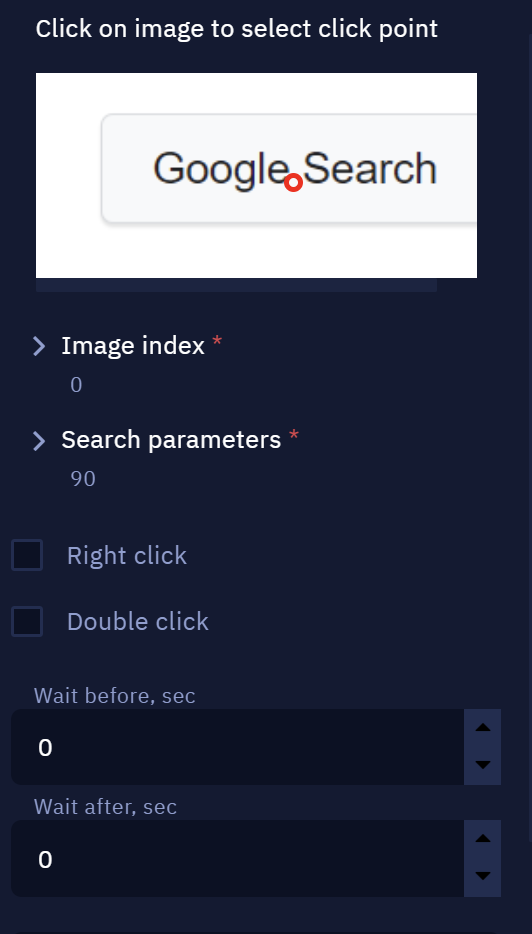
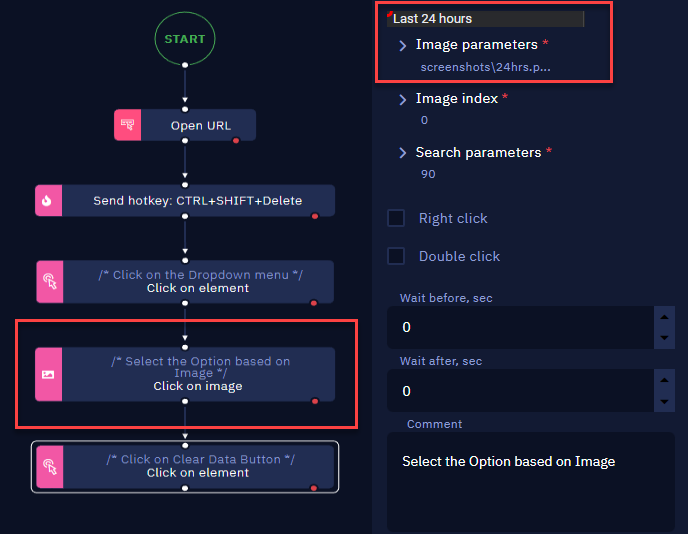
NoteUse the option "Search parameters" to inform the percentage of similarity that the tool must reach when comparing with the screenshot to make the click. Make sure you use a value above 80%.
Closing a Browser Tab
Description
We can easily close a browser tab using Studio Pro activities. In this article, we describe the steps you can use to do that with web automation.
Instructions
To use this method, you just need the Send hotkey activity to trigger the close window tab function in the browser.
PreconditionYou need a browser window with more than one tab opened.
Follow these steps:
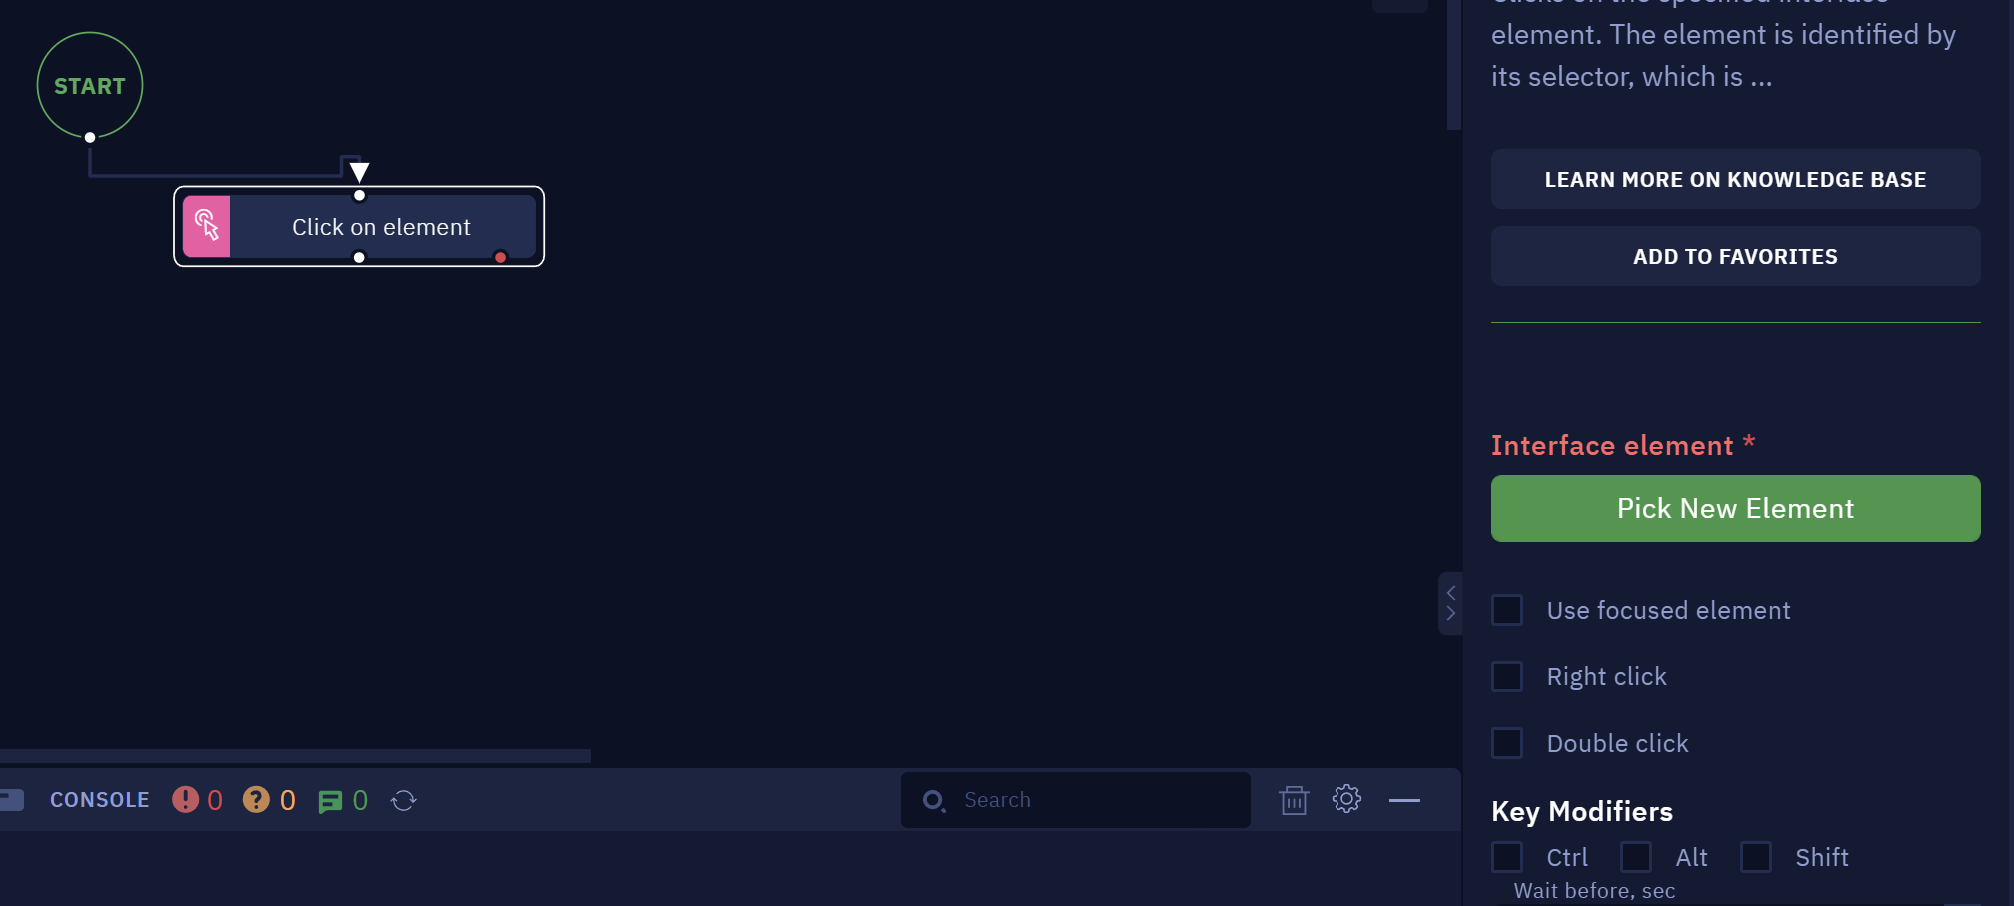
- Add the Send hotkey activity
In this example, we want to close the wikipedia.com browser tab. So you must set the activity to work on a Wikipedia element, as the following image shows:
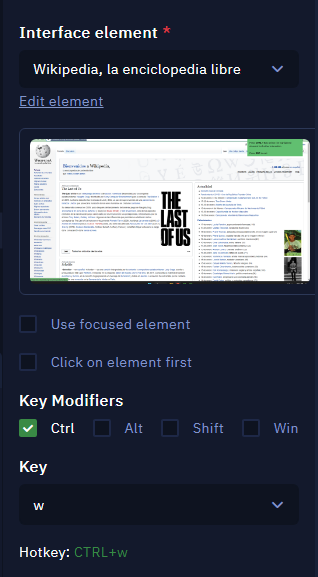
- Configure the activity as shown in the image above
- Interface element: Select the Wikipedia element. You can also use the “Focused element" if the browser would be the current focus during the bot’s execution
- Key modifier: Ctrl is checked
- Key: W
If you want to close another tab, you just need to modify the Interface Element — or use the Activate element activity on the browser window, then use the "Focused element" option.
NoteCtrl + W is the standard hotkey to close a browser tab.
Recognizing Web Elements
Description
If we need our bots to perform actions in the web browser, dealing with web elements is usually essential. The logic is simple: recognize it, then tell the bot what to do with it.
Here we explore 3 options to recognize them.
Instructions
Using the internal picker
- Click on "Pick New Element"
- Hover your mouse over the page to see the elements highlighted. Focus on your target and press Ctrl + X
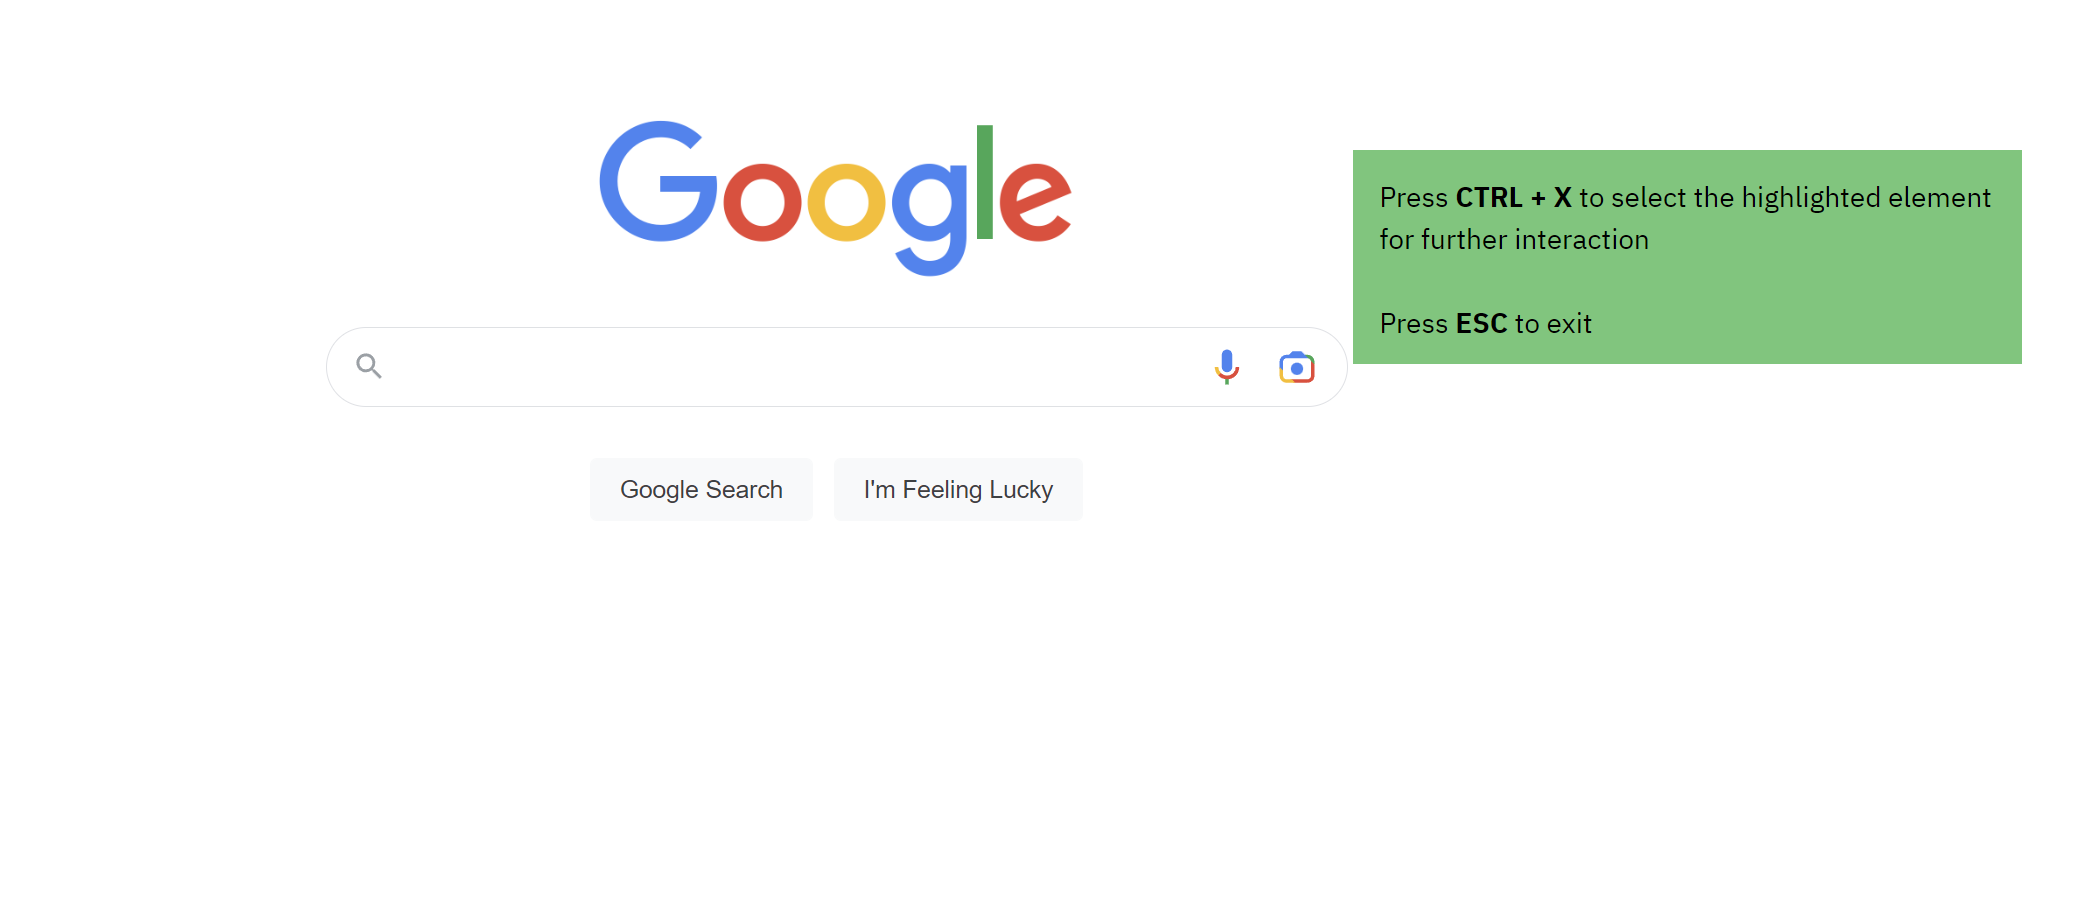
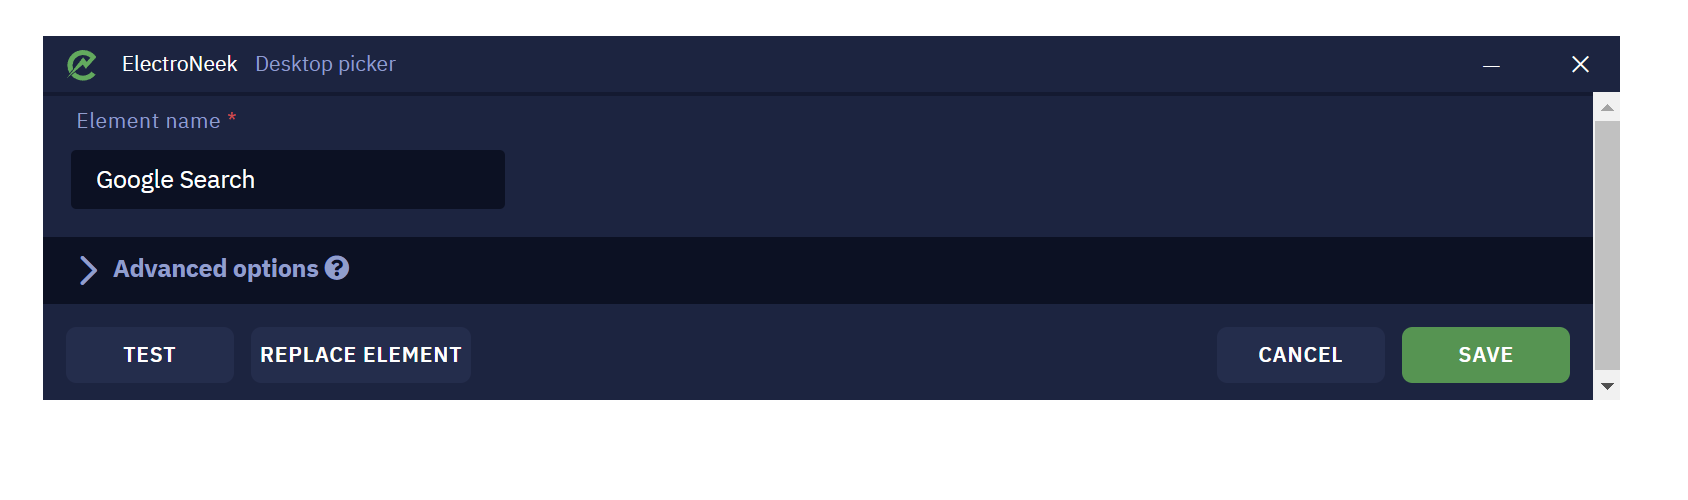
- A pop-up appears to indicate that the element was captured. Press "Save"
Using XPath
-
Go to the web page from which you need to select the element
-
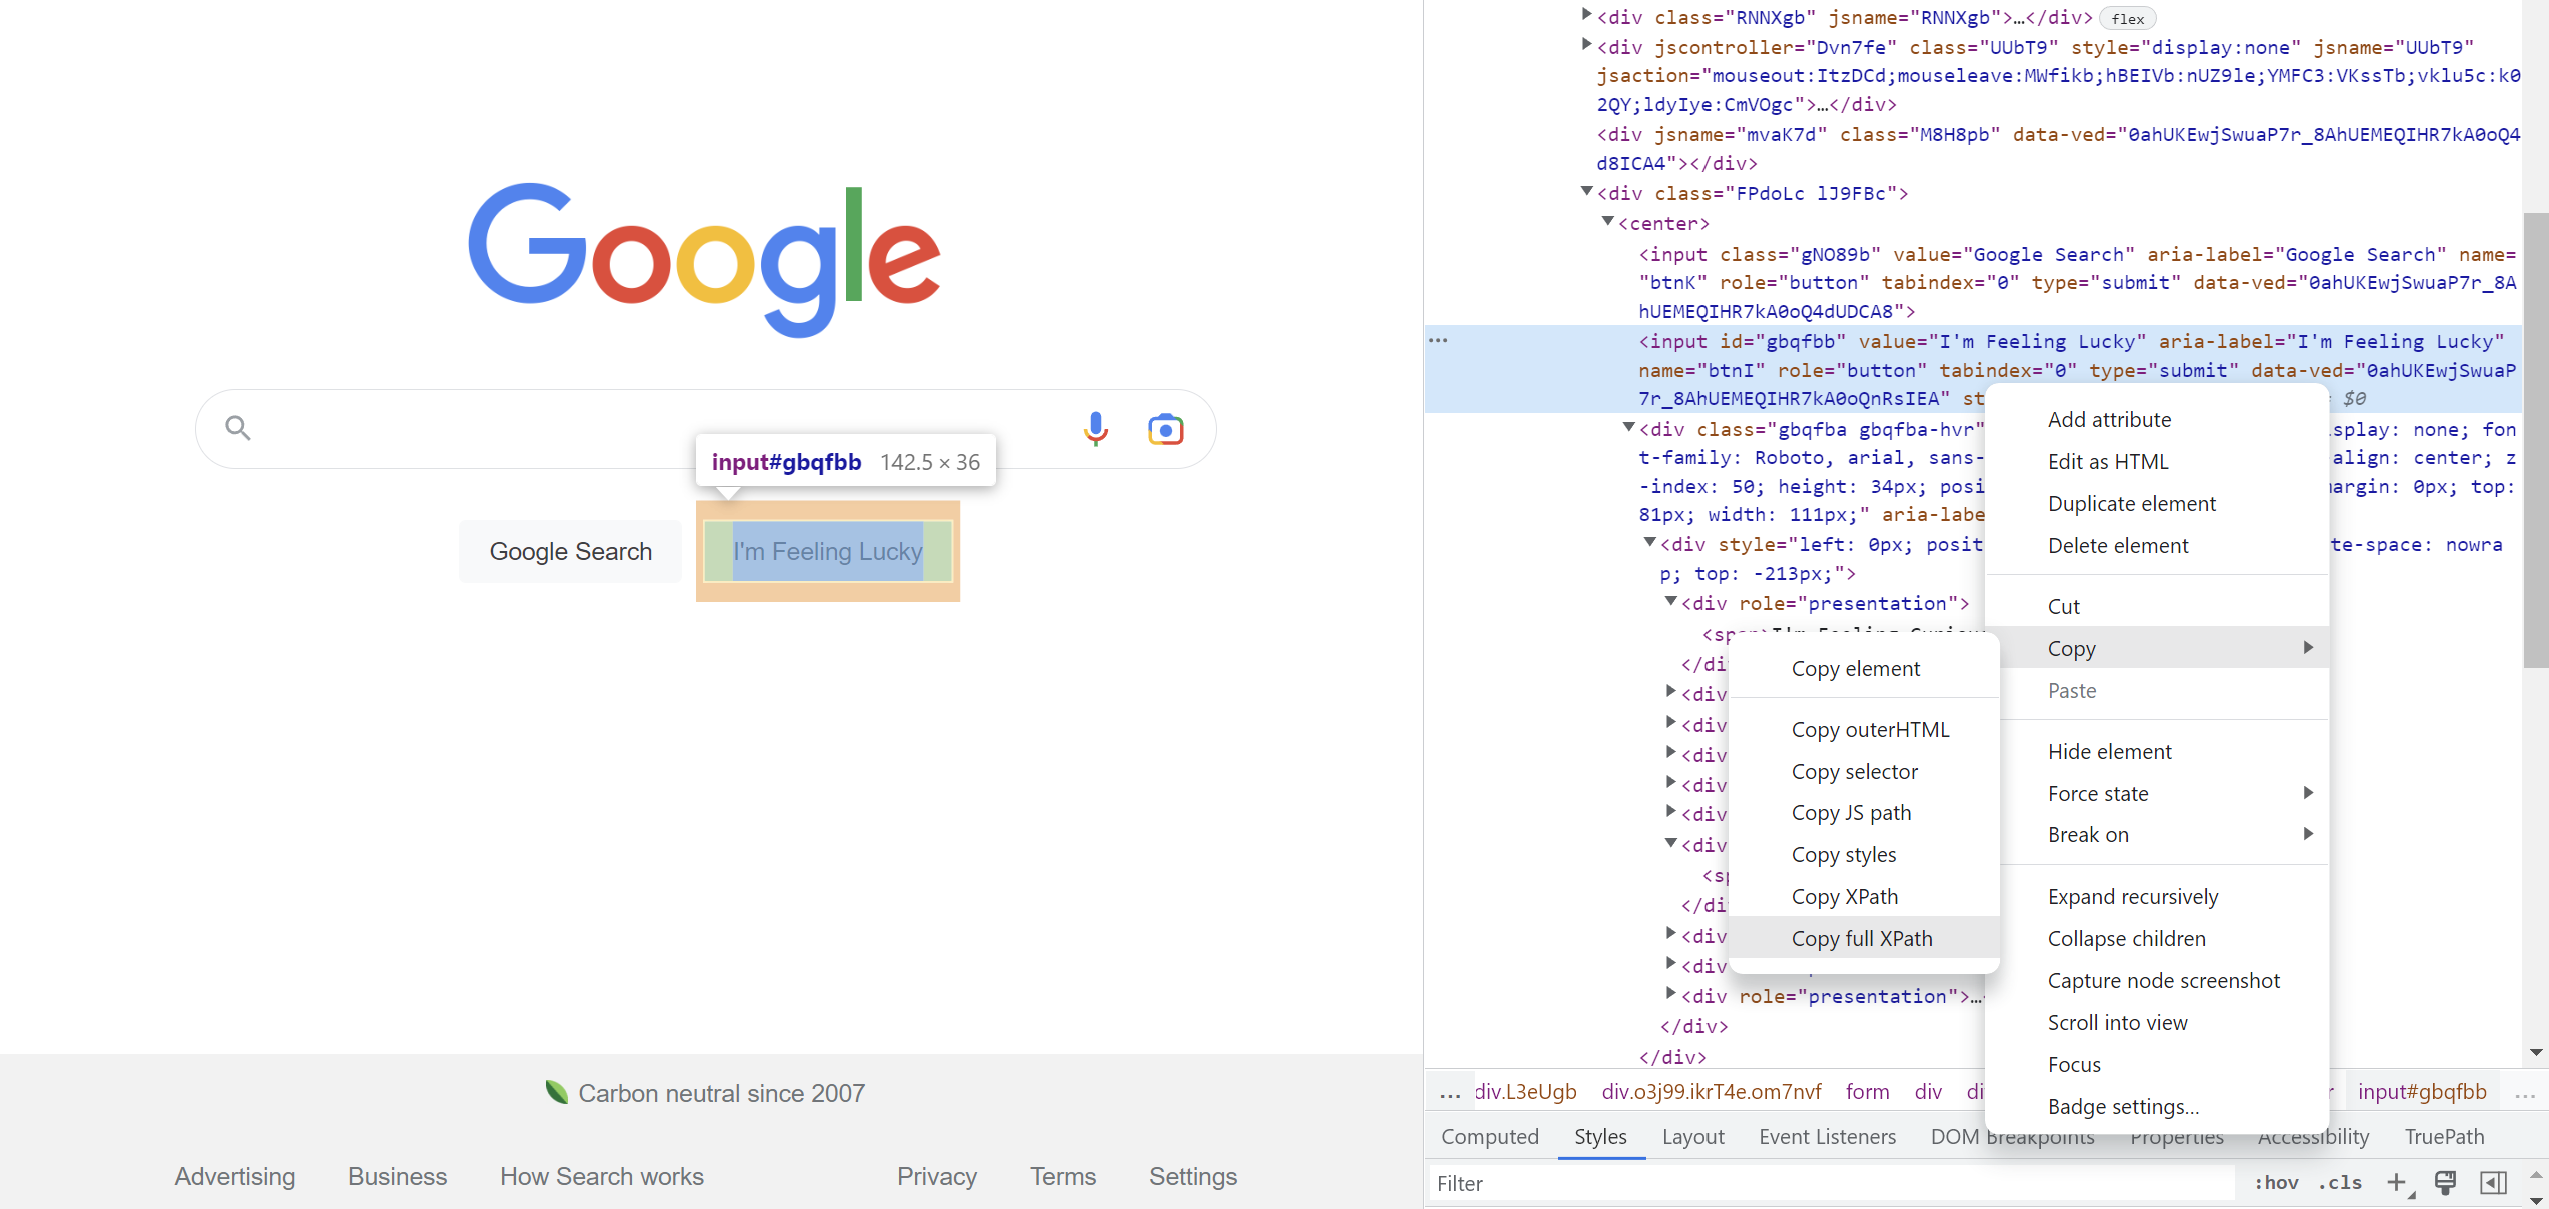
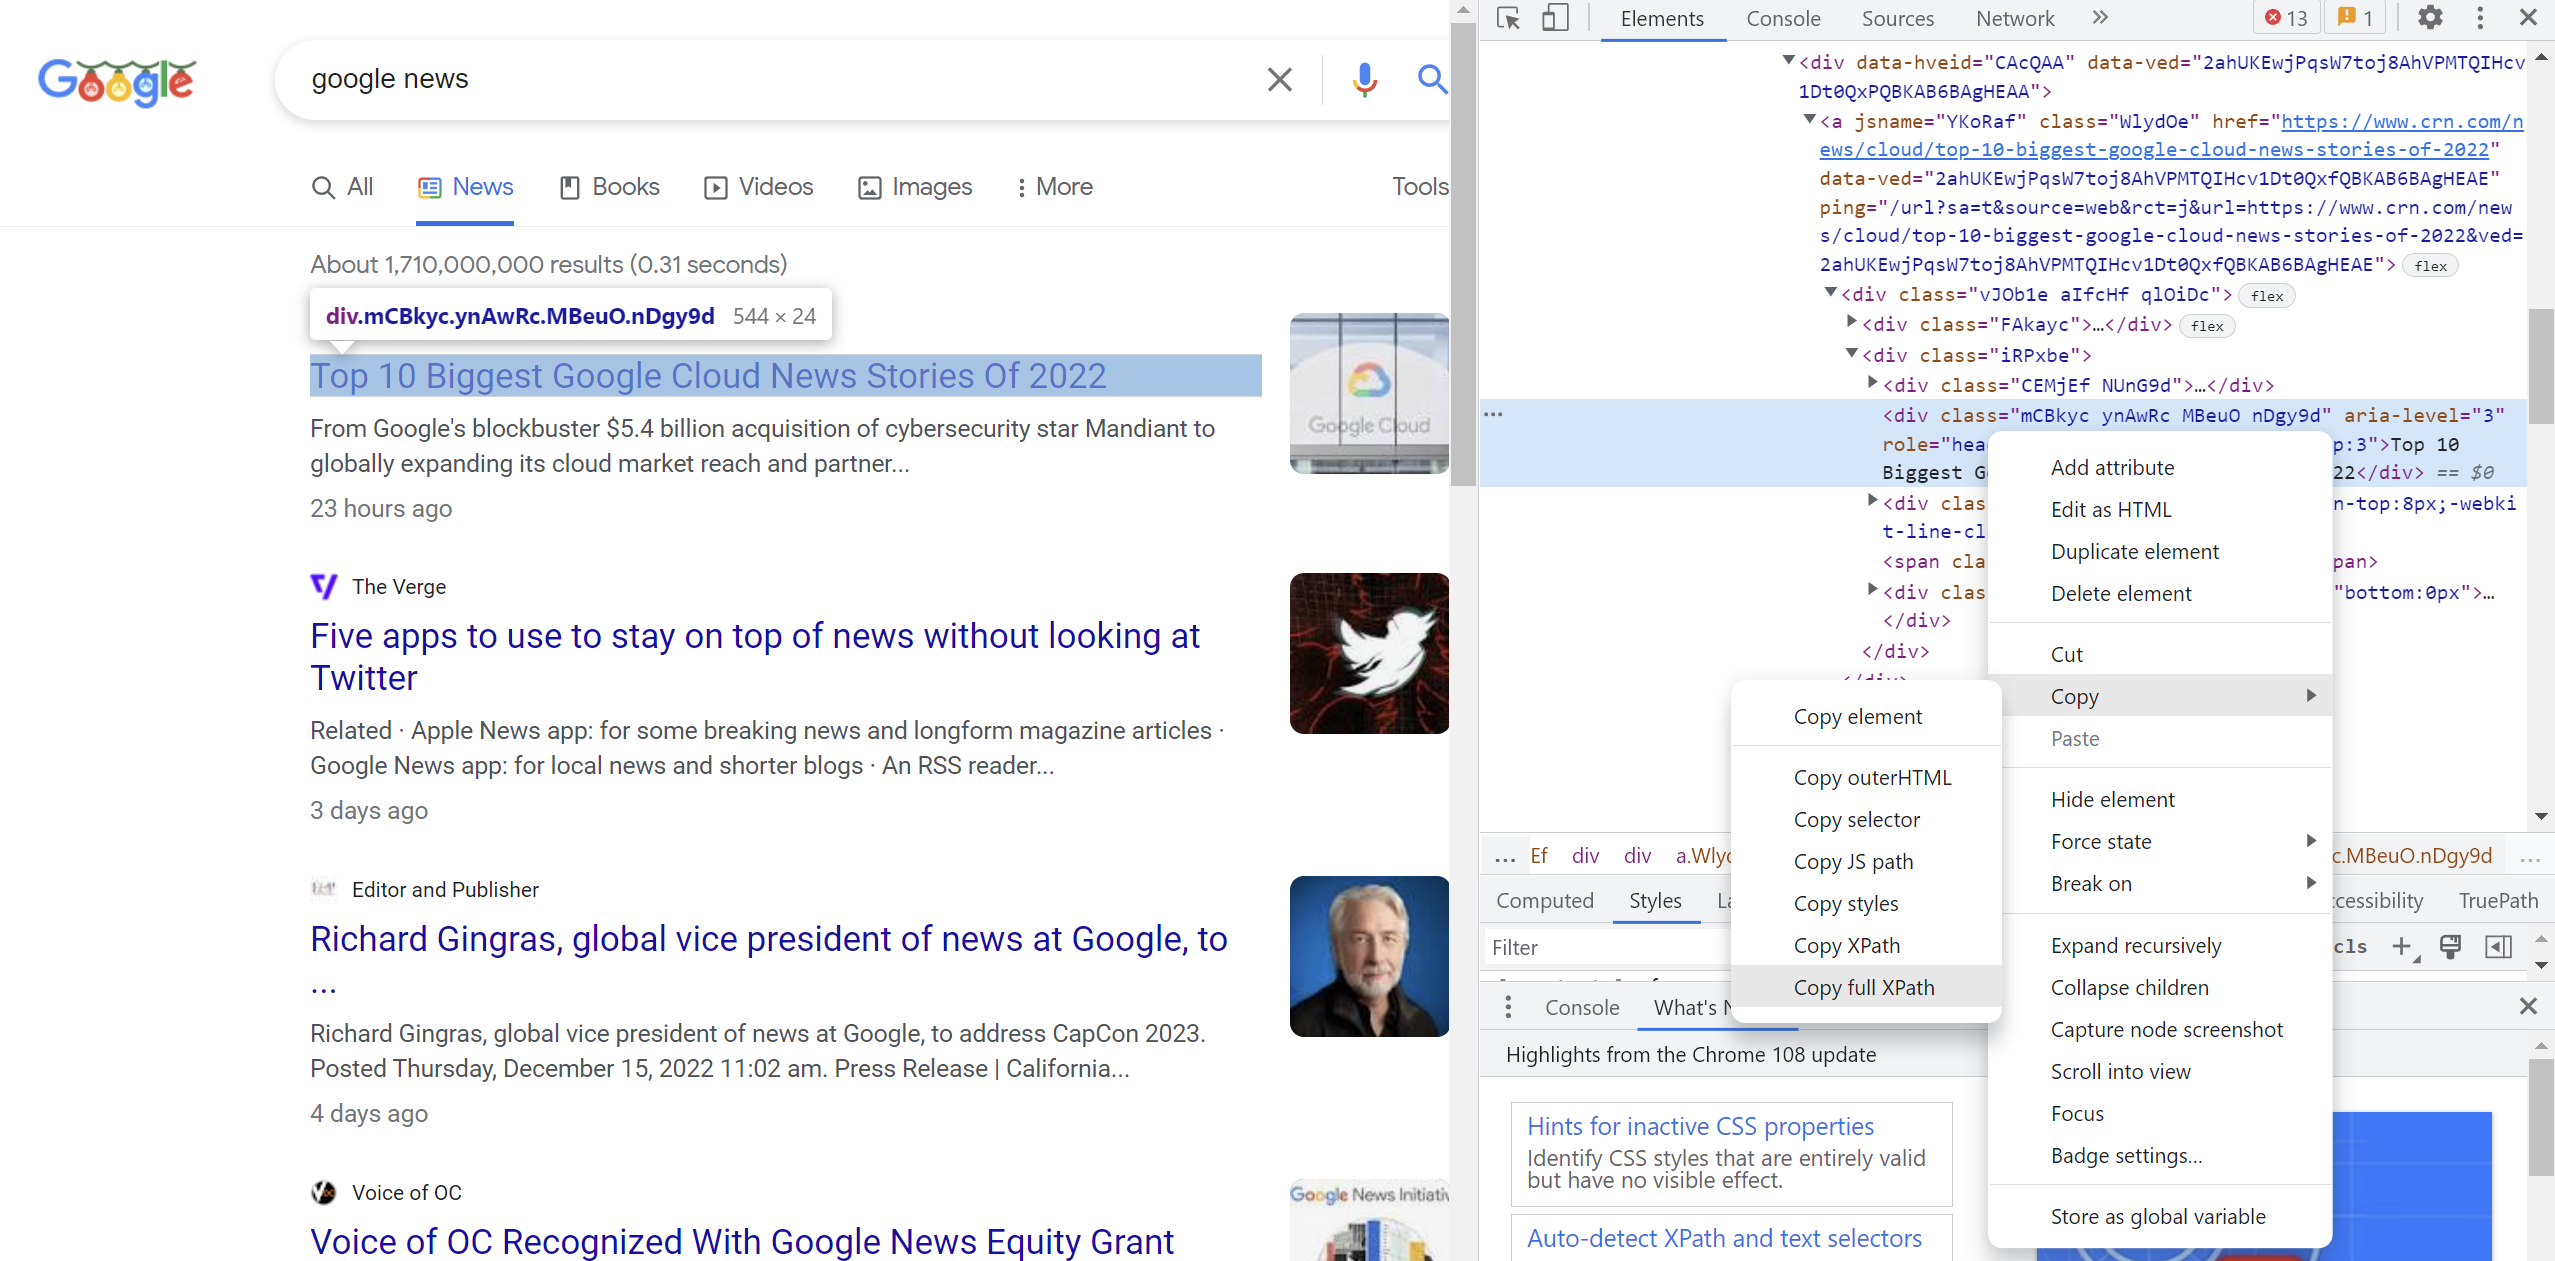
Right-click on the web element whose XPath you need to get
-
Choose the option “Inspect"
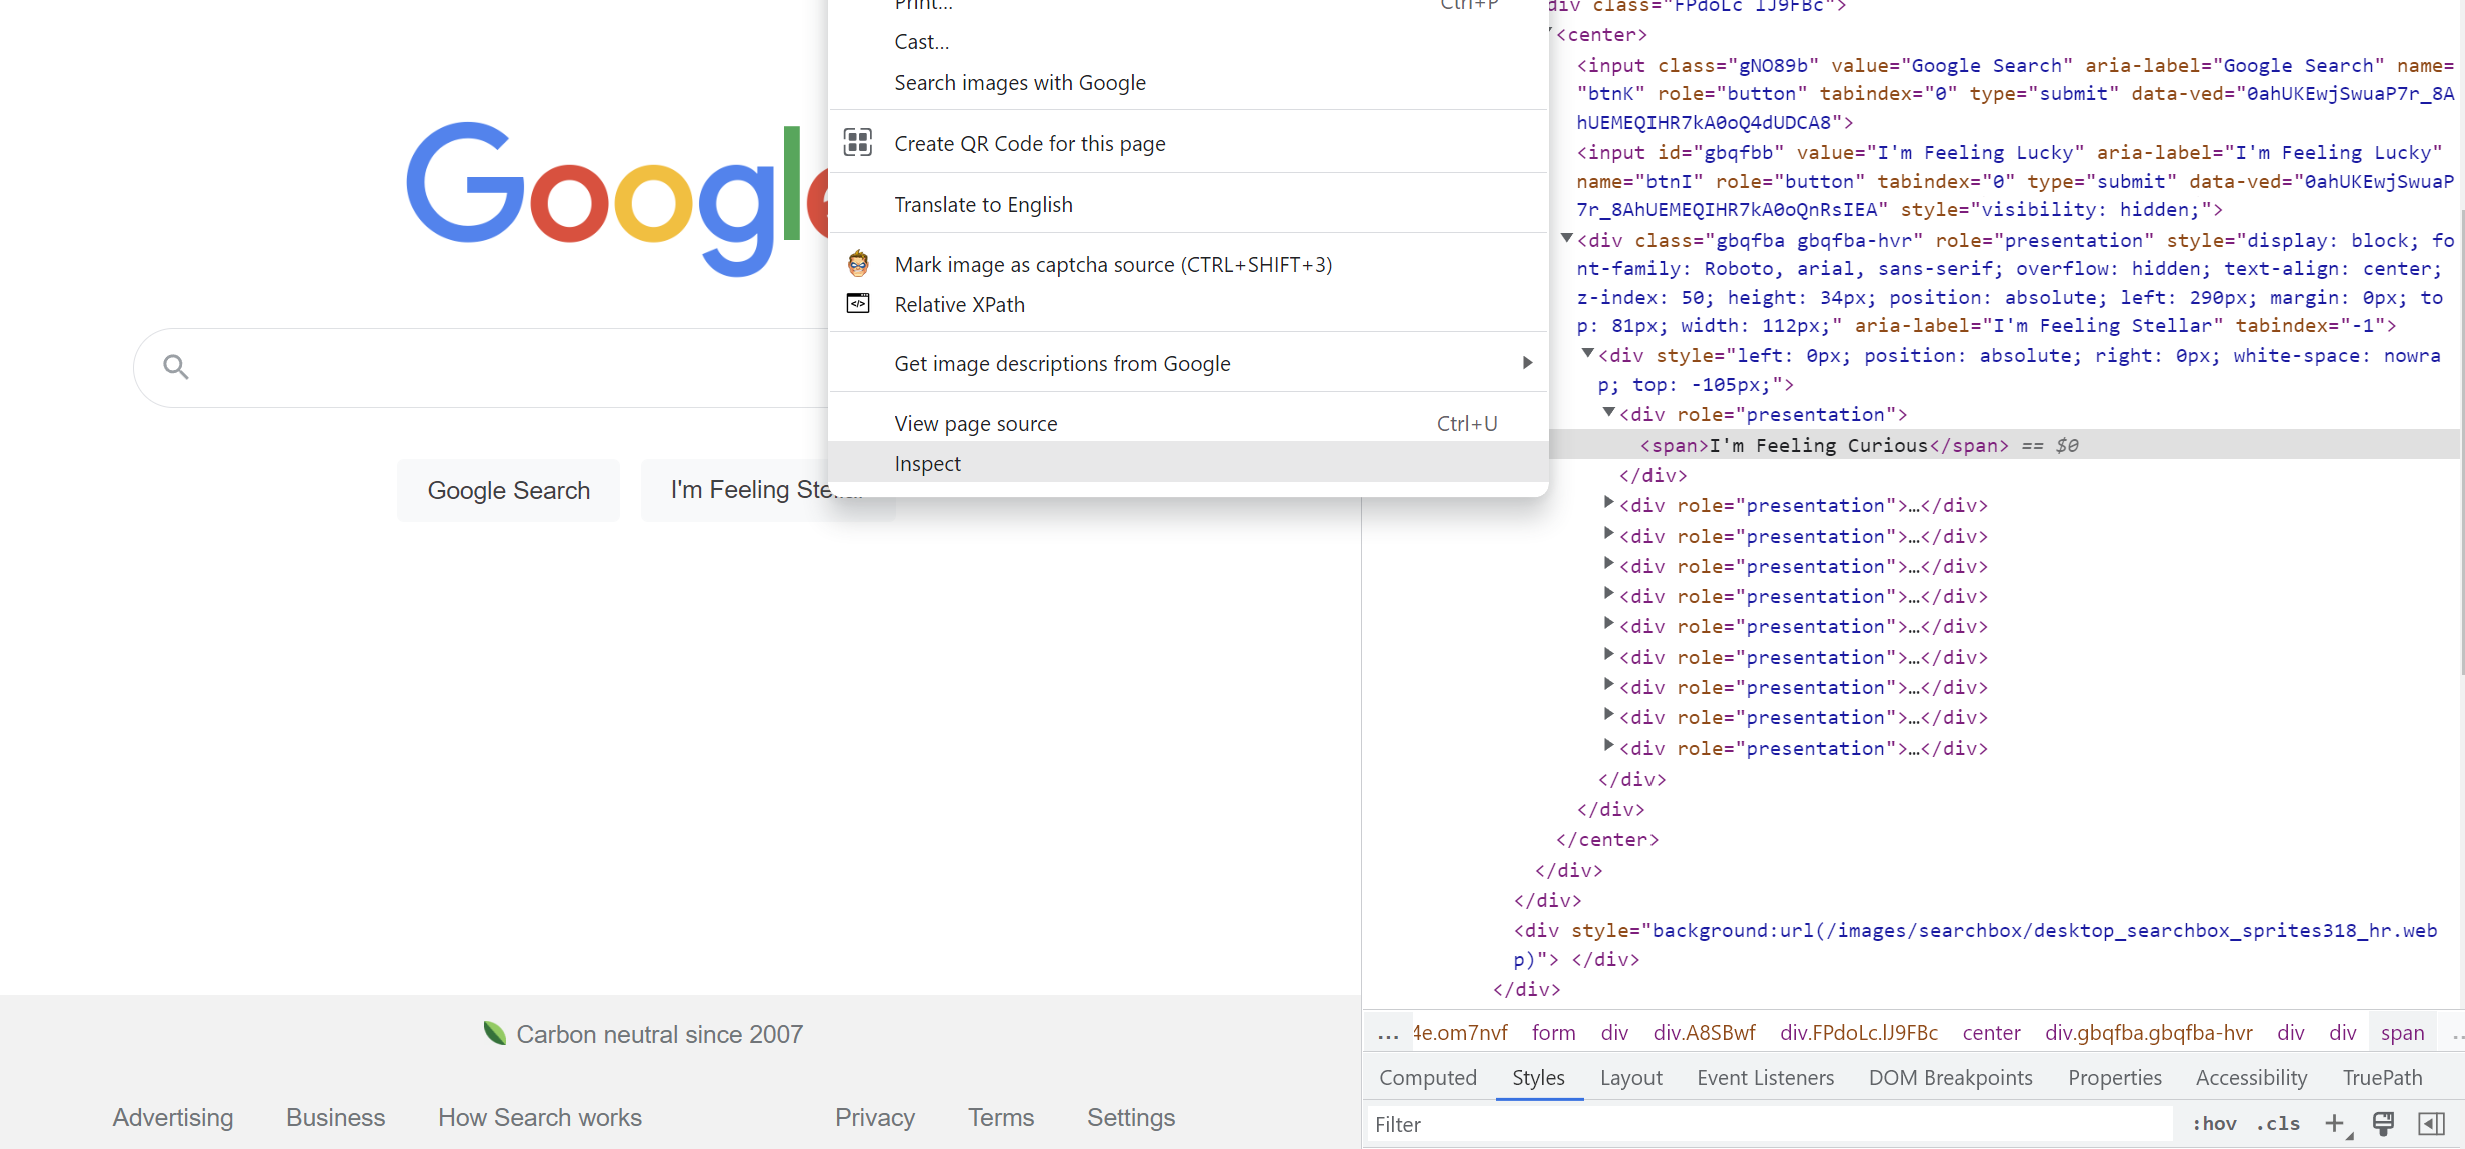
- After identifying the element in the code, right-click on it and choose Copy → Copy full XPath
- On Studio Pro, choose Elements → Add new Element → Browser Element
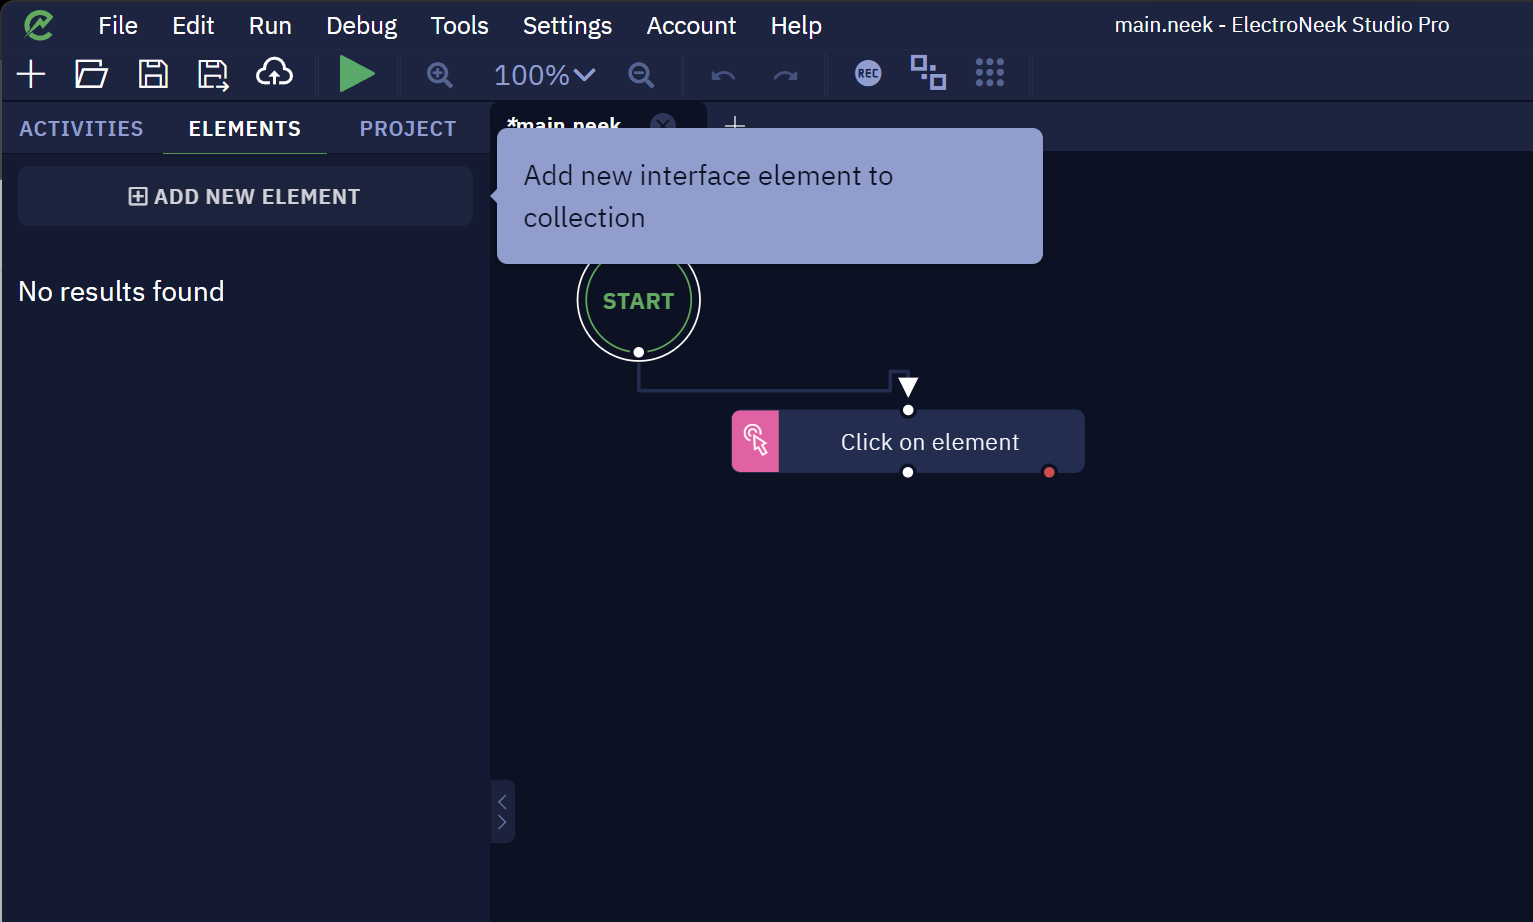
- Add the element name and choose the option "Xpath"
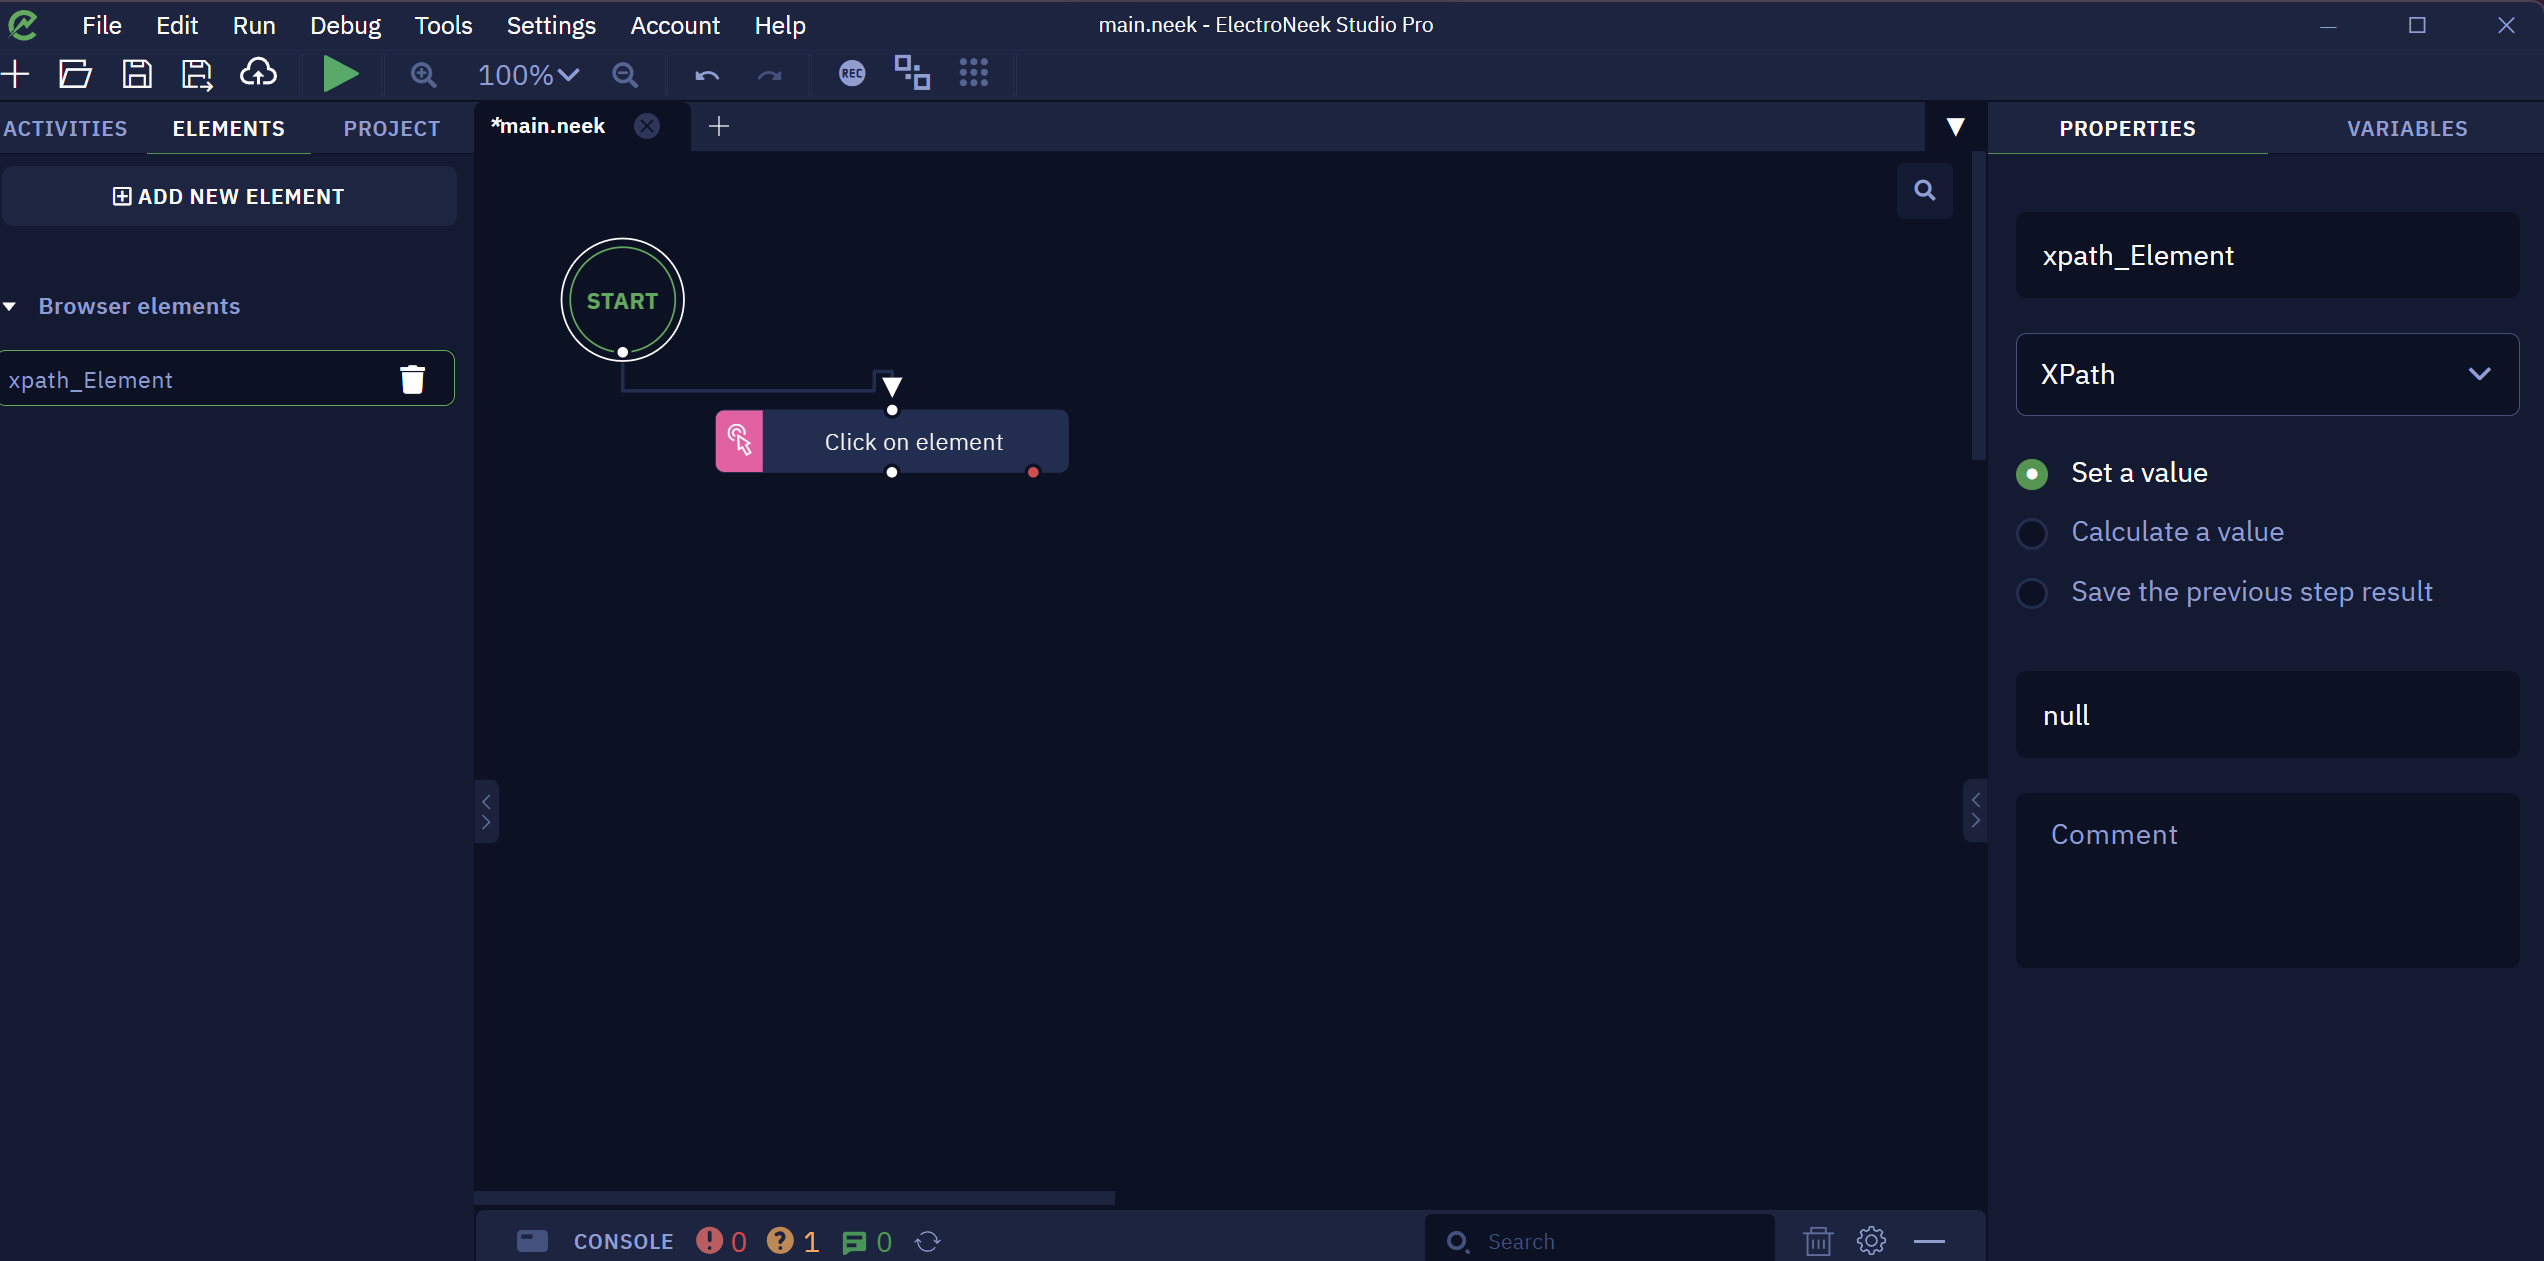
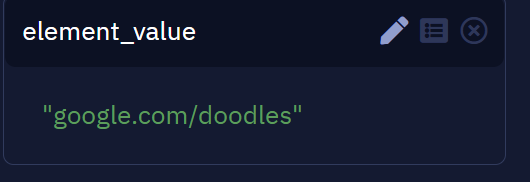
- To finish, you need to paste the XPath value you copied from the web page on the “Set a value“ field:
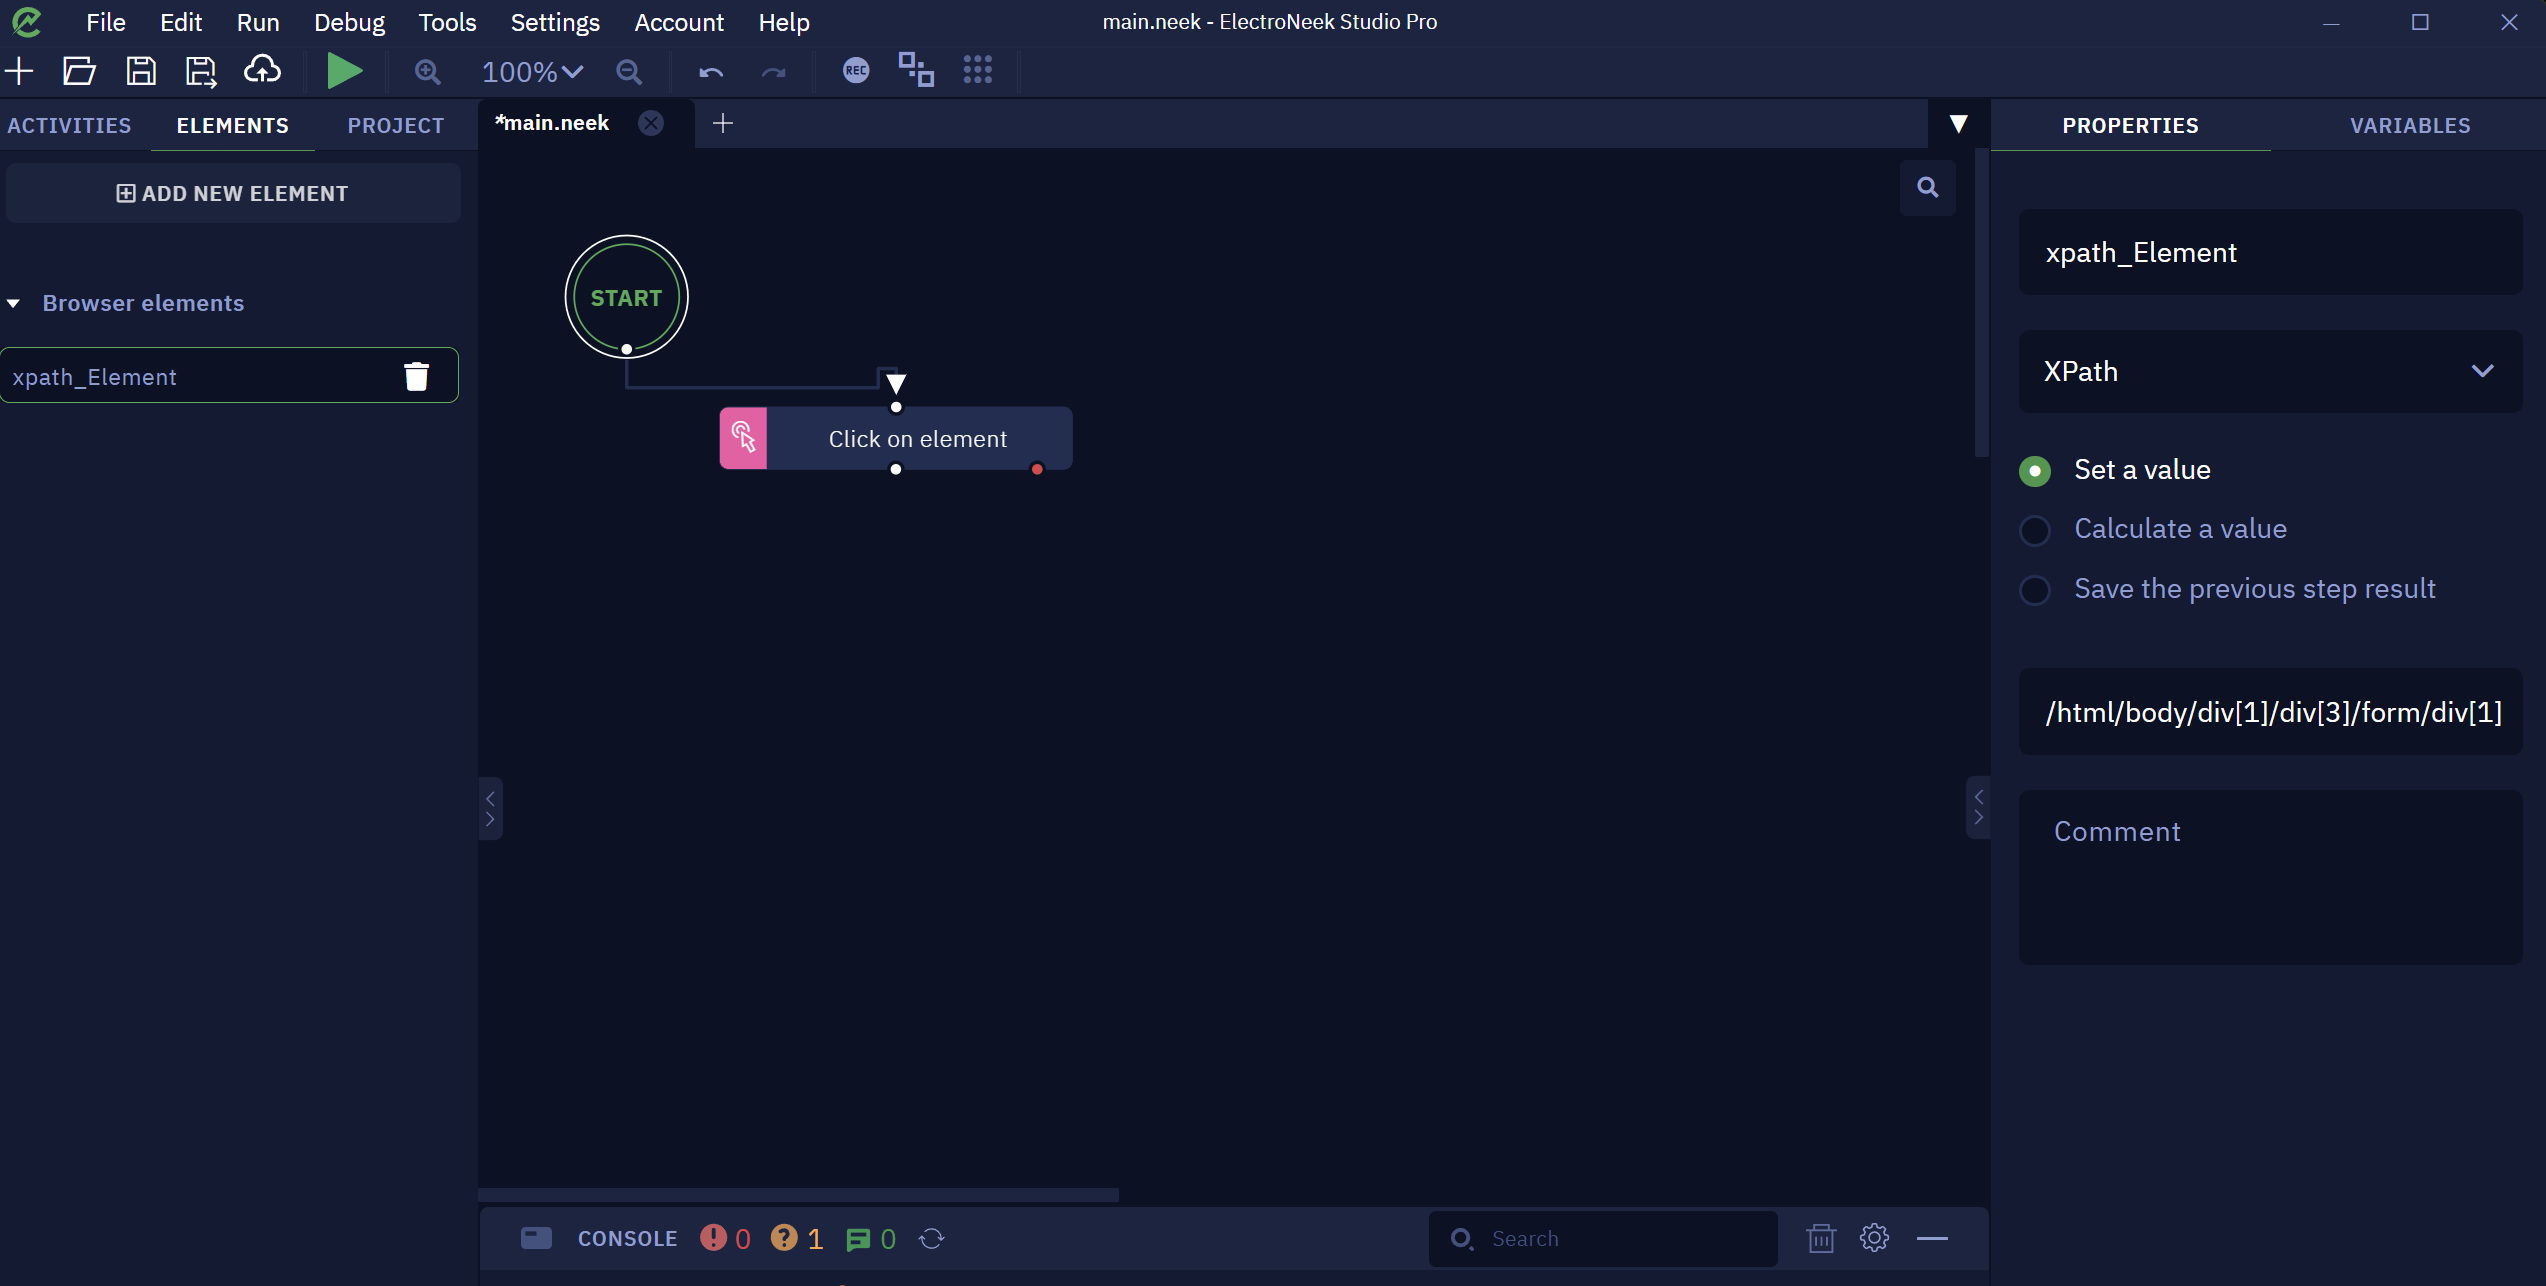
Now you can use this element in your web activities.
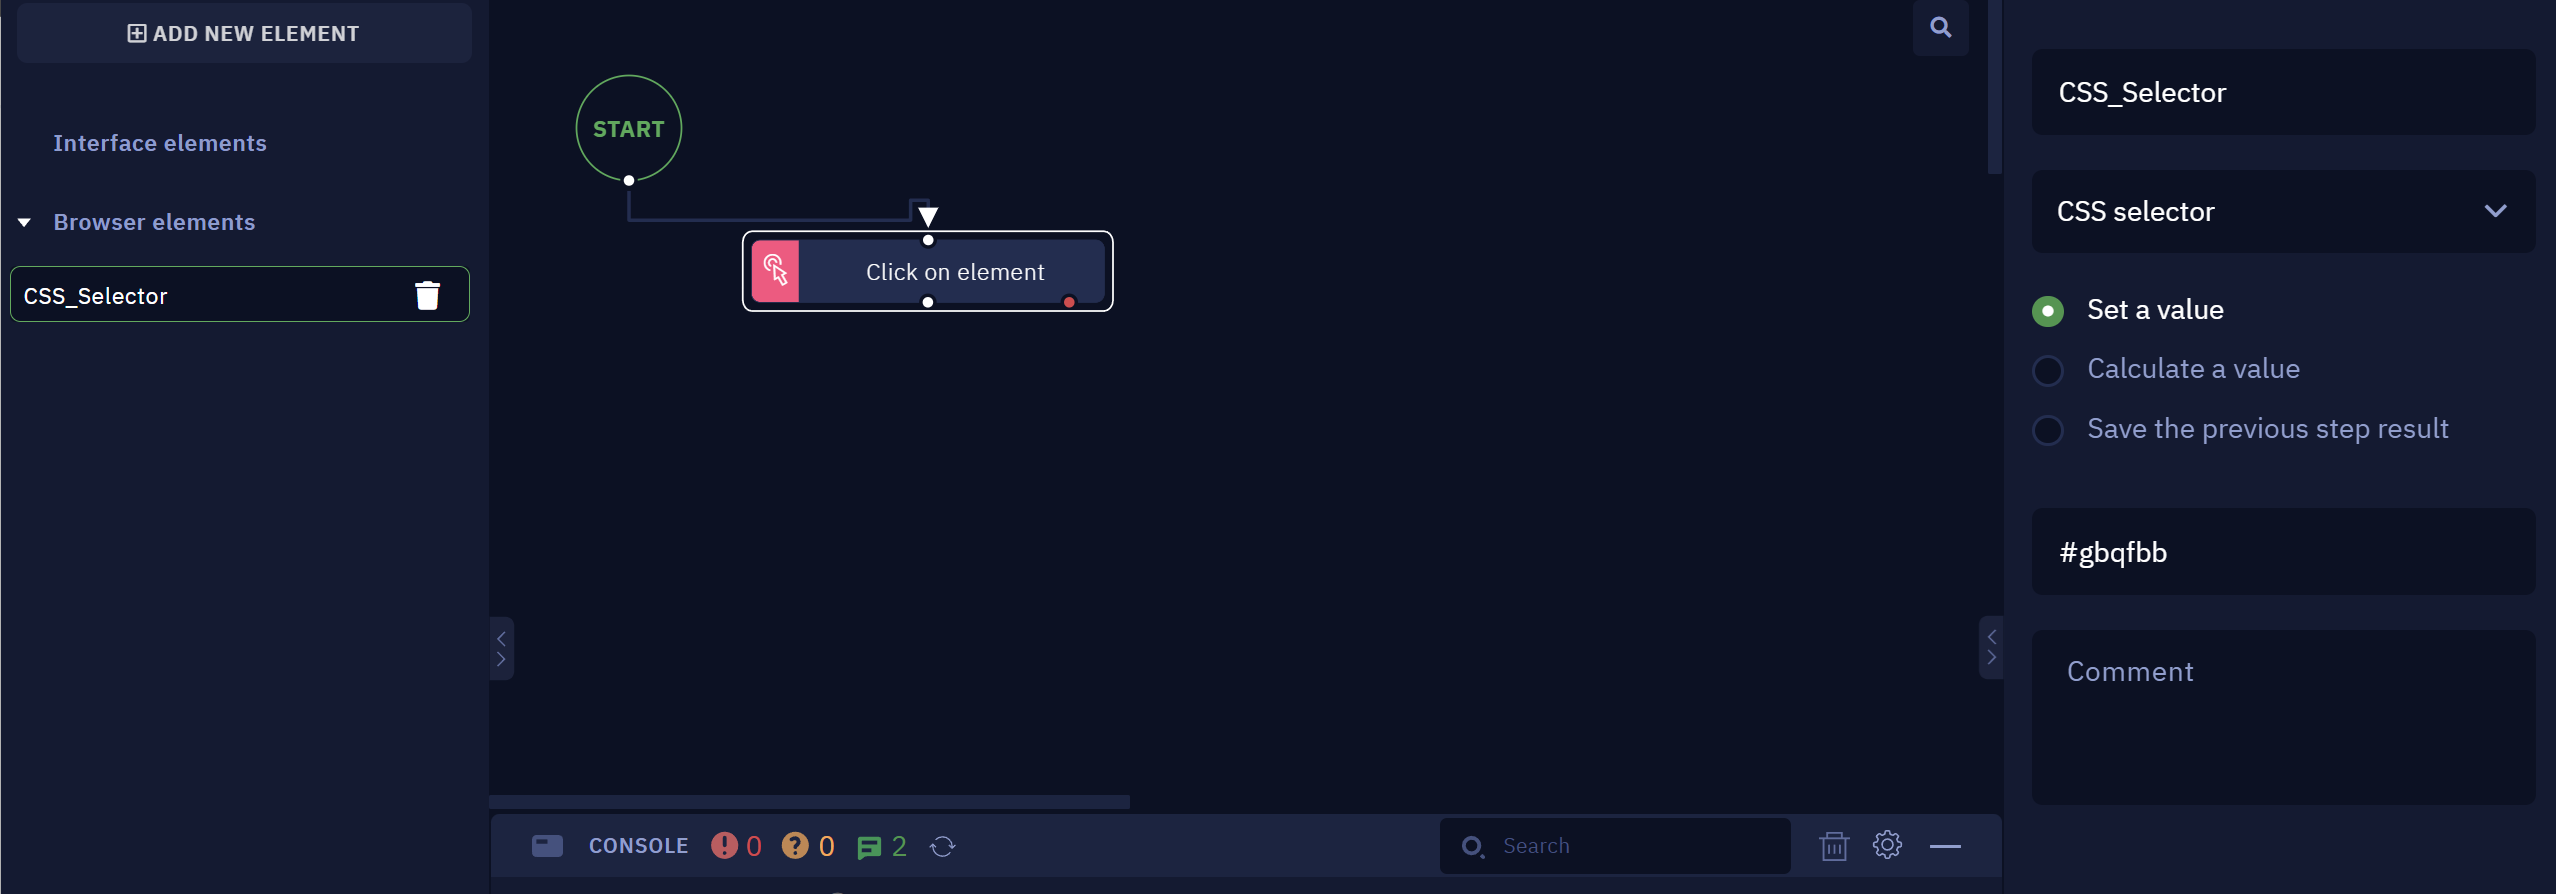
Using CSS selectors
-
Create a new Web Element as demonstrated in the XPath part, but choose the CSS Selector instead
-
Go to the web page and press F12
-
Select the element and click on Copy → Copy selector:
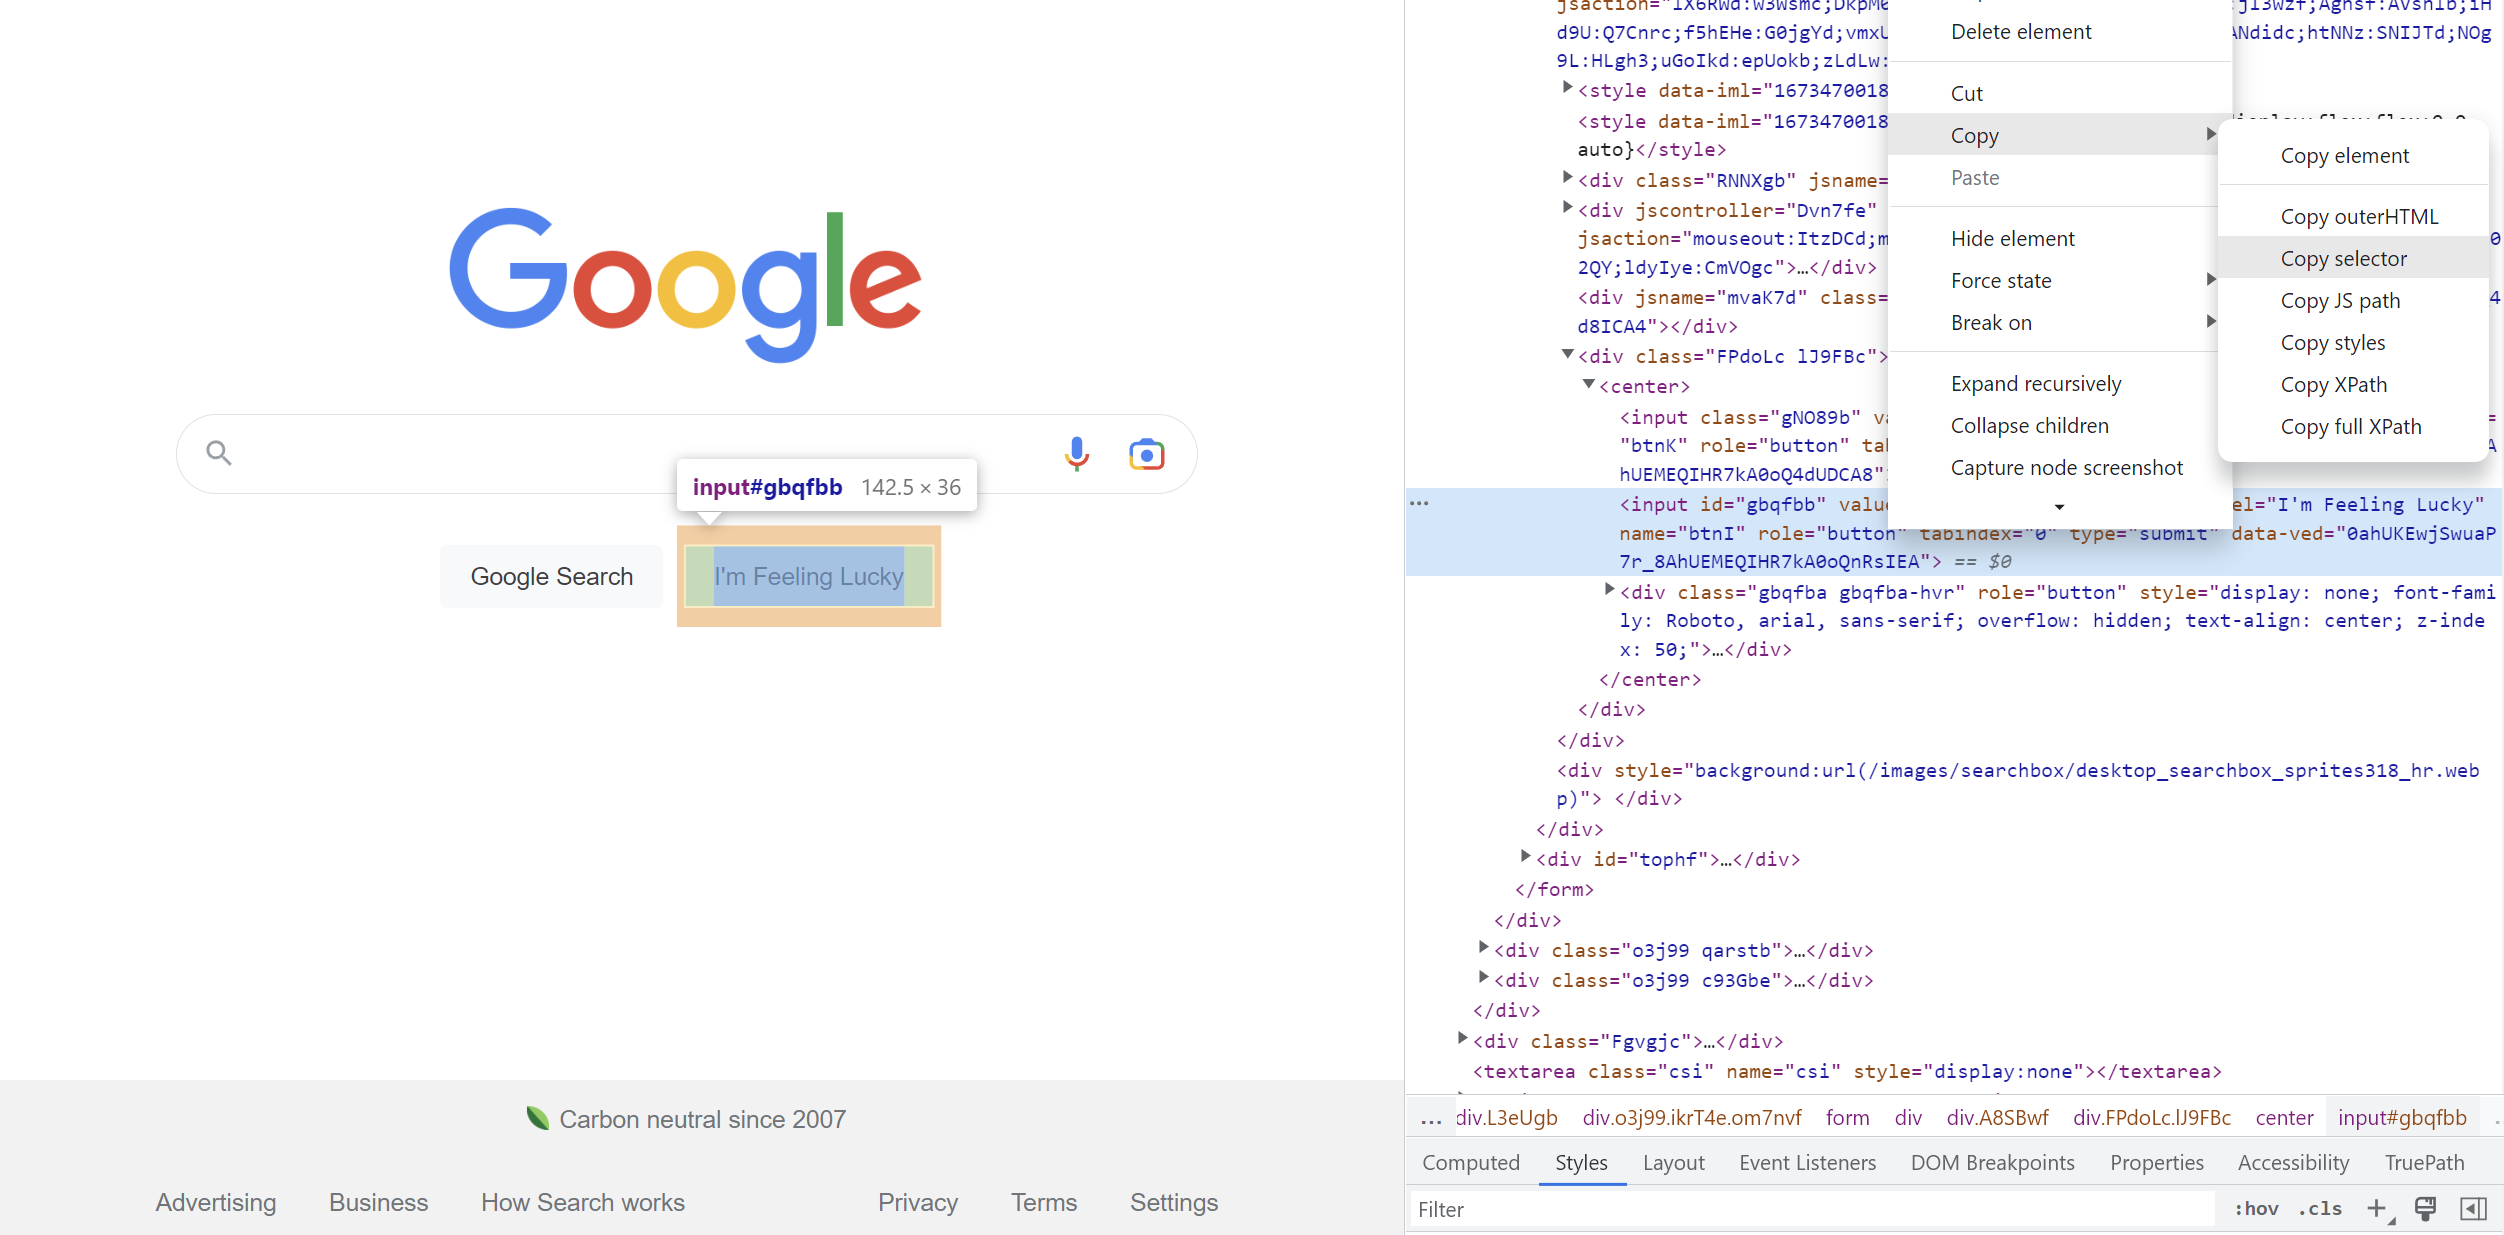
- Paste it into the web element "Value" field
TipThere are many ways to interact with web elements using XPath and CSS. Find more examples in this web page.
Going back to previous page
Description
There are scenarios when we want to go back to the previous web page as part of our workflow.
In this article, you will see 3 different ways to perform this action.
Instructions
There are 3 methods to return to a previous web page in a workflow:
- Using the Send hotkey activity — press the Alt key and the left arrowtogether.
- Using the Click on image activity — select the back arrow on the left side of the browser's top bar.
- Using the Execute Javascript activity — read Window history.back() then add this script:
function test () {
history.back();
}Getting the value from the address bar
Description
In this How to article we going to make an example of how to obtain the Browser address value.
Instructions
Here's a step-by-step guide to get the value from the browser address bar:
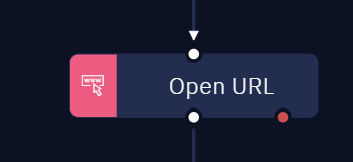
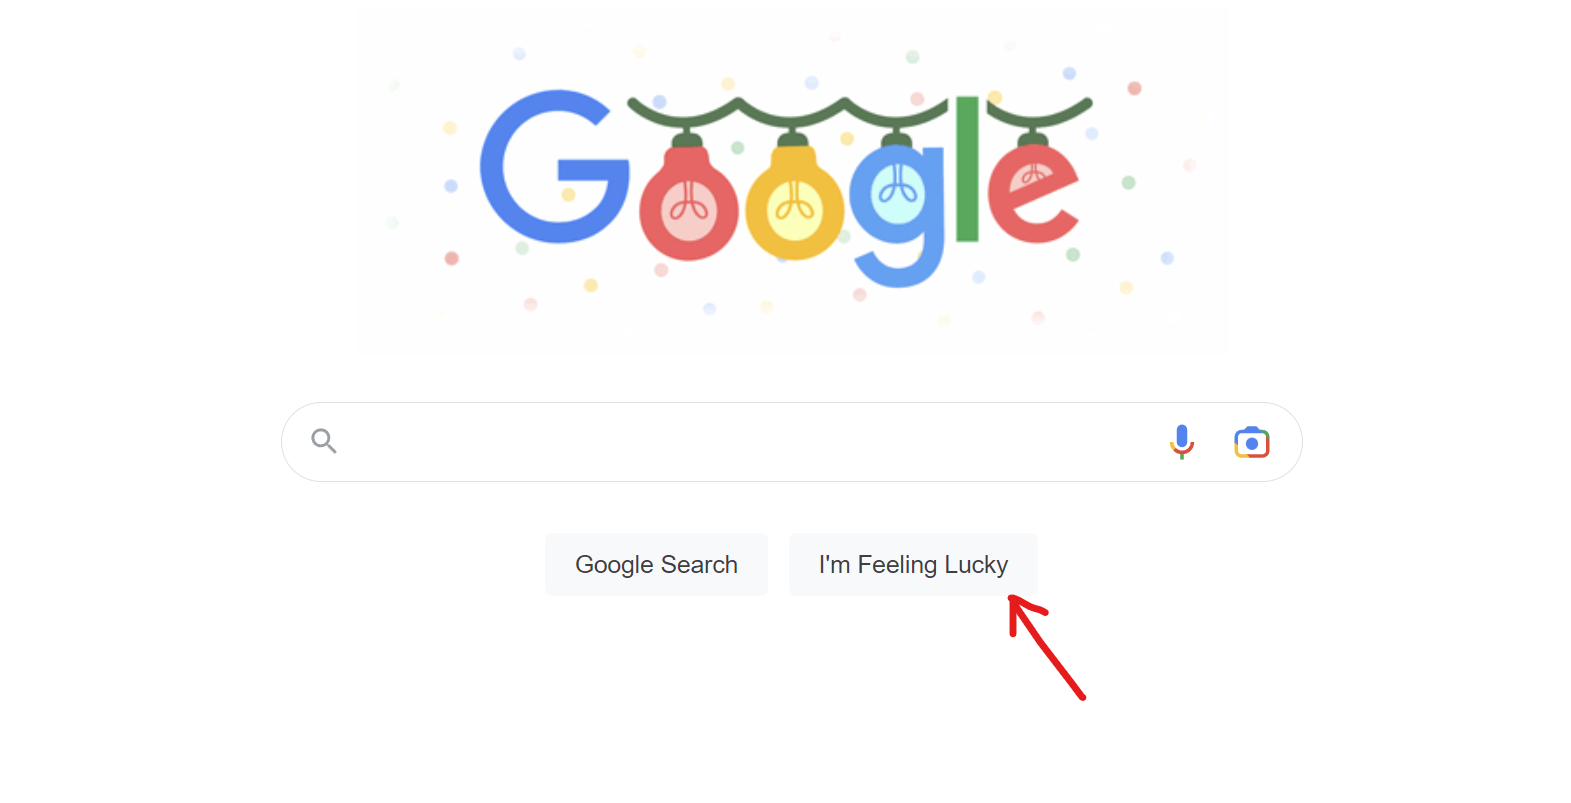
- Start using the Open URL activity to open the website “google.com".
- Choose the Click on element activity to click on the “I'm Feeling Lucky“ button.
-
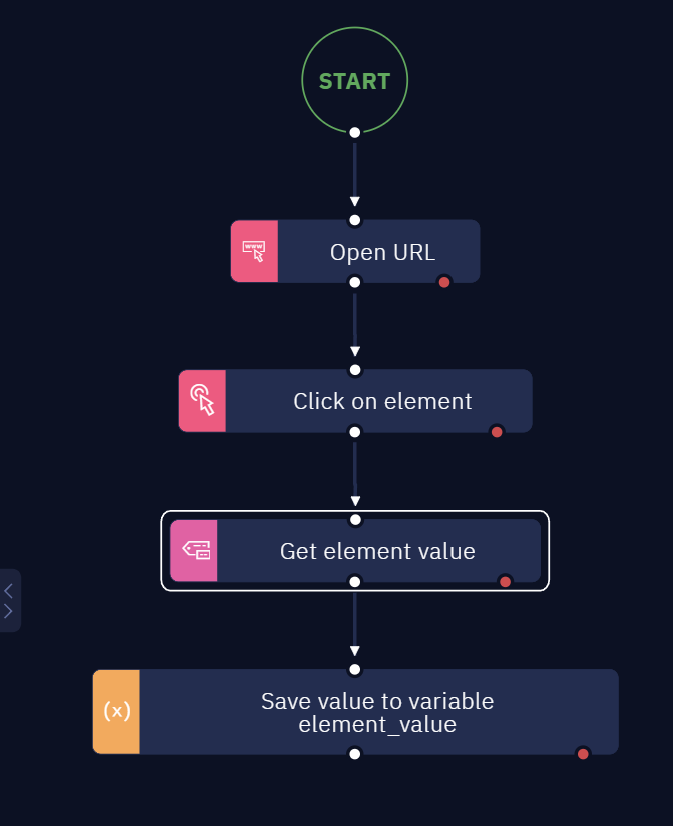
Choose the Get Element Value activity from Desktop (Gui Automation).
-
Select the address bar element using the picker tool.
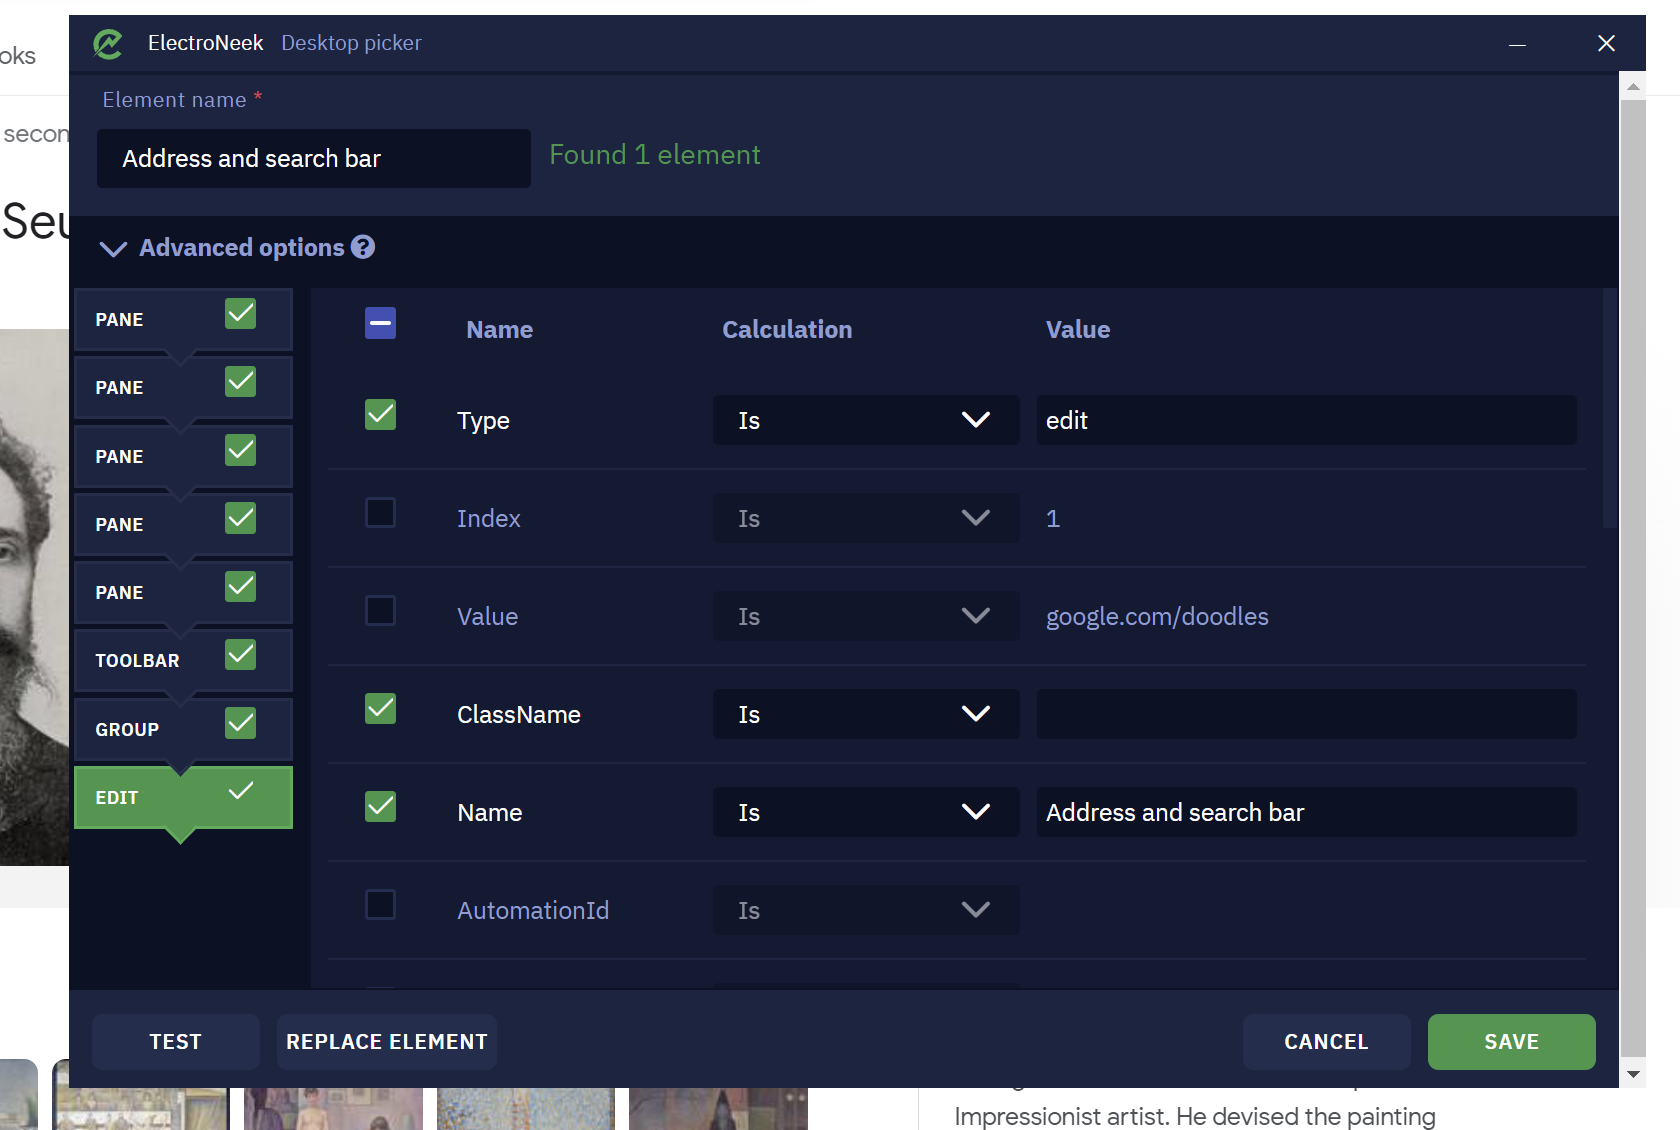
PS: It is important to unselect all the specific values (any value that can change after time).
The Complete Project looks like that:
Alternatively, you may prefer to use the Get element property activity. In this case your workflow should look like this:
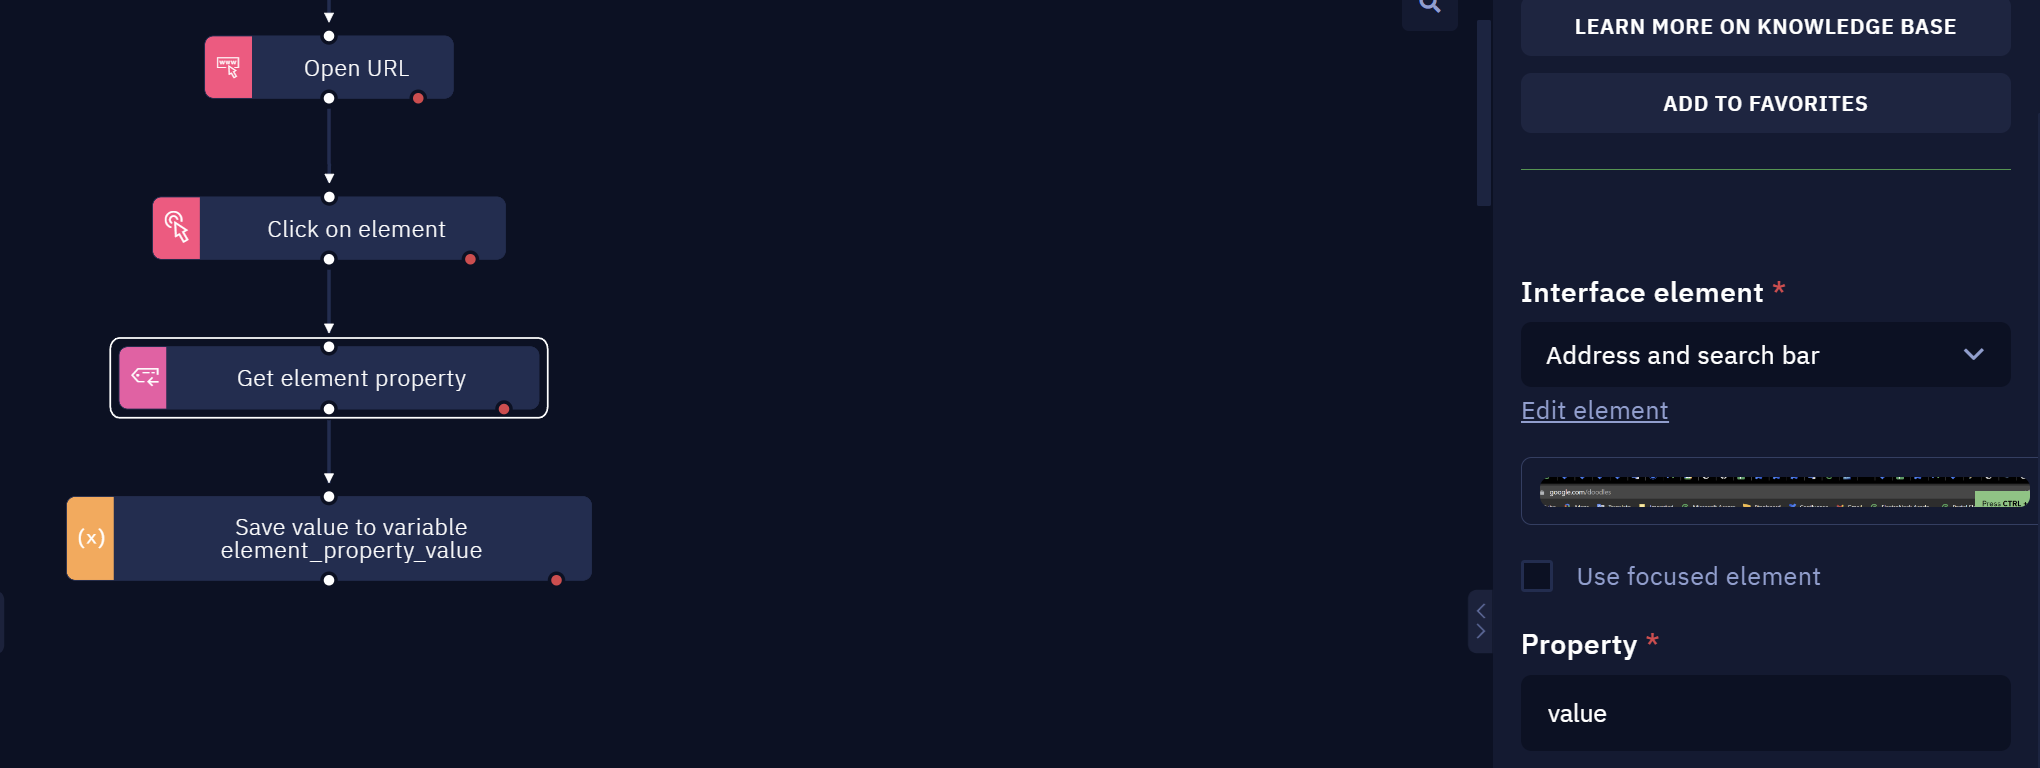
After you run the workflow, the result is this:
Looping through similar elements on a page
Description
When building bots, we can benefit from getting information from a list on a website. Here you will learn how to do a loop using XPath to obtain such a list.
This procedure is useful in order to get multiple elements inside a loop. Also, with the number of items on hand, you can use it to extract them in another activity. So, let us see the steps.
Instructions
Here’s how to do it in a few easy steps:
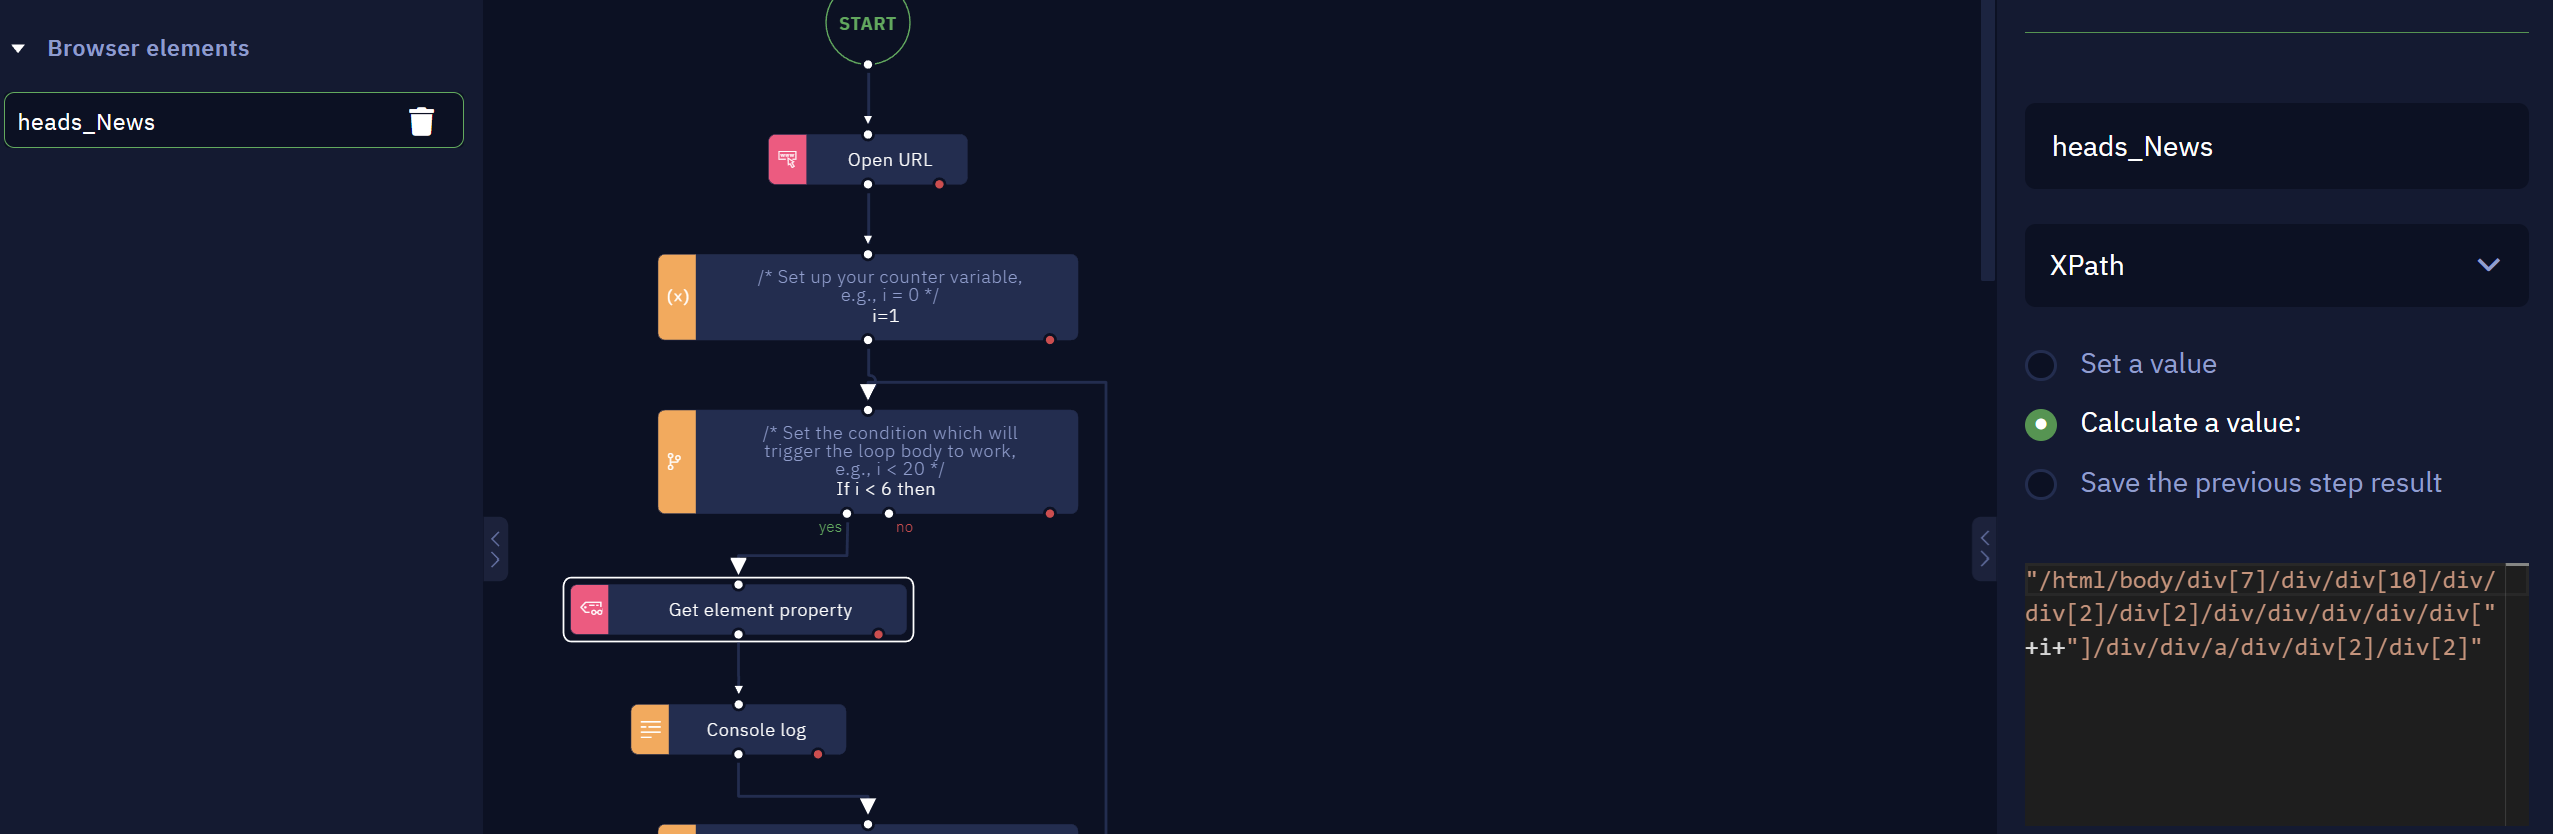
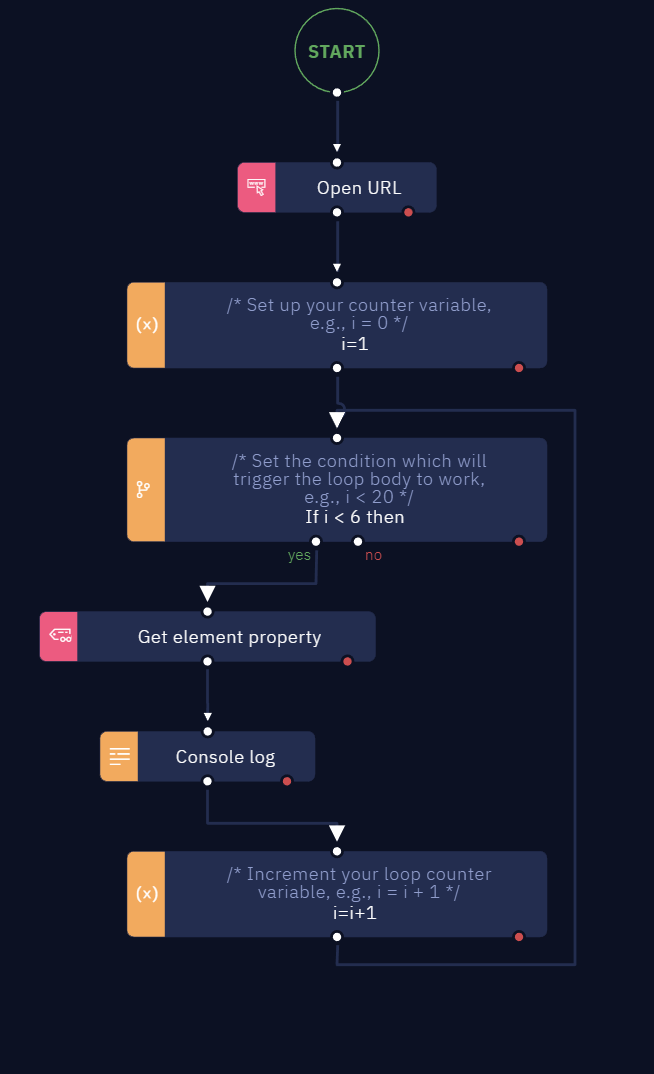
- Insert in the workflow a Do-While loop activity
- Insert in the workflow the Get element Property activity
- Get the Full XPath to the element on the website:
- Now, select a similar element (in this example, the “Five apps to use…" header). Copy both paths to Notepad to discern the difference. In this example, we see the following:
/html/body/div[7]/div/div[10]/div/div[2]/div[2]/div/div/div/div/div[1]/div/div/a/div/div[2]/div[2]
/html/body/div[7]/div/div[10]/div/div[2]/div[2]/div/div/div/div/div[2]/div/div/a/div/div[2]/div[2]
- We can see the specific DIV that changed the value from the first heading to the second. Now we can create an element with this dynamically.
With this workflow, you are able to get the elements from this list while running the loop, This is the final result:
The Result
In this case, as we display the result in the Console, but you could also save it to a variable or a database.

Extracting data from a page
Description
There may be scenarios where you are interested in extracting all the titles or all the hyperlinks of search results from a web page. This action can be done using 2 activities in Studio Pro: the Get Element Property activity and the Get Element Value activity.
In this article, you will learn how to extract several values from a web page.
Instructions
To perform those actions, follow these instructions. The only difference is the activity you select — the rest of the steps are the same for both of them. So, let us see how to do it:
-
Add the Get Element Property activity or the Get Element Value activity to your workflow.
-
Select the "Element Name" for the search results or the values you want in the Browser Picker.
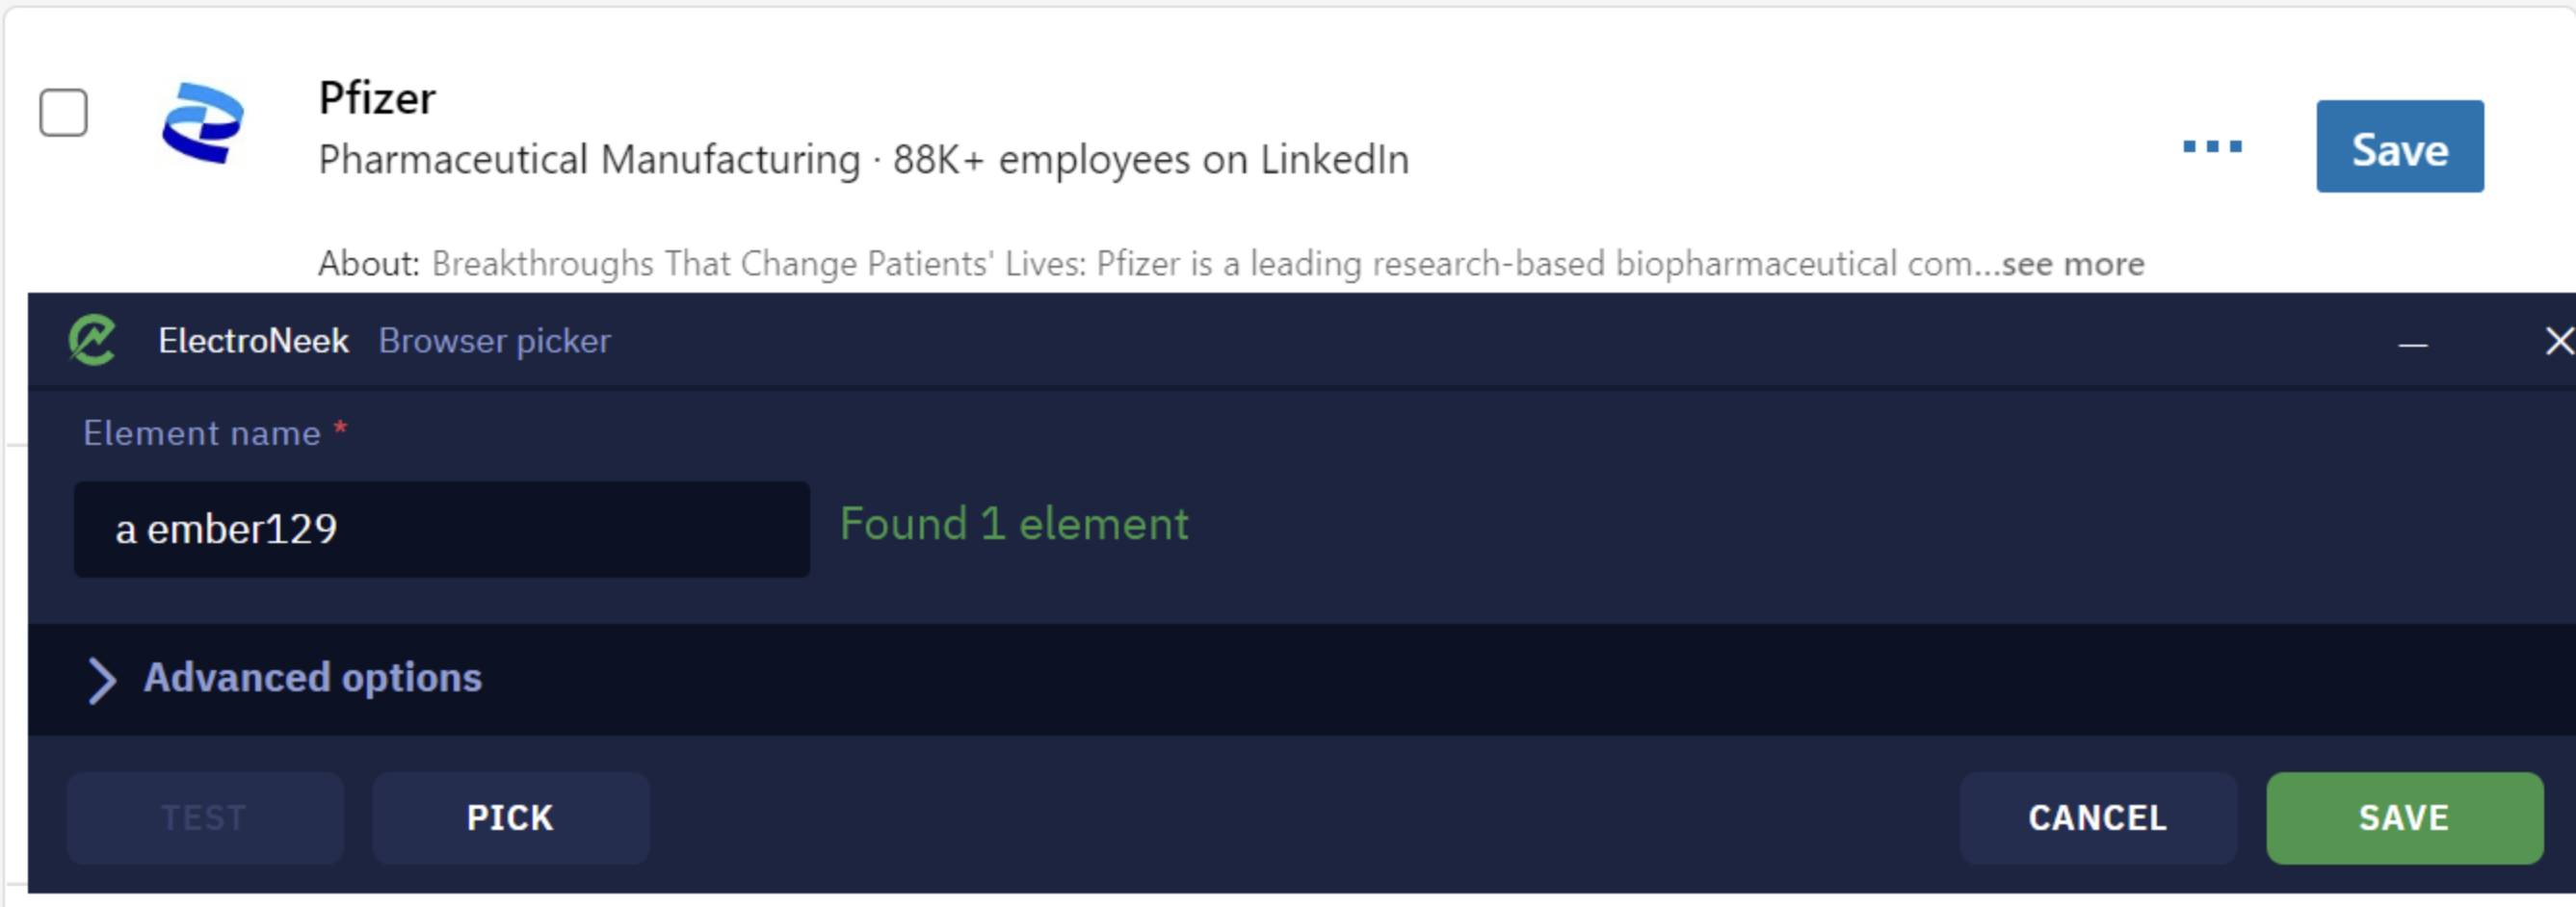
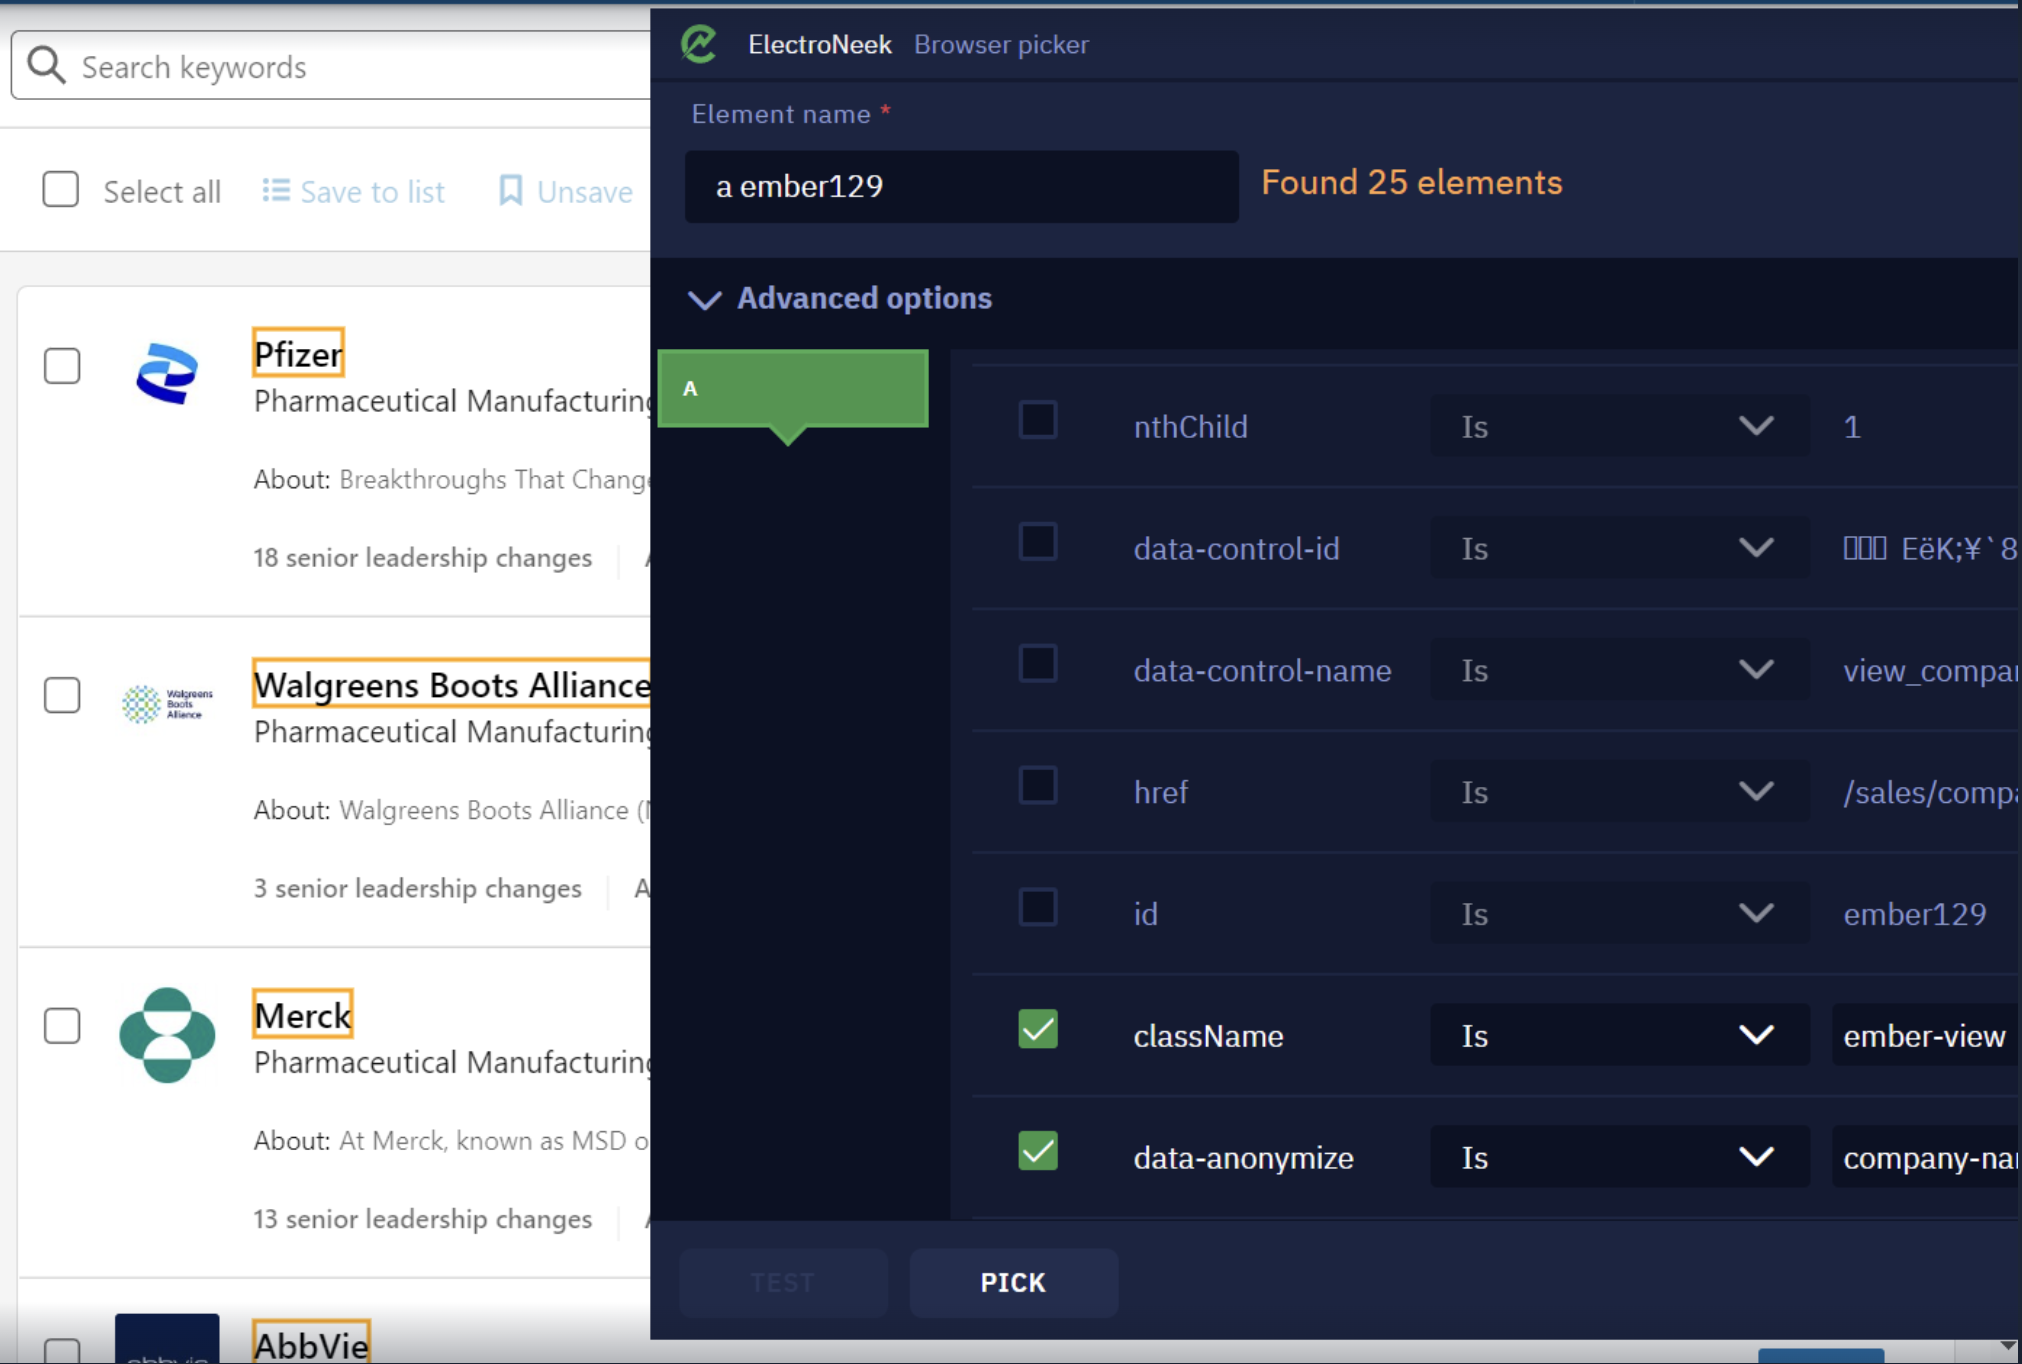
- Expand the "Advanced options".
- Adjust the attributes in such a way that the Browser Picker is able to identify all values.
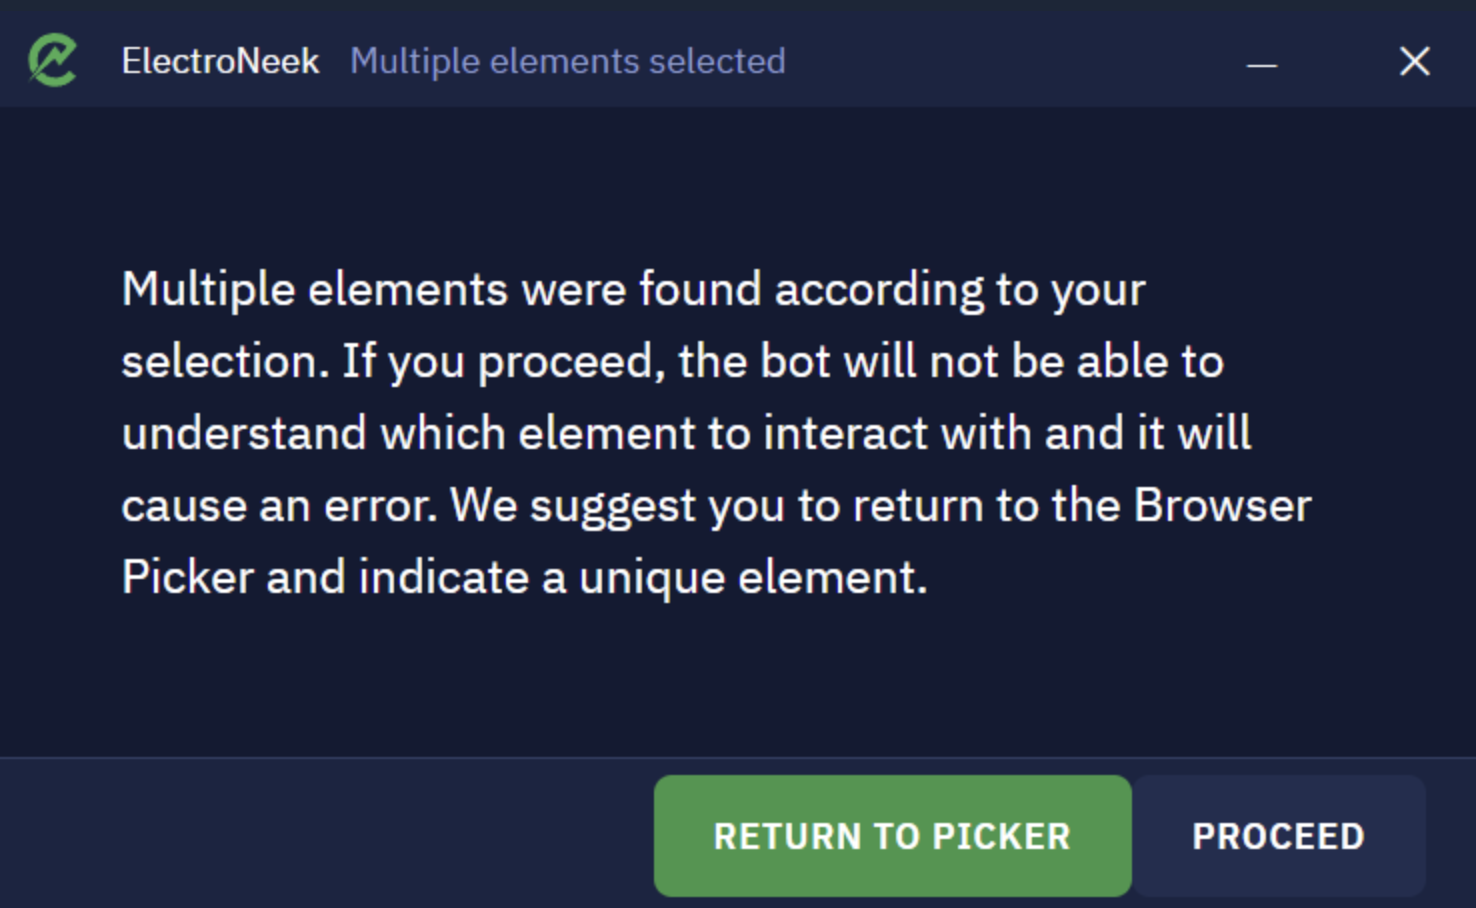
-
Click on Save. A confirmation pop-up window opens.
-
Press "Proceed".
-
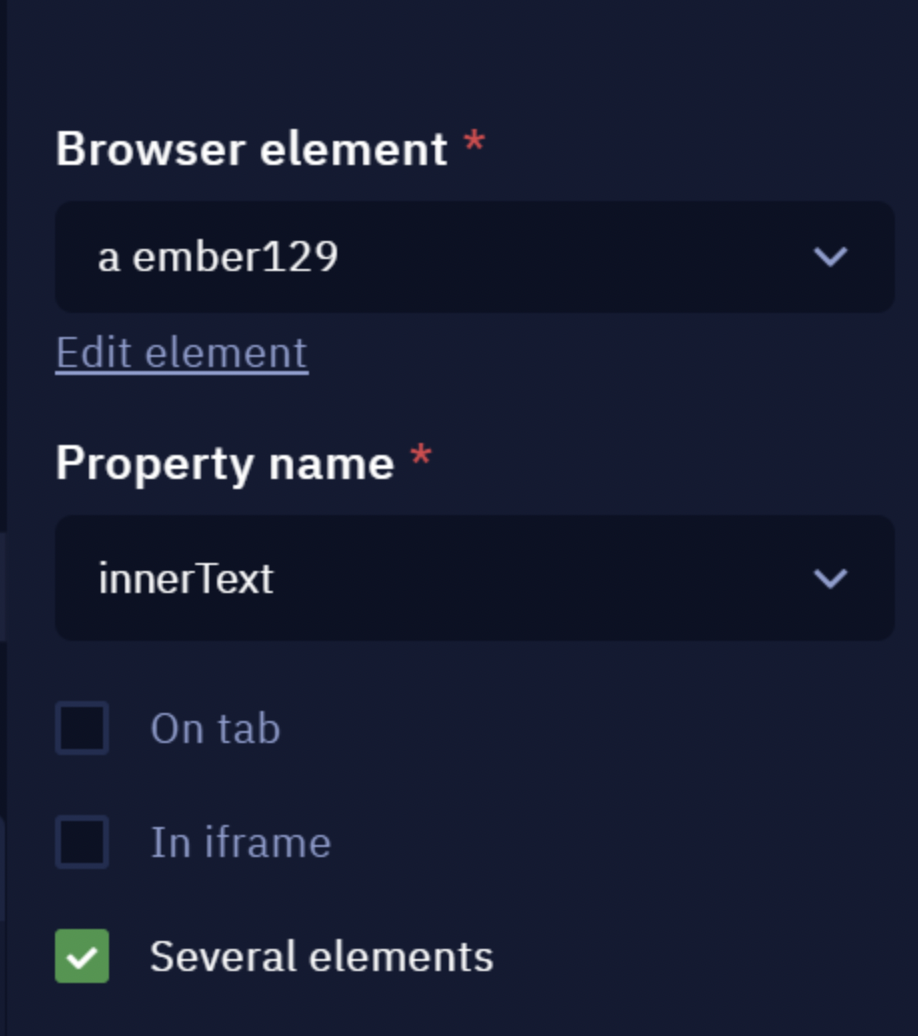
Add a "Property name" that you are interested in extracting from the web page. In this example: innerText.
-
Also, make sure the parameter "Several elements" is enabled so the activities can extract multiple data from the website.
- After you run the bot, you may see a result similar to the following screenshot:
How to clear browser cache using a workflow
Introduction
In this guide, we will delve into the process of programmatically clearing the cache of web browsers. This practice is crucial for ensuring smooth browsing experiences, as web browsers accumulate data from various websites in their cache and cookies. By following the steps outlined below, you can effectively address issues such as slow loading times and formatting glitches that may arise on websites.
NoteElectroNeek Studio Pro offers support for both Chrome and Edge browsers. While the examples provided focus on Google Chrome, the principles are also applicable to Microsoft Edge.
Step-by-step guide
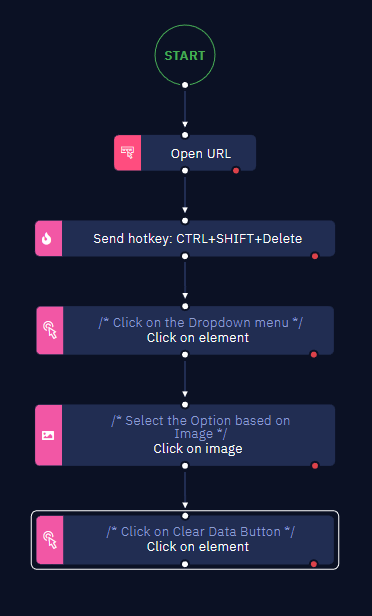
- Begin by adding an "Open URL" activity to your workflow. Input the desired URL, such as "www.google.com," in this activity.
- After the browser window opens, employ a "Send Hotkey" activity to trigger the clearing process. Use the key combination CTRL+SHIFT+Delete to initiate cache clearance.
- As a result of the hotkey command, the "Clear Browsing Data" window will appear.
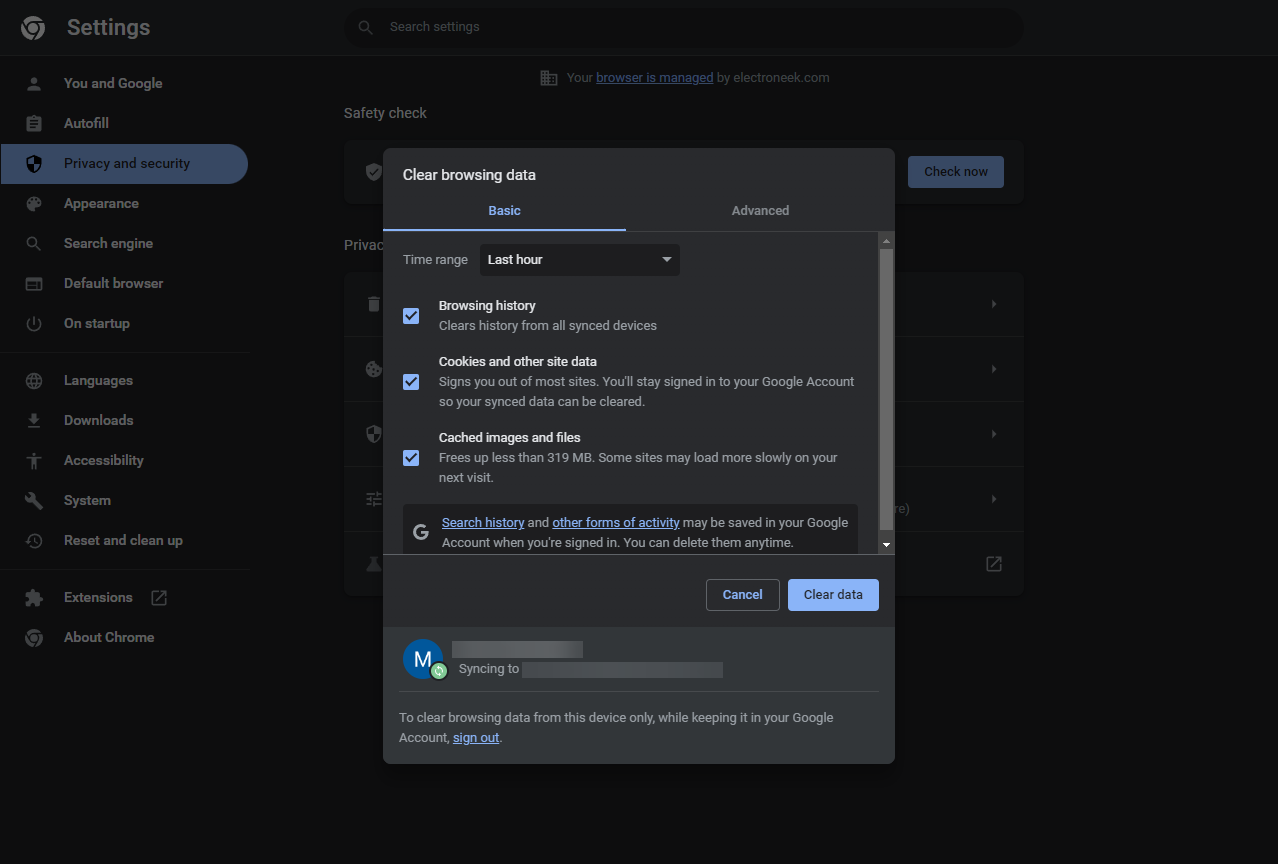
- Choose a timeframe to clear using the "Click on image" activity.
- Finally, employ the "Click on Element" activity to click the "Clear Data" button, initiating the cache clearance for the selected time range.
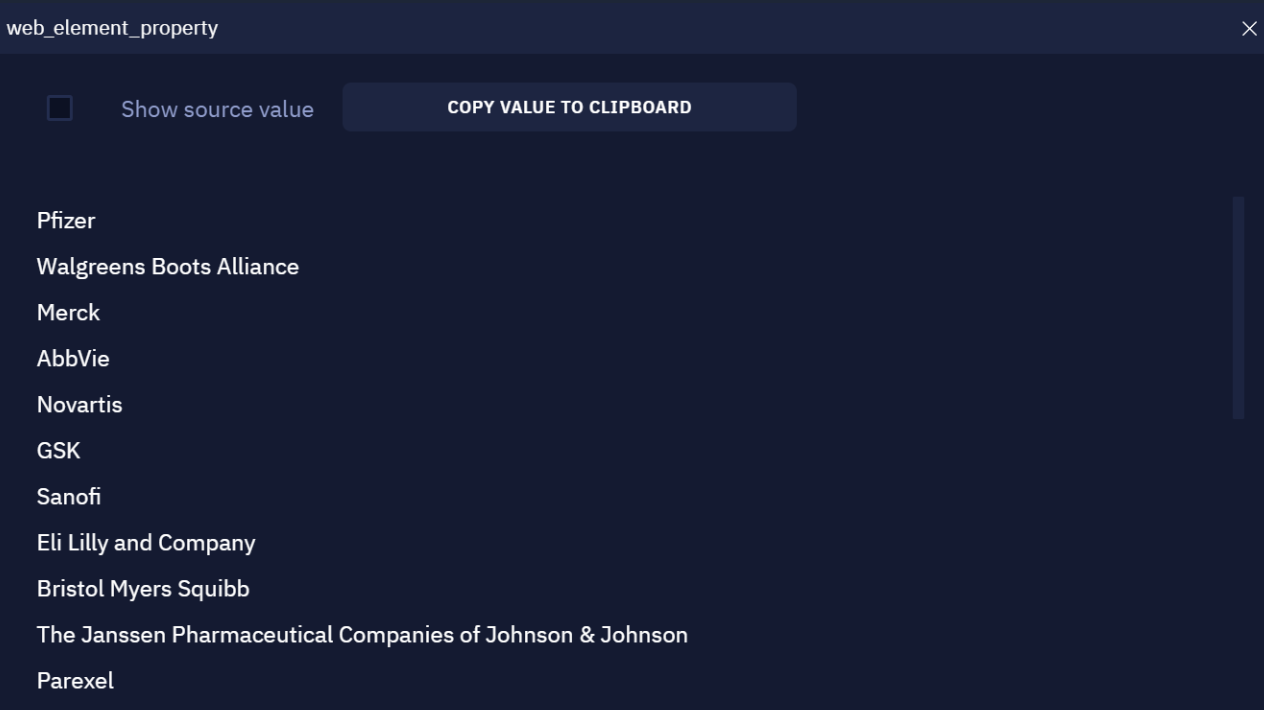
How to obtain total records from a web table
Working with web tables often requires extracting information efficiently, such as determining the total number of rows. In this article, we explore two methods to obtain the total record count from a web table.
Method 1: Using "Scrape Structured Data" Activity
- Open the web page that contains the table using the "Open URL" activity.
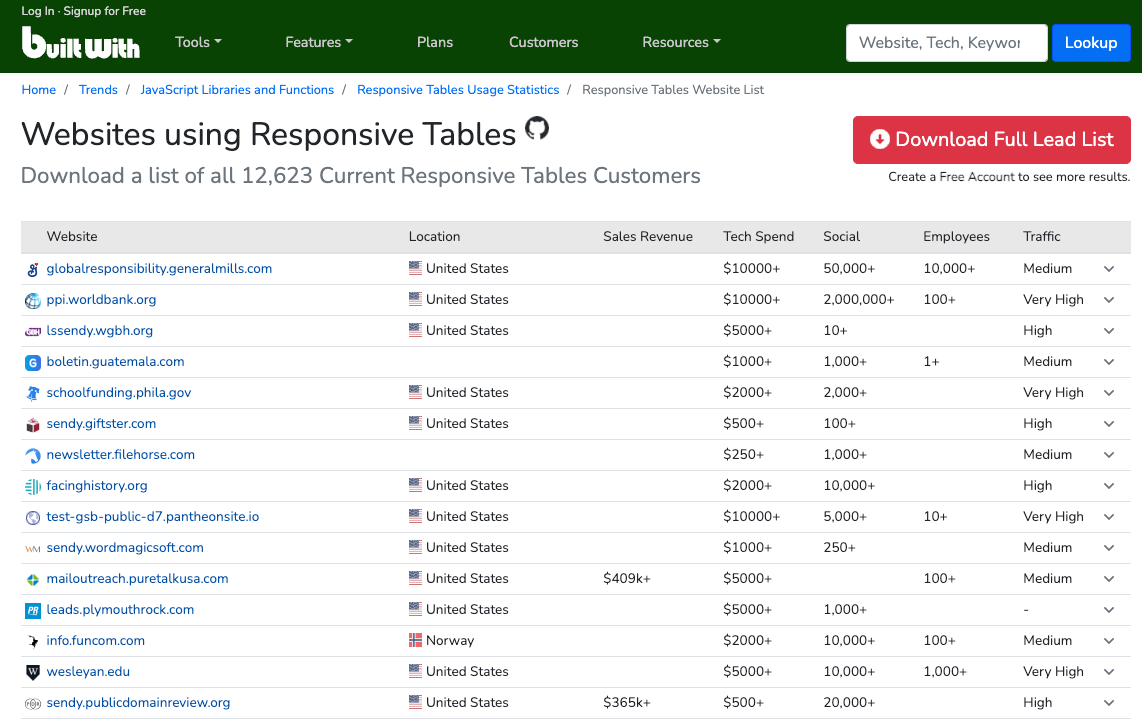
- Employ the "Scrape Structured Data" activity to capture all table rows. For the purpose of this example, you can scrape any column from the table.
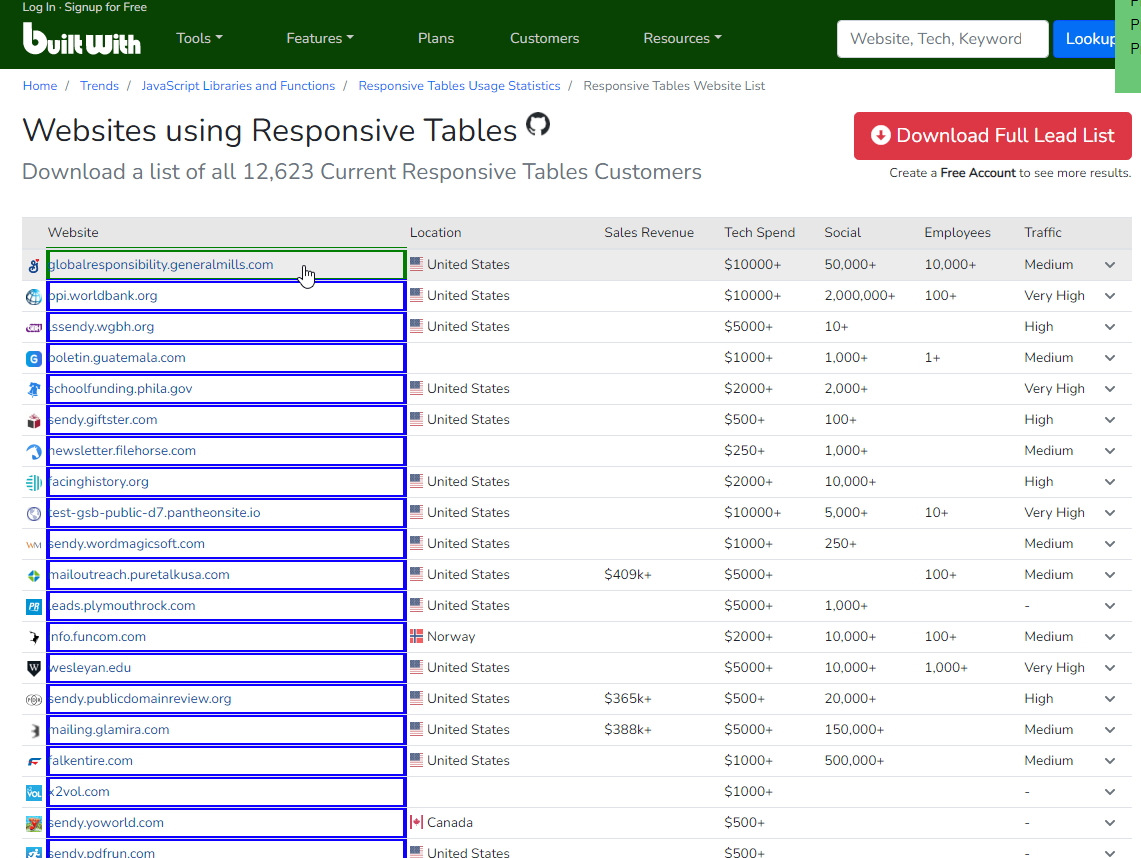
- Save the results in a .csv file.
- Use the "Read table" activity to open the .csv file and create a variable to store the extracted data.
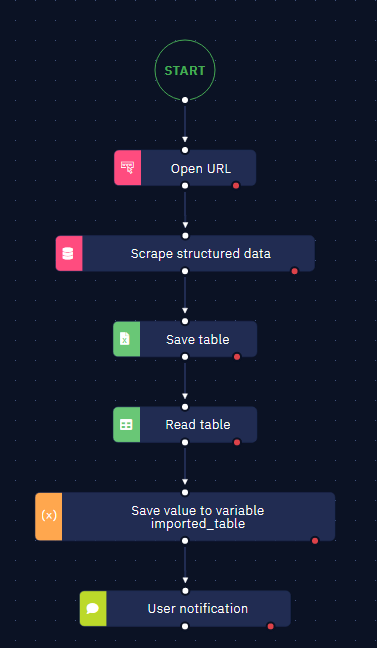
- Access the total row count by using the .length attribute of the array-type variable.
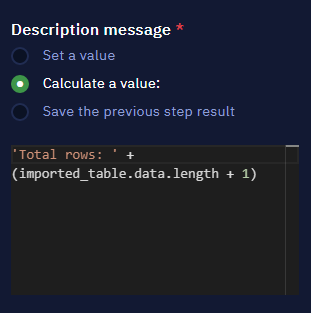
NoteAdjust the count using +1, because JavaScript starts counting from 0, not from 1.
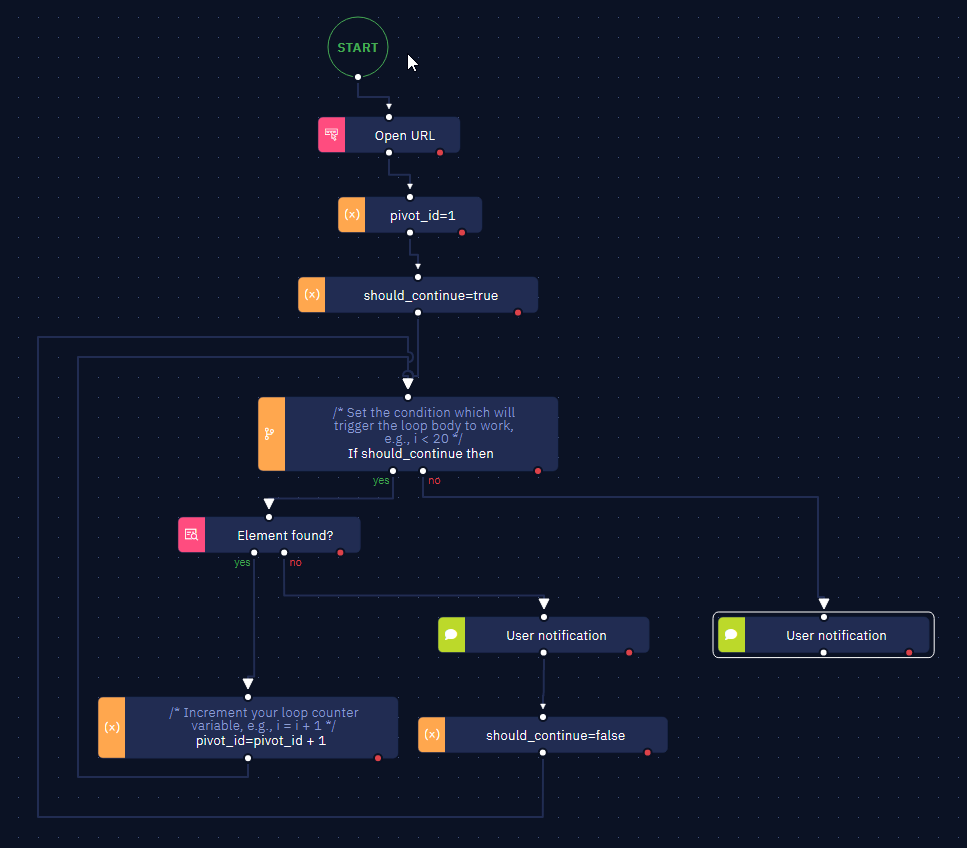
Method 2: Utilizing "Element Found?" Activity in a While Loop
- Declare a variable to serve as both the dynamic selector and the counter for table rows using the "Assign value to variable" activity.
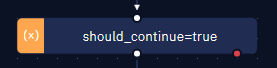
- Declare the variable used as a condition for the while loop. Use the “Assign value to variable“ activity.
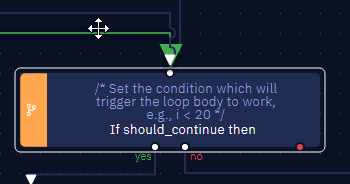
- Use the “Do-while loop“ activity to create the structure and set the condition variable created in the previous step.
- Within the 'yes' flow of the loop, utilize the "Element found" activity and configure the dynamic selector accordingly.
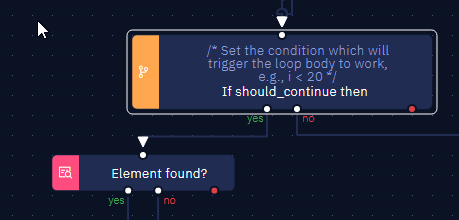
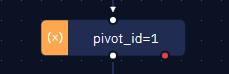
- Identify the attribute that corresponds to the row number within the table, assigning it to the previously created 'pivot_id' variable.

NoteTo evaluate the 'pivot_id' variable as a selector, remember to employ the 'Calculate' method in the calculations field.
- If the element is not found, set the value
falsein the 'should_continue' variable. - Conversely, if the element is found, increment the 'pivot_id' variable by +1.
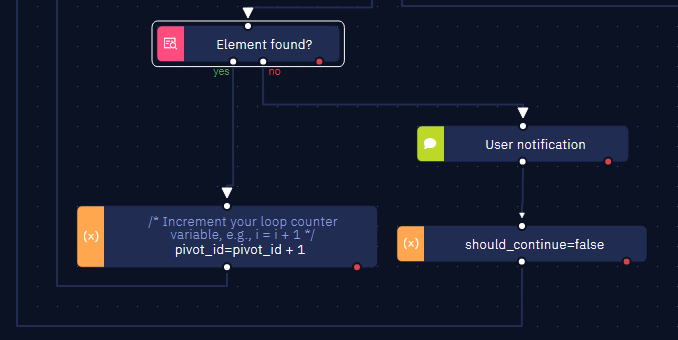
- In the 'no' flow of the loop condition, print the variable representing the total rows, adjusting it by subtracting 1.
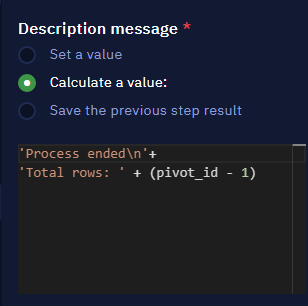
NoteSubtracting 1 compensates for the default autoincrement logic inherent in the while loop.
- The final implementation looks like this:
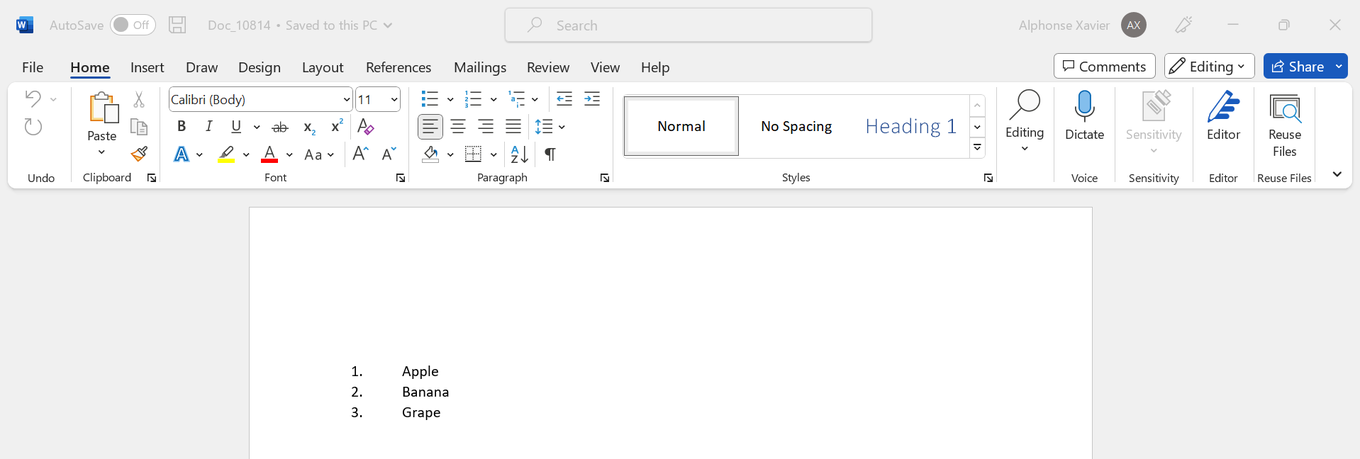
How to enter data as an ordered list in a Word file
In various scenarios, you might need to organize data extracted from a web page into a Word file in a structured manner. This article presents a step-by-step guide to achieving this task effectively.
Instructions
- Let us assume that we have an array containing the data you wish to input into a Word file as an ordered list.
- To write the data into the Word file in an ordered list format, follow this syntax:
'<ol><li>'+data[counter]+'</li></ol>'
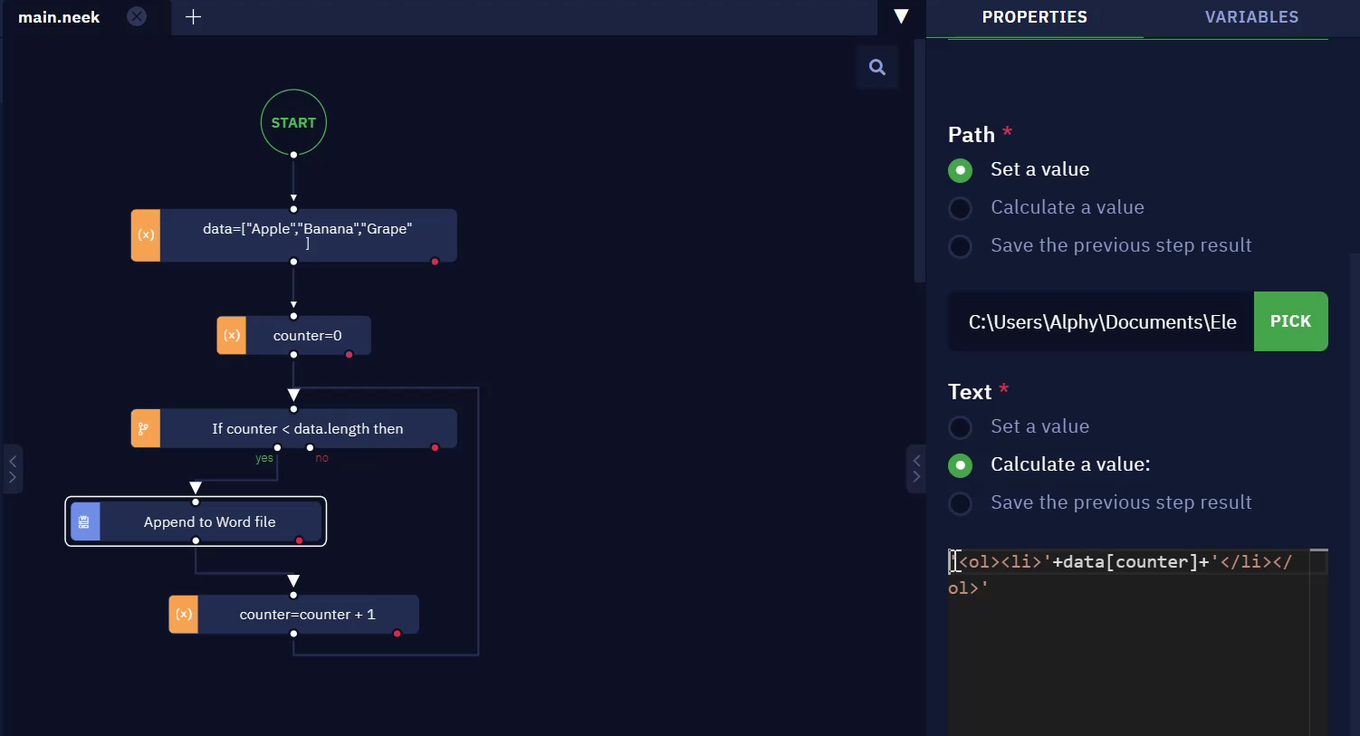
- The result should look like this: