
How-tos: Miscellaneous
Formatting Dates
Description
Dates are a very common type of data and giving them the proper format is extremely important in order to present the information adequately. For the same reason, the format of hours needs attention.
In this article, you will learn how to format and calculate dates using Studio Pro activities.
Prerequisites
First of all, we need to know what data format standard we are dealing with. Notice that dates have whether ISO 8601 or RFC 2822 format.
In the case of using ISO 8601, the information follows the format YYYY-MM-DD, for example, 2017-06-01. If we include time in the ISO format, the date and time after the T designator is appended to the end — for example, 2016-06-01T14:41:36-08:00. ISO 8601 also supports multiple date formats, such as YYYY-MM-DD that is 2021-06-10, which also stands for June 10, 2021.
Now, for RFC 2822, there are many entry options, such as 10 Jun 2021. This standard includes the abbreviated day of the week, numeric date, a three-letter abbreviation of the month, year, time, and time zone — for example, 01 Jun 2016 14:31:46 -0700.
NoteRFC 2282 format is used in Internet contexts, such as emails or web pages.
To successfully use the below instructions, bear in mind that you need to work with one of these formats.
Instructions
Here’s how to format dates in a few easy steps.
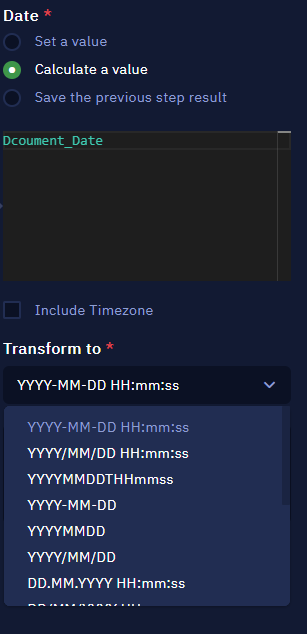
Changing the date format
-
Set the variable with the date format allowed
-
Use Export to Format activity
-
Set the "Calculate a value" option and enter the variable name set in step 1 or use Set a value picker
-
Click on the "Transform to" parameter and select the format needed from the drop-down list
- Save the result using the Assign value to variable activity (it is added by default)
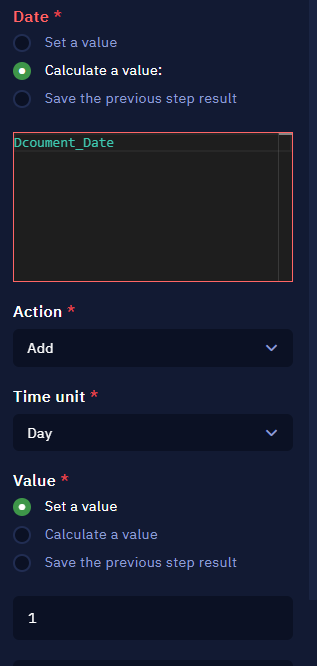
Calculating a date
We can also add or subtract days from a date. Here is how to do it:
-
Add the Calculate date activity to your workflow
-
Set the "Calculate a value" parameter and enter the variable name set in step 1.1 — or use the "Set a value" picker
-
Set the "Action" parameter accordingly (add or subtract)
-
Set the "Time unit" value
-
Input the "Value" parameter according to what you have set in set 3 above
- Save the result using the Assign value to variable activity (added by default).
NoteRegardless of the format of the variables, the result of this activity will be in ISO 8601 format "2022-12-20T00:00:00.000Z". This format can be changed later using the activity described in step 1.
Calculating a difference
Finally, we can also calculate a difference between dates. To do that, follow these steps:
-
Set two variables with a valid date format
-
Add the Calculate difference activity
-
Set the "Initial date" parameter using the variable name set in step 1 or use the "Set a value" picker
-
Set the date to subtract the parameter using the variable name set in step 1 or use the "Set a value" picker
-
Save the result using the Assign value to variable activity (added by default)
NoteStudio Pro also supports date management using the Moment Js library.
Example:
1moment().format('MMMM Do YYYY, h:mm:ss a'); // December 19th 2022, 7:47:27 pm 2moment().format('dddd'); // Monday 3moment().format("MMM Do YY"); // Dec 19th 22 4moment().format('YYYY [escaped] YYYY'); // 2022 escaped 2022 5moment().format();
Bear in mind that the MomentJs library methods must be used in the "Calculate a value" parameter of the Assign value to variable activity.
Creating Custom Logs
Description
We can benefit a lot from creating custom logs from our activities, especially if we have it at hand in an easy-to-access table/sheet. In this article, you find a simple method to create logs of your workflows using Google Sheets.
Instructions
Follow these steps:
- Create a spreadsheet in Google Sheets
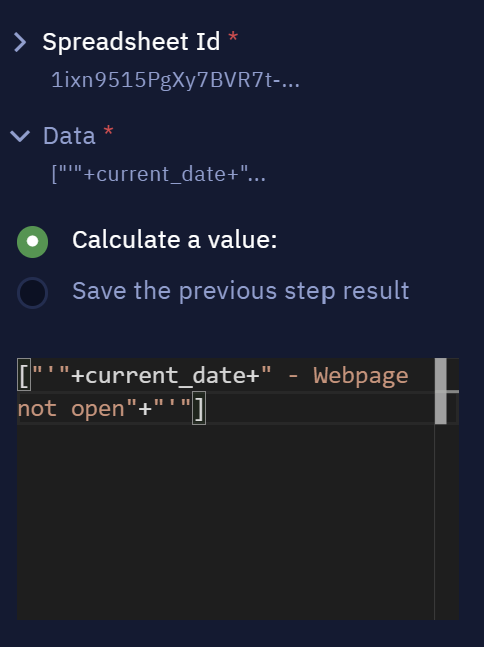
- Get the spreadsheet ID — which is located in the URL, as you can see highlighted below: https://docs.google.com/spreadsheets/d/1ixn9515PgXy7BVR7t-6tmGcWUbPP5….ecENA/edit#gid=0

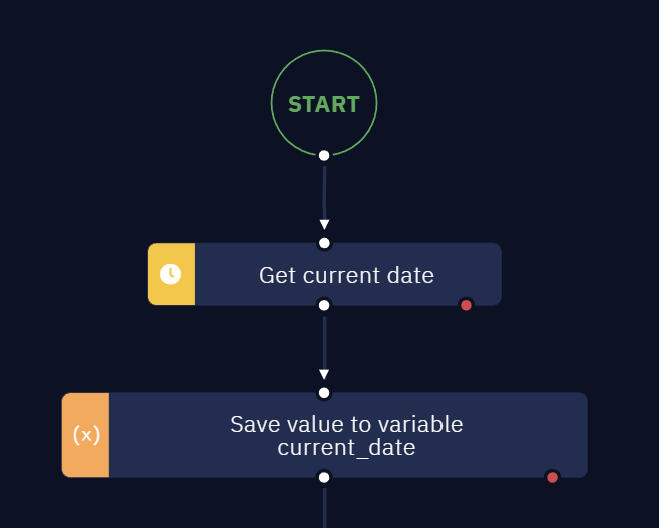
- On Studio Pro, add the Get current date activity to your workflow to collect the date to your logs

-
Add the activities you need to your workflow
-
For each of these activities, connect the Exception Exit (the red dot) to an Append Value activity
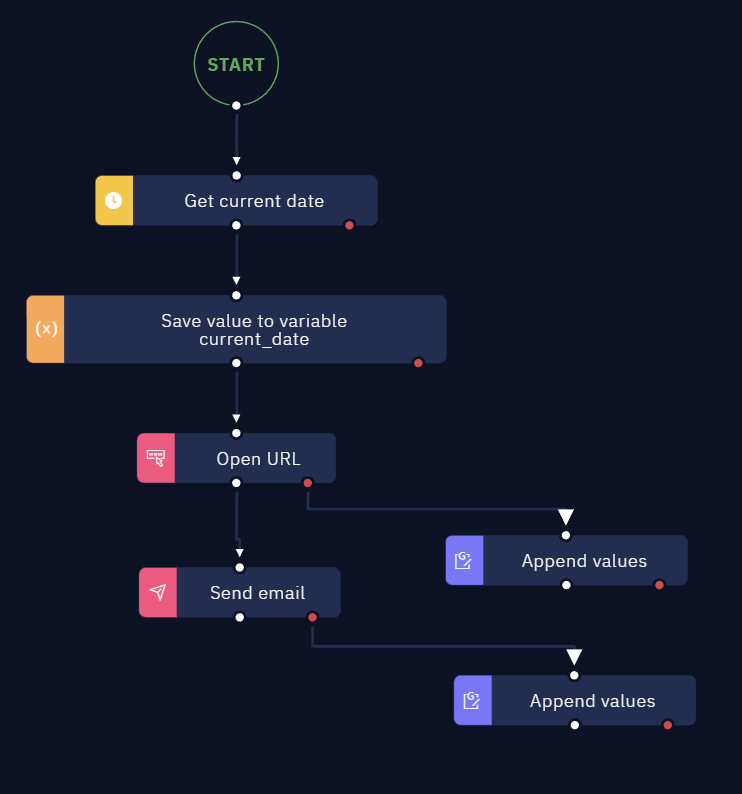
- In the Append Value activity:
- Add the spreadsheet ID (from step 2)
- Select "Calculate a value" and insert the following data:
["'"+current_date+" - Webpage not open"+"'"]
Note that you need to replace “webpage not open“ with a name to your specific activity action.
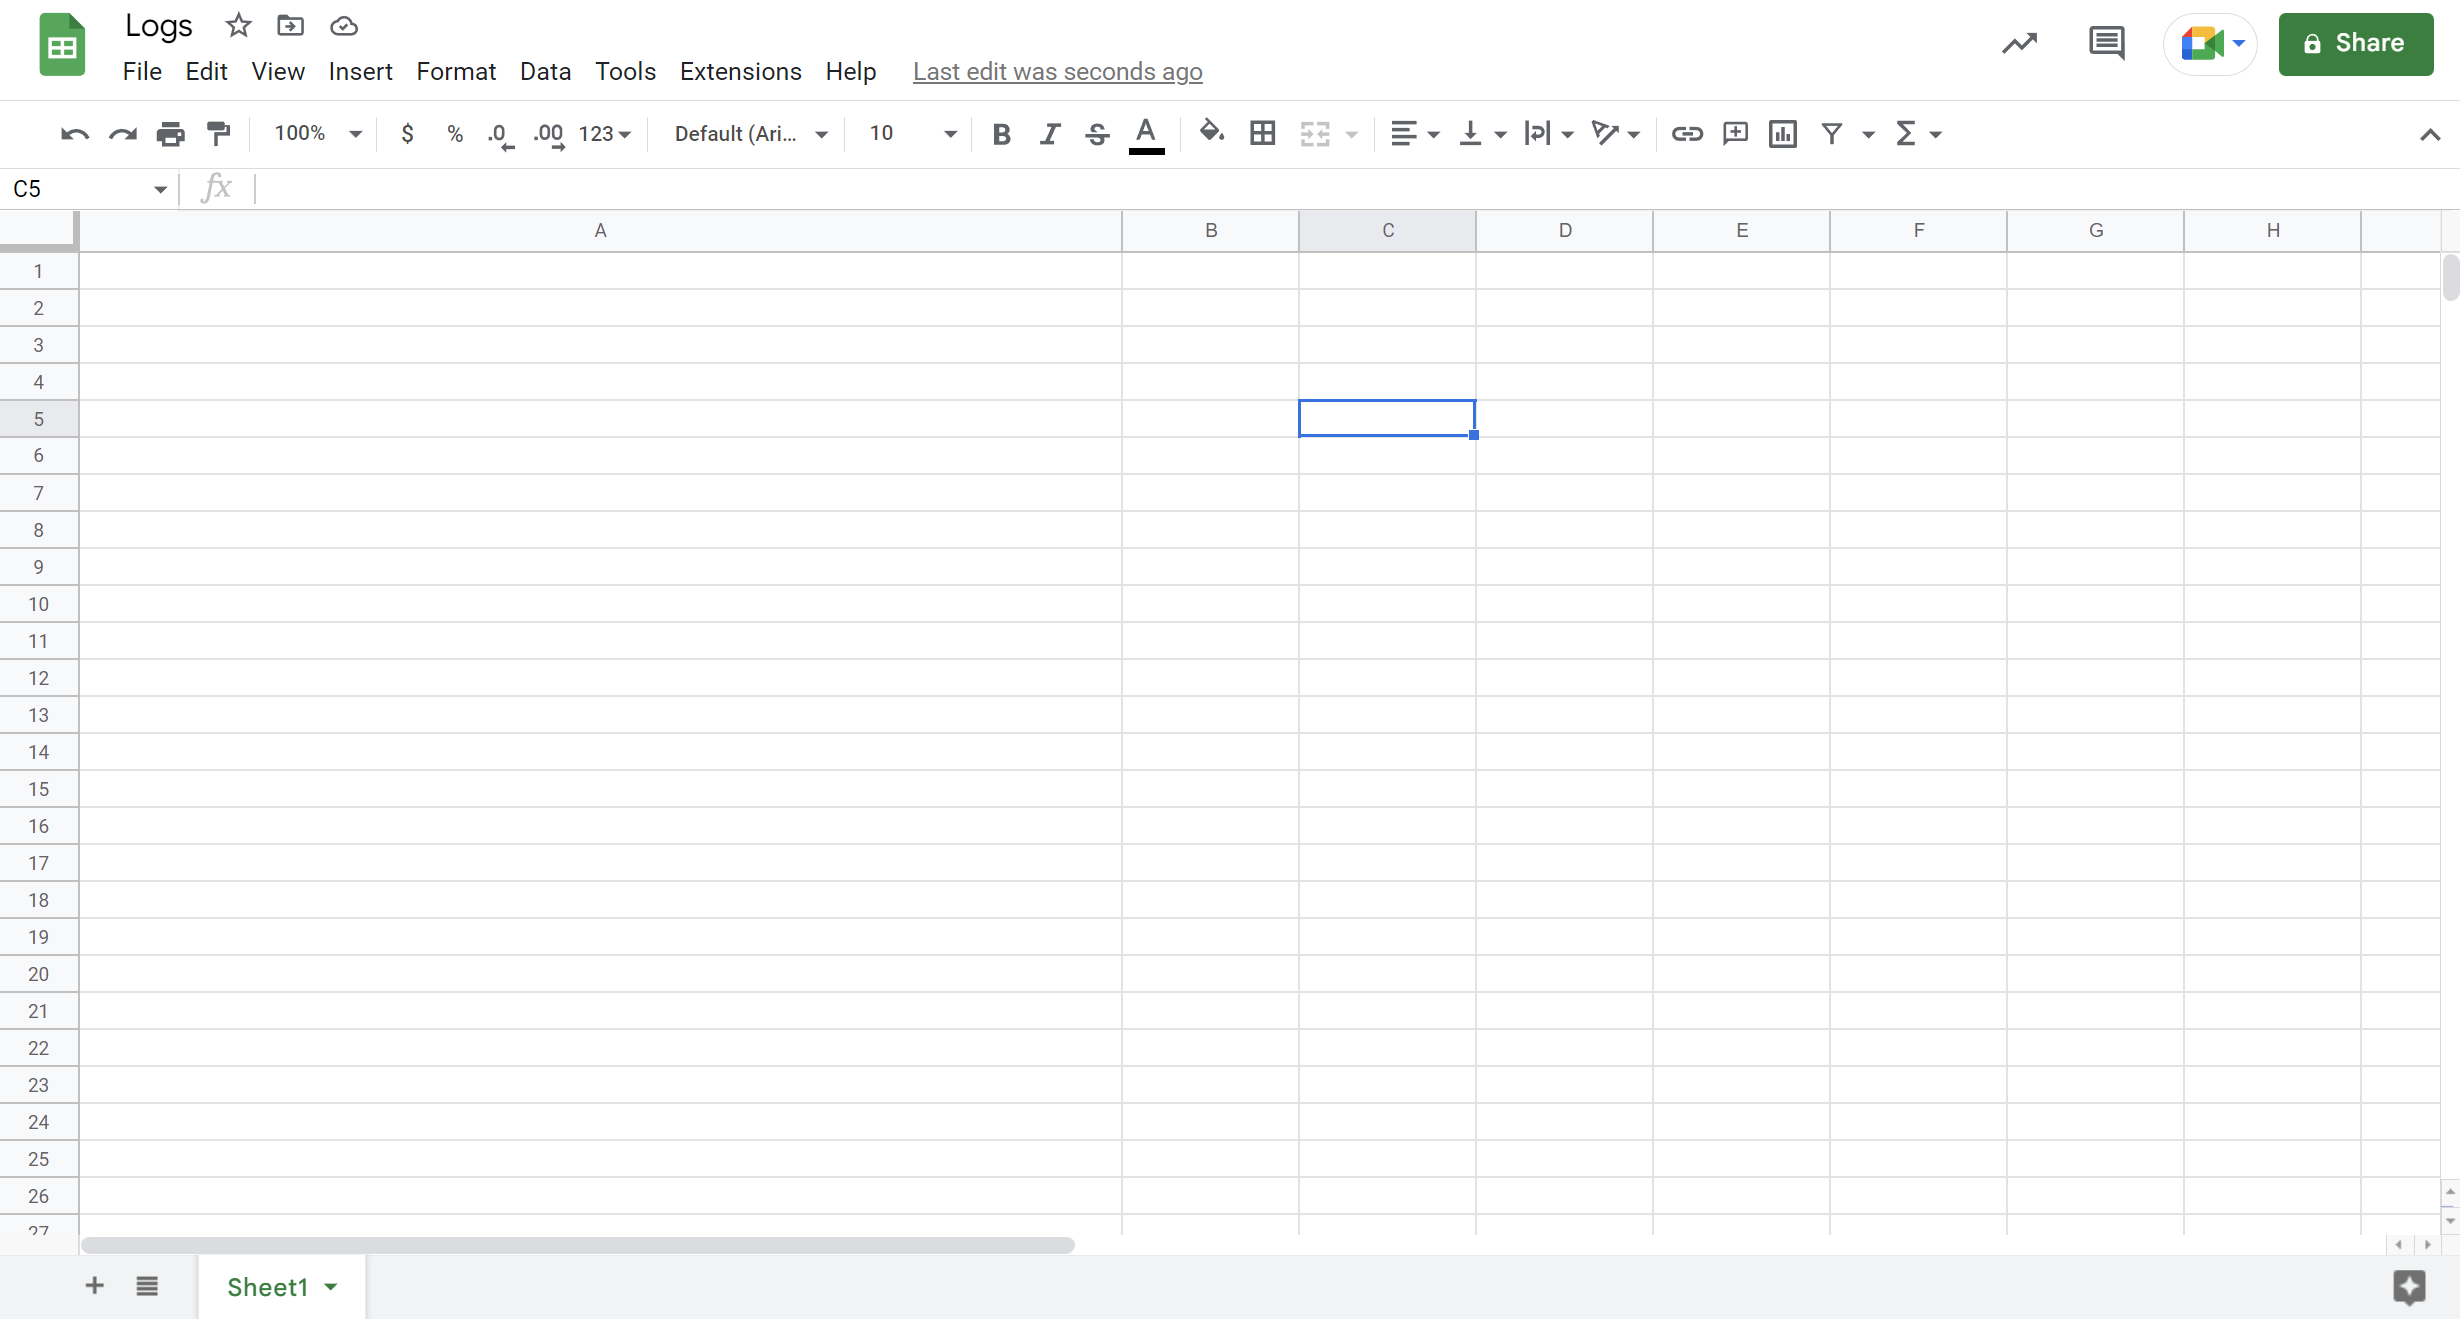
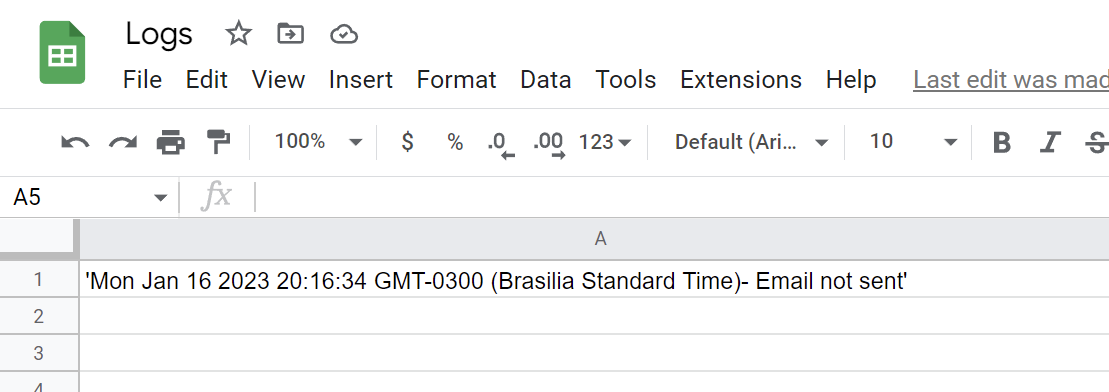
The result must be the following:

NoteKeep in mind that you need to have your Google Account configured in the Services account. For more details about that, check the How to use Google App Passwords.
Activating bots when a file appears
Description
In this article, you will learn how to trigger a workflow to perform actions using the File trigger activity.
Instructions
Here’s how to use triggers in workflows in a few steps:
- First, insert the File Trigger activity at the beginning of the workflow.
- In the "Event" parameter, choose the “Appearance“ option.
- Then, click "Wait for any file to appear" so any file can trigger this workflow.
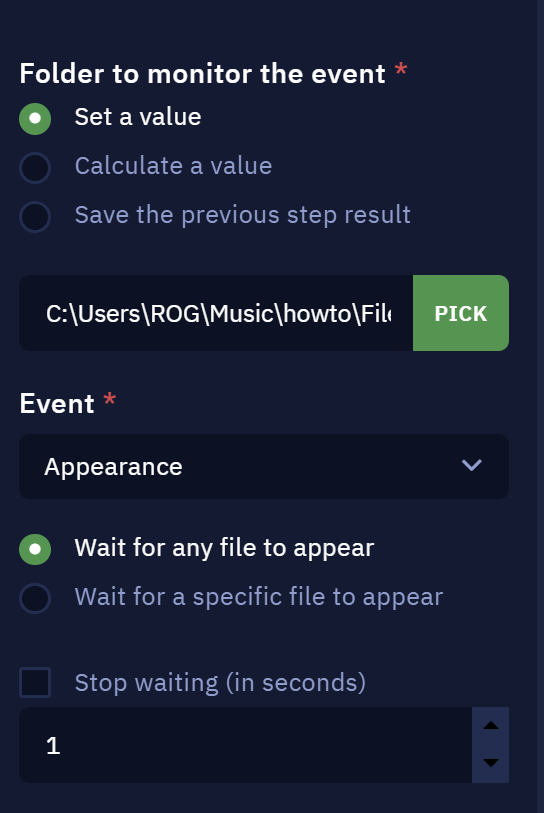
- In this example, a Console log activity was added to confirm when the file is added to a folder.
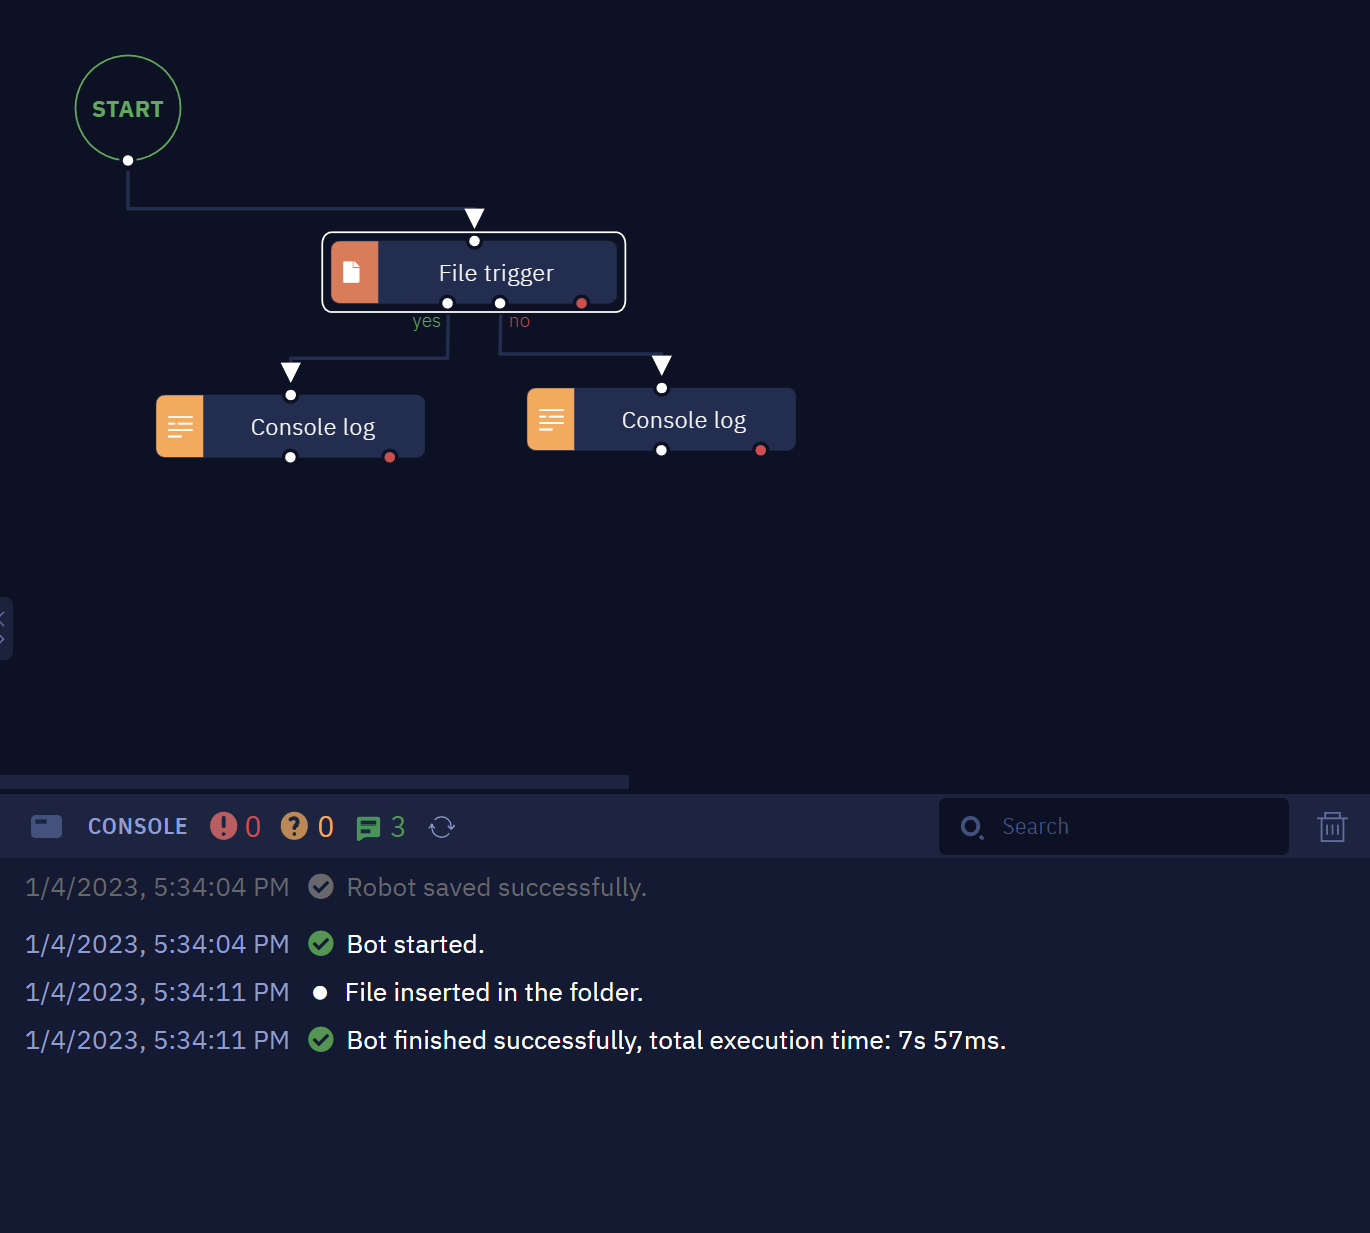
- You may keep this workflow running until a file is added to the folder, or schedule it with SaaS Orchestrator so it executes every 5 minutes, for example.
Hiding the Status Window
Description
Hiding the status window is helpful when the bot is running and requires any interaction with interface elements that may be behind this screen. In this article, you will learn how to hide it when a robot is running.
Instructions
There are two ways to perform this action: from Studio Pro and from Bot Runner.
Here’s how to do it in a few easy steps:
Using Studio Pro
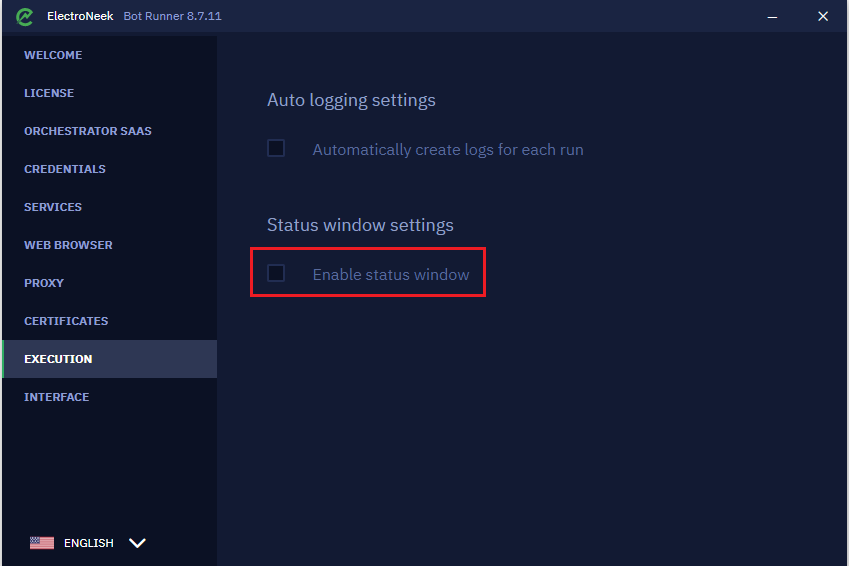
Open the Project.
- Go to "Settings".
- Click "Execution". The settings window opens.
- Find "Status window settings" and uncheck the “Enable status window” option.
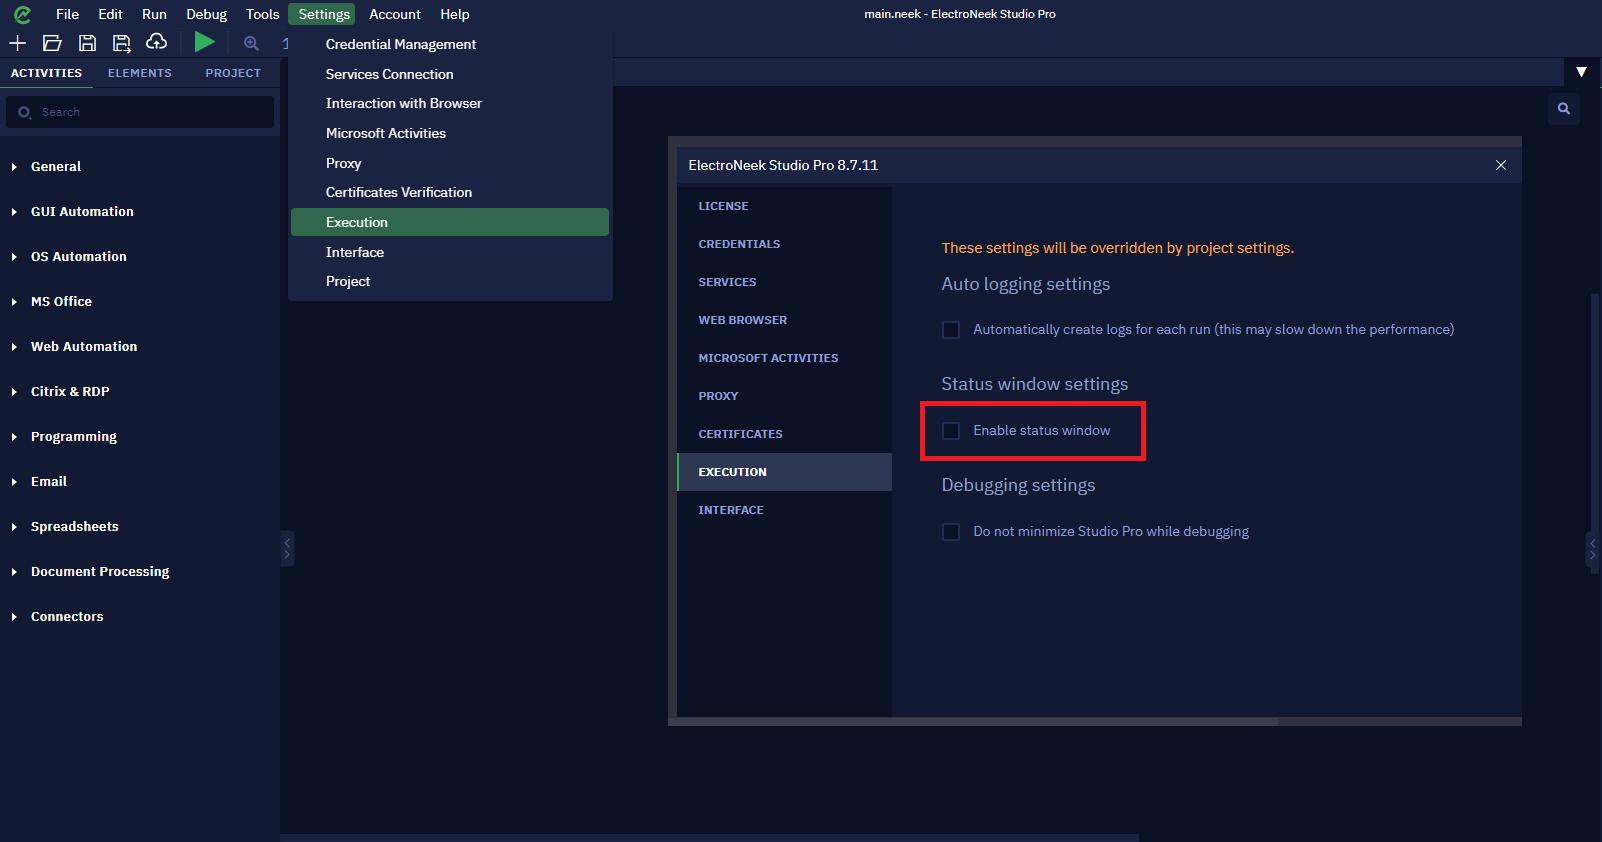
CautionThis option only disables the status window for Studio Pro. If you want the window to be disabled when the robot is executed from Bot Runner manually or from Orchestrator, you must disable the status window from the menu Settings → Project → Execution → Uncheck the "Enable status window" option.
NoteAll project settings made in the Settings → Project menu are exported when the workflow is published to SaaS Orchestrator or exported to the .neek file.
Using Bot Runner
- Open Bot Runner.
- Right-click on the Bot Runner icon displayed in the tray.

- In the context menu, select "Settings". The Bot Runner settings window opens.
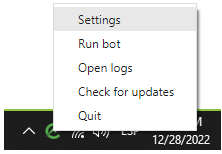
- Go to "Execution" settings and uncheck the "Enable status window" option.
NoteRemember that by hiding the window, it becomes invisible during the entire execution of the project. That way, it is not possible to activate or deactivate the status window while the robot is running.
Sending Mobile Messages
Description
Nowadays, it is common to send automated texts using social media platforms.
NoteThere are some interesting third-party messaging APIs that are useful for sending WhatsApp messages from Studio Pro using the HTTP request activity. Two examples are:
Twilio's WhatsApp API
Twilio's SMS API
Now, let us see how to send WhatsApp messages and SMS messages using Studio Pro.
Prerequisites
The "Twilio Sandbox for WhatsApp" needs to be set up to use this feature.
Instructions
hatsapp messages
In Studio Pro:
The parameters for the HTTP request to send Whatsapp messages from Studio Pro need to be provided as follows:
URL: https://api.twilio.com/2010-04-01/Accounts/AC9c78dee256a67ff8a7e3193c51eb8dad/Messages.json where AC9c78dee256a67ff8a7e3193c51eb8dad is the Account SID.
Method: POST
Authorization header: Username is Account SID and password is the AUTH_TOKEN
Additional headers: {"Content-type":"application/x-www-form-urlencoded"}
Body parameters:
1{ 2 "Body":"Hello", 3 "To":"whatsapp:+91730511222", 4 "From":"whatsapp:+14155238886" 5}
SMS Messages
In Studio Pro:
The parameters for the HTTP request to send SMS messages from Studio Pro need to be provided as follows:
URL: https://api.twilio.com/2010-04-01/Accounts/AC9c78dee256a67ff8a7e3193c51eb8dad/Messages.json where AC9c78dee256a67ff8a7e3193c51eb8dad is the Account SID.
Method: POST
Authorization header: Username is Account SID and password is the AUTH_TOKEN
Additional headers: {"Content-type":"application/x-www-form-urlencoded"}
Body parameters:
1{ 2 "Body":"Hello", 3 "To":"+91730123456", 4 "From":"+1 985 616 6020" 5}
The "From" number — which in our case is +1 985 616 6020 — needs to be purchased from Twilio. Notice that, on the publishing date of this article, Twilio provides a default amount of $15 dollars for your trial account, from which the "From’" number can be purchased for $1 dollar.
How to translate text from one language to another using Python
The translation can be done using the ‘Execute Python’ activity.
Instructions
Prerequisites:
In the Command Prompt, run the following command to install deep-translator:
pip install deep-translator
Python script
 from deep_translator import GoogleTranslator

new_arabic = "كورولا صالون تويوتا"

translated = GoogleTranslator(source='auto', target='en').translate(new_arabic)

print (translated)
How to calculate the exact number of days between two dates in Studio Pro
If you need to calculate the difference between two dates, you can utilize the 'Calculate difference' activity. However, the results from this activity are provided in the following format:
{"years": 0, "months": 2, "days": 1, "hours": 0, "minutes": 0, "seconds": 0}It doesn't directly give you the precise number of days between the two dates. Instead, it provides the breakdown of the difference in terms of years, months, days, hours, minutes, and seconds. Therefore, we will show you a different approach to solve this problem.
Instructions
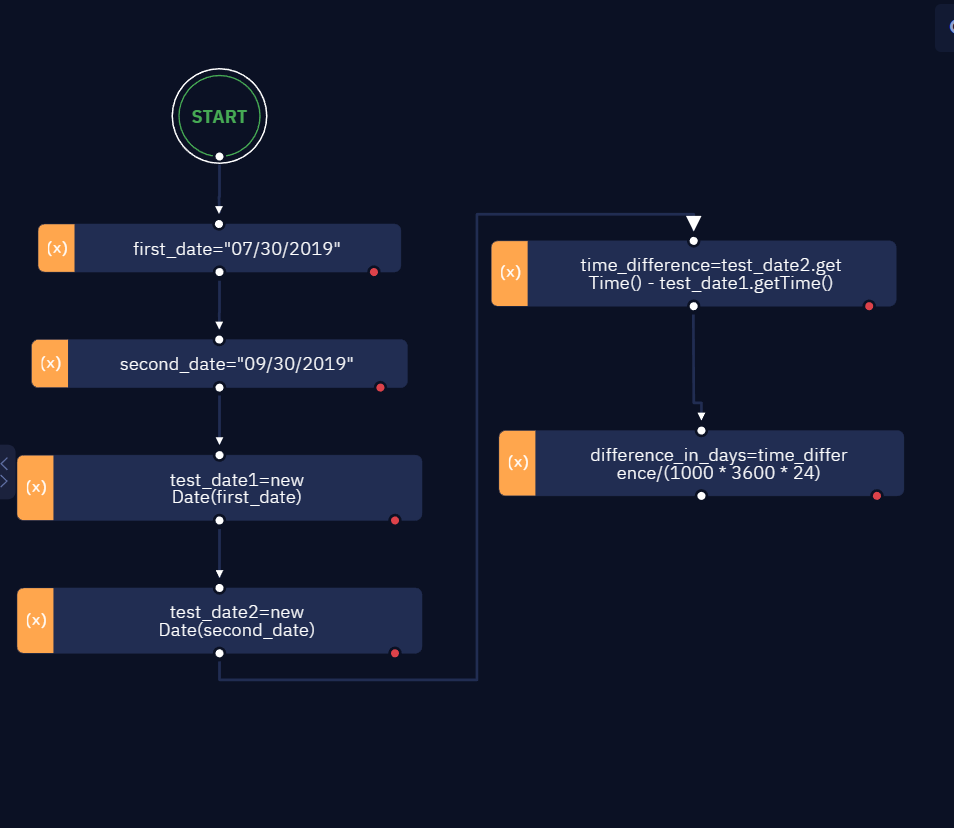
- Define two dates using new Date().
- Calculate the time difference of two dates using date2.getTime() – date1.getTime();
- Calculate the number of days between two dates, divide the time difference of both dates by number of milliseconds in a day (1000_60_60*24).
How to copy values from one column to another using the 'Execute macro' activity
In certain situations, you may need to copy values (including null) from one column to another. This task can be accomplished using the 'Execute macro' activity.
Instructions
The VBScript:
Sub Test()
Dim xlApp
Set xlApp = CreateObject("Excel.Application")
xlApp.visible = False
set objWb = xlApp.Workbooks.Open("C:\\Users\\Alphy\\Documents\\ElectroNeek\\12-Dec\\10357\\Book1.xlsx")
set oSheet = objWb.Worksheets(1)
Set objRange = oSheet.Range("A:A").EntireColumn
objRange.Copy
Set objRange2 = oSheet.Range("B:B").EntireColumn
objRange.Copy(objRange2)
objWb.save
xlApp.Quit
End Sub
The above script copies all the values (including the null values) from Column A to Column B.
The source and the target column can also be passed as an input argument as follows:
Sub Test(source, target)
Dim xlApp
Set xlApp = CreateObject("Excel.Application")
xlApp.visible = False
set objWb = xlApp.Workbooks.Open("C:\\Users\\Alphy\\Documents\\ElectroNeek\\12-Dec\\10357\\Book1.xlsx")
set oSheet = objWb.Worksheets(1)
Set objRange = oSheet.Range(source+":"+source).EntireColumn
objRange.Copy
Set objRange2 = oSheet.Range(target+":"+target).EntireColumn
objRange.Copy(objRange2)
objWb.save
xlApp.Quit
End Sub
How to save logs using Google Sheets
When working with Studio Pro, keeping track of workflow activities can greatly assist in monitoring and troubleshooting. Here's a guide to creating a spreadsheet in Google Sheets to log your activities.
- Create a Spreadsheet in Google Sheets:
- Get the Spreadsheet ID from the URL. The ID is located after the
/d/.
https://docs.google.com/spreadsheets/d/1ixn9515PgXy7BVR7t-6tmGcWUbPP5….ecENA/edit#gid=0

- Within Studio Pro, choose the "Get current Date" activity. This step is essential for capturing the precise date of each logged activity.
- In subsequent workflow activities, pinpoint the error-handling points using a red dot (the exception exit). For each of these points, incorporate the "Append Value" activity.

- In the "Append Value" activity, input the Spreadsheet ID and the designated phrase, such as
['"+current_date+" - Webpage not open'"]. Remember to customize the phrase to match the specific action of the activity.

- The result of this logging process will appear as follows in your Google Sheet:
NoteMake sure your Google account is set up in the Services account. For additional guidance, refer to this article.
How to throw custom exceptions in a workflow
In Studio Pro, there are only 2 ways for a workflow to stop:
- an activity block is reached that has no continuation -- that is, no connections on its ending ports;
- an unhandled exception occurrs.
An unhandled exception is an event where an activity block fails, while its Exception Port (the red bot on the bottom right of the block) is not connected to any other blocks.
This event will generate a log line on the Console Log, with the error type "Workflow Logic Error", which will include all error details.

Make sure to expand the error message with the arrow on the left of "Workflow Logic Error" to see the full error details.
When this exception is reached, the rest of the workflow will stop executing, regardless of whether the exception ocurred in the starting flow of a project, or in one of its subprograms.
However, in some cases, you may want to actively force an exception to occur. In those cases, the "Console Log" activity (with message type "Error") is insufficient, because while it may contain the error details, it doesn't stop the workflow. This may be particularly bothersome when your workflow contains multiple nested subprograms -- you may wish for execution to stop on one subprogram without moving on to the next one.
While there is no dedicated activity to throw a custom exception, this can be done very easily with a single line of JavaScript code in the "Execute JS code" activity, which uses the "throw" command. That code is:
throw new Error('Insert error details here')This line of code will behave exactly like any unhandled exception, stopping all execution of the workflow and resulting in a log line with type "Workflow Logic Error"; however, the error details will be the ones you entered between the parentheses of the code.

Of course, you can also leverage your workflow's variables to customize the error details. For example, if your workflow is processing invoices and you want to throw an exception when one is not found, your code may look like this:
throw new Error('Could not find Invoice with ID ' + invoiceID + '. Please verify that it exists')You may also use JavaScript Template literals by starting and ending the error details with the backtick character (`), like in this example:
throw new Error(`Could not find Invoice number ${invoiceID}. Please verify that it exists`)Both the above pieces of code result in the following log line:

Keep in mind that a period (.) and additional text ("If the issue persists...") will always be added to the error details.
Before using a variable in an exception, make sure the variable has been declared with the "Assign value to variable" activity at any point before your exception -- and if it was declared on a different subprogram, make sure it is a Global variable.